open webui源码分析12-Pipeline
Pipeline是 Open WebUI 的一项创新,它 为任何支持 OpenAI API 规范的 UI 客户端带来了模块化、可定制的工作流 —— 甚至更多功能!只需几行代码,你就能轻松扩展功能、集成自己的专有逻辑并创建动态工作流。
当你处理计算密集型任务(例如运行大型模型或复杂逻辑)时,你可能希望将这些任务从主 Open WebUI 实例中分流出去,以获得更好的性能和可扩展性,Pipeline是你的最佳选择。
本文首先讲解如何集成Pipeline,然后对open webui的相关代码进行分析。
一、集成Pipeline
1)架构简述
open webui集成Pipeline架构如下图所示:

Pipelines是一个基座服务,承载所有的Pipeline。Pipeline处理计算密集型任务,比如一个AI Agent。Pipeline可动态插拔,一个Pipeline依赖与ollama或公有LLM。
Pipelines运行在open webui后端容器之外,可以在其他的容器内运行,也可以在宿主机上运行。后面以在容器内运行为例。
2)运行Pipelines
运行Pipelines支持两种方式,一种是从容器直接运行,一种是下载文件后运行。现在以docker运行为例。
#docker run -d -p 9099:9099 --privileged=true --add-host=host.docker.internal:host-gateway -v pipelines:/app/pipelines --name pipelines --restart always ghcr.io/open-webui/pipelines:main
3)连接Pipelines
从【管理员】—>【设置】->【外部连接】进入外部连接管理页面:
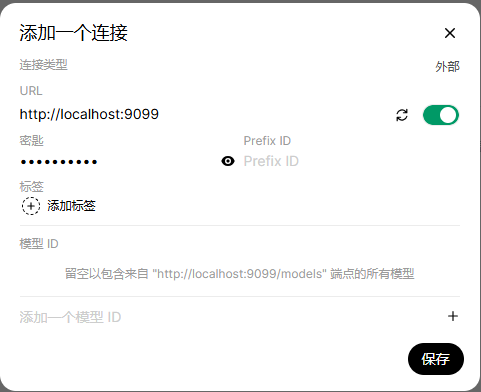
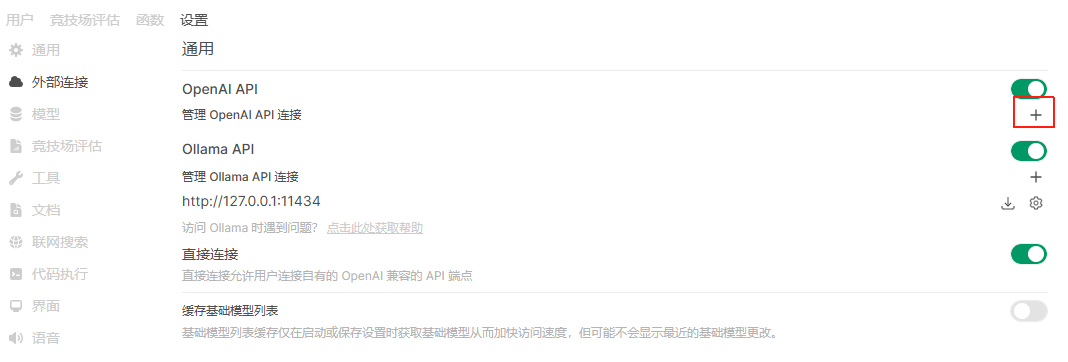 选择右侧【+】,在增加一个连接页面,输入Pipelines信息,其中
URL:http://localhost:9099 密钥:0p3n-w3bu!,然后保存:
4)Pipeline配置管理
从【管理员】—>【设置】->【Pipeline】进入Pipeline的管理页面:
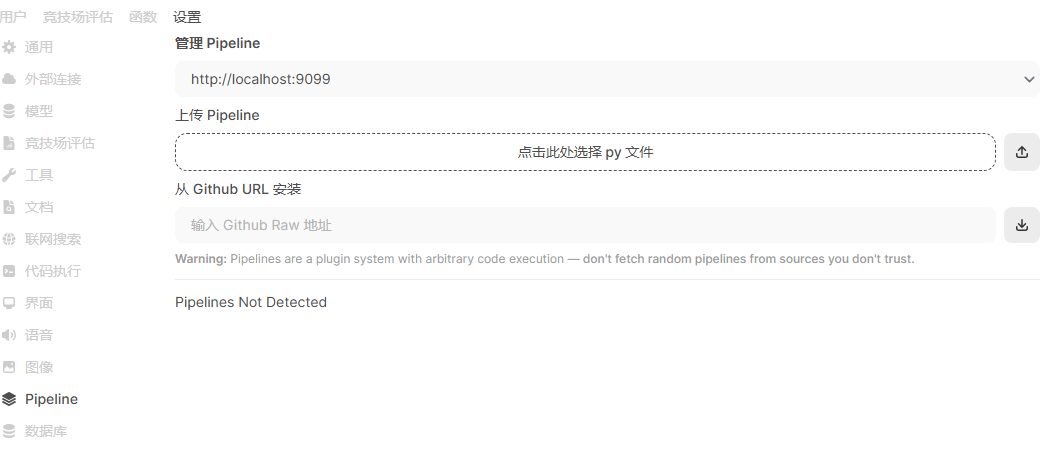
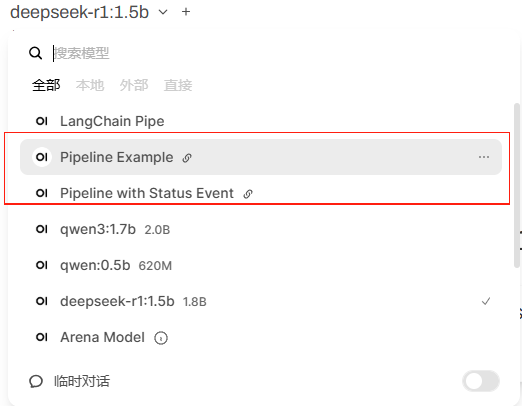
在这里可以通过直接上传流水线文件或者从github安装,我这里直接从github安装一个两个Pipeline,效果如下图:
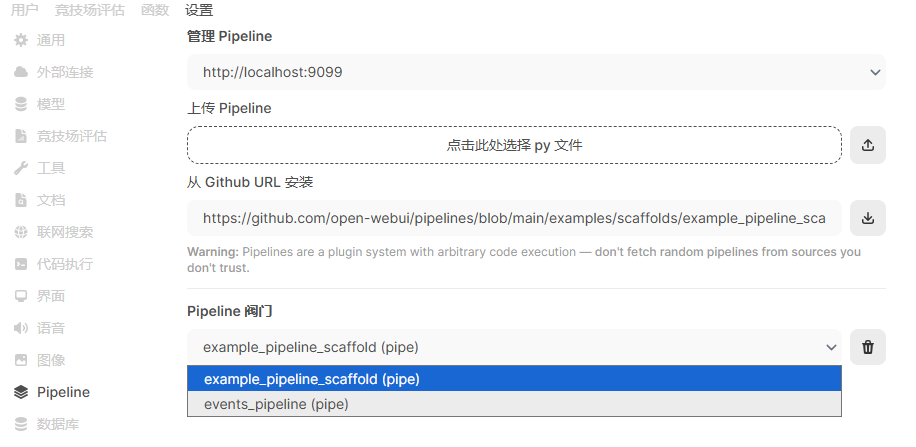
在对话页面的模型列表中可以看到这两个Pipeline,可以直接选用。
二、Pipeline管理分析
1)数据模型
Pipeline相关数据直接存储在request.app.state.config中,并未存储到数据库中,所以不涉及对应的表。
2)增加连接
增加连接时,请求数据如下:
{
"ENABLE_OPENAI_API": true,#启用openai API
"OPENAI_API_BASE_URLS": [
"http://localhost:9099" #运行的Pipelines服务地址
],
"OPENAI_API_KEYS": [
"0p3n-w3bu!" #Pipelines服务访问密钥
],
"OPENAI_API_CONFIGS": { #配置信息
"0": {
"enable": true,
"tags": [],
"prefix_id": "",
"model_ids": [],
"connection_type": "external"
}
}
}
对应入口为http://{ip:port}/openai/config/update,对应入口代码为openai.py文件的update_config方法,具体如下:
@router.post("/config/update")
async def update_config(
request: Request, form_data: OpenAIConfigForm, user=Depends(get_admin_user)
):#以下三行代码把请求数据中的数值分别赋值给request.app.state.config中的对应属性
request.app.state.config.ENABLE_OPENAI_API = form_data.ENABLE_OPENAI_API
request.app.state.config.OPENAI_API_BASE_URLS = form_data.OPENAI_API_BASE_URLS
request.app.state.config.OPENAI_API_KEYS = form_data.OPENAI_API_KEYS'''
处理API_URL和API_KEY数量不一致的情况,。
如果API_KEY数量多于API_URL,则request.app.state.config仅保留与API_URL数量
相同的API_KEY,则在request.app.state.config中的API_KEY,用""补足。
'''
if len(request.app.state.config.OPENAI_API_KEYS) != len(
request.app.state.config.OPENAI_API_BASE_URLS
):
if len(request.app.state.config.OPENAI_API_KEYS) > len(
request.app.state.config.OPENAI_API_BASE_URLS
):
request.app.state.config.OPENAI_API_KEYS = (
request.app.state.config.OPENAI_API_KEYS[
: len(request.app.state.config.OPENAI_API_BASE_URLS)
]
)
else:
request.app.state.config.OPENAI_API_KEYS += [""] * (
len(request.app.state.config.OPENAI_API_BASE_URLS)
- len(request.app.state.config.OPENAI_API_KEYS)
)request.app.state.config.OPENAI_API_CONFIGS = form_data.OPENAI_API_CONFIGS
# Remove the API configs that are not in the API URLS
keys = list(map(str, range(len(request.app.state.config.OPENAI_API_BASE_URLS))))
request.app.state.config.OPENAI_API_CONFIGS = {
key: value
for key, value in request.app.state.config.OPENAI_API_CONFIGS.items()
if key in keys
}return {#返回经过处理后的openai api连接数据
"ENABLE_OPENAI_API": request.app.state.config.ENABLE_OPENAI_API,
"OPENAI_API_BASE_URLS": request.app.state.config.OPENAI_API_BASE_URLS,
"OPENAI_API_KEYS": request.app.state.config.OPENAI_API_KEYS,
"OPENAI_API_CONFIGS": request.app.state.config.OPENAI_API_CONFIGS,}
3)增加一个Pipeline
增加一个Pipeline时,请求数据如下:
{
"url": "https://github.com/open-webui/pipelines/blob/main/examples/scaffolds/example_pipeline_scaffold.py",#Pipeline地址
"urlIdx": "0" #Pipeline索引
}
增加一个Pipeline对应入口为http://{ip:port}/api/v1/pipelines/add,对应入口方法为pipelines.py文件的add_pipeline方法,具体如下:
@router.post("/add")
async def add_pipeline(
request: Request, form_data: AddPipelineForm, user=Depends(get_admin_user)
):
r = None
try:#以下代码根据urlIdx从request.app.state.config获取Pipelines服务器的地址和密钥
urlIdx = form_data.urlIdxurl = request.app.state.config.OPENAI_API_BASE_URLS[urlIdx]
key = request.app.state.config.OPENAI_API_KEYS[urlIdx]r = requests.post(#把新增Pipeline数据发送到Pipelines服务器的对应端点
f"{url}/pipelines/add",
headers={"Authorization": f"Bearer {key}"},
json={"url": form_data.url},
)r.raise_for_status()
data = r.json()'''
返回前端增加Pipeline结果,增加成功后为
{
"status": true,
"detail": "Pipeline added successfully from ./pipelines/example_pipeline_scaffold.py"
}'''
return {**data} #把处理结果返回到前端
except Exception as e:
# Handle connection error here
log.exception(f"Connection error: {e}")detail = None
if r is not None:
try:
res = r.json()
if "detail" in res:
detail = res["detail"]
except Exception:
passraise HTTPException(
status_code=(r.status_code if r is not None else status.HTTP_404_NOT_FOUND),
detail=detail if detail else "Pipeline not found",
)
三、Pipeline应用分析
1)示例Pipeline
用户在前端与AI对话时,如果在模型列表选择了一个Pipeline,则触发Pipeline相关流程。我们选择Pipeline Example,这个Pipeline是一个简单的示例,仅仅在各环节打屏输出,并不做任何额外处理。
代码片段如下:
async def inlet(self, body: dict, user: dict) -> dict:
# This function is called before the OpenAI API request is made. You can modify the form data before it is sent to the OpenAI API.
print(f"inlet:{__name__}")print(body)
print(user)return body
async def outlet(self, body: dict, user: dict) -> dict:
# This function is called after the OpenAI API response is completed. You can modify the messages after they are received from the OpenAI API.
print(f"outlet:{__name__}")print(body)
print(user)return body
def pipe(
self, user_message: str, model_id: str, messages: List[dict], body: dict
) -> Union[str, Generator, Iterator]:
# This is where you can add your custom pipelines like RAG.
print(f"pipe:{__name__}")# If you'd like to check for title generation, you can add the following check
if body.get("title", False):
print("Title Generation Request")print(messages)
print(user_message)
print(body)return f"{__name__} response to: {user_message}"
2)调用流程
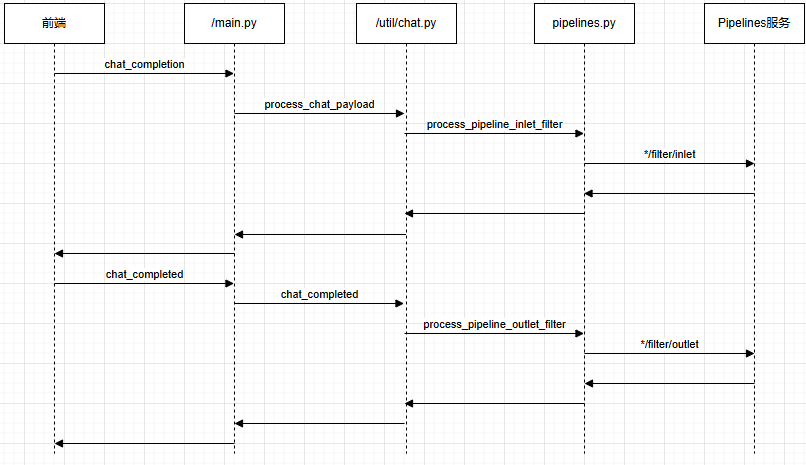
使用Pipeline时,一次会话中有关Pipe的主要流程如下图所示:
3)使用Pipeline发起会话
发起对话时,请求数据如下:
{
"stream": true,
"model": "example_pipeline_scaffold",
"messages": [
{
"role": "user",
"content": "日啖荔枝三百颗,不辞长作岭南人"
}
],
"params": {},
"tool_servers": [],
"features": {
"image_generation": false,
"code_interpreter": false,
"web_search": false,
"memory": true
},
"variables": {
"{{USER_NAME}}": "acaluis",
"{{USER_LOCATION}}": "Unknown",
"{{CURRENT_DATETIME}}": "2025-08-29 12:23:13",
"{{CURRENT_DATE}}": "2025-08-29",
"{{CURRENT_TIME}}": "12:23:13",
"{{CURRENT_WEEKDAY}}": "Friday",
"{{CURRENT_TIMEZONE}}": "Etc/GMT-8",
"{{USER_LANGUAGE}}": "zh-CN"
},
"model_item": { #重点关注这里
"id": "example_pipeline_scaffold",
"name": "Pipeline Example",
"object": "model",
"created": 1756441175,
"owned_by": "openai",
"pipeline": {
"type": "pipe",
"valves": false
},
"connection_type": "external",
"openai": {
"id": "example_pipeline_scaffold",
"name": "Pipeline Example",
"object": "model",
"created": 1756441175,
"owned_by": "openai",
"pipeline": {
"type": "pipe",
"valves": false
},
"connection_type": "external"
},
"urlIdx": 0,
"actions": [],
"filters": [],
"tags": []
},
"session_id": "rZTdC6lN627cFI6NAADc",
"chat_id": "64727f8c-8685-4470-a467-41dbbd0a3d94",
"id": "348ab370-a219-460f-b30e-3077475fb87e",
"background_tasks": {
"title_generation": true,
"tags s_generation": true,
"follow_up_generation": true
}
}
使用Pipeline发起对话时,处理入口方法为process_chat_payload方法,代码分析如下:
async def process_chat_payload(request, form_data, user, metadata, model):
……
#流水线处理,调用process_pipeline_inlet_filter方法
try:
form_data = await process_pipeline_inlet_filter(
request, form_data, user, models
)
except Exception as e:
raise e……
核心的逻辑在process_pipeline_inlet_filter方法,具体如下:
该方法主要逻辑就是调用指定的Pipeline的inlet方法
async def process_pipeline_inlet_filter(request, payload, user, models):
user = {"id": user.id, "email": user.email, "name": user.name, "role": user.role}
model_id = payload["model"]#获取所有的与本流水线相关的经过优先级排序过滤器
sorted_filters = get_sorted_filters(model_id, models)
model = models[model_id]if "pipeline" in model:#把本pipeline增加到过滤器表中
sorted_filters.append(model)async with aiohttp.ClientSession(trust_env=True) as session:
for filter in sorted_filters:#遍历过滤器列表,调用Pipelines服务
urlIdx = filter.get("urlIdx")try:
urlIdx = int(urlIdx)
except:
continueurl = request.app.state.config.OPENAI_API_BASE_URLS[urlIdx]
key = request.app.state.config.OPENAI_API_KEYS[urlIdx]if not key:
continueheaders = {"Authorization": f"Bearer {key}"}
request_data = {
"user": user,
"body": payload,
}try:
async with session.post(#在Pipelines服务中执行对应Pipeline的innet方法
f"{url}/{filter['id']}/filter/inlet",
headers=headers,
json=request_data,
ssl=AIOHTTP_CLIENT_SESSION_SSL,
) as response:
payload = await response.json()
response.raise_for_status()
except aiohttp.ClientResponseError as e:
res = (
await response.json()
if response.content_type == "application/json"
else {}
)
if "detail" in res:
raise Exception(response.status, res["detail"])
except Exception as e:
log.exception(f"Connection error: {e}")return payload
4)使用Pipeline结束补足
使用Pipeline结束补足时,调用Pipeline的outlet方法,API入口为http://{ip:port}/api/chat/completed,对应处理方法为chat_completed方法,具体代码如下:
该方法调用chat_completed_handler完成收尾处理,在 chat_completed_handler处理流水线的相关逻辑。
@app.post("/api/chat/completed")
async def chat_completed(
request: Request, form_data: dict, user=Depends(get_verified_user)
):
try:
model_item = form_data.pop("model_item", {})if model_item.get("direct", False):
request.state.direct = True
request.state.model = model_itemreturn await chat_completed_handler(request, form_data, user)
except Exception as e:
raise HTTPException(
status_code=status.HTTP_400_BAD_REQUEST,
detail=str(e),
)
chat_completed_handler实际对应的是chats.py中的chat_completed,与流水线有关的入口代码在这里。
该方法调用process_pipeline_outlet_filter,核心逻辑在process_pipeline_outlet_filter。
async def chat_completed(request: Request, form_data: dict, user: Any):
if not request.app.state.MODELS:
await get_all_models(request, user=user)if getattr(request.state, "direct", False) and hasattr(request.state, "model"):
models = {
request.state.model["id"]: request.state.model,
}
else:
models = request.app.state.MODELSdata = form_data
model_id = data["model"]
if model_id not in models:
raise Exception("Model not found")model = models[model_id]
try:
data = await process_pipeline_outlet_filter(request, data, user, models)
except Exception as e:
return Exception(f"Error: {e}")metadata = {
"chat_id": data["chat_id"],
"message_id": data["id"],
"filter_ids": data.get("filter_ids", []),
"session_id": data["session_id"],
"user_id": user.id,
}extra_params = {
"__event_emitter__": get_event_emitter(metadata),
"__event_call__": get_event_call(metadata),
"__user__": user.model_dump() if isinstance(user, UserModel) else {},
"__metadata__": metadata,
"__request__": request,
"__model__": model,
}try:
filter_functions = [
Functions.get_function_by_id(filter_id)
for filter_id in get_sorted_filter_ids(
request, model, metadata.get("filter_ids", [])
)
]result, _ = await process_filter_functions(
request=request,
filter_functions=filter_functions,
filter_type="outlet",
form_data=data,
extra_params=extra_params,
)
return result
except Exception as e:
return Exception(f"Error: {e}")
process_pipeline_outlet_filter代码如下:
该方法与process_pipeline_inlet_filter方法基本一样,区别仅在于调用Pipelines时的url,从而调用Pipeline实例中的outlet方法。
async def process_pipeline_outlet_filter(request, payload, user, models):
user = {"id": user.id, "email": user.email, "name": user.name, "role": user.role}
model_id = payload["model"]
sorted_filters = get_sorted_filters(model_id, models)
model = models[model_id]if "pipeline" in model:
sorted_filters = [model] + sorted_filtersasync with aiohttp.ClientSession(trust_env=True) as session:
for filter in sorted_filters:
urlIdx = filter.get("urlIdx")try:
urlIdx = int(urlIdx)
except:
continueurl = request.app.state.config.OPENAI_API_BASE_URLS[urlIdx]
key = request.app.state.config.OPENAI_API_KEYS[urlIdx]if not key:
continueheaders = {"Authorization": f"Bearer {key}"}
request_data = {
"user": user,
"body": payload,
}try:
async with session.post(
f"{url}/{filter['id']}/filter/outlet", #here! 调用Pipelines服务中该过滤器的outlet方法
headers=headers,
json=request_data,
ssl=AIOHTTP_CLIENT_SESSION_SSL,
) as response:
payload = await response.json()
response.raise_for_status()
except aiohttp.ClientResponseError as e:
try:
res = (
await response.json()
if "application/json" in response.content_type
else {}
)
if "detail" in res:
raise Exception(response.status, res)
except Exception:
pass
except Exception as e:
log.exception(f"Connection error: {e}")return payload
