微服务的编程测评系统12-xxl-job-历史竞赛-竞赛报名
提示:文章写完后,目录可以自动生成,如何生成可参考右边的帮助文档
文章目录
- 前言
- 1. C端历史竞赛列表
- 1.1 xxl-job引入
- 1.2 前端开发
- 2. 竞赛报名
- 2.1 业务分析
- 2.2 后端开发
- 2.3 ThreadLocal
- 总结
前言
1. C端历史竞赛列表
1.1 xxl-job引入
如果未完赛竞赛列表中的竞赛完赛了,怎么转移到redis中的历史竞赛列表呢–》动态变化的,而且一直在执行–》定时任务
定时任务频率:任意时刻都可能结束竞赛了–》一个exam对应一个定时任务–》太多了
每天凌晨去执行–》第二天的才是历史竞赛,当天凌晨之前结束的可以不算是历史竞赛
可以提供频率,比如每12h,或者6h
—》需要一个工具来操作
XXL-JOB是⼀个分布式任务调度平台,其核⼼设计⽬标是开发迅速、学习简单、轻量级、易扩展。现已开放源代码并接⼊多家公司线上产品线,开箱即⽤。
xxl-job官网
第一先配置部署调度中心
docker pull xuxueli/xxl-job-admin:2.4.0
初始化数据库
请在源码中获取 “调度数据库初始化SQL脚本” 并执⾏即可。
源码地址:http://gitee.com/xuxueli0323/xxl-job
调度数据库初始化SQL脚本位置为: /xxl-job/doc/db/tables_xxl_job.sql
grant create,drop,select,insert,update,delete,alter on xxl_job.* to 'ojtest'@'%';
记得给权限
启动docker容器
docker run -e PARAMS="--spring.datasource.url=jdbc:mysql://172.17.0.2:3306/xxl_job?useUnicode=true&characterEncoding=UTF-8&autoReconnect=true&serverTimezone=Asia/Shanghai --spring.datasource.username=ojtest --spring.datasource.password=123456" -p 8080:8080 --name xxl-job-admin -d xuxueli/xxl-job-admin:2.4.0
进⼊调度中⼼
容器启动之后,可从浏览器中进⼊调度中⼼。
调度中⼼访问地址:http://localhost:8080/xxl-job-admin
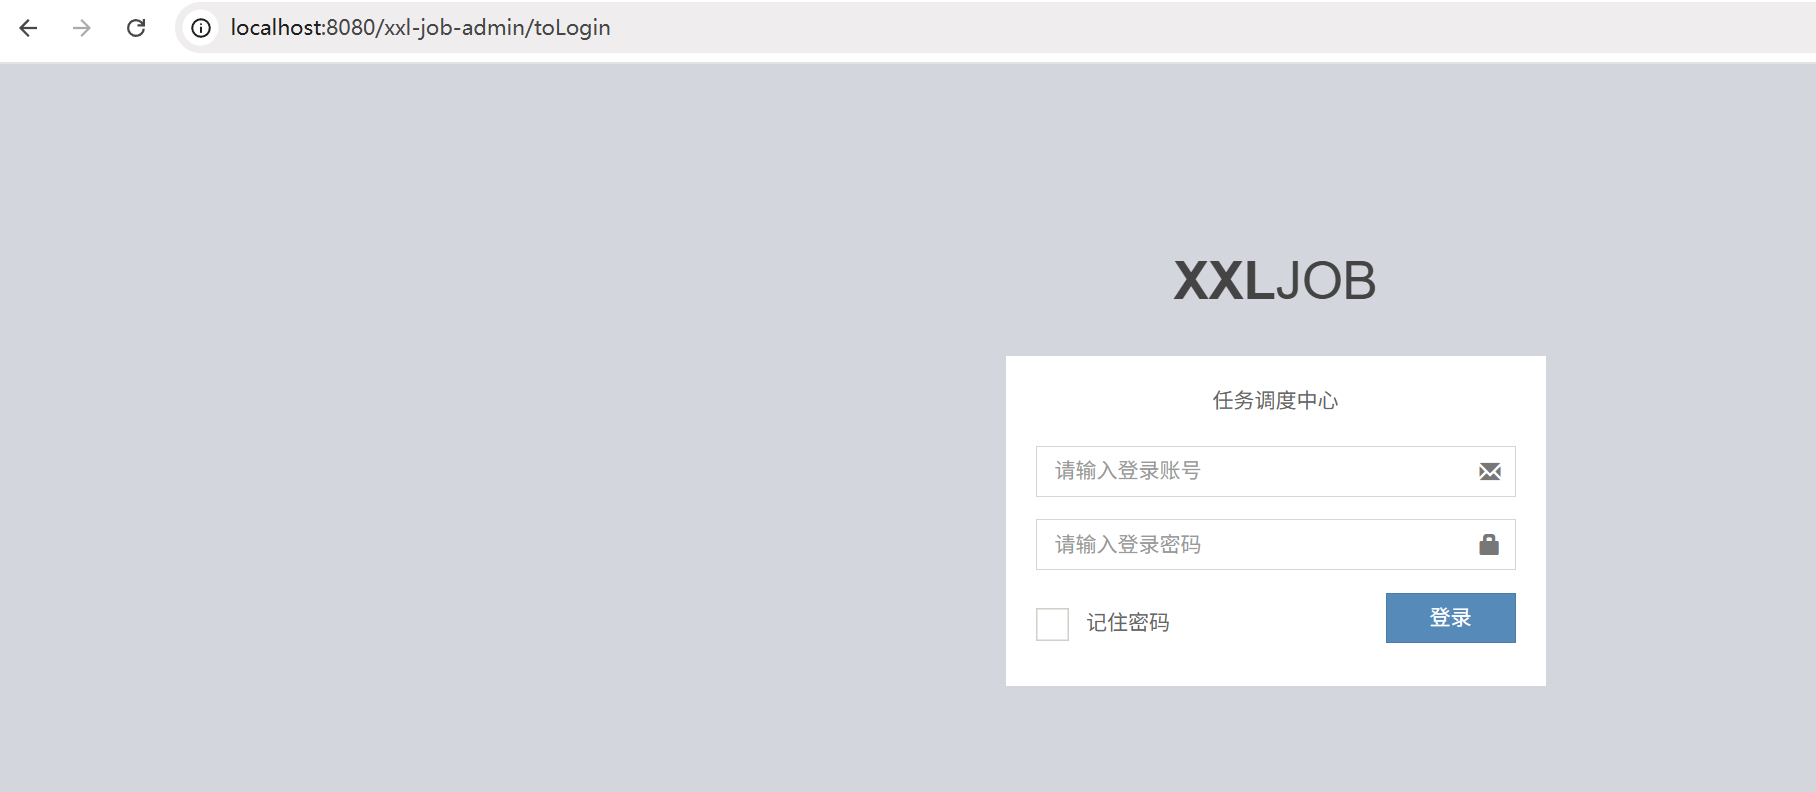
默认登录账号 “admin/123456”
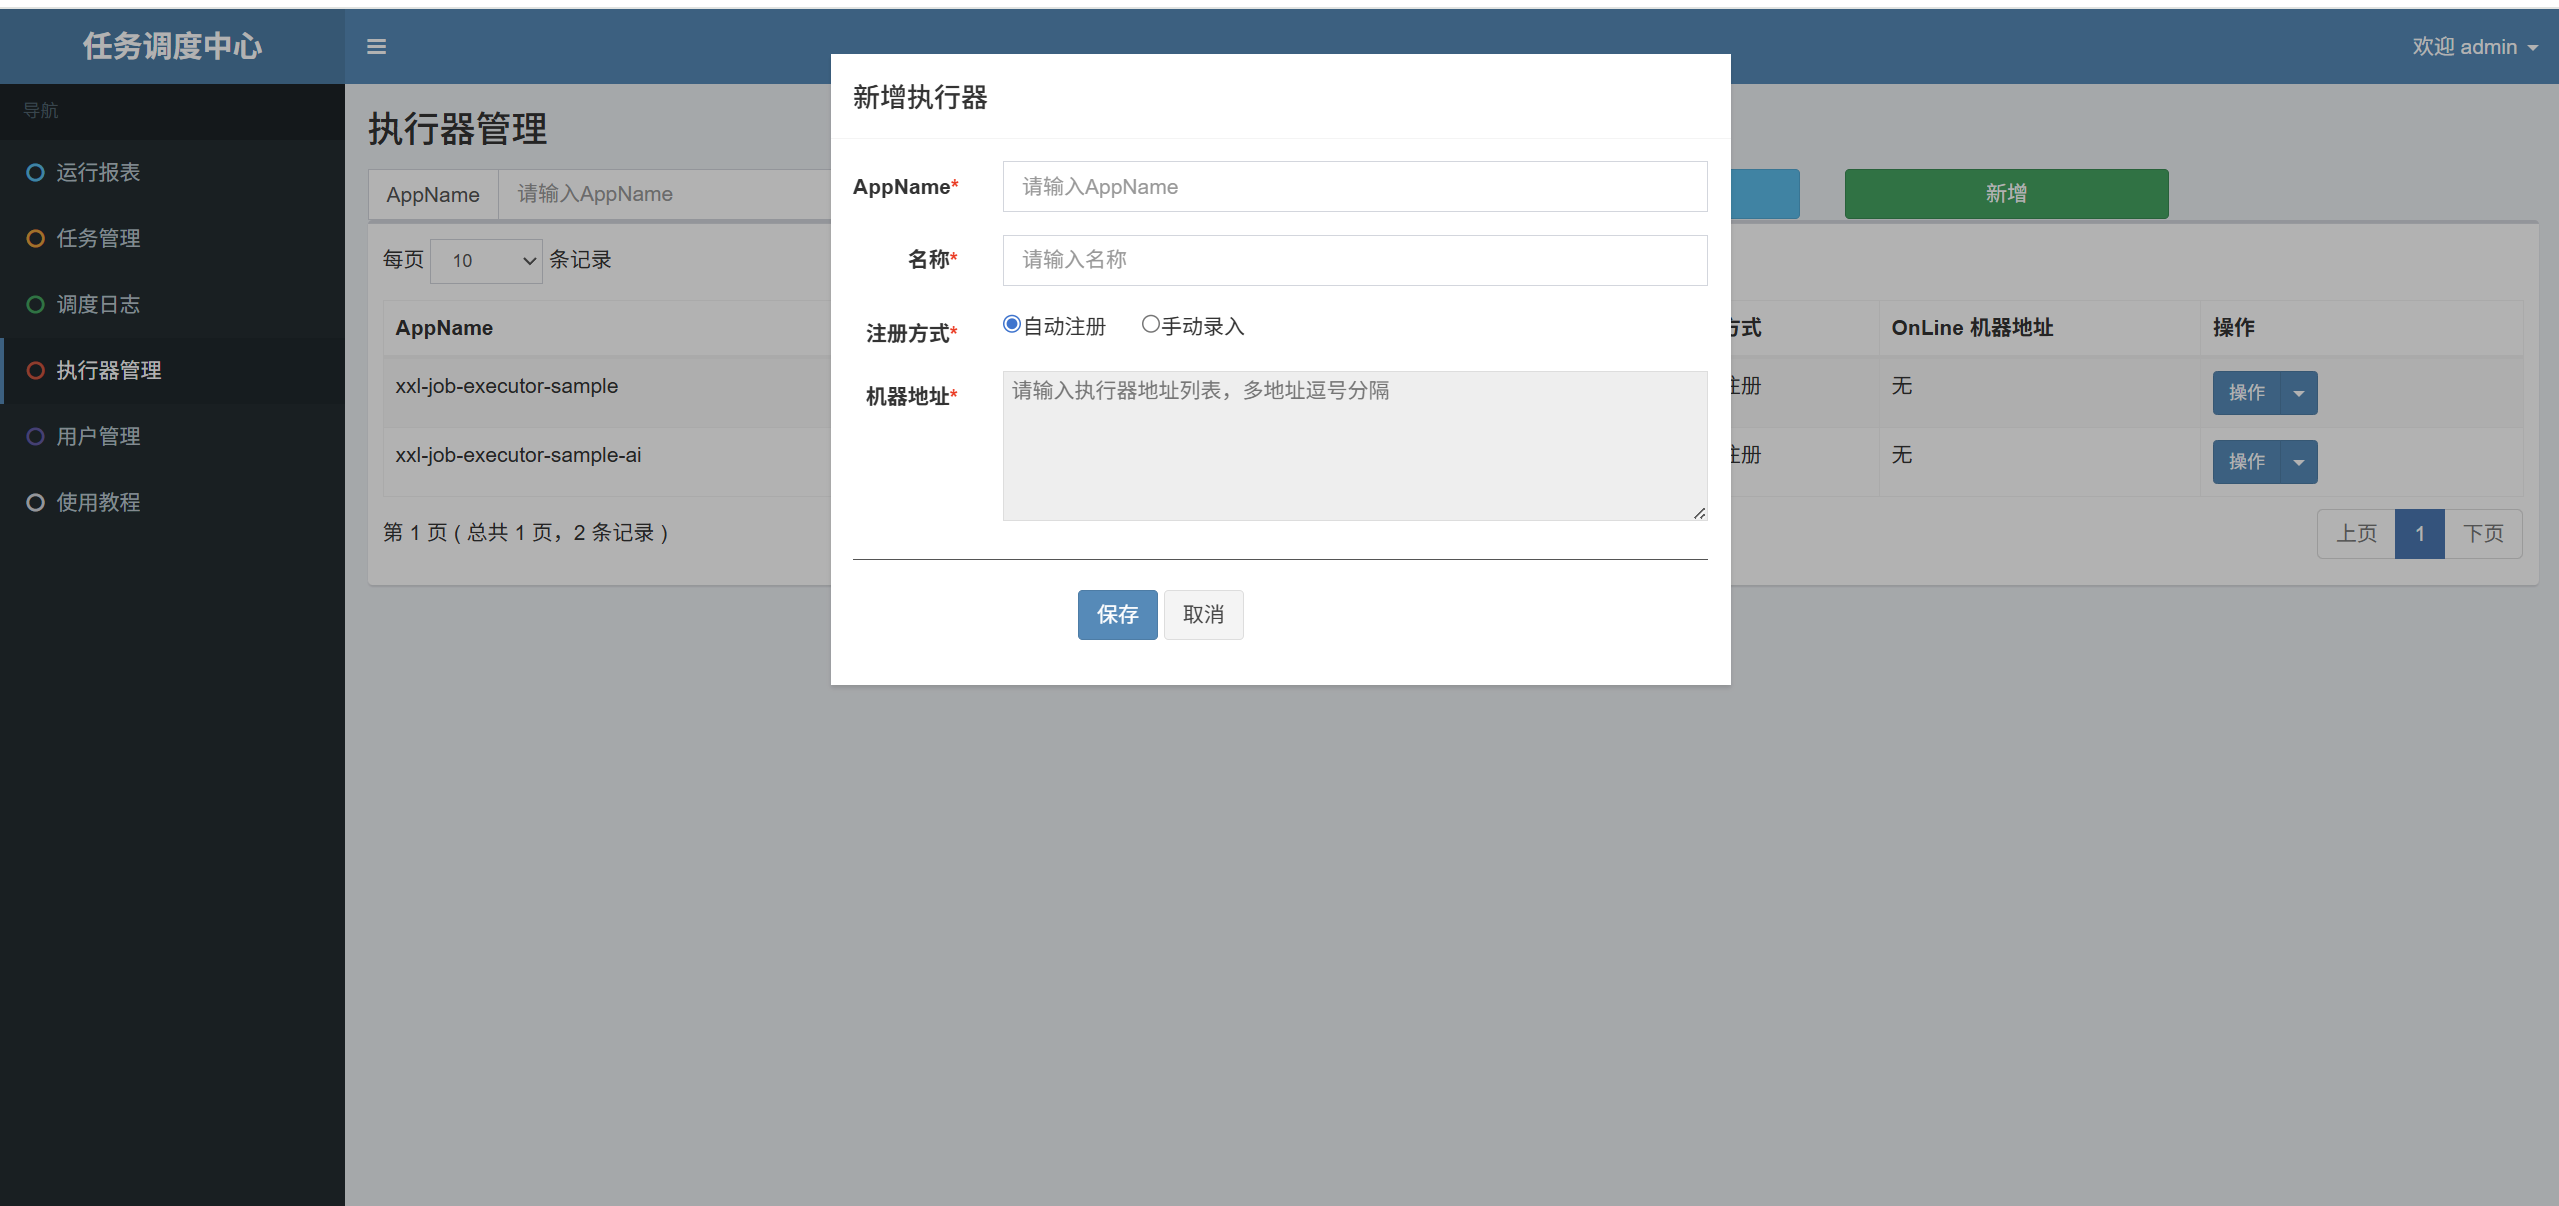
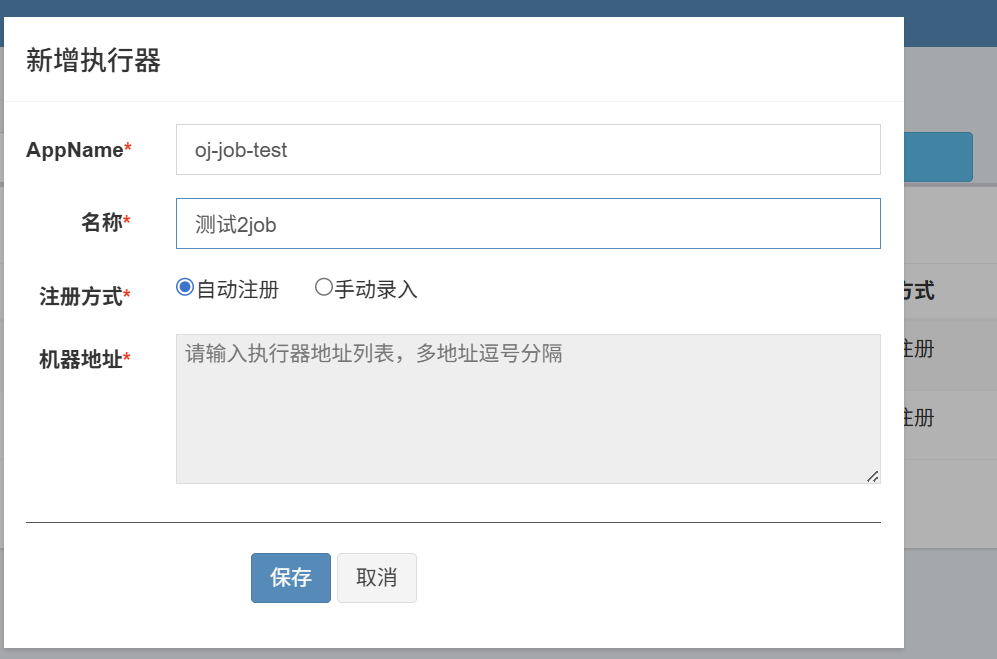
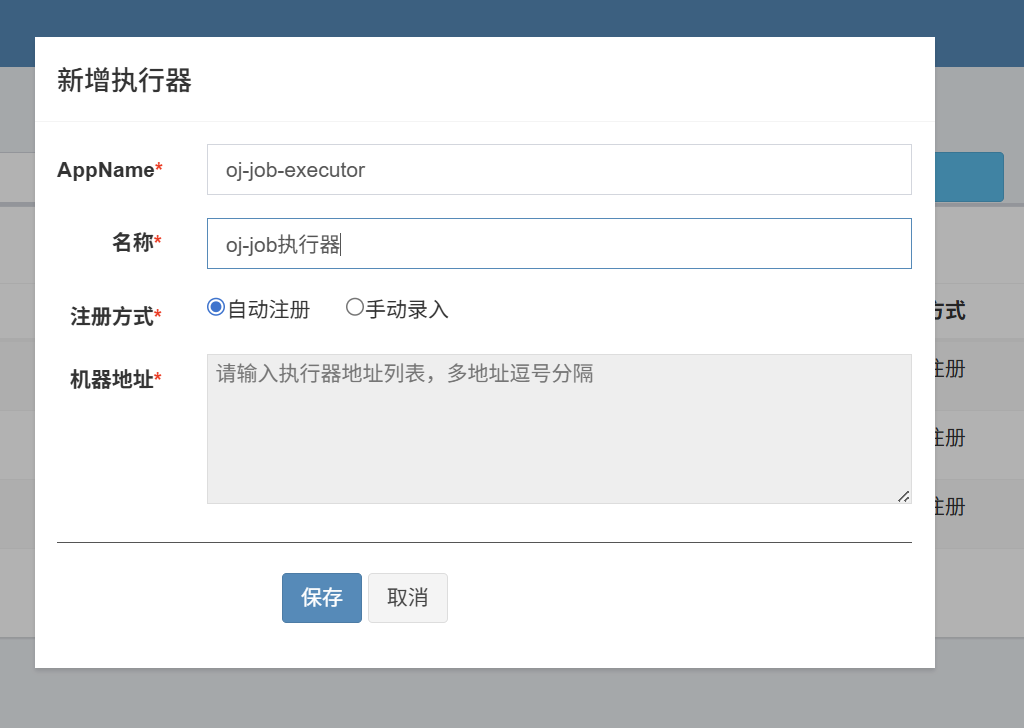
然后开始新增执行器
AppName是唯一标识,就是运行的程序实例,就是oj-job,就是唯一标识oj-job
就是要和oj-job对应起来
名称就是中文名,这个不是很重要
选了自动注册就不用填写机器地址了
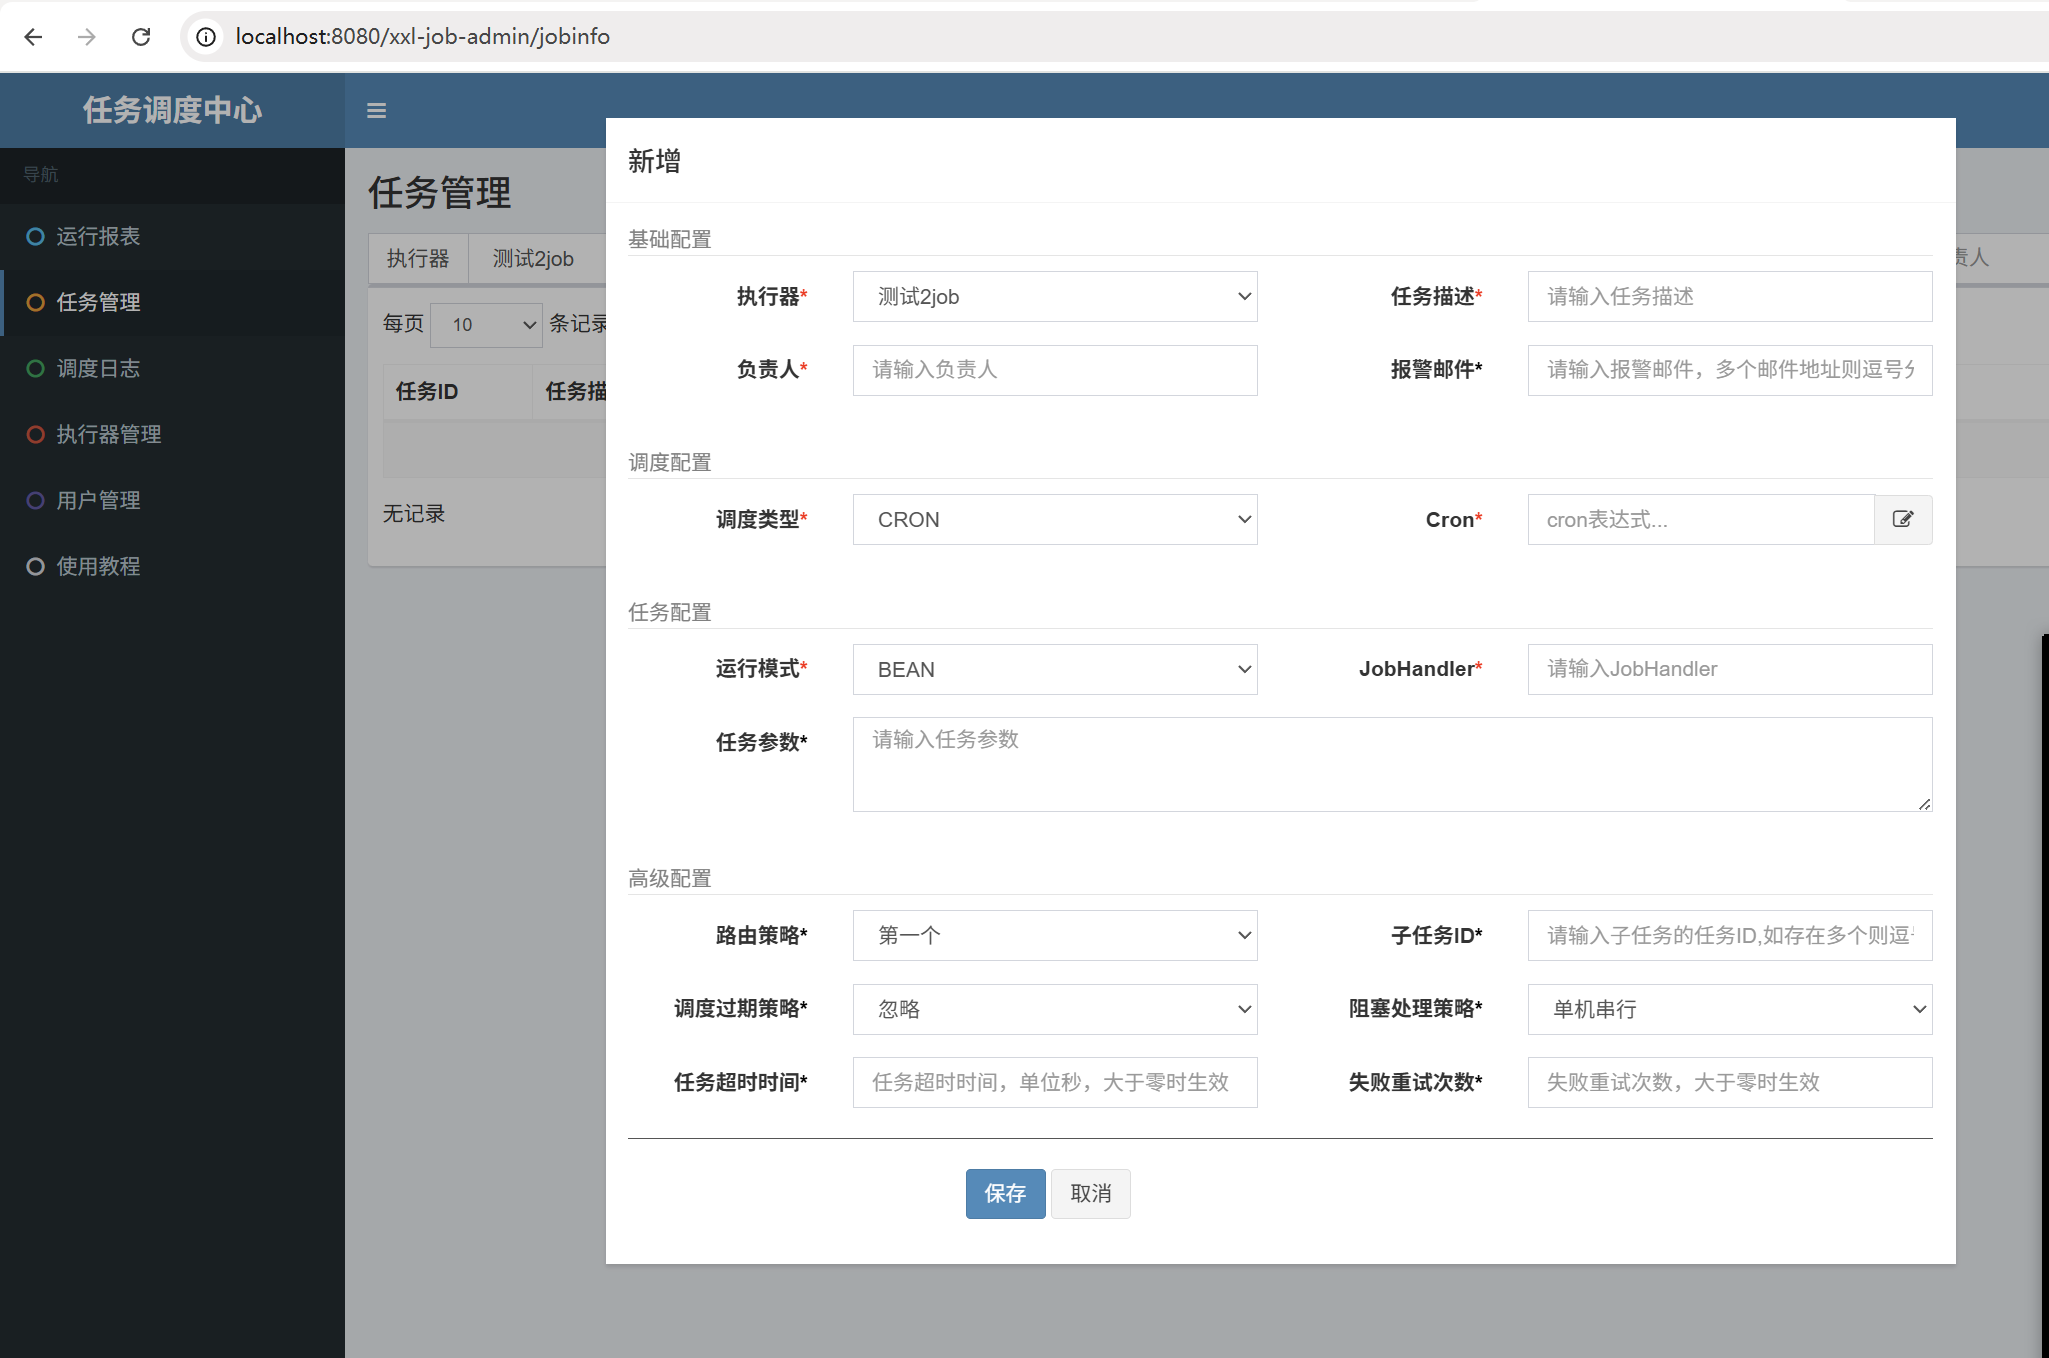
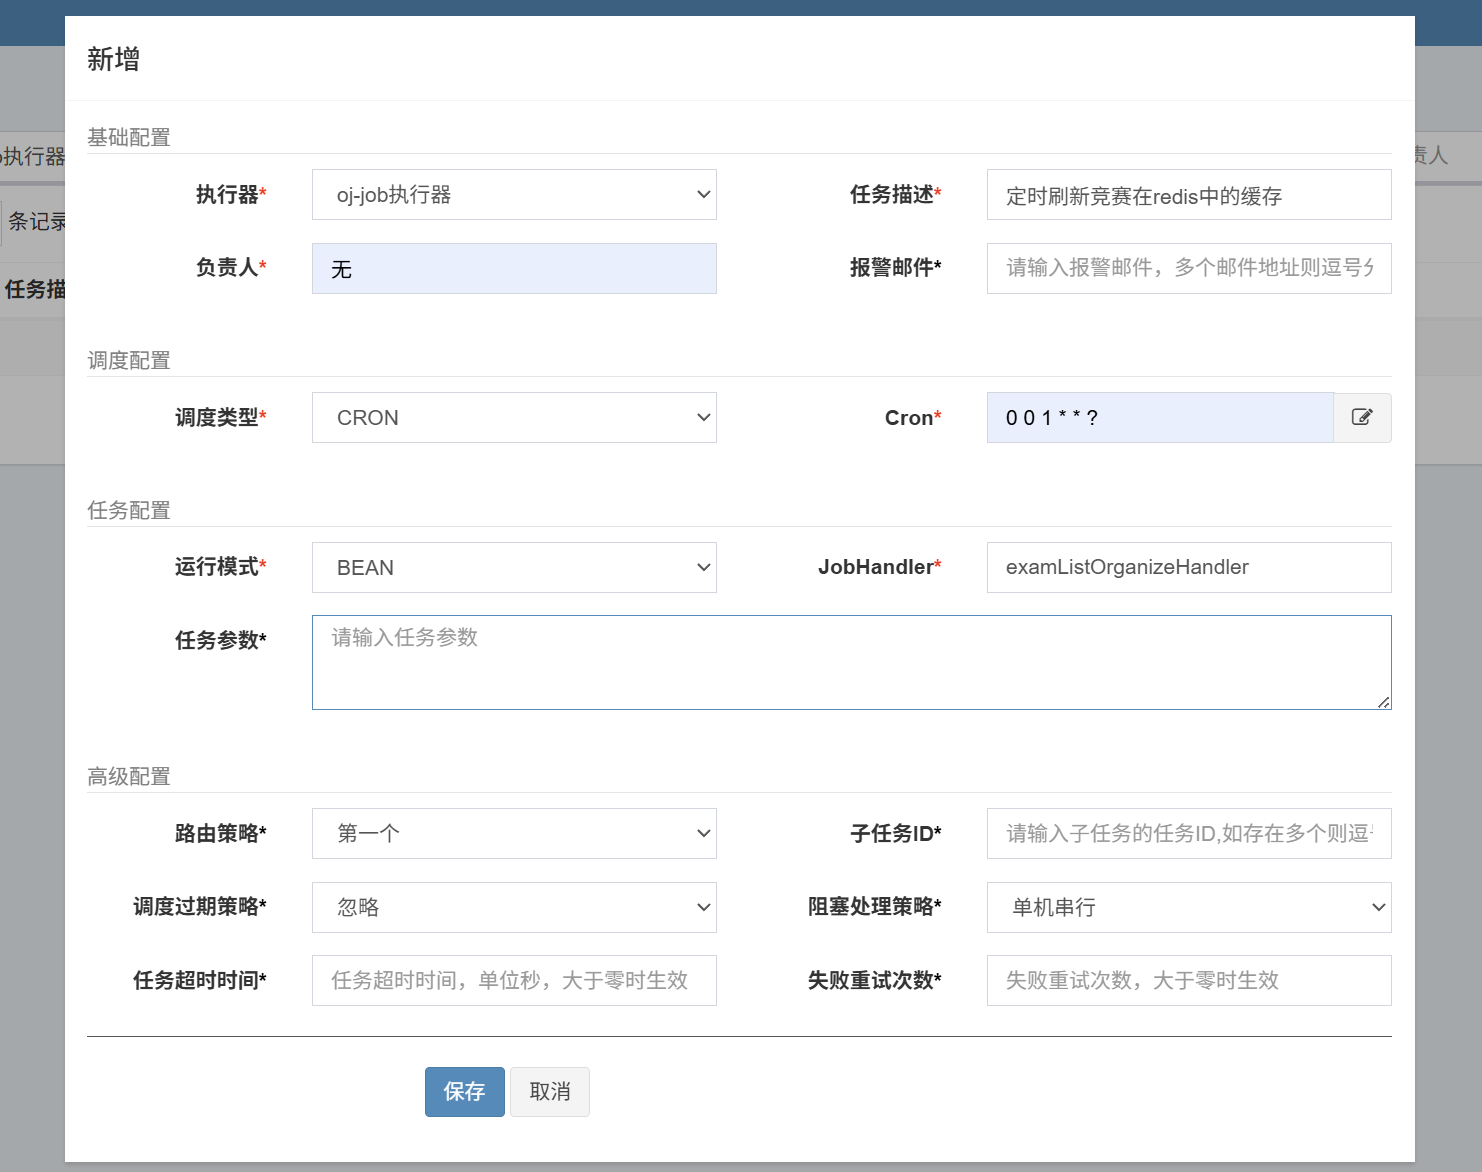
然后是新增任务
JobHandler是后端对应任务要执行的方法
第二就是,job服务就是来弄定时器的
名字叫做执行器项目
<dependency><groupId>com.ck</groupId><artifactId>oj-common-core</artifactId><version>${oj-common-core.version}</version></dependency><dependency><groupId>com.ck</groupId><artifactId>oj-common-redis</artifactId><version>${oj-common-redis.version}</version></dependency><!-- xxl-job-core --><dependency><groupId>com.xuxueli</groupId><artifactId>xxl-job-core</artifactId><version>${xxl-job.version}</version></dependency><dependency><groupId>com.ck</groupId><artifactId>oj-common-mybatis</artifactId><version>${oj-common-mybatis.version}</version></dependency>
核心依赖就是xxl-job-core
<xxl-job.version>2.4.0</xxl-job.version>
然后是xxl-job的nacos配置
server:port: 9203
spring:data:redis:port: 6379host: localhostpassword: 123456datasource:url: jdbc:mysql://localhost:3306/ckoj_dev?useUnicode=true&characterEncoding=utf8&useSSL=true&serverTimezone=GMT%2B8username: ojtestpassword: 123456hikari:minimum-idle: 5 # 最⼩空闲连接数maximum-pool-size: 20 # 最⼤连接数idle-timeout: 30000 # 空闲连接存活时间(毫秒)connection-timeout: 30000 # 连接超时时间(毫秒)
xxl:job:admin:addresses: http://localhost:8080/xxl-job-adminaccessToken: default_tokenexecutor:appname: ${spring.application.name}-executor
这里的appname就是执行器管理那里的appname
这里的accessToken是一个默认值
然后还有一个配置类
@Configuration
@Slf4j
public class XxlJobConfig {@Value("${xxl.job.admin.addresses}")private String adminAddresses;@Value("${xxl.job.accessToken}")private String accessToken;@Value("${xxl.job.executor.appname}")private String appname;@Beanpublic XxlJobSpringExecutor xxlJobExecutor() {log.info(">>>>>>>>>>> xxl-job config init.");XxlJobSpringExecutor xxlJobSpringExecutor = new XxlJobSpringExecutor();xxlJobSpringExecutor.setAdminAddresses(adminAddresses);xxlJobSpringExecutor.setAppname(appname);xxlJobSpringExecutor.setAccessToken(accessToken);return xxlJobSpringExecutor;}
}
就是用那些配置创建了一个XxlJobSpringExecutor 实例
官方实例
可以看这个模仿官方实例

@XxlJob(“demoJobHandler”)就是bean下的JobHandler
0 0 1 * * ?这个表示哦每天凌晨一点执行
0/10 * * * * ?这个表示10s执行一次
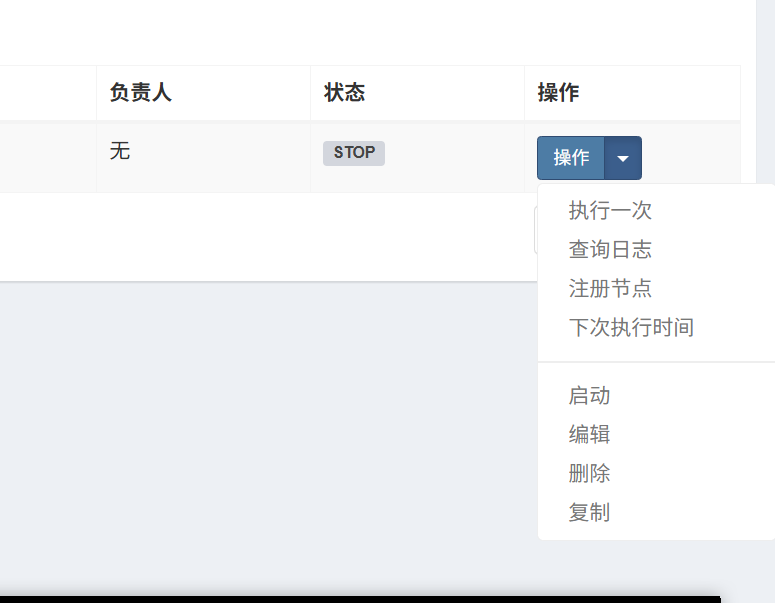
点击执行一次就是不管cron,直接执行
没有启动的任务是无法执行的
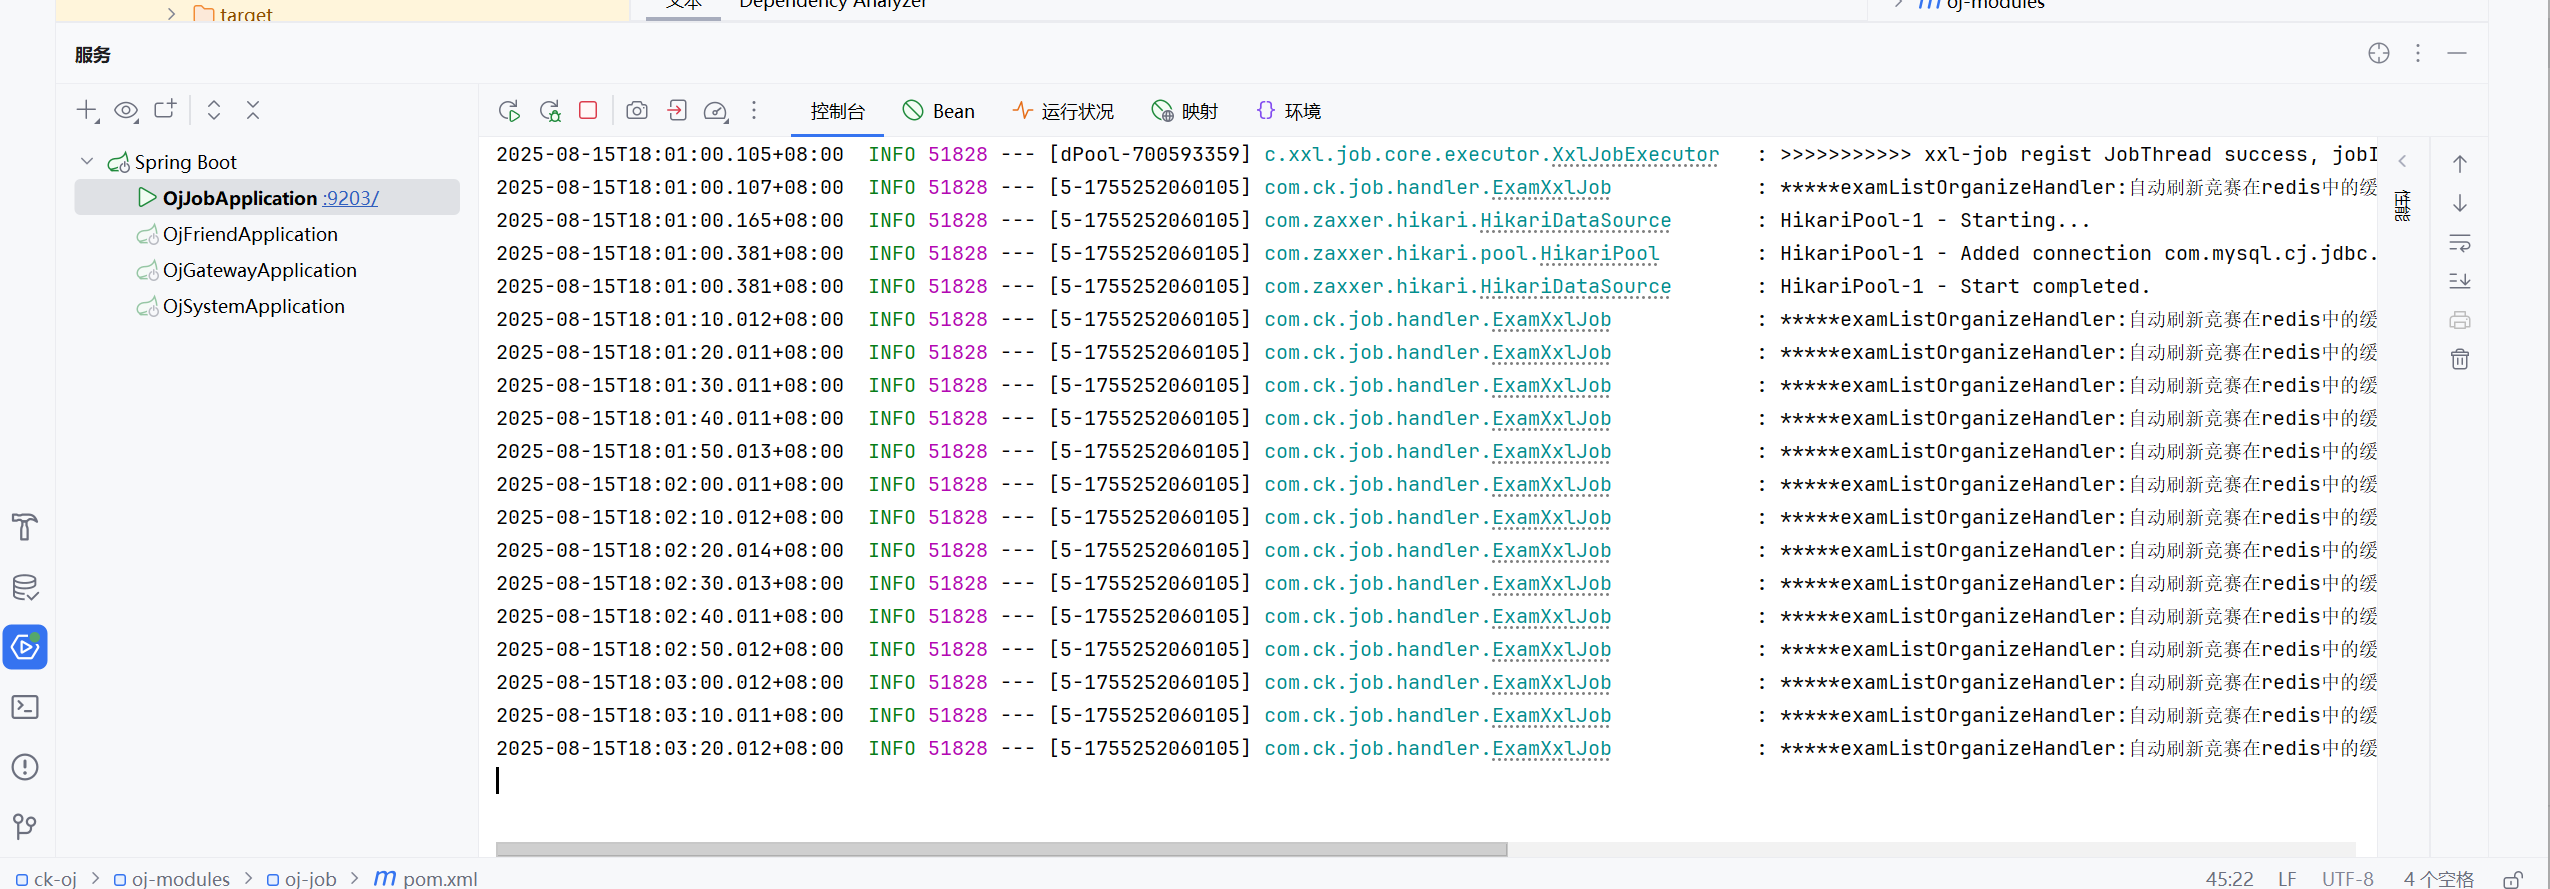
然后在oj-job下面创handler的包
@Slf4j
@Component
public class ExamXxlJob {@Autowiredprivate ExamMapper examMapper;@Autowiredprivate RedisService redisService;@XxlJob("examListOrganizeHandler")public void examListOrganizeHandler(){log.info("*****examListOrganizeHandler:自动刷新竞赛在redis中的缓存*****");List<Exam> examTimeList = new ArrayList<>();examTimeList = examMapper.selectList(new LambdaQueryWrapper<Exam>().select(Exam::getExamId, Exam::getTitle, Exam::getStartTime, Exam::getEndTime).gt(Exam::getEndTime, LocalDateTime.now()).eq(Exam::getStatus, Constants.TRUE).orderByDesc(Exam::getCreateTime));refreshCache(examTimeList,CacheConstants.EXAM_UNFINISHED_LIST);List<Exam> examHistoryList = new ArrayList<>();examHistoryList = examMapper.selectList(new LambdaQueryWrapper<Exam>().select(Exam::getExamId, Exam::getTitle, Exam::getStartTime, Exam::getEndTime).le(Exam::getEndTime, LocalDateTime.now()).eq(Exam::getStatus, Constants.TRUE).orderByDesc(Exam::getCreateTime));refreshCache(examHistoryList,CacheConstants.EXAM_HISTORY_LIST);}//刷新缓存逻辑public void refreshCache(List<Exam> examList,String key) {if (CollectionUtil.isEmpty(examList)) {return;}Map<String, Exam> examMap = new HashMap<>();List<Long> examIdList = new ArrayList<>();for (Exam exam : examList) {examMap.put(getDetailKey(exam.getExamId()), exam);examIdList.add(exam.getExamId());}redisService.multiSet(examMap);  //刷新详情缓存redisService.deleteObject(key);redisService.rightPushAll(key, examIdList);      //刷新列表缓存}private String getDetailKey(Long examId) {return CacheConstants.EXAM_DETAIL + examId;}
}
这样就可以了
<dependency><groupId>com.mysql</groupId><artifactId>mysql-connector-j</artifactId></dependency>
记得引入mysql驱动
这样就可以了
然后我们手动去数据库修改结束时间,在去任务调度器执行一次,发现也是没有问题的
1.2 前端开发
竞赛列表是首页面的子页面
{path: '/c-oj/home',name: 'home',component: () => import('@/views/Home.vue'),children: [{path: 'exam',name: 'exam',component: () => import('@/views/Exam.vue')},{path: 'question',name: 'question',component: () => import('@/views/Question.vue')}]},
{path: '/',redirect: '/c-oj/home/question'},
然后就是点击跳转的功能实现
App.vue里面的routerview渲染的是一级页面
二级页面需要二级的routerview渲染
<el-menu router class="oj-navbar-menu" mode="horizontal"><el-menu-item index="/c-oj/home/question">题库</el-menu-item><el-menu-item index="/c-oj/home/exam">竞赛</el-menu-item></el-menu>
<RouterView />
然后就是进行写前端代码了
export function getExamListService(params) {return service({url: "/exam/semiLogin/redis/list",method: "get",params,});
}
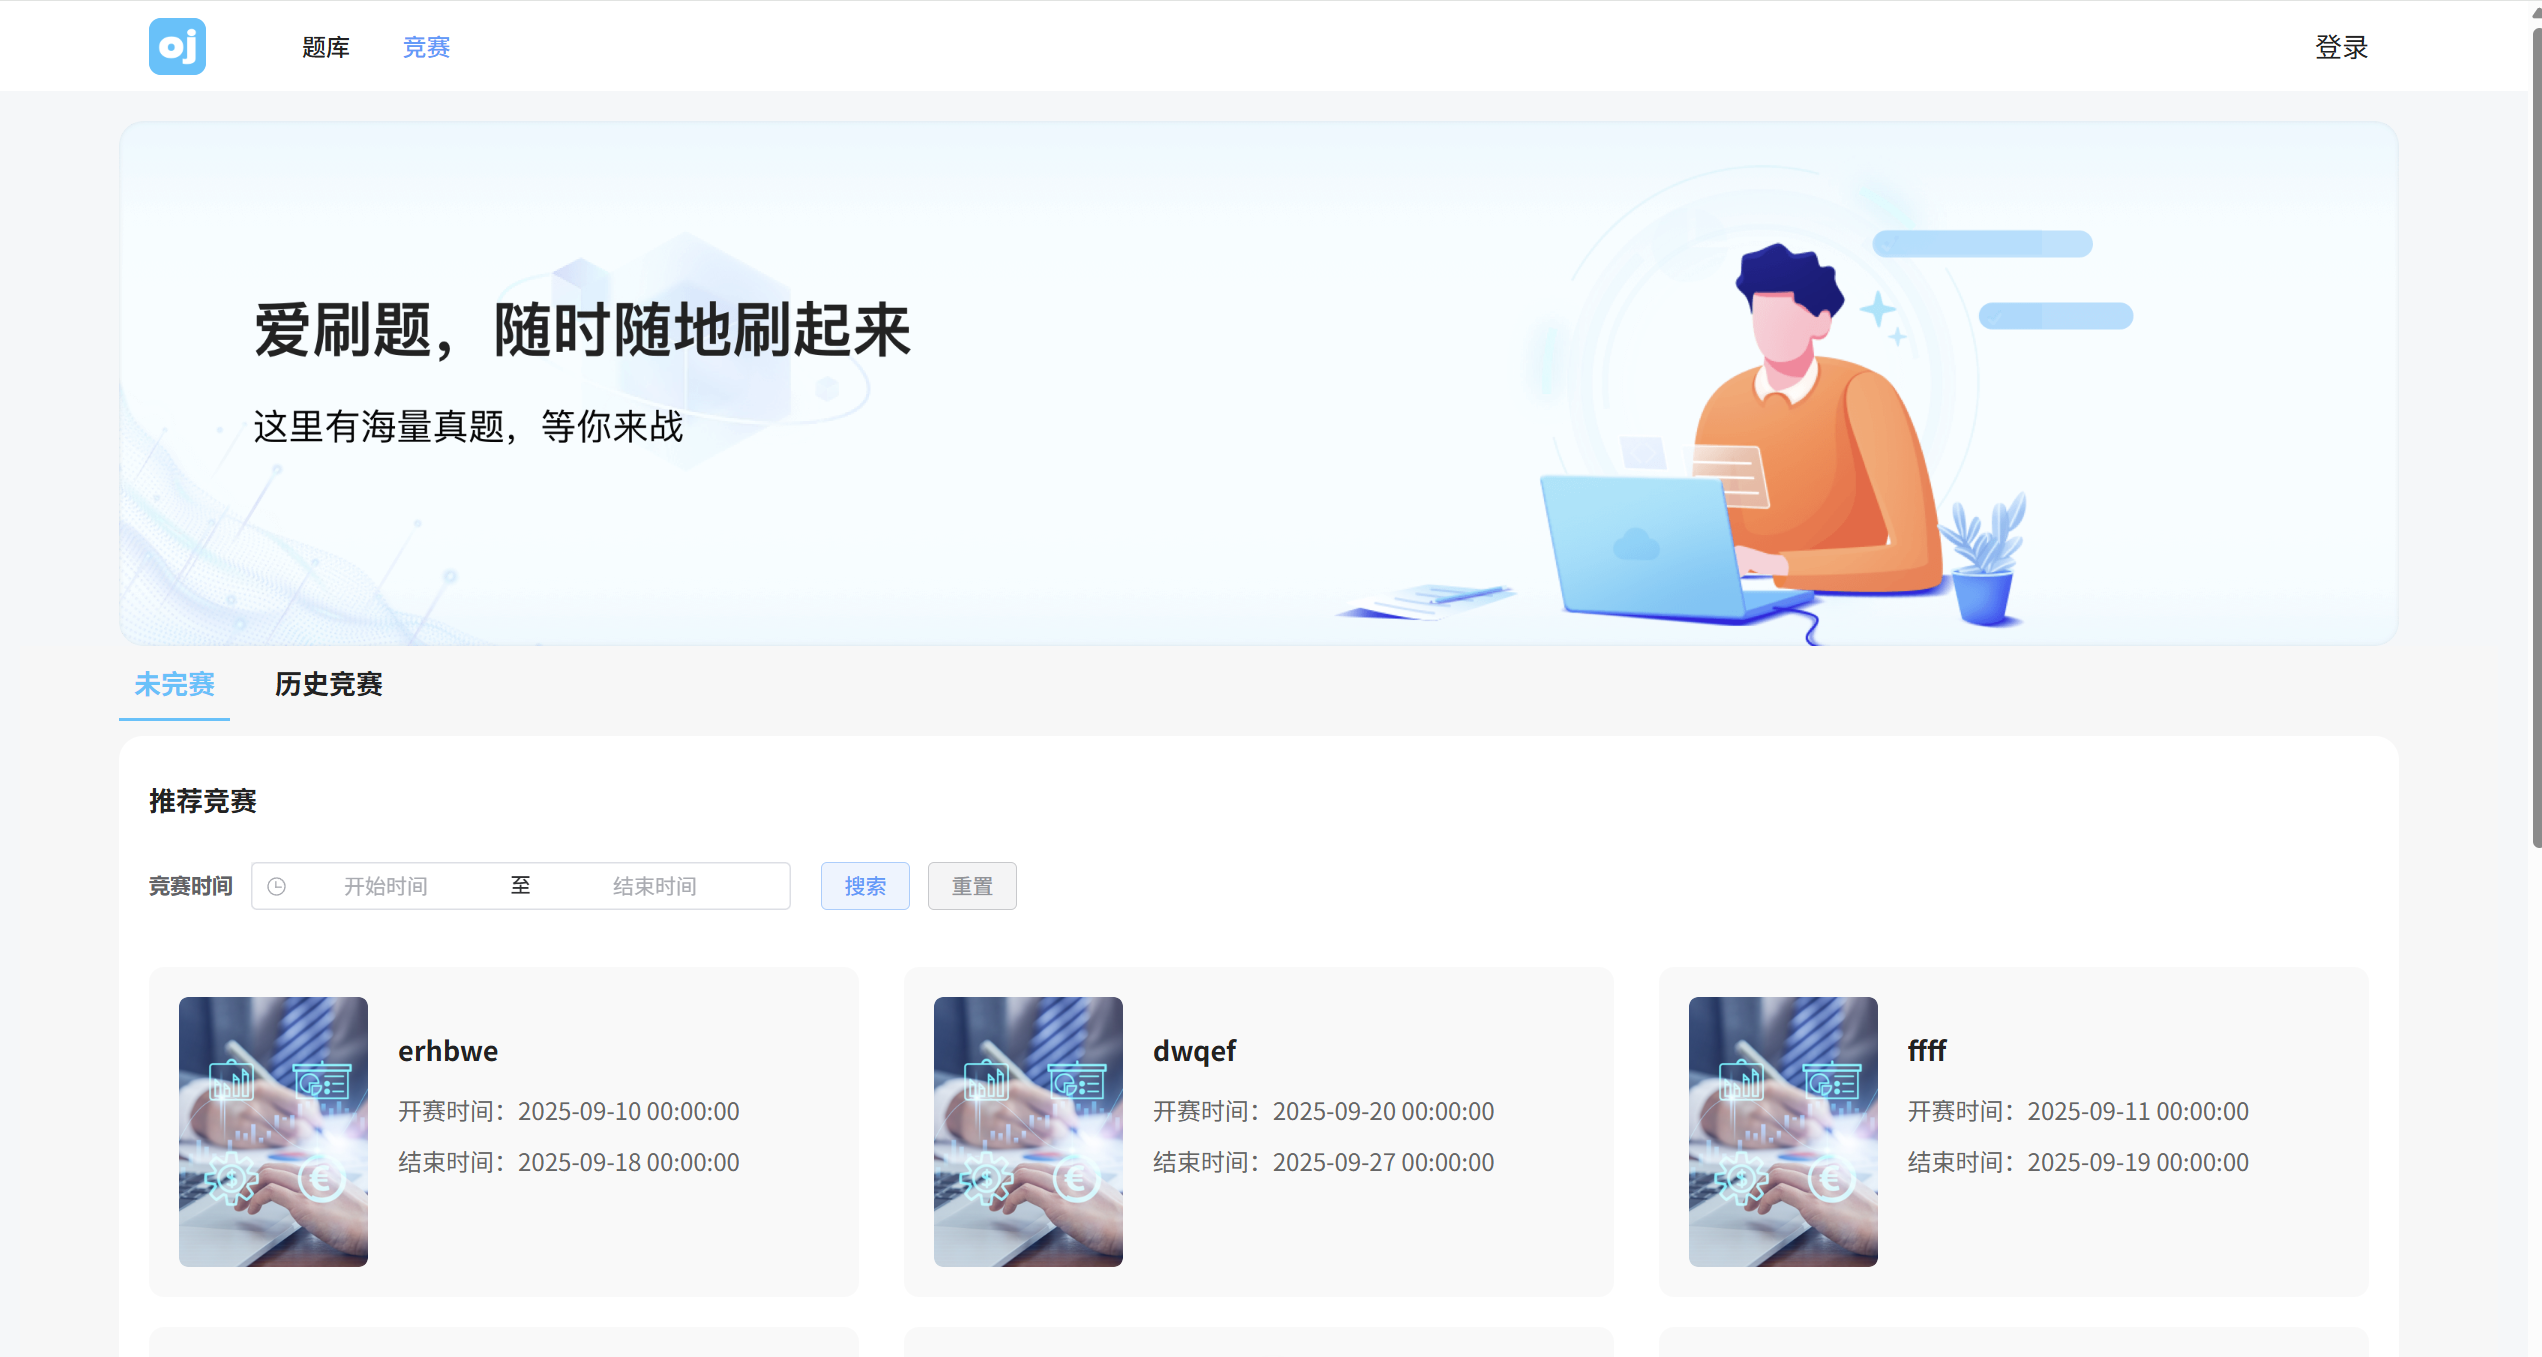
<template><div class="exam-page flex-col"><div class="exam-selected-section flex-col"><div class="exam-option-group flex-row justify-between"><div class="exam-option" v-for="option in options" :key="option.value"@click="selectOption(option.value)" :class="{ selected: selectedOption === option.value }">{{ option.label }}</div></div><div class="center-box"><span class="exam-list-title">推荐竞赛</span><el-form inline="true" class="exam-navigation flex-row justify-between"><el-form-item label="竞赛时间" prop="datetimerange" class="exam-navigation-box"><el-date-picker style="width:360px;" v-model="params.datetimerange" type="datetimerange"range-separator="⾄" start-placeholder="开始时间" end-placeholder="结束时间"></el-date-picker></el-form-item><el-form-item><el-button @click="onSearch" plain type="primary">搜索</el-button><el-button @click="onReset" plain type="info">重置</el-button></el-form-item></el-form><!-- </div> --><div class="exam-list-group flex-row"><div class="exam-list-item flex-col" v-for="(exam, index) inexamList" :key="index"><div><img src="@/assets/images/exam.png"></div><div class="right-info"><span class="exam-title">{{ exam.title }}</span><div class="exam-content flex-col justify-between"><span>开赛时间:{{ exam.startTime }}</span><span>结束时间:{{ exam.endTime }}</span></div></div></div></div><div class="exam-page-pagination flex-row"><el-pagination background layout="total, sizes, prev, pager, next,
jumper" :total="total" v-model:current-page="params.pageNum" v-model:page-size="params.pageSize":page-sizes="[3, 6, 9, 12]" @size-change="handleSizeChange"@current-change="handleCurrentChange" /></div></div></div></div>
</template>
<script setup>
import { reactive, ref } from 'vue'
import { getExamListService } from '@/apis/exam'
//参数定义
const examList = ref([]) //题⽬列表
const total = ref(0)
const selectedOption = ref(0); // 初始化选中的⽂本
const options = ref([{ label: '未完赛', value: 0 },{ label: '历史竞赛', value: 1 },
])
const params = reactive({pageNum: 1,pageSize: 9,type: 0
})
//竞赛列表
async function getExamList() {const result = await getExamListService(params)examList.value = result.rowstotal.value = result.total
}
getExamList()
async function selectOption(type) {selectedOption.value = typeparams.pageNum = 1params.type = typegetExamList()
}
// 搜索/重置
function onSearch() {params.value.pageNum = 1getExamList()
}
function onReset() {params.pageNum = 1params.pageSize = 9params.type = 0getExamList()
}
// 分⻚
function handleSizeChange(newSize) {params.pageNum = 1getExamList()
}
function handleCurrentChange(newPage) {getExamList()
}</script>
<style lang="scss" scoped>
.exam-page {background-color: rgba(247, 247, 247, 1);position: relative;overflow: hidden;display: flex;.center-box {max-width: 1520px;margin: 0 auto;width: 100%;min-height: 368px;background: #FFFFFF;border-radius: 16px;padding: 0 20px;padding-top: 30px;margin-top: 10px;}.exam-selected-section {margin: 0 auto;margin-bottom: 20px;position: relative;padding-top: 50px;max-width: 1520px;width: 100%;.exam-option-group {width: fit-content;height: 50px;position: absolute;top: 0;left: 0;.exam-option {cursor: pointer;padding: 10px;border-bottom: 2px solid transparent;transition: all 0.3s ease;font-family: PingFangSC, PingFang SC;font-weight: 600;font-size: 18px;color: #222;height: 50px;width: fit-content;display: flex;justify-content: center;align-items: center;margin-right: 20px;}.exam-option.selected {color: #32C5FF;border-bottom: 2px solid #32C5FF;}}.exam-list-title {height: 24px;font-family: PingFangSC, PingFang SC;font-weight: 600;font-size: 18px;color: #222222;line-height: 25px;text-align: left;margin-bottom: 30px;display: block;}:deep(.exam-navigation) {width: 554px;height: 40px;font-size: 100px;margin-bottom: 30px;.el-form-item {margin-right: 20px;}.el-form-item__label {background: #fff;}.exam-navigation-box {background-color: rgba(242, 243, 244, 1);border-radius: 6px;height: 30px;// width: 460px;font-weight: 700;}}.exam-list-group {// width: 1200px;flex-wrap: wrap;@media screen and (min-width: 1420px) {.exam-list-item {width: 32%;&:nth-of-type(3n) {margin-right: 0;}}}@media screen and (max-width: 1419px) {.exam-list-item {width: 48%;margin-right: 2%;&:nth-of-type(2n) {margin-right: 0;}}}@media screen and (max-width: 970px) {.exam-list-item {width: 100%;margin-right: 0;}}.exam-list-item {height: 220px;background: #F9F9F9;border-radius: 10px;margin-right: 2%;margin-bottom: 20px;padding: 20px;box-sizing: border-box;display: flex;align-items: center;flex-direction: row;justify-content: space-between;cursor: pointer;.right-info {width: calc(100% - 146px);}.exam-title {height: 26px;font-family: PingFangSC, PingFang SC;font-weight: 600;font-size: 18px;color: #222222;line-height: 26px;text-align: left;max-width: 90%;overflow: hidden;text-overflow: ellipsis;white-space: nowrap;margin-bottom: 16px;display: block;}.exam-content {margin-bottom: 26px;span {height: 22px;font-family: PingFangSC, PingFang SC;font-weight: 400;font-size: 16px;color: #666666;line-height: 22px;display: block;margin-bottom: 12px;}}img {width: 126px;height: 180px;border-radius: 6px;}&:hover {background: #fff;box-shadow: 0px 0px 6px 0px rgba(0, 0, 0, 0.1);.exam-title {color: #32C5FF;}.el-button {background: #f7f7f7;}}.exam-hash-entry {float: right;font-size: 18px;font-family: PingFangSC-Regular, PingFang SC;font-weight: 400;color: #999;}.exam-button-container {display: flex;justify-content: space-between;/* 或者使⽤ flex-start 来紧密排列按钮 */align-items: center;/* 如果需要垂直居中 *//* 其他样式,如外边距、内边距等 */.el-button {width: 120px;height: 44px;background: #F7F7F7;border-radius: 4px;border: 1px solid #32C5FF;font-family: PingFangSC, PingFang SC;font-weight: 400;font-size: 18px;color: #32C5FF;line-height: 44px;text-align: center;}}}}.exam-page-pagination {width: 594px;height: 40px;margin: 30px 0 73px 800px;}}
}
</style>
这样就可以了
2. 竞赛报名
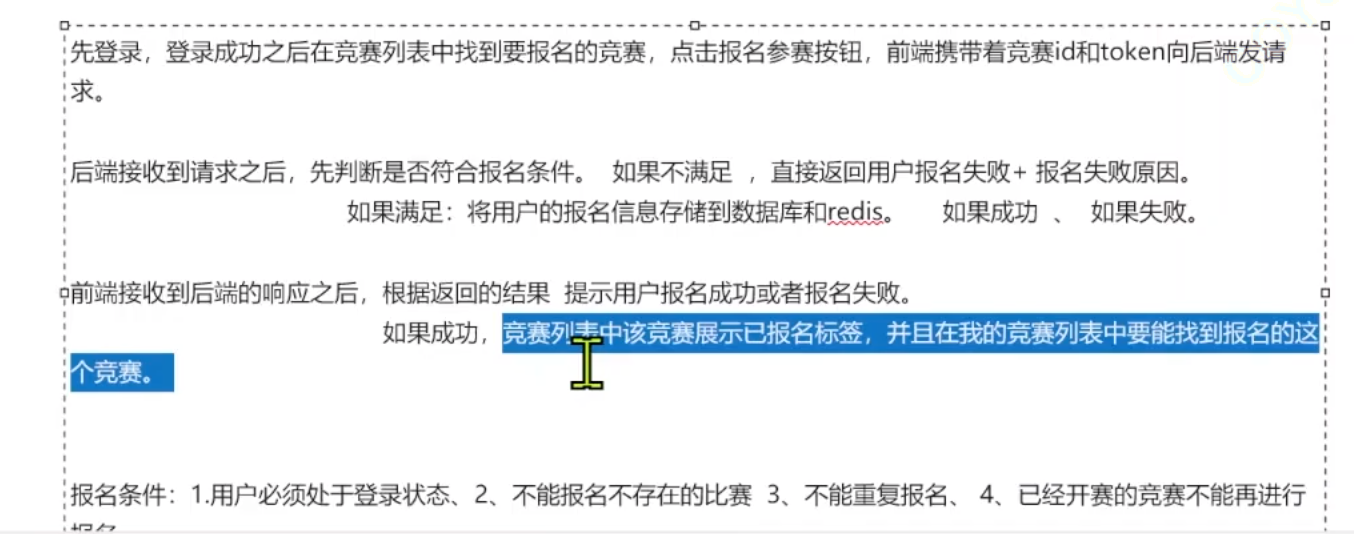
2.1 业务分析
没有登录的用户不能报名
点击报名之后不能取消报名
已经开赛的比赛就在未完赛那里,可以去答题
所以未完赛有三个状态
未开赛:去报名,已报名,
已经开赛:报名之后去答题,未报名,没有报名显示已开赛
历史竞赛那里可以查看排名,查看的用户是报名的用户,和竞赛练习

我的竞赛列表是用户报名的竞赛
用户报名信息要存在数据库和redis中
就是竞赛和用户的关联
–》重新设计一个表
竞赛排名————》是对报名竞赛的用户进行排名,展示排名还要展示得分的


create table tb_user_exam(
user_exam_id bigint unsigned NOT NULL COMMENT '用户竞赛关系id',
user_id bigint unsigned NOT NULL COMMENT '用户id',
exam_id bigint unsigned NOT NULL COMMENT '竞赛id',
score int unsigned COMMENT '得分',
exam_rank  int unsigned COMMENT '排名',
create_by    bigint unsigned not null  comment '创建人',
create_time  datetime not null comment '创建时间',
update_by    bigint unsigned  comment '更新人',
update_time  datetime comment '更新时间',
primary key(user_exam_id)
)
如何设计缓存结构呢
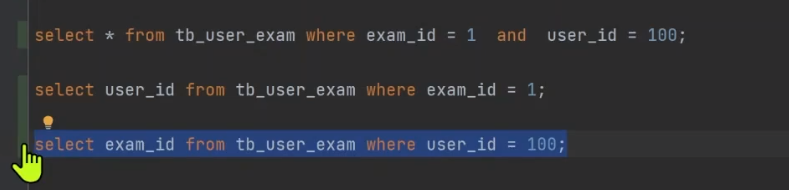
通过examId查询userId,来统计排名—》定时器–>数据库中找
根据userId找出报名的竞赛–>如何设计–>list
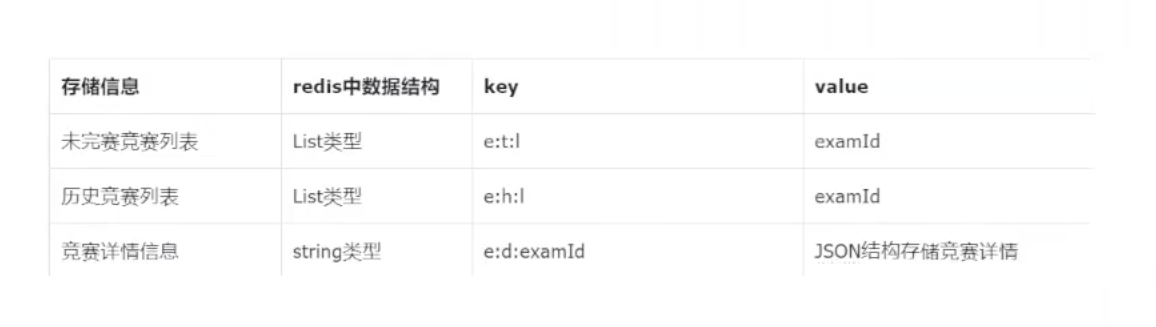
那么list存储的就是examid,key要区分不同用户,每个用户都要缓存自己报名竞赛的examId,key为user:exam:list:userId

这样设计就可以了
e:d:examId是公共的
根据userId和examId判断用户是否报名了某个竞赛
user:exam:list:userId已经可以满足这个需求了
报名后端代码逻辑
2.2 后端开发
@Getter
@Setter
@TableName("tb_user_exam")
public class UserExam extends BaseEntity {@JsonSerialize(using = ToStringSerializer.class)@TableId(value = "USER_EXAM_ID", type = IdType.ASSIGN_ID)private Long userExamId;@JsonSerialize(using = ToStringSerializer.class)private Long examId;@JsonSerialize(using = ToStringSerializer.class)private Long userId;private Integer score;private Integer examRank;
}
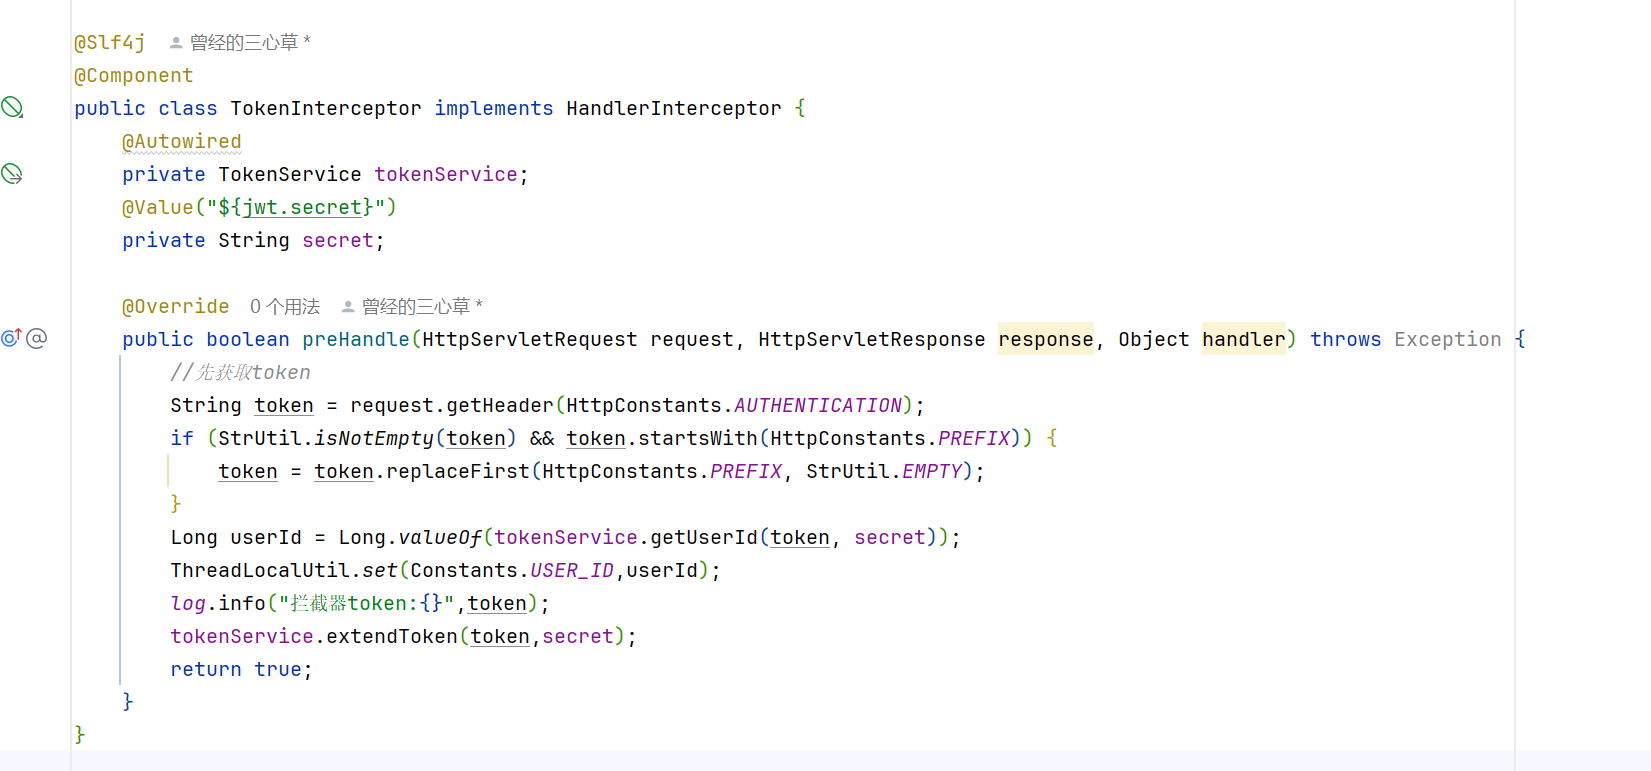
在tokenService中
public String getUserId(String token, String secret) {Claims claims;try {claims = JwtUtils.parseToken(token, secret); //获取令牌中信息 解析payload中信息if (claims == null) {log.error("令牌已过期或验证不正确!");return null;}} catch (Exception e) {log.error("令牌已过期或验证不正确!e:",e);return null;}return JwtUtils.getUserId(claims); //获取jwt中的key}
public final static String USER_EXAM_LIST_USERID = "user:exam:list:"; //竞赛详情信息
在ExamCacheManager中
public void addUserExamCache(Long userId,Long examId){String userExamListKey = getUserExamListKey(userId);redisService.leftPushForList(userExamListKey,examId);}private String getUserExamListKey(Long userId){return CacheConstants.USER_EXAM_LIST_USERID+userId;}
这个是因为要插入redis嘛
@Autowiredprivate ExamMapper examMapper;@Autowiredprivate UserExamMapper userExamMapper;@Autowiredprivate TokenService tokenService;@Value("${jwt.secret}")private String secret;@Autowiredprivate ExamCacheManager examCacheManager;@Overridepublic int enter(Long examId, String token) {//先判断这个竞赛存不存在Exam exam = examMapper.selectOne(new LambdaQueryWrapper<Exam>().eq(Exam::getExamId, examId));if(exam==null){throw new ServiceException(ResultCode.EXAM_ID_NOT_EXIST);}//在判断这个竞赛是不是已经开赛了,开赛的竞赛不能报名if(exam.getStartTime().isBefore(LocalDateTime.now())){throw new ServiceException(ResultCode.EXAM_HAVE_STARED);}//然后是判断用户是否已经报名这个竞赛Long userId = Long.valueOf(tokenService.getUserId(token,secret));UserExam userExam = userExamMapper.selectOne(new LambdaQueryWrapper<UserExam>().eq(UserExam::getExamId, examId).eq(UserExam::getUserId, userId));if(userExam!=null){throw new ServiceException(ResultCode.USER_HAVE_ENTERED);}//然后是插入数据库和redisexamCacheManager.addUserExamCache(userId,examId);//然后是插入数据库userExam = new UserExam();userExam.setExamId(examId);userExam.setUserId(userId);return userExamMapper.insert(userExam);}
这样就OK了
但是有一个值得注意的就是userId我们在网关就获取到了,能不能直接利用呢
2.3 ThreadLocal
线程本地变量
一个用户的一个请求对应一个线程访问,----》有自己变量的副本,每个线程都有自己的变量–》userId就可以存在这个里面,每个用户就有自己的userId,每个线程都是不同的userId
我们用的是TransmittableThreadLocal
作⽤:项⽬中我们如果想要某个对象在程序运⾏中的任意位置获取到,就需要借助ThreadLocal(TransmittableThreadLocal)来实现。
我们把这个的工具写在core,因为很多地方都会用到这个工具类
<transmittable-thread-local.version>2.14.4</transmittable-thread-local.version>
<dependency><groupId>com.alibaba</groupId><artifactId>transmittable-thread-local</artifactId><version>${transmittable-thread-local.version}</version>
</dependency>
引入依赖
idea格式化代码的快捷键是ctrl+alt+l
vscode是shift+alf+f
public class ThreadLocalUtil {private static final TransmittableThreadLocal<Map<String, Object>>THREAD_LOCAL = new TransmittableThreadLocal<>();public static void set(String key, Object value) {Map<String, Object> map = getLocalMap();map.put(key, value == null ? StrUtil.EMPTY : value);}public static <T> T get(String key, Class<T> clazz) {Map<String, Object> map = getLocalMap();return (T) map.getOrDefault(key, null);}public static Map<String, Object> getLocalMap() {Map<String, Object> map = THREAD_LOCAL.get();if (map == null) {map = new ConcurrentHashMap<String, Object>();THREAD_LOCAL.set(map);}return map;}public static void remove() {THREAD_LOCAL.remove();}
}
这样就成功了
请求处理完就要remove,不然会内存泄漏
但是网关和friend是两个不同的微服务,所以进程肯定是不一样的,这个ThreadLocal只能获取同一个进程里面存储的数据
但是我们在security的拦截器中也会得到userId,而且security被friend引入
所以是同一个进程,这样就可以使用ThreadLocal了
所以我们现在security中使用ThreadLocal存储userId
Long userId = Long.valueOf(tokenService.getUserId(token, secret));ThreadLocalUtil.set(Constants.USER_ID,userId);
这样就可以了,然后是获取
Long userId = ThreadLocalUtil.get(Constants.USER_ID, Long.class);
在friend写这个就可以了
然后就是mybatis中自动填充修改人id和姓名的代码也可以修改了
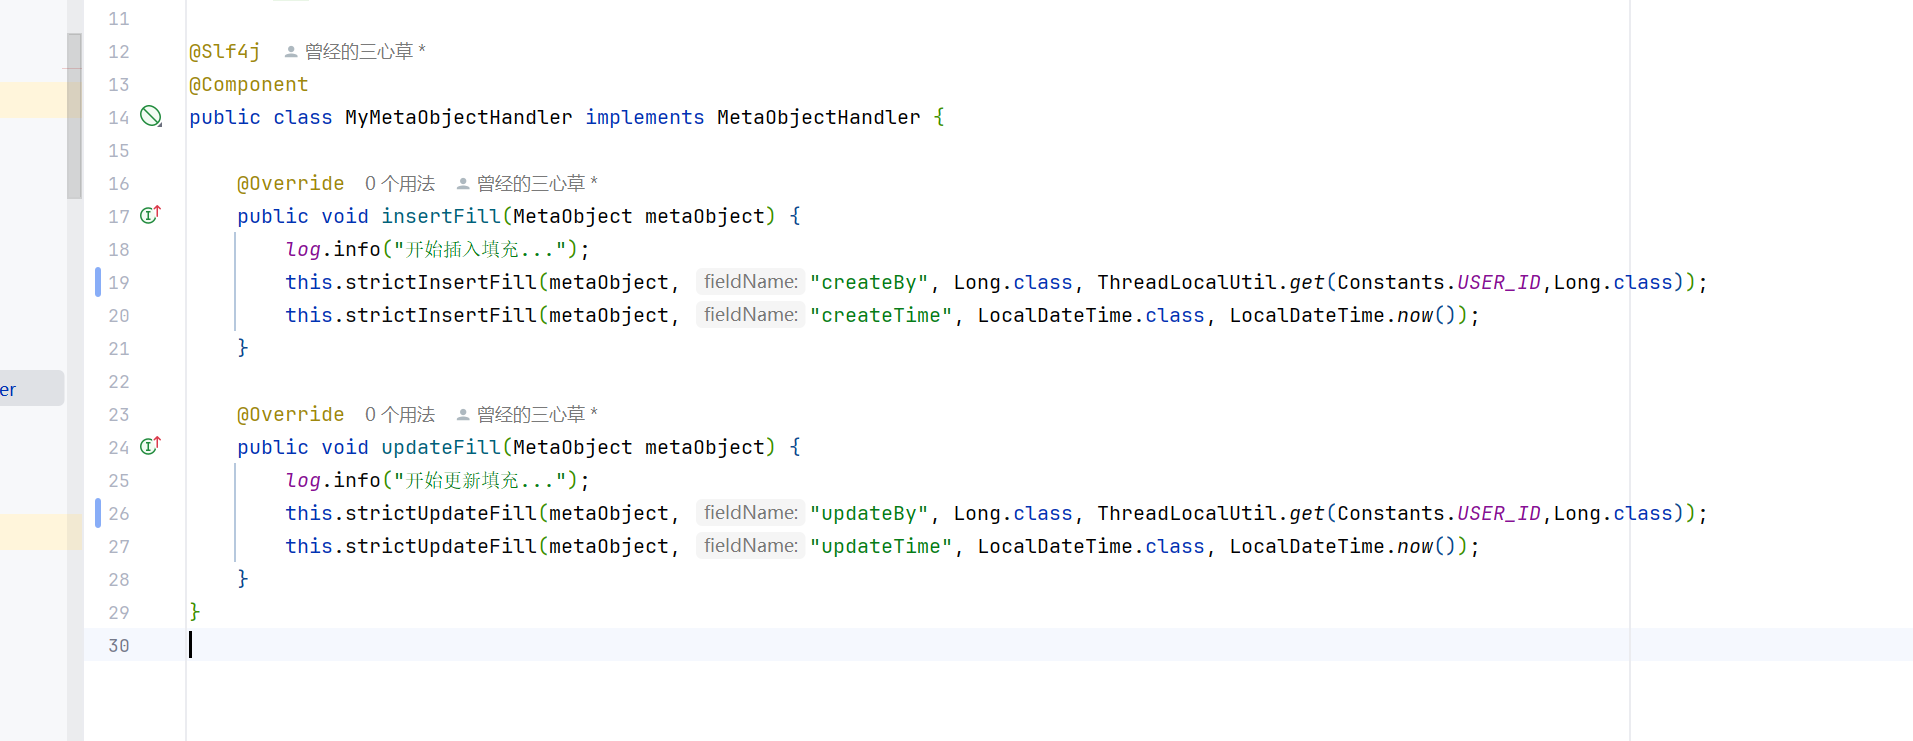
这样就成功了