Manim教程:第12章 函数,函数图像和文字的渲染
1.初等函数和它的表达式
常量函数,幂函数,指数函数,对数函数,三角函数和反三角函数成为基本初等函数。基本初等函数经过有限四则运算和符合运算得到的函数称为初等函数。

1. 常量函数
- 表达式:
(其中 c 是常数)
- 参数的意思: 是一个固定的常数。
- 定义域:c
- 值域:
- 奇偶性: 偶函数
- 单调性: 不单调
- 周期性: 周期性(周期为任意值)
- manim示例:
from manim import * class FunctionC1(Scene): def construct(self): a1=MathTex("constant Function").shift(3.5*UP) self.add(a1)title = Title().shift(3.4*UP) self.add(title) # Create axes and shift them down ax = Axes().add_coordinates().shift(0.2*DOWN) # Plot the constant function f(x) = 1 curve = ax.plot(lambda x: 1, color=DARK_BLUE) label = MathTex(r"f(x) = 1 \\ c=1").next_to([-3,1.5,0], buff=0.1).set_color(DARK_BLUE)# Add a label to the curve #label = MathTex("f(x) = 1").next_to(curve, UR, buff=0.2).set_color(DARK_BLUE).shift(2*LEFT) # Add the axes and the curve to the scene self.add(ax, curve, label)

2. 幂函数
- 表达式:
(其中 n为常数)
- 参数的意思: n是幂的指数。
- 定义域:
- n为正整数:x
(−∞,+∞)
- n为负整数: x>0
- n为正整数:x
- 值域:
- n为偶数:[0,+∞)
- n为奇数: (−∞,+∞)
- n为负数: (0,+∞)(当 x>0)
- 奇偶性:
- 偶函数(当 n为偶数)
- 奇函数(当 n 为奇数)
- 单调性:
- 当 n>0 时,单调递增(n为奇数时可在 x<0 区间内非单调)
- 当 n<0 时,在 x>0 区间单调递减。
- 周期性: 非周期性
示例:
from manim import * class FunctionPow(Scene): def construct(self): # Title for the plot title = Title("Power Functions") self.add(title) # Create axes ax = Axes().add_coordinates().shift(0.2*DOWN) #ax.add_coordinate_labels() # 添加坐标标签 # Plot the functions with appropriate ranges curve1 = ax.plot(lambda x: x**(-2), color=DARK_BLUE, x_range=[0.1, 2.3]) # x > 0 curve2 = ax.plot(lambda x: x**0.5, color=YELLOW, x_range=[0, 2.3]) # x >= 0 curve3 = ax.plot(lambda x: x**1, color=GREEN, x_range=[-2.4, 2.3]) curve4 = ax.plot(lambda x: x**3, color=ORANGE, x_range=[-1.5, 1.2]) # Add labels to the curves label1 = MathTex(r"f(x) = x^{-2}").next_to([2,0.5,0], buff=0.1).set_color(DARK_BLUE) label2 = MathTex(r"g(x) = x^{0.5}").next_to(curve2, UR, buff=0.1).set_color(YELLOW) label3 = MathTex(r"h(x) = x").next_to(curve3, UR, buff=0.1).set_color(GREEN) label4 = MathTex(r"i(x) = x^3").next_to(curve4, DL, buff=0.1).set_color(ORANGE) # Add everything to the scene self.add(ax, curve1, curve2, curve3, curve4, label1, label2, label3, label4) 
3. 指数函数
- 表达式:
(其中 a>0,a≠1)
- 参数的意思: a是基数,x是指数。
- 定义域: x
- 值域: (0,+∞)
- 奇偶性: 非奇偶函数
- 单调性:
- a>1时,单调递增
- 0<a<1时,单调递减
- 周期性: 非周期性
from manim import *
import math as maclass FunctionExponential(Scene): def construct(self): # Title for the plot title = Title("Exponential Function") self.add(title) # Create axes ax = Axes(x_range=[-1,9],y_range=[-1,9],x_length=12,y_length=6).add_coordinates().shift(0.2*DOWN) #ax.add_coordinate_labels() # 添加坐标标签 # Plot the functions with appropriate ranges curve1 = ax.plot(lambda x: 0.5**x, color=DARK_BLUE, x_range=[-5, 5]) # 1> a > 0 curve2 = ax.plot(lambda x: 1.5**x, color=YELLOW, x_range=[-5, 2.7]) # a>1 curve3 = ax.plot(lambda x: ma.exp(x), color=PINK, x_range=[-5, 2.7]) # a>1 # Add labels to the curves label1 = MathTex(r"f(x) = 0.5^{x} \\ a=0.5,0<a<1").next_to([1.5,-1,0], buff=0.1).set_color(DARK_BLUE) label2 = MathTex(r"g(x) = 1.5^{x} \\ a=2,a>1").next_to(curve2, UR, buff=0.1).set_color(YELLOW) label3 = MathTex(r"g(x) = e^{x} \\ a=2,a>1").next_to([-2,2,0]).set_color(PINK) # Add everything to the scene self.add(ax, curve1, curve2,curve3, label1, label2,label3) 
4. 对数函数
- 表达式:
(其中 a>0,a≠1)
- 参数的意思: a是底数,x 是对数的真数。
- 定义域: x
- 值域: f(x)
- 奇偶性: 非奇偶函数
- 单调性: 单调递增
- 周期性: 非周期性
from manim import *
import math as ma class FunctionLogarithm(Scene): def construct(self): # Title for the plot title = Title("Logarithmic Functions") self.add(title) # Create axes ax = Axes(x_range=[0.01, 9], y_range=[-3, 3], x_length=10, y_length=5).add_coordinates().shift(0.2*DOWN) # Plot the functions with appropriate ranges curve1 = ax.plot(lambda x: ma.log(x, 0.5), color=DARK_BLUE, x_range=[0.01, 6]) # a < 1 curve2 = ax.plot(lambda x: ma.log(x, 2), color=YELLOW, x_range=[0.01, 8]) # a = 2 curve3 = ax.plot(lambda x: ma.log(x), color=PINK, x_range=[0.01, 8]) # a = e # Add labels to the curves label1 = MathTex(r"f(x) = \log_{0.5}{x} \\ a=0.5, 0<a<1").next_to([2.5, -2, 0], buff=0.1).set_color(DARK_BLUE) label2 = MathTex(r"g(x) = \log_{2}{x} \\ a=2").next_to(curve3, UR, buff=0.1).set_color(YELLOW) label3 = MathTex(r"h(x) = \log{x} \\ a=e").next_to([2.5,0.5, 0], buff=0.1).set_color(PINK) # Add everything to the scene self.add(ax, curve1, curve2, curve3, label1, label2, label3) 
5. 三角函数
- 表达式:
- 正弦函数: f(x)=sinxf(x)=sinx
- 余弦函数: f(x)=cosxf(x)=cosx
- 正切函数: f(x)=tanxf(x)=tanx
- 参数的意思: xx 是角度(通常以弧度为单位)。
- 定义域:
- sin(x)和 cos(x): x
- tan(x):
- sin(x)和 cos(x): x
- 值域:
- sin(x)和 cos(x): [−1,1][−1,1]
- tan(x): (−∞,+∞)
- 奇偶性:
- sinx: 奇函数
- cosx: 偶函数
- tanx: 奇函数
- 单调性:
- sinx: 在 (2kπ,(2k+1)π) 上单调递增
- cosx: 在 (2kπ,(2k+1)π)上单调递减
- tanx: 在每个周期内单调递增
- 周期性:
- sin(x)和 cos(x): 周期 2π
- tanx: 周期 ππ
from manim import *
import numpy as np class FunctionTrigonometric(Scene): def construct(self): # Title for the plot title = Title("Trigonometric Functions") self.add(title) # Create axes ax = Axes(x_range=[-6, 6], y_range=[-2, 2], x_length=12, y_length=6).add_coordinates().shift(0.2*DOWN) # Plot the functions with appropriate ranges curve1 = ax.plot(np.sin, color=DARK_BLUE, x_range=[-6, 4]) # Sin function curve2 = ax.plot(np.cos, color=YELLOW, x_range=[-6, 5]) # Cos function curve3 = ax.plot(np.tan, color=PINK, x_range=[-1.19, 1]) # Tan function # Add labels to the curves label1 = MathTex(r"f(x) = \sin{x}").next_to(curve1, DR, buff=0.1).set_color(DARK_BLUE) label2 = MathTex(r"g(x) = \cos{x}").next_to(curve2, UR, buff=0.1).set_color(YELLOW) label3 = MathTex(r"h(x) = \tan{x}").next_to(curve3, UR, buff=0.1).set_color(PINK) # Add everything to the scene self.add(ax, curve1, curve2, curve3, label1, label2, label3) 
6. 反三角函数
- 表达式:
- arcsin(x)
- arccos(x)
- arctan(x)
- 参数的意思: x是三角函数的值。
- 定义域:
- arcsin(x): [−1,1]
- arccos(x: [−1,1]
- arctan(x): (−∞,+∞)
- 值域:
- arcsin(x):
- arccos(x):
- arctan(x):
- arcsin(x):
- 奇偶性:
- arcsinx: 奇函数
- arccosx: 非奇偶函数
- arctanx: 奇函数
- 单调性:
- arcsinx: 单调递增
- arccosx: 单调递减
- arctanx: 单调递增
- 周期性: 非周期性
from manim import *
import numpy as np
import mathclass FunctionInverseTrigonometric(Scene):  def construct(self):   # Title for the plot  title = Title("Inverse Trigonometric Functions")  self.add(title)  # Create axes  ax = Axes(x_range=[-7.5, 7.5], y_range=[-5, 5], x_length=12, y_length=6).add_coordinates().shift(0.2*DOWN)  # Plot the functions with appropriate ranges  curve1 = ax.plot(np.arcsin, color=DARK_BLUE, x_range=[-1, 1])  # Inverse Sin function  curve2 = ax.plot(math.acos, color=YELLOW, x_range=[-1, 1])     # Inverse Cos function  curve3 = ax.plot(np.arctan, color=PINK, x_range=[-10, 4])       # Inverse Tan function  # Add labels to the curves  label1 = MathTex(r"f(x) = \arcsin{x}").next_to(curve1, UR+3*UP, buff=0.1).set_color(DARK_BLUE)  label2 = MathTex(r"g(x) = \arccos{x}").next_to(curve2, DR+5*DOWN, buff=0.1).set_color(YELLOW)  label3 = MathTex(r"h(x) = \arctan(x)").next_to(curve3, UR, buff=0.1).set_color(PINK)  # Add everything to the scene  self.add(ax, curve1, curve2, curve3, label1, label2, label3)
2.用python实现视频中插入各种形式的文本,包括普通文本、数学公式、项目符号列表和标题
tex_mobject 模块提供了一系列可以使用 LaTeX 渲染文本的类。通过这个模块,你能够在视频中插入各种形式的文本,包括普通文本、数学公式、项目符号列表和标题等。具体类的功能如下:
- BulletedList:用于创建带项目符号的列表。
- MathTex:专门用于显示数学表达式的 LaTeX 字符串。
- SingleStringMathTex:渲染 LaTeX 文本的基本构件。
- Tex:用于普通文本的 LaTeX 渲染。
1.BulletedList表示一个带有项目符号的列表。
BulletedList 是一个函数,用于创建一个带有项目符号的列表,通常用于动画或视频制作中,以清晰地展示要点。
函数说明
BulletedList(*items, buff=0.5, dot_scale_factor=2, tex_environment=None, **kwargs)-
*items:可变参数,传入你希望在列表中展示的项目符号文本,可以是字符串,也可以是其他支持渲染的对象,如Tex或MathTex。 -
buff:项之间的垂直间距,类型为浮点数,默认值为 0.5。这决定了列表中各项之间的间隔大小。 -
dot_scale_factor:项目符号的缩放因子,默认值为 2。这个参数控制项目符号点的大小,相对于默认大小的比例。 -
tex_environment:指定 LaTeX 环境的字符串,默认值为 None。可以用来定义项目符号文本的格式。如果设置了这个参数,项目符号文本将会在指定的 LaTeX 环境中被渲染。 -
**kwargs:其他关键字参数,可以传递给Mobject的构造函数,允许自定义额外的属性或行为。
示例使用
bulleted_list = BulletedList( "第一点", "第二点", "第三点",
buff=0.5, dot_scale_factor=1.5 ) 在这个示例中,BulletedList 将生成一个包含三项的项目符号列表,项目符号点比默认大小稍小,项之间的间距为 0.5。
总结
BulletedList 是一个方便的工具,可以在你的动画或演示中有条理地展示多个内容点,通过参数灵活控制外观和布局。
示例:
from manim import *class BulletedListExample(Scene):def construct(self):title = Title(f"BulletedList")blist = BulletedList("Item 1", "Item 2", "Item 3", height=2, width=2)blist.set_color_by_tex("Item 1", RED)blist.set_color_by_tex("Item 2", GREEN)blist.set_color_by_tex("Item 3", BLUE)self.add(blist, title)
2.MathTex用于编译包含 LaTeX 的数学模式字符串。
MathTex 是 Manim 中用于显示 LaTeX 数学公式的类。该类允许用户将 LaTeX 代码渲染为可动画显示的数学公式。以下是对函数及其参数的详细解释:
函数和参数
MathTex(*tex_strings, arg_separator=' ',
substrings_to_isolate=None, tex_to_color_map=None,
tex_environment='align*', **kwargs)
参数说明:
-
*tex_strings:- 这是一个可变参数,用户可以传入多个 LaTeX 字符串以构建数学公式。每个字符串将在渲染时按顺序连接在一起。
-
arg_separator(默认值为' '):- 这个参数定义了多个参数之间的分隔符。默认情况下,它是一个空格,意味着在渲染 LaTeX 时,会将各个部分用空格分隔开。可以根据需要更改为其他字符。
-
substrings_to_isolate(默认值为None):- 这是一个列表,用于指定需要单独处理的子字符串。当提供这些子字符串时,Manim 会将它们单独处理并允许对其应用特殊格式或颜色。
-
tex_to_color_map(默认值为None):- 这是一个字典,将 LaTeX 代码中的特定字符串映射到颜色。例如,
{'x': RED}会将所有的x字符变为红色。此参数使得在数学公式中可以灵活地设置不同部分的颜色。
- 这是一个字典,将 LaTeX 代码中的特定字符串映射到颜色。例如,
-
tex_environment(默认值为'align*'):- 这个参数指定了 LaTeX 环境的名称。在该环境中渲染数学表达式,
align*使得多个行的公式可以进行对齐。可以根据公式的特定需要选择不同的 LaTeX 环境。
- 这个参数指定了 LaTeX 环境的名称。在该环境中渲染数学表达式,
-
**kwargs:- 这是一个可变关键字参数,可以传递给
Mobject的构造函数。这使得可以灵活地设置额外的属性或行为,例如位置、颜色等。
- 这是一个可变关键字参数,可以传递给
示例使用
math_expr = MathTex( r"E = mc^2", tex_to_color_map={"E": BLUE, "mc^2": GREEN},
substrings_to_isolate=["E"] )
在这个示例中,我们创建了一个数学公式 E = mc^2,将 E 设为蓝色,并且 mc^2 设为绿色,且E将在 LaTeX 中单独处理。
总结
MathTex 是一个强大的工具,可以帮助您在 Manim 中优雅地呈现数学表达式。通过灵活的参数设置,您可以控制公式的样式、颜色及其渲染方式,以满足各种动画和演示的需要。
示例:
class Formula(Scene):def construct(self):title = Title("MathTex",color=RED) t = MathTex(r"\int_a^b f'(x) dx = f(b)- f(a)")#self.add(t,title)equation = MathTex(r"e^x = x^0 + x^1 + \frac{1}{2} x^2 + \frac{1}{6} x^3 + \cdots + \frac{1}{n!} x^n + \cdots",substrings_to_isolate="x")equation.set_color_by_tex("x", YELLOW)equation.set_color_by_tex("\+", RED)a=Group(t, equation).arrange(DOWN, buff=.8)self.add(title,a)
3.SingleStringMathTex用于渲染 LaTeX 文本的基本构建块。
SingleStringMathTex 是 Manim 中用于显示单个字符串 (单个 LaTeX 数学公式) 的类。它类似于 MathTex,但专门用于处理单个字符串的情况。以下是对其参数的详细解释:
函数和参数
SingleStringMathTex(tex_string, stroke_width=0,should_center=True, height=None, organize_left_to_right=False,tex_environment='align*', tex_template=None, font_size=48, **kwargs) 参数说明:
-
tex_string:- 这是要显示的 LaTeX 公式字符串。由于这是一个单字符串版本,因此不支持多个字符串。
-
stroke_width(默认值为0):- 这个参数定义了公式边界的线宽。它控制公式的外观轮廓,0 表示没有边框。
-
should_center(默认值为True):- 这个参数决定是否将公式在画布上居中。如果设置为
False,公式将以左对齐的方式显示。
- 这个参数决定是否将公式在画布上居中。如果设置为
-
height(默认值为None):- 这个参数可以指定公式的高度。如果提供,公式将根据指定的高度进行缩放,以适应所需的大小。
-
organize_left_to_right(默认值为False):- 这个参数控制文本的排列方向。如果设置为
True,文本会从左到右排列。默认情况下,LaTeX 环境任务一般会保持原有的排列方式。
- 这个参数控制文本的排列方向。如果设置为
-
tex_environment(默认值为'align*'):- 该参数指定使用的 LaTeX 环境名称。默认情况下为
align*。可以根据需求选择合适的 LaTeX 环境来控制公式的渲染方式。
- 该参数指定使用的 LaTeX 环境名称。默认情况下为
-
tex_template(默认值为None):- 这个参数允许用户提供 LaTeX 模板以自定义渲染的样式。如果设置了此参数,公式将按照指定的模板进行渲染。
-
font_size(默认值为48):- 这个参数指定了公式的字体大小,可以根据需要进行调整,以适配不同的场合或视觉效果。
-
**kwargs:- 这是一个可变关键字参数,可以传递给
Mobject的构造函数,允许使用额外的属性或行为设置,例如颜色、位置等。
- 这是一个可变关键字参数,可以传递给
示例使用
class Formula01(Scene):def construct(self):title = Title("SingleStringMathTex",color=RED) math_expr = SingleStringMathTex( r"f(x) = ax^2 + bx + c", stroke_width=1, should_center=True, height=0.5, font_size=0.5 )math_expr2 = SingleStringMathTex( r"f(x) = ax^2 + bx + c", stroke_width=1, should_center=True, height=1, font_size=0.5 )a=Group(math_expr,math_expr2).arrange(DOWN, buff=.8)self.add(title,a)
在这个示例中,我们创建了一个数学表达式 f(x) = ax^2 + bx + c,设定了边界线宽、居中显示、高度和字体大小。
总结
SingleStringMathTex 是一种方便的方式来渲染单个 LaTeX 数学表达式。通过灵活的参数设置,您可以轻松控制字体大小、边框样式、对齐方式和环境选择,以适应各种演示和动画场景。
4.Tex用于编译普通模式下的 LaTeX 字符串。
Tex 是 Manim 中用于渲染 LaTeX 文本的类,支持多个字符串并将它们组合成一个数学表达式或普通文本的对象。以下是对其参数的详细解释:
函数和参数
Tex(*tex_strings, arg_separator='', tex_environment='center', **kwargs) 参数说明:
-
*tex_strings:- 这是一个可变参数,可以接收多个字符串作为输入。所有输入的字符串将在渲染时组合成一个整体。通常用于一起显示多个 LaTeX 表达式或文本。
-
arg_separator(默认值为''):- 这个参数用于定义在多个字符串之间插入的分隔符。默认为空字符串(即没有分隔符),如果你希望在多个字符串之间加入特定的符号或空格,可以设置此参数。
-
tex_environment(默认值为'center'):- 该参数定义了所使用的 LaTeX 环境。默认情况下是
'center',它在画布上居中显示文本。你可以根据需要选择其他 LaTeX 环境,如equation、align等,以控制文本的布局方式。
- 该参数定义了所使用的 LaTeX 环境。默认情况下是
-
**kwargs:- 这是一个可变关键字参数,允许用户在创建
Tex对象时传入额外的样式或设置。例如,文本的颜色、位置、字体大小等都可以通过这个参数传递。
- 这是一个可变关键字参数,允许用户在创建
示例使用
class Formula02(Scene):def construct(self):title = Title("Text",color=RED) text = Tex( r"f(x) = ax^2 + bx + c", r"\quad \text{where } a, b, c \in \mathbb{R}", arg_separator=' ', tex_environment='align*', color=BLUE )self.add(title,text)
在这个示例中,我们创建了一个包含两个字符串的 LaTeX 文本,第一个表达式是二次函数的标准形式,第二个字符串解释了变量的含义。使用了空格作为字符串之间的分隔符,同时指定了 align* 环境以获得适合的布局,并将文本颜色设为蓝色。
总结
Tex 类提供了一个灵活的方式来渲染 LaTeX 文本和数学表达式,可以处理多个字符串、控制分隔符、选择渲染环境,并支持多种样式设置。这使得在 Manim 中创建复杂的数学文档和动态图形变得简单方便。
3.文本的渲染方法
在动画制作中,文本的展示是一个重要环节。在这个背景下,Text 类作为显示非 LaTeX 文本的 Mobjects(数学对象)被广泛使用。与使用 Tex 和 MathTex 插入 LaTeX 文本相比,Text 允许用户直接添加普通文本,极大地简化了文本处理的流程。
Text 类依赖于 Pango 库,它具备强大的文本渲染能力,包括支持多种字符集和非英语字母的展示。例如,你可以通过 Text 类轻松展示中文(如“你好”)、日文(如“こんにちは”)、韩文(如“안녕하세요”)等,这对于需要国际化显示的项目尤其重要。
使用 Text 类时,用户应该注意文本的字体选择和展示效果。合适的字体不仅能提升文本的美观性,还能提高可读性。因此,建议参考对应的教程“Text Without LaTeX”来获取关于字体的详细信息。
总结来说,Text 类为动画制作人员提供了一种简单而有效的方式来展示各种语言的文本,弥补了仅依赖 LaTeX 处理文本的不足。通过利用 Pango 库,这种方法显著提高了文本处理的灵活性和多样性,使得动画作品能够更加生动、丰富地展示信息。无论是教育视频、广告还是短片,这种能力都可以为观众带来更好的视觉体验。
1.控制文本的外观和行为
MarkupText 是一个用于渲染文本的函数,允许用户通过多种参数来控制文本的外观和行为。
MarkupText(text, fill_opacity=1, stroke_width=0, color=None, font_size=48,
line_spacing=-1, font='', slant='NORMAL', weight='NORMAL', justify=False,gradient=None, tab_width=4, height=None, width=None, should_center=True,disable_ligatures=False, warn_missing_font=True, **kwargs)
以下是对每个参数的解释:
text: 要显示的文本内容。fill_opacity: 文本填充的透明度,在 0 到 1 之间,默认为 1(完全不透明)。stroke_width: 文本边缘线的宽度,默认值为 0,表示不画边缘线。color: 文本的颜色,通常由 RGBA 格式指定。font_size: 文本字体大小,默认值为 48。line_spacing: 行间距,默认为 -1,表示使用默认行距。font: 字体名称(例如 "Arial"),默认值为空字符串,意味着使用默认字体。slant: 字体倾斜,接受值有 'NORMAL'、'ITALIC' 和 'OBLIQUE',默认为 'NORMAL'。weight: 字体粗细,接受值有 'NORMAL'、'BOLD',默认为 'NORMAL'。justify: 是否对齐文本,默认为 False。gradient: 文本的渐变效果,默认为 None。tab_width: 制表符宽度,默认为 4。height: 文本所占的高度,默认为 None,根据内容自动调整。width: 文本所占的宽度,默认为 None,根据内容自动调整。should_center: 是否使文本居中,默认为 True。disable_ligatures: 是否禁用连字,默认为 False。warn_missing_font: 如果指定字体缺失,是否发出警告,默认为 True。**kwargs: 其他额外参数。
以下是一个示例代码,展示了如何使用这些参数:
from manim import * class ExampleScene(Scene): def construct(self): # 创建带有多个参数的 MarkupText 对象 text = MarkupText( "Hello, World!", # 文本内容 fill_opacity=0.8, # 填充透明度 stroke_width=2, # 边缘线宽度 color=BLUE, # 文本颜色 font_size=36, # 字体大小 line_spacing=1.5, # 行间距 font='Arial', # 字体名称 slant='ITALIC', # 字体倾斜状态 weight='BOLD', # 字体粗细 justify=True, # 文本对齐 tab_width=4, # 制表符宽度 should_center=True # 是否居中 ) # 将文本添加到画面中 self.play(Write(text)) self.wait(2) # 等待 2 秒
示例2:
from manim import *class MarkupExample(Scene):def construct(self):text = MarkupText('<span foreground="red" size="x-large" >Blue text</span> is <i>cool</i>!"')self.add(text)
示例3:
from manim import * class BasicMarkupExample(Scene): def construct(self): # 使用 YELLOW 常量而不是字符串格式 text1 = MarkupText( "<b>foo</b> <i>bar</i> <span fgcolor='yellow'> <b><i>foobar</i></b> </span>", color=RED ) text2 = MarkupText("<s>foo</s> <u>bar</u> <big>big</big> <small>small</small>") text3 = MarkupText("H<sub>2</sub>O and H<sub>3</sub>O<sup>+</sup>") text4 = MarkupText("type <tt>help</tt> for help") text5 = MarkupText( '<span underline="double">foo</span> <span underline="error">bar</span>' ) group = VGroup(text1, text2, text3, text4, text5).arrange(DOWN) self.add(group)-
创建标记文本:
text1 = MarkupText("<b>foo</b> <i>bar</i> <b><i>foobar</i></b>")text1: 使用 HTML 样式标签创建的文本,包含加粗(<b>)、斜体(<i>)和嵌套样式(加粗斜体)。结果将呈现为 "foo" 加粗,"bar" 斜体,以及 "foobar" 加粗和斜体。
text2 = MarkupText("<s>foo</s> <u>bar</u> <big>big</big> <small>small</small>")text2: 同样使用标记样式,包含删除线(<s>)、下划线(<u>)、增大(<big>)和减小(<small>)文本的标签。
text3 = MarkupText("H<sub>2</sub>O and H<sub>3</sub>O<sup>+</sup>")text3: 显示化学式,使用下标(<sub>)和上标(<sup>)显示 "H₂O" 和 "H₃O⁺"。
text4 = MarkupText("type <tt>help</tt> for help")text4: 使用<tt>标签(等宽字体)显示 "help"。
text5 = MarkupText('<span underline="double">foo</span> <span underline="error">bar</span>')text5: 通过<span>标签定义自定义格式,"foo" 使用双下划线,"bar" 使用错误下划线(表示未定义或错误)。
-
将文本组合:
group = VGroup(text1, text2, text3, text4, text5).arrange(DOWN)- 使用
VGroup创建一个垂直的文本组,排列所有文本对象(从text1到text5),arrange(DOWN)方法将它们垂直排列。
- 使用
-
添加到场景:
self.add(group)- 将创建的组添加到场景中,以便渲染和显示。

示例4:
from manim import *class ColorExample(Scene):def construct(self):text1 = MarkupText(f'all in red <span fgcolor="{YELLOW}">except this</span>', color=RED)text2 = MarkupText("nice gradient", gradient=(BLUE, GREEN))text3 = MarkupText('nice <gradient from="RED" to="YELLOW">intermediate</gradient> gradient',gradient=(BLUE, GREEN),)text4 = MarkupText('fl ligature <gradient from="RED" to="YELLOW">causing trouble</gradient> here')text5 = MarkupText('fl ligature <gradient from="RED" to="YELLOW" offset="1">defeated</gradient> with offset')text6 = MarkupText('fl ligature <gradient from="RED" to="YELLOW" offset="1">floating</gradient> inside')text7 = MarkupText('fl ligature <gradient from="RED" to="YELLOW" offset="1,1">floating</gradient> inside')group = VGroup(text1, text2, text3, text4, text5, text6, text7).arrange(DOWN)self.add(group)
示例5:
from manim import *class JustifyText(Scene):def construct(self):ipsum_text = ("Lorem ipsum dolor sit amet, consectetur adipiscing elit.""Praesent feugiat metus sit amet iaculis pulvinar. Nulla posuere ""quam a ex aliquam, eleifend consectetur tellus viverra. Aliquam ""fermentum interdum justo, nec rutrum elit pretium ac. Nam quis ""leo pulvinar, dignissim est at, venenatis nisi.")psum_text01 = ("阿尔伯特·爱因斯坦曾说:“想象力比知识更重要。知识是有限的,""而想象力环绕着整个世界,促使进步。在科学、艺术,以及各个领域,""创造力都是推动人类文明发展的关键。无论遇到什么困难,""保持好奇心和探索精神,才能不断发现新的可能性。""真正的智慧不仅在于了解世界,更在于启发他人,共同追寻未知的真理。”""这句话体现了他对创新和思维的深刻理解。")justified_text = MarkupText(ipsum_text, justify=True).scale(0.5)not_justified_text = MarkupText(psum_text01, justify=False).scale(0.5)just_title = Title("English Text")njust_title = Title("Chines Text")self.add(njust_title, not_justified_text)self.wait(2)self.play(FadeOut(not_justified_text),FadeIn(justified_text),FadeOut(njust_title),FadeIn(just_title),)self.wait(2) |  |
4. 渲染代码的方法
Code 函数是 Manim(一个强大的数学动画库)中的一个重要工具,旨在将代码片段以视觉化的方式呈现。在教育和演示场合中,向观众展示算法或代码逻辑时,清晰的视觉效果是必不可少的。通过 Code 函数,用户可以轻松地将特定编程语言的代码导入,并且自定义其外观,包括字体、颜色、背景形状和行间距等。
该函数支持多种编程语言,如 Python、Java 和 C++ 等,使得用户能够根据需要选择语言并进行语法高亮。此外,Code 函数还实现了行号功能,方便观众追踪上下文,从而增强理解。通过调节参数,如 tab_width 和 line_spacing,用户可以精细控制代码的表现形式。这种功能让 Manim 在编程教育和技术讲座中,成为一个极具价值的工具,不仅能展示数学概念,还能有效传达编程思想。
Code(file_name=None, code=None, tab_width=3, line_spacing=0.3, font_size=24,
font='Monospace', stroke_width=0, margin=0.3, indentation_chars='    ',
background='rectangle', background_stroke_width=1,
background_stroke_color=ManimColor('#FFFFFF'), corner_radius=0.2, insert_line_no=True,
line_no_from=1, line_no_buff=0.4, style='vim', language=None, generate_html_file=False,
warn_missing_font=True, **kwargs)
Code 函数用于在 Manim 中渲染代码段。它允许用户配置各种属性,例如字体、背景样式、行号等,以便可以精确地控制代码的视觉表现。
参数解释
-
file_name (default:
None):
指定代码文件的名称,如果为None,则需要通过code参数提供代码。 -
code (default:
None):
要渲染的代码内容。如果不提供file_name,则必须提供此参数。 -
tab_width (default:
3):
每个制表符的宽度,以空格数表示。 -
line_spacing (default:
0.3):
行之间的间距。 -
font_size (default:
24):
代码字体的大小。 -
font (default:
'Monospace'):
使用的字体样式,默认是等宽字体。 -
stroke_width (default:
0):
文字的笔画宽度。 -
margin (default:
0.3):
代码框的边距。 -
indentation_chars (default:
' '):
表示缩进的字符,通常为空格字符。 -
background (default:
'rectangle'):
背景形状,可以是矩形或其他形状。 -
background_stroke_width (default:
1):
背景的笔画宽度。 -
background_stroke_color (default:
ManimColor('#FFFFFF')):
背景边框的颜色,使用 ManimColor 方法定义颜色。 -
corner_radius (default:
0.2):
背景的圆角半径。 -
insert_line_no (default:
True):
是否在渲染的代码旁插入行号。 -
line_no_from (default:
1):
行号的起始值。 -
line_no_buff (default:
0.4):
行号和代码之间的缓冲距离。 -
style (default:
'vim'):
代码的样式,例如颜色和语法高亮。 -
language (default:
None):
指定代码的语言以便于高亮。 -
generate_html_file (default:
False):
是否生成 HTML 文件。 -
warn_missing_font (default:
True):
是否在缺少指定字体时发出警告。 -
kwargs:
允许传递其他参数。
示例代码
现在,我们将使用上述所有参数来写一个示例代码段:
from manim import *class CodeFromString(Scene):def construct(self):code1 = '''from manim import Scene, Squareclass FadeInSquare(Scene):def construct(self):s = Square()self.play(FadeIn(s))self.play(s.animate.scale(2))self.wait()'''rendered_code1 = Code( file_name=None, #指定代码文件的名称,如果为 None,则需要通过 code 参数提供代码。code=code1 , #要渲染的代码内容。如果不提供 file_name,则必须提供此参数。tab_width=4, #每个制表符的宽度,以空格数表示。line_spacing=0.4, #行之间的间距。font_size=24, #代码字体的大小。font="Monospace", #使用的字体样式,默认是等宽字体。stroke_width=1, #文字的笔画宽度。margin=0.8, #代码框的边距。indentation_chars=' ', #表示缩进的字符,通常为空格字符。background="square", #背景形状,可以是矩形或其他形状。background_stroke_width=1, #背景的笔画宽度。background_stroke_color=ManimColor('#AAAAAA'), #背景边框的颜色,使用 ManimColor 方法定义颜色。corner_radius=2.5, #背景的圆角半径。insert_line_no=True, #是否在渲染的代码旁插入行号。line_no_from=1, #行号的起始值。line_no_buff=0.5, #行号和代码之间的缓冲距离。style='monokai', #代码的样式,例如颜色和语法高亮。language='Python', #指定代码的语言以便于高亮。generate_html_file=False, #是否生成 HTML 文件。warn_missing_font=False #是否在缺少指定字体时发出警告。)self.add(rendered_code1) 运行结果:
示例2:
from manim import *class CodeFromString(Scene):def construct(self):code = '''from manim import Scene, Squareclass FadeInSquare(Scene):def construct(self):s = Square()self.play(FadeIn(s))self.play(s.animate.scale(2))self.wait()
'''rendered_code = Code(code=code, tab_width=4, background="window",language="Python", font="Monospace")self.add(rendered_code)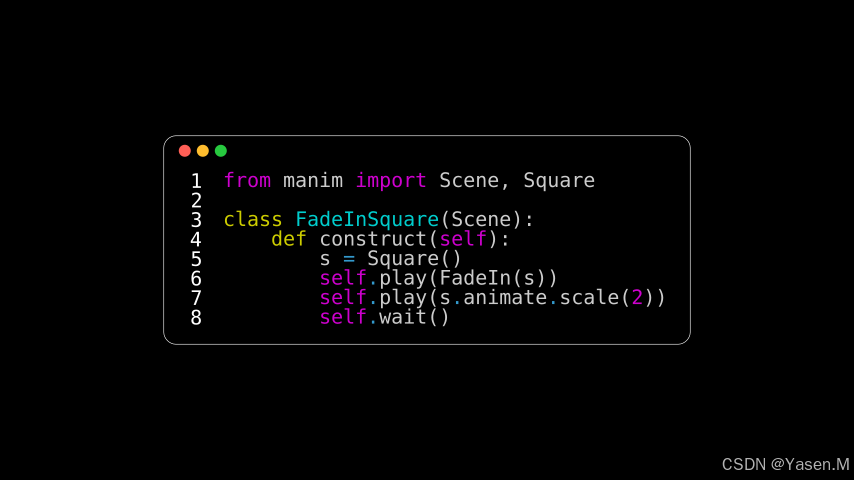
language 参数可以用于指定要高亮显示的编程语言。
language 参数可以用于指定要高亮显示的编v虽然支持的语言可能会依赖于具体的实现和配置,但以下是一些常见的编程语言选项:
- python: 用于 Python 代码高亮。
- javascript: 用于 JavaScript 代码。
- java: 用于 Java 代码。
- c: 用于 C 语言代码。
- cpp: 用于 C++ 代码。
- html: 用于 HTML 代码。
- css: 用于 CSS 代码。
- bash: 用于 Bash 脚本。
- ruby: 用于 Ruby 代码。
- swift: 用于 Swift 代码。
- go: 用于 Go 语言代码。
具体的支持语言和高亮方式可以参考相应的文档或源代码
1.Python和C的效果:
from manim import *class CodeFromStringC(Scene):def construct(self):code1 = '''from manim import Scene, Squareclass FadeInSquare(Scene):def construct(self):s = Square()'''code2 ='''#include <studio.h>int main(){printf("Hello, World");return(0);}'''rendered_code1 = Code(code=code1, tab_width=4, background="window",language="Python", font="Monospace")rendered_code2 = Code(code=code2, tab_width=4, background="window",language="C", font="Monospace")aa=VGroup(rendered_code1,rendered_code2)aa.arrange(DOWN, buff=0.5) self.add(aa)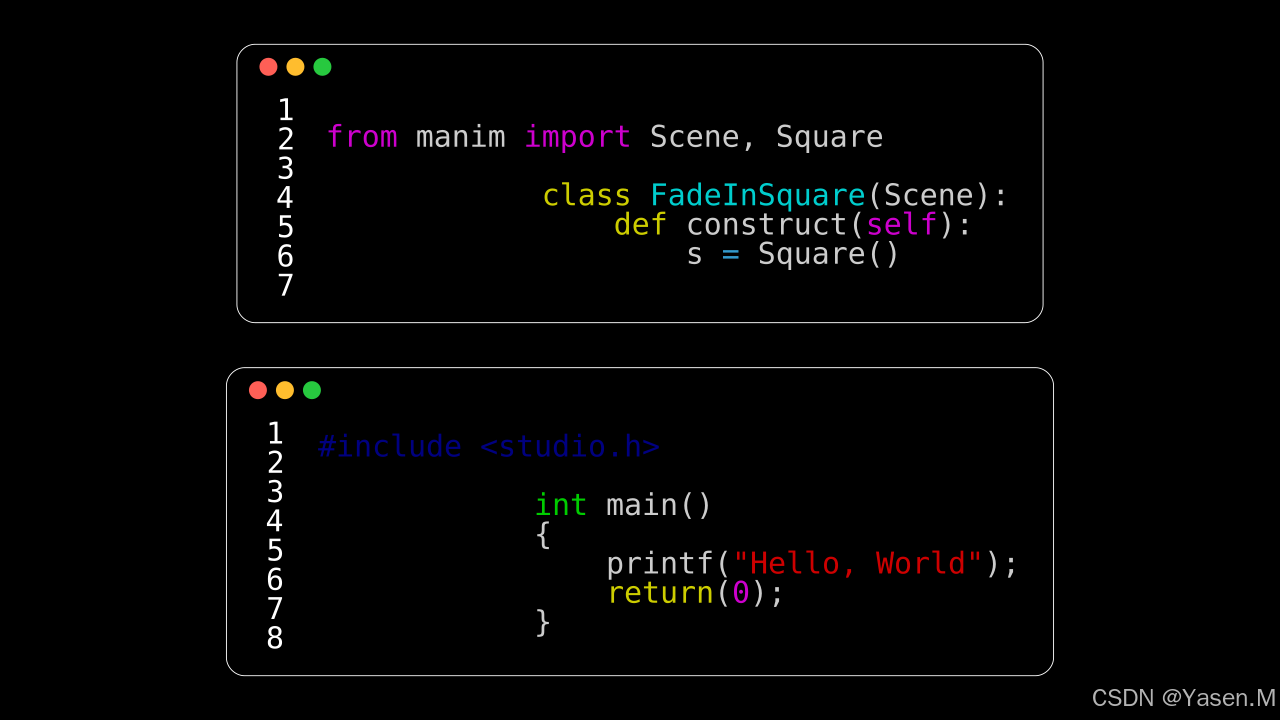
2.C++和C#的效果:
from manim import *class CodeFromStringC(Scene):def construct(self):code1 = '''#include<iostream> int main()
{std::cout << "Hello World";return 0;
}'''code2 ='''using System;
class Program
{public static void Main(string[] args){Console.WriteLine("Hello, World");}
}'''rendered_code1 = Code(code=code1, tab_width=4, background="window",language="C++", font="Monospace")rendered_code2 = Code(code=code2, tab_width=4, background="window",language="C#", font="Monospace")aa=VGroup(rendered_code1,rendered_code2)aa.arrange(DOWN, buff=0.5) self.add(aa)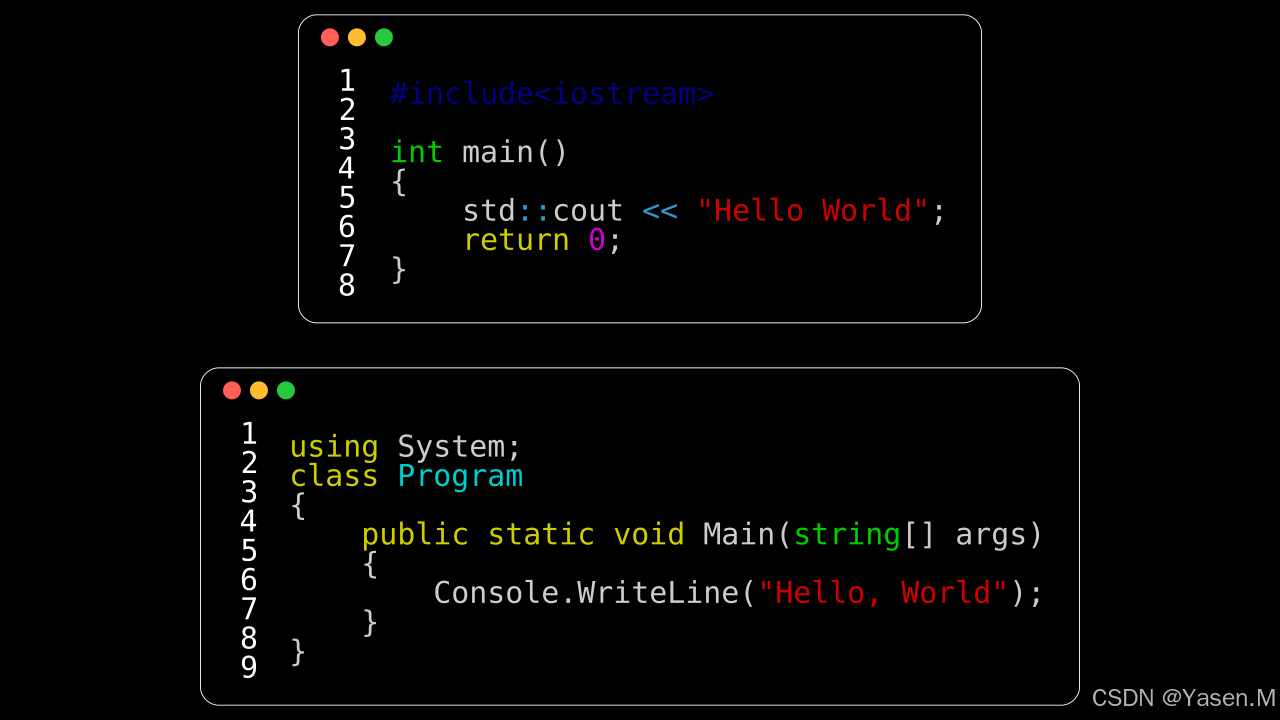
3. Bash,Basic和HTML
from manim import *class CodeFromStringB(Scene):def construct(self):code1 = '''echo "Hello, World"'''code2 ='''PRINT "Hello, World"'''code3 =''' Hello, World'''code4 ='''public class Main {public static void main(String[] args) {System.out.println("Hello, World!");}
}
'''rendered_code1 = Code(code=code1, tab_width=4, background="window",language="Bash", font="Monospace")rendered_code2 = Code(code=code2, tab_width=4, background="window",language="Basic", font="Monospace")rendered_code3 = Code(code=code3, tab_width=4, background="window",language="HTML", font="Monospace")rendered_code4 = Code(code=code4, tab_width=4, background="window",language="Java", font="Monospace")aa=VGroup(rendered_code1,rendered_code2,rendered_code3,rendered_code4)aa.arrange(DOWN, buff=0.5) self.add(aa)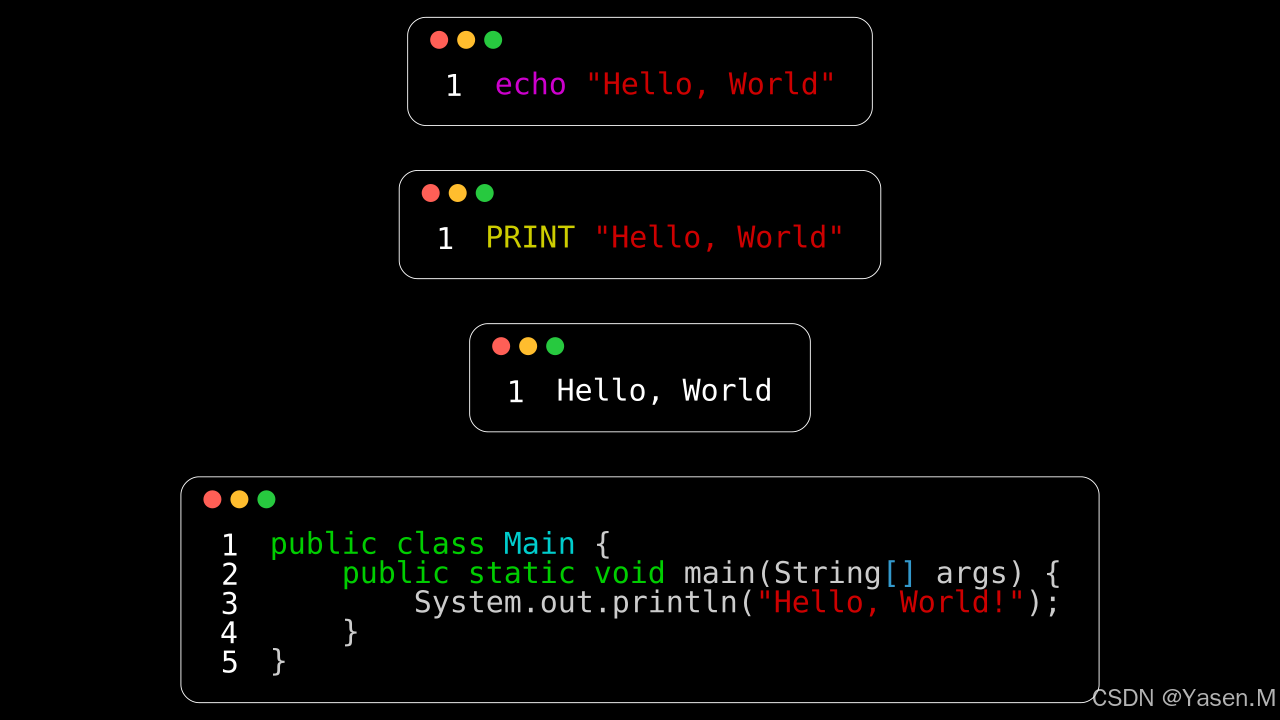
后面还有很多,你们也可以试一下。
8. Clipper
? "Hello, World"
9. Delphi
program HelloWorld;
beginWriteln('Hello, World');
end.
10. CoffeeScript
console.log 'Hello, World'
11. MatLab
disp('Hello, World')
12. Julia
println("Hello, World")
13. JavaScript
document.write('Hello, World');
14. Logo
print [Hello, World]
15. jQuery
$("body").append("Hello, World");
16. Perl 5
print "Hello, World";
17. Pascal
program HelloWorld;
beginWriteLn('Hello, World');
end.
18. Objective-C
#import
#import int main(void)
{NSLog(@"Hello, World");return 0;
}
19. Visual Basic .NET
Module Module1Sub Main()Console.WriteLine("Hello, World")End Sub
End Module
20. R
cat('Hello, World')
21. VBScript
MsgBox "Hello, World"
22. XSLT
Hello, World
23. Processing
void setup(){println("Hello, World");
}
24. Ruby
puts "Hello, World"
25. Swift
print("Hello, World")
5.实现动态数字的显示和变化
Numbers 是一个用于表示和处理数值的基础类,通常在数学可视化和动画中使用。它包含以下功能:
- 数值表示: 可以表示整数、小数等基本数值类型。
- 动态更新: 允许数值随时间变化,通常结合动画效果使用。
- 格式化输出: 支持自定义输出格式,如指定小数位数、文本颜色和字体大小。
应用场景:
- 在数学动画中展示计算结果。
- 创建动态交互式模拟,实时更新数值。
- 可视化数据分析结果,增强观众理解。
Numbers 类的使用 在数学、物理等领域的教学和演示中尤为重要,可以帮助直观地传达抽象概念。
1.DecimalNumber: 用于显示小数值,支持自定义小数位数、颜色和字体大小。
DecimalNumber 用于在动画中显示一个小数值,支持多种配置选项。构造函数如下:
DecimalNumber(number=0, num_decimal_places=2, mob_class=<class
'manim.mobject.text.tex_mobject.MathTex'>, include_sign=False, group_with_commas=True,
digit_buff_per_font_unit=0.001, show_ellipsis=False, unit=None, unit_buff_per_font_unit=0,
include_background_rectangle=False, edge_to_fix=array([-1., 0., 0.]), font_size=48,
stroke_width=0, fill_opacity=1.0, **kwargs)
以下是各参数的简要说明:
各参数的解释
- number: 要显示的小数值,默认为0。
- num_decimal_places: 小数位数,默认为2。
- mob_class: 使用的对象类,默认为
MathTex,用于显示数学文本。 - include_sign: 是否包括正负号,默认为False。
- group_with_commas: 是否以逗号分隔大数字部分,默认为True。
- digit_buff_per_font_unit: 字符间距的缓冲量,默认为0.001。
- show_ellipsis: 是否显示省略号,默认为False。
- unit: 可选的单位,默认为None。
- unit_buff_per_font_unit: 单位与数字之间的缓冲量,默认为0。
- include_background_rectangle: 是否包含背景矩形,默认为False。
- edge_to_fix: 修正边缘,默认为
array([-1., 0., 0.]),用于调整位置。 - font_size: 字体大小,默认为48。
- stroke_width: 边框宽度,默认为0(无边框)。
- fill_opacity: 填充不透明度,默认为1.0(完全不透明)。
- kwargs: 其他可选参数。
示例代码
以下是一个使用所有参数的代码示例,展示如何创建一个DecimalNumber对象并配置其属性:
from manim import * class DecimalNumberExample(Scene): def construct(self): # 创建一个DecimalNumber对象,初始值为12345.678 decimal_number = DecimalNumber( number=12345.678, # 显示的小数值 num_decimal_places=5, # 保留3位小数 mob_class=MathTex, # 使用MathTex显示数字 include_sign=True, # 包含正负号 group_with_commas=True, # 使用逗号分隔大数字 digit_buff_per_font_unit=0.005, # 字符间距的缓冲量 show_ellipsis=False, # 不显示省略号 unit="m/s", # 设置单位为米每秒 unit_buff_per_font_unit=0.02, # 单位与数字之间的缓冲量 include_background_rectangle=True, # 包含背景矩形 edge_to_fix=np.array([-1., 0., 0.]), # 修正边缘位置 font_size=48, # 设置字体大小 stroke_width=2, # 设置边框宽度 fill_opacity=0.7, # 设置填充不透明度 ) # 添加到场景 self.add(decimal_number) # 设置背景矩形的颜色和透明度 background_rectangle = SurroundingRectangle(decimal_number, buff=0.1) background_rectangle.set_fill(BLUE, opacity=0.3) # 设置背景颜色为蓝色,透明度为0.3 self.add(background_rectangle) # 将背景矩形添加到场景 # 动画将数值移动到原点位置 self.play(decimal_number.animate.move_to(ORIGIN)) 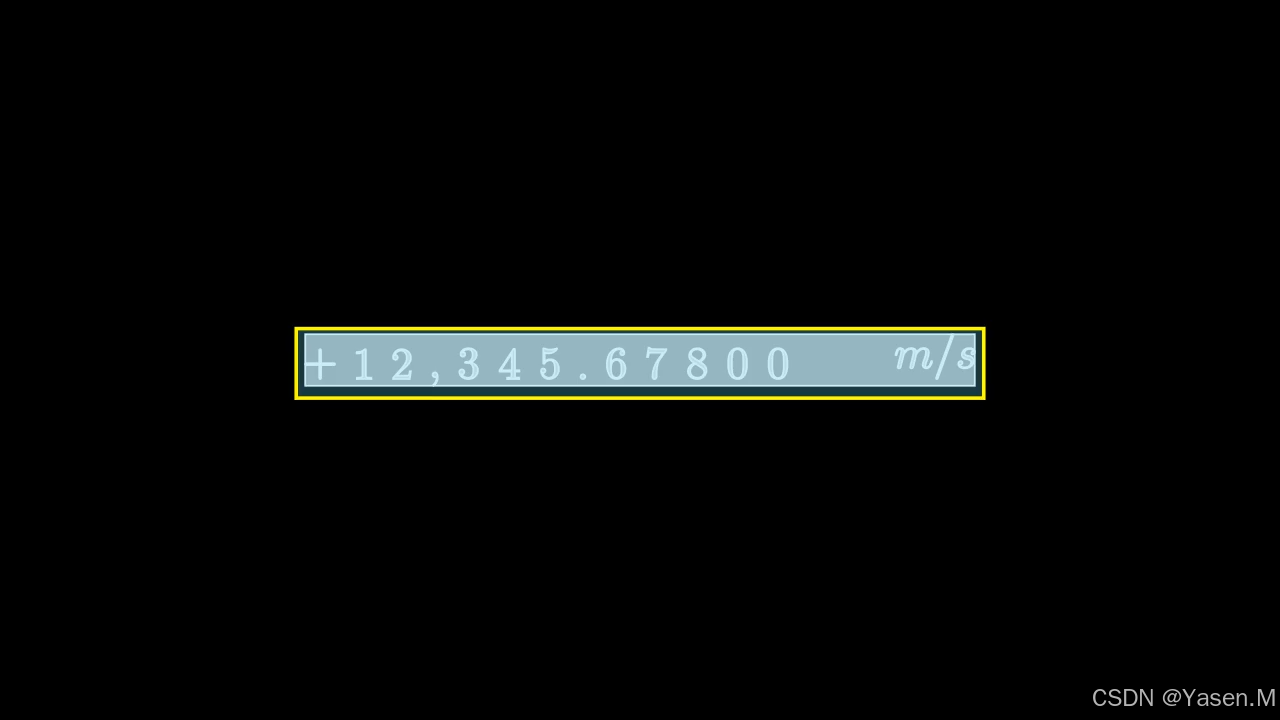
示例2:
class MovingSquareWithUpdaters(Scene):def construct(self):self.add(NumberPlane())decimal = DecimalNumber( number=2.678, # 显示的小数值 num_decimal_places=5, # 保留3位小数 mob_class=MathTex, # 使用MathTex显示数字 include_sign=True, # 包含正负号 group_with_commas=True, # 使用逗号分隔大数字 digit_buff_per_font_unit=0.005, # 字符间距的缓冲量 show_ellipsis=False, # 不显示省略号 unit="m/s", # 设置单位为米每秒 unit_buff_per_font_unit=0.002, # 单位与数字之间的缓冲量 include_background_rectangle=True, # 包含背景矩形 edge_to_fix=np.array([-1., 0., 0.]), # 修正边缘位置 font_size=48, # 设置字体大小 stroke_width=2, # 设置边框宽度 fill_opacity=0.25, # 设置填充不透明度 ) square = Dot(radius=0.1,color=RED).to_edge(UP+LEFT)#创建一个方形并将其移动到画面的顶部边缘 (UP)。decimal.add_updater(lambda d: d.next_to(square, RIGHT))decimal.add_updater(lambda d: d.set_value(square.get_center()[1]))#第一个更新器使得数字总是显示在方形的右侧。#第二个更新器将数字设置为方形的 Y 坐标值(方形当前位置的高度)。这意味着方形的高度变化时,数字的值会随之更新。self.add(square, decimal)#将方形和数字添加到场景中。self.play(square.animate.to_edge(DOWN),rate_func=there_and_back,run_time=5,#将方形动画移动到画面的底部边缘 (DOWN),动画持续时间为 5 秒。#rate_func=there_and_back 指定动画先向下运动再回到原处。)self.wait()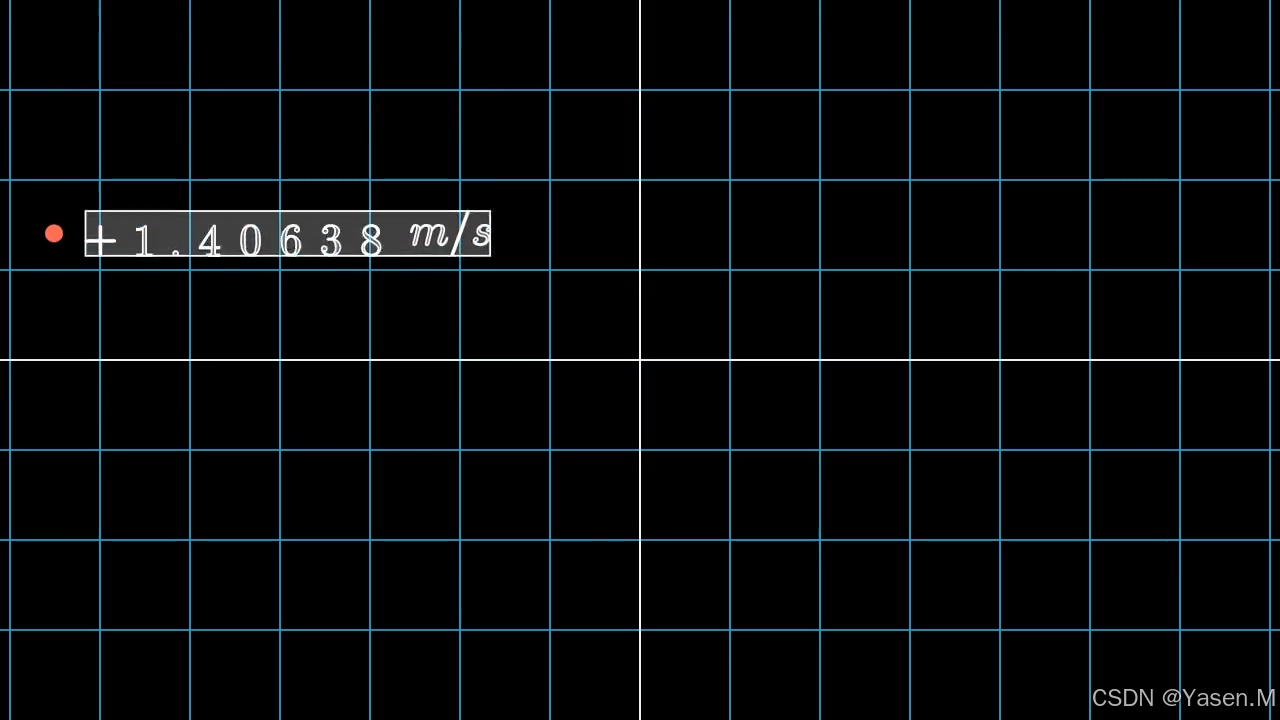
2.动态更新: 允许数值随时间变化
Integer: 用于显示整数值,支持自定义颜色和字体大小。动态更新:,允许数值随时间变化,通常结合动画效果使用。Integer 是 Manim 中用于显示整数的类,通常用来创建动态展示数字的对象。
Integer(number=0, num_decimal_places=0, **kwargs)以下是对 Integer 类及其参数的解释:
构造函数
Integer(number=0, num_decimal_places=0, **kwargs) 参数解释
-
number:
- 类型:
int - 默认值:
0 - 描述:初始化时显示的整数值。可以传入任何整数作为起始值。
- 类型:
-
num_decimal_places:
- 类型:
int - 默认值:
0 - 描述:用于设置数字显示的小数位数。虽然这个参数在
Integer中通常设置为0,但它的存在可用于格式化目的,确保对呈现效果的控制。
- 类型:
-
kwargs:
- 描述:用于传递额外的关键字参数。例如,这些参数可以控制数字的颜色、大小、位置等视觉属性,具体取决于使用中支持的其他参数。
用法示例
当你使用 Integer 类时,可以创建一个简单的整数对象,例如:
number_display = Integer(number=5, num_decimal_places=0) 这样你就得到了一个显示数字 5 的 Integer 对象,且不会显示任何小数部分。
示例:
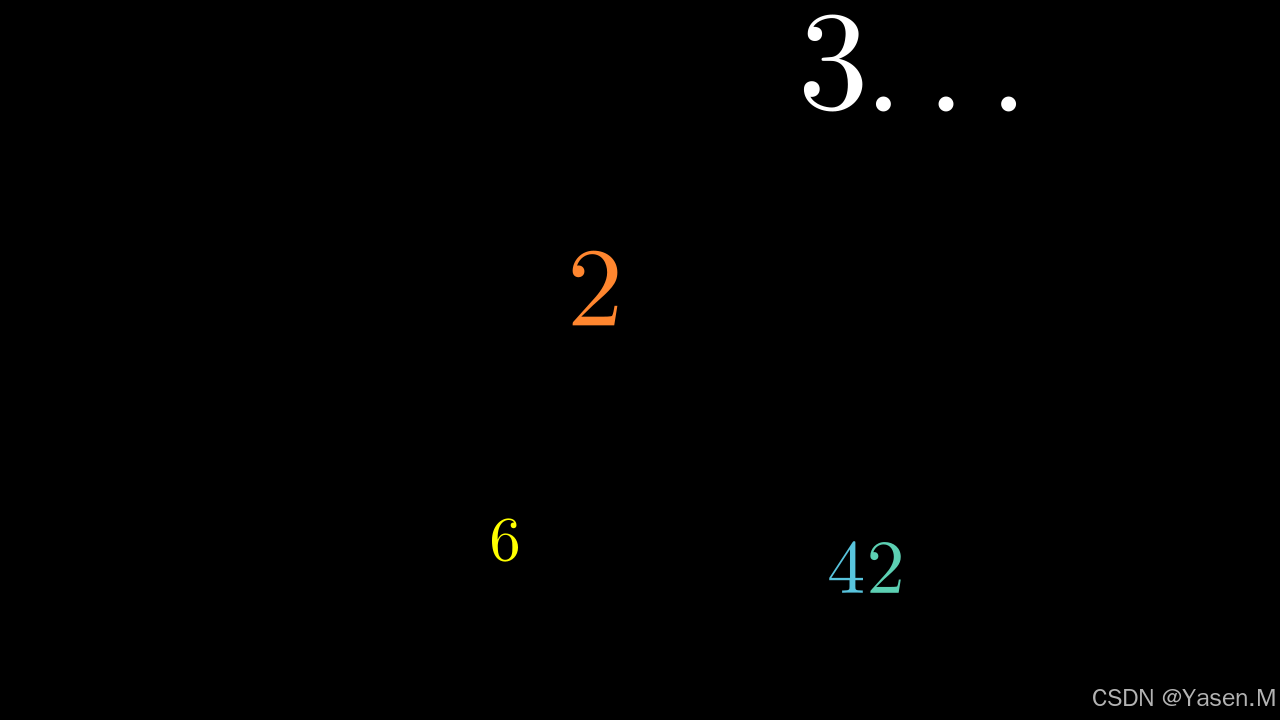
class IntegerExample(Scene):def construct(self):self.add(Integer(number=2.5).set_color(ORANGE).scale(2.5).set_x(-0.5).set_y(0.8))self.add(Integer(number=3.14159, show_ellipsis=True).set_x(3).set_y(3.3).scale(3.14159))self.add(Integer(number=42).set_x(2.5).set_y(-2.3).set_color_by_gradient(BLUE, TEAL).scale(1.7))self.add(Integer(number=6.28).set_x(-1.5).set_y(-2).set_color(YELLOW).scale(1.4))
3.创建和展示变量
Variable 是 Manim 中用于创建和展示变量的类,能够动态显示数值并与动画中的其他对象互动。以下是对 Variable 函数及其参数的详细解释:
构造函数
Variable(var, label,
var_type=<class 'manim.mobject.text.numbers.DecimalNumber'>,num_decimal_places=2, **kwargs)
参数解释
-
var:
- 类型:
float或int - 描述:要展示的变量的数值。这个值可以在动画中动态更新,反映变量的当前状态。
- 类型:
-
label:
- 类型:
str - 描述:与变量关联的标签,用于在显示时标识变量的名称。例如,如果
var是速度,可以将label设置为"v",以更好地理解它所代表的物理量。
- 类型:
-
var_type:
- 类型:类(默认为
DecimalNumber) - 描述:指定要用于显示变量的类型。
DecimalNumber用于显示浮点数,可以使用其他类型(如Integer)进行替换,以符合具体需求。
- 类型:类(默认为
-
num_decimal_places:
- 类型:
int - 默认值:
2 - 描述:设置显示的数字的小数位数。这是一个格式化参数,可以根据需要调整,以控制数字的呈现格式。
- 类型:
-
kwargs:
- 描述:用于传递额外的关键字参数,类似于
Integer的用法。可用于控制变量的颜色、字体、大小等视觉属性。
- 描述:用于传递额外的关键字参数,类似于
用法示例
创建一个变量显示的实例:
speed = Variable(var=10, label="v",var_type=DecimalNumber, num_decimal_places=2) 这段代码创建了一个名为 speed 的 Variable 对象,显示的初始值为 10,标签为 $v$(速度),使用浮点数格式,并显示两个小数位。
from manim import *class VariablesWithValueTracker(Scene):def construct(self):var = 0.5on_screen_var = Variable(var, Text("var"), num_decimal_places=3)on_screen_var.label.set_color(RED)on_screen_var.value.set_color(GREEN)self.play(Write(on_screen_var))self.wait()var_tracker = on_screen_var.trackervar = 10.5self.play(var_tracker.animate.set_value(var))self.wait()int_var = 0on_screen_int_var = Variable(int_var, Text("int_var"), var_type=Integer).next_to(on_screen_var, DOWN)on_screen_int_var.label.set_color(RED)on_screen_int_var.value.set_color(GREEN)self.play(Write(on_screen_int_var))self.wait()var_tracker = on_screen_int_var.trackervar = 10.5self.play(var_tracker.animate.set_value(var))self.wait()subscript_label_var = 10on_screen_subscript_var = Variable(subscript_label_var, "{a}_{i}").next_to(on_screen_int_var, DOWN)self.play(Write(on_screen_subscript_var))self.wait()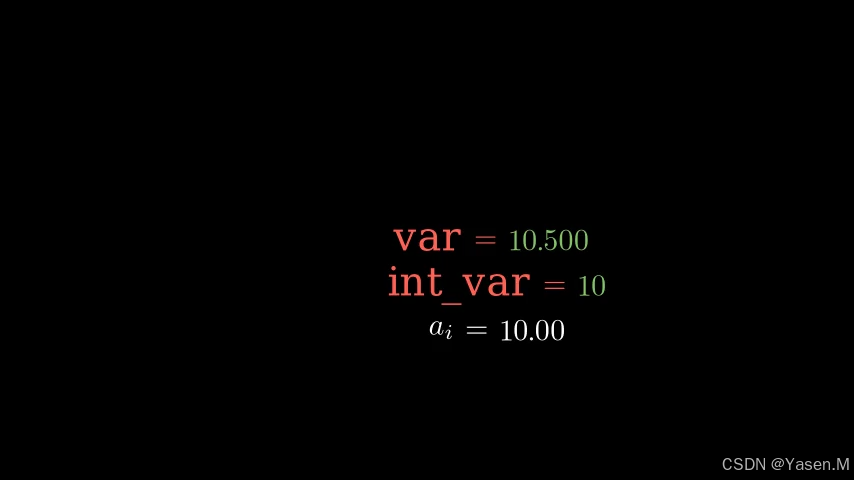
示例2:
class VariableExample(Scene):def construct(self):start = 2.0x_var = Variable(start, 'x', num_decimal_places=3)sqr_var = Variable(start**2, 'x^4', num_decimal_places=3)Group(x_var, sqr_var).arrange(DOWN)sqr_var.add_updater(lambda v: v.tracker.set_value(x_var.tracker.get_value()**4))self.add(x_var, sqr_var)self.play(x_var.tracker.animate.set_value(5), run_time=2, rate_func=linear)self.wait(0.1)
 |  |
 |  |