DNS基本功能搭建
一、DNS基本功能实验
步骤一:准备工作
安装bind
[root@localhost ~]# dnf -y install bind配置dns服务器(77.77),httpd服务器(77.78),客户端(77.79),使用网卡VMnet1,都是进主机模式。
DNS服务器
[root@localhost ~]# ip add
1: lo: <LOOPBACK,UP,LOWER_UP> mtu 65536 qdisc noqueue state UNKNOWN group default qlen 1000link/loopback 00:00:00:00:00:00 brd 00:00:00:00:00:00inet 127.0.0.1/8 scope host lovalid_lft forever preferred_lft foreverinet6 ::1/128 scope host valid_lft forever preferred_lft forever
2: ens160: <BROADCAST,MULTICAST,UP,LOWER_UP> mtu 1500 qdisc mq state UP group default qlen 1000link/ether 00:0c:29:f6:d2:16 brd ff:ff:ff:ff:ff:ffaltname enp3s0inet 192.168.77.77/24 brd 192.168.77.255 scope global noprefixroute ens160valid_lft forever preferred_lft foreverinet6 fe80::20c:29ff:fef6:d216/64 scope link noprefixroute valid_lft forever preferred_lft forever
web服务器
[root@localhost ~]# ip add
1: lo: <LOOPBACK,UP,LOWER_UP> mtu 65536 qdisc noqueue state UNKNOWN group default qlen 1000link/loopback 00:00:00:00:00:00 brd 00:00:00:00:00:00inet 127.0.0.1/8 scope host lovalid_lft forever preferred_lft foreverinet6 ::1/128 scope host valid_lft forever preferred_lft forever
2: ens160: <BROADCAST,MULTICAST,UP,LOWER_UP> mtu 1500 qdisc mq state UP group default qlen 1000link/ether 00:0c:29:6b:bb:8d brd ff:ff:ff:ff:ff:ffaltname enp3s0inet 192.168.77.78/24 brd 192.168.77.255 scope global noprefixroute ens160valid_lft forever preferred_lft foreverinet6 fe80::20c:29ff:fe6b:bb8d/64 scope link noprefixroute valid_lft forever preferred_lft forever
客户端
[root@localhost ~]# ip add
1: lo: <LOOPBACK,UP,LOWER_UP> mtu 65536 qdisc noqueue state UNKNOWN group default qlen 1000link/loopback 00:00:00:00:00:00 brd 00:00:00:00:00:00inet 127.0.0.1/8 scope host lovalid_lft forever preferred_lft foreverinet6 ::1/128 scope host valid_lft forever preferred_lft forever
2: ens160: <BROADCAST,MULTICAST,UP,LOWER_UP> mtu 1500 qdisc mq state UP group default qlen 1000link/ether 00:0c:29:a8:21:47 brd ff:ff:ff:ff:ff:ffaltname enp3s0inet 192.168.77.79/24 brd 192.168.77.255 scope global noprefixroute ens160valid_lft forever preferred_lft foreverinet6 fe80::20c:29ff:fea8:2147/64 scope link noprefixroute valid_lft forever preferred_lft forever
步骤二:配置主配置文件
设置服务器监听网卡(/etc/named.conf)
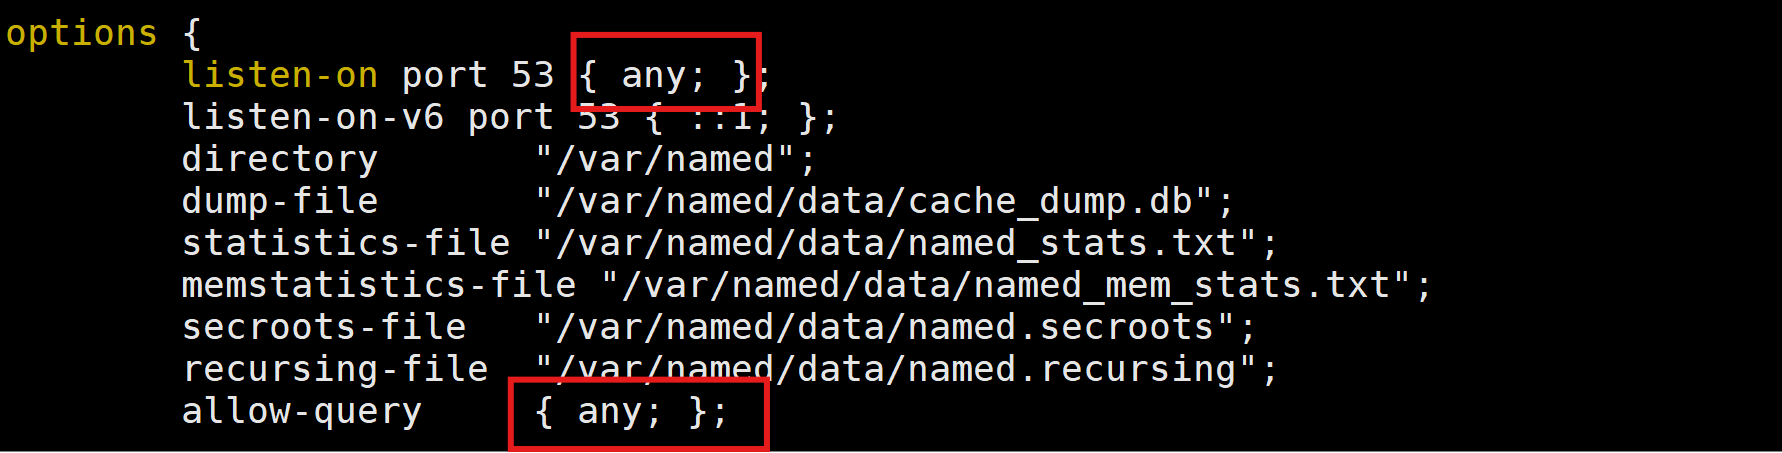
配置区域配置文件(/etc/named.rfc1912.zones)
#配置自定义的域名
zone "xxhf.com" IN {type master;file "named.localhost";#配置域名指向解析的ip网段,这里要倒序
zone "77.168.192.in-addr.arpa" IN {type master;file "named.loopback";
配置数据文件
正向数据配置文件:/var/named/named.localhost
$TTL 1D
@       IN SOA  xxhf.com.        rname.invalid. (0       ; serial1D      ; refresh1H      ; retry1W      ; expire3H )    ; minimumNS      dns.xxhf.com.
dns.xxhf.com.   A       192.168.77.77
www.xxhf.com.   A       192.168.77.78
反向数据配置文件:/var/named/named.loopback
$TTL 1D
@       IN SOA  xxhf.com.        rname.invalid. (0       ; serial1D      ; refresh1H      ; retry1W      ; expire3H )    ; minimumNS      dns.xxhf.com.
77      PTR     dns.xxhf.com.
78      PTR     www.xxhf.com.
步骤三:启动DNS服务
[root@localhost ~]# systemctl start named
步骤四:客户端配置
网卡:dns=192.168.77.77
[ipv4]
method=manual
address=192.168.77.79/24
dns=192.168.77.77
步骤五:实验测试
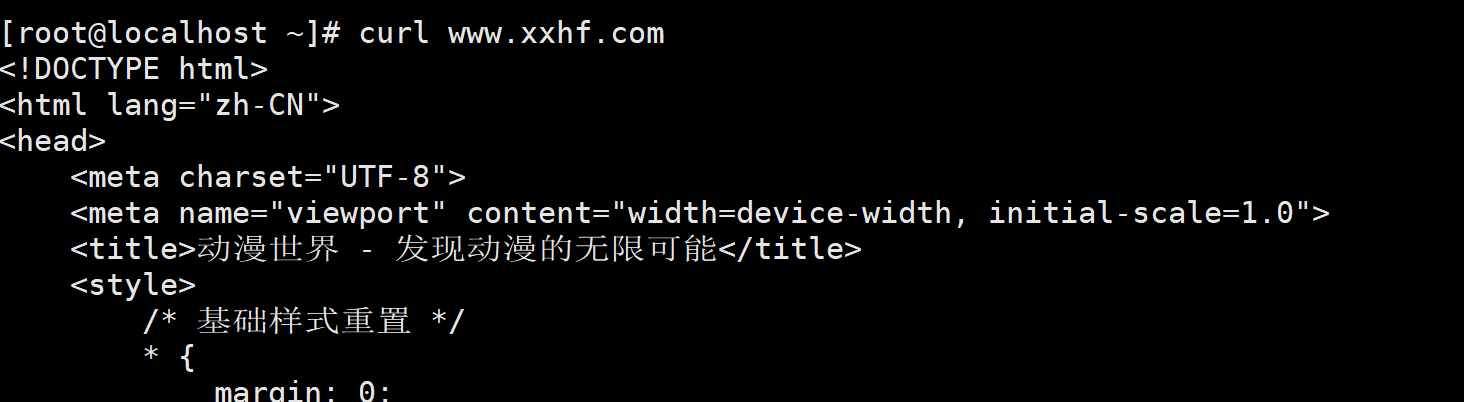
搭建httpd服务器(77.78),启动httpd服务,设置index.html网站
[root@localhost ~]# systemctl start httpd
[root@localhost ~]# ss -anpt | grep :80
LISTEN 0      511                *:80               *:*     users:(("httpd",pid=1049,fd=4),("httpd",pid=1048,fd=4),("httpd",pid=1047,fd=4),("httpd",pid=1045,fd=4))
在客户端使用域名,通过指定的dns服务器解析域名获取ip,访问web网站
使用nslookup命令查看DNS解析过程
#测试前记得关闭防火墙
[root@localhost ~]# nslookup www.xxhf.com
Server:		192.168.77.77
Address:	192.168.77.77#53Name:	www.xxhf.com
Address: 192.168.77.78[root@localhost ~]# nslookup 192.168.77.78
78.77.168.192.in-addr.arpa	name = www.xxhf.com.
二、DNS主从服务搭建
主服务器配置(77.77)
正向区域配置文件和反向区域配置文件添加实时同步配置,数据配置文件同上,重启named服务
zone "xxhf.com" IN {type master;file "named.localhost";allow-update { 192.168.77.78; };also-notify { 192.168.77.78; };
};zone "77.168.192.in-addr.arpa" IN {type master;file "named.loopback";allow-update { 192.168.77.78; };also-notify { 192.168.77.78; };
};
从服务器配置(77.78)
更改服务器类型,设置主服务器ip地址,设置数据配置文件路径,启动时自动同步到指定文件中
zone "xxhf.com" IN {type slave;file "slaves/named.localhost";masters { 192.168.77.77; };masterfile-format text;#allow-update { none; };
};zone "77.168.192.in-addr.arpa" IN {type slave;file "slaves/named.loopback";masters { 192.168.77.77; };masterfile-format text;#allow-update { none; };
重启named服务
测试主从服务器
查看主服务器已有的数据记录解析
1.查看从服务器记录文件(/var/named/slaves/named.localhost):
$ORIGIN .
$TTL 86400      ; 1 day
xxhf.com                IN SOA  xxhf.com. rname.invalid. (2          ; serial86400      ; refresh (1 day)3600       ; retry (1 hour)604800     ; expire (1 week)10800      ; minimum (3 hours))NS      dns.xxhf.com.
$ORIGIN xxhf.com.
dns                     A       192.168.77.77
www                     A       192.168.77.78
2.修改客户端(77.79)dns域名,改主服务器地址77.77为从服务器地址77.78
[ipv4]
method=manual
address=192.168.77.79/24
dns=192.168.77.78
3.测试正向解析,即使用客户端查看从服务器能否解析域名
[root@localhost ~]# nslookup www.xxhf.com
Server:		192.168.77.78
Address:	192.168.77.78#53Name:	www.xxhf.com
Address: 192.168.77.78
查看主服务器的数据同步和解析
1.在主服务器上添加新数据,同时更新数据文件的序列号(serial)
$TTL 1D
@       IN SOA  xxhf.com.        rname.invalid. (2       ; serial1D      ; refresh1H      ; retry1W      ; expire3H )    ; minimumNS      dns.xxhf.com.
dns.xxhf.com.   A       192.168.77.77
www.xxhf.com.   A       192.168.77.78
mail.xxhf.com.  A       192.168.77.78
2.重启named服务,在从服务器(77.78)上查看数据是否被同步
$ORIGIN .
$TTL 86400      ; 1 day
xxhf.com                IN SOA  xxhf.com. rname.invalid. (2          ; serial86400      ; refresh (1 day)3600       ; retry (1 hour)604800     ; expire (1 week)10800      ; minimum (3 hours))NS      dns.xxhf.com.
$ORIGIN xxhf.com.
dns                     A       192.168.77.77
mail                    A       192.168.77.78
www                     A       192.168.77.78
3.在客户端上使用nslookup命令,查看是否能访问到从服务器更新后的域名
[root@localhost ~]# nslookup mail.xxhf.com
Server:		192.168.77.78
Address:	192.168.77.78#53Name:	mail.xxhf.com
Address: 192.168.77.78
三、DNS缓存服务搭建
步骤一:77.77继续做主服务器,77.78关闭named服务,另做缓存服务器,77.79为客户端
[root@localhost ~]# systemctl stop named
[root@localhost ~]# dnf -y install dnsmasq
步骤二:配置缓存文件(/etc/dnsmasq.conf)
vim /etc/dnsmasq.conf
#添加监听的网口,默认只监听在127.0.0.1上,注释掉是监听在所有网卡IP上
interface=ens160
#配置缓存记录的服务器IP
server=主dns服务器ip
#配置缓存记录的数量
cache-size=15000步骤三:启动dnsmasq服务,查看端口号(也是53)
[root@localhost ~]# systemctl start dnsmasq
[root@localhost ~]# ss -anpt | grep :53
LISTEN 0      32                             127.0.0.1:53         0.0.0.0:*     users:(("dnsmasq",pid=1424,fd=7))
LISTEN 0      32                         192.168.77.78:53         0.0.0.0:*     users:(("dnsmasq",pid=1424,fd=5))
LISTEN 0      32     [fe80::20c:29ff:fe6b:bb8d]%ens160:53            [::]:*     users:(("dnsmasq",pid=1424,fd=9))
LISTEN 0 32 [::1]:53 [::]:* users:(("dnsmasq",pid=1424,fd=11)) 步骤四:关闭主DNS服务器,客户端配置缓存DNS服务器的地址,再次测试
#未关闭主DNS服务器
[root@localhost ~]# nslookup mail.xxhf.com
Server:		192.168.77.78
Address:	192.168.77.78#53Name:	mail.xxhf.com
Address: 192.168.77.78#设置客户端的DNS为缓存DNS服务器地址
[root@localhost ~]# cat /etc/resolv.conf
# Generated by NetworkManager
search localdomain
nameserver 192.168.77.78
nameserver 192.168.78.1#关闭DNS后,再次执行域名解析命令
[root@localhost ~]# nslookup mail.xxhf.com
Server:		192.168.77.78
Address:	192.168.77.78#53Non-authoritative answer:  #仍能解析,但不权威
Name:	mail.xxhf.com
Address: 192.168.77.78
补充
DNS原理:
- 递归:发生在客户端与首选DNS服务器之间,返回确定的值
- 迭代:发生在首选DNS服务器与后续DNS服务器之间,返回大致的值
DNS相关参数:
- 软件包:bind
- 服务名:named
- 默认端口:53
- 主配置文件:/etc/named.conf(服务运行参数)
- 区域配置文件:/etc/rfc1912.zones(正反向区域定义信息)
- 数据配置文件:/var/named/named.localhost或named.loopback(主机名和IP的对应解析关系)
注:nslookup命令解析不出hosts文件里的记录,hosts文件优先级高于DNS服务