巧用python之--模仿PLC(PLC模拟器)
工作中用到了VM(VisionMaster4.3)有时候需要和PLC打交道,但是PLC毕竟是别人的,不方便修改别人的程序,这时候需要一个灵活的PLC模拟器是多么好呀!
先说背景:
PLC型号
汇川Easy521:
Modbus TCP 192.168.1.10:502
在汇川Easy521中Modbus保持寄存器=D寄存器 ,在modbus协议中 0-4区 3区就是 保持寄存器(R/W)
那么事情很简单了:只需要做一个ModbusTCP的服务端 就能模拟PLC:
Modbus RTU是主从结构 分 Modbus 主机 / 从机 Master / Slave;
RTU模式主从 主机会轮询从机 问一次答一次; 一般电脑做主机 PLC做从机;
但是当电脑同时连接很多台PLC,电脑做主机,主动询问PLC那么电脑的压力会很大;
这时候电脑可以做从机,多个PLC做主机,电脑端成了被动,那么电脑压力会小很多;
(适用于MODBUS RTU &TCP) 扯远了;
好了这里只说Modbus_TCP 粗略的说Modbus_TCP的报文实际就是RTU 增加文件头去掉CRC校验;
注意下面说的Tcp都指得是modbusTCP;;;
客户端 服务器 Client/Server
VisionMaster4.3只支持Modbus> TcpClient
TcpClient按主从结构分是主机/(Master), PLC扮演的是 Modbus> TcpServer (Slave)
所以在Modbustcp这里,服务器是modbus从机,客户端是modbus主机;
由 TcpClient(VM) 去 轮询 TcpServer(PLC);
好了,搞清楚原理了,下来就是,模拟一个TcpServer(PLC);就是一个可以用的PLC模拟器.
当然你用Modsim/ModScan也可以,但是操作不便;
;因为之前就做过一些用hsl库C#,模拟modbusTCPServer,这里程序放出来吧;
using System;
using System.Collections.Generic;
using System.ComponentModel;
using System.Data;
using System.Drawing;
using System.Linq;
using System.Net;
using System.Text;
using System.Threading.Tasks;
using System.Windows.Forms;using System;
using System.Collections.Generic;
using System.Net;
using System.Runtime.Remoting.Contexts;
using System.Threading;using HslCommunication;namespace MB_TCPServer
{public partial class Form1 : Form{HslCommunication.ModBus.ModbusTcpServer modbusTcpServer;public Form1(){InitializeComponent();modbusTcpServer  = new HslCommunication.ModBus.ModbusTcpServer();modbusTcpServer.ServerStart(502);modbusTcpServer.Write("50", (UInt16)1);modbusTcpServer.Write("60", (UInt16)1);modbusTcpServer.Write("61", (UInt16)1);OperateResult <UInt16> intReg_100 = modbusTcpServer.ReadUInt16("50");                    // 读取输入寄存器100的值if (intReg_100.IsSuccess){Console.WriteLine("success!");Console.WriteLine("");}else{Console.WriteLine("failed:" + intReg_100.Message);}List<string> ipAddresses = GetIpAddresses();//调用Console.WriteLine(ipAddresses.Count);//有几个ipforeach (string ipAddress in ipAddresses){Console.WriteLine(ipAddress);//ip分别有哪些comboBox_me_ip.Items.Add(ipAddress);}comboBox_me_ip.SelectedItem   = 1; }private void button1_Click(object sender, EventArgs e){}public static List<string> GetIpAddresses(){List<string> ipAddresses = new List<string>();try{// 获取本地主机名string hostName = Dns.GetHostName();// 使用主机名获取IP地址信息IPHostEntry hostEntry = Dns.GetHostEntry(hostName);// 获取IP地址列表foreach (IPAddress ipAddress in hostEntry.AddressList){// 确保IP地址不是IPv6的环回地址或者IPv4的环回地址if (!ipAddress.IsIPv4MappedToIPv6 && ipAddress.AddressFamily != System.Net.Sockets.AddressFamily.InterNetworkV6){ipAddresses.Add(ipAddress.ToString());}}}catch (Exception ex){}return ipAddresses;/*List<string> ipAddresses = GetIpAddresses();//调用Console.WriteLine(ipAddresses.Count);//有几个ipforeach (string ipAddress in ipAddresses){Console.WriteLine(ipAddress);//ip分别有哪些}*/}private void button_trig_Click(object sender, EventArgs e){modbusTcpServer.Write("50", (UInt16)10);    OperateResult<UInt16> intReg_100 = modbusTcpServer.ReadUInt16("50");                    // 读取输入寄存器100的值if (intReg_100.IsSuccess){Console.WriteLine("success!");Console.WriteLine(intReg_100.Content);textBox_trig.Text= intReg_100.Content.ToString();}else{Console.WriteLine("failed:" + intReg_100.Message);}}private void button2_Click(object sender, EventArgs e){modbusTcpServer.Write("50", (UInt16)0);OperateResult<UInt16> intReg_100 = modbusTcpServer.ReadUInt16("50");                    // 读取输入寄存器100的值if (intReg_100.IsSuccess){Console.WriteLine("success!");Console.WriteLine(intReg_100.Content);textBox_trig.Text = intReg_100.Content.ToString();}else{Console.WriteLine("failed:" + intReg_100.Message);}}private void button3_Click(object sender, EventArgs e){button_trig_Click(null,null);Thread.Sleep(200);// 太快vm反应不过来button2_Click(null, null);}}
}
可以看出实际有用的只有这些:其余都是 winform界面;
using HslCommunication;
namespace MB_TCPServer
{public partial class Form1 : Form{HslCommunication.ModBus.ModbusTcpServer modbusTcpServer;public Form1(){modbusTcpServer  = new HslCommunication.ModBus.ModbusTcpServer();modbusTcpServer.ServerStart(502);modbusTcpServer.Write("50", (UInt16)1);modbusTcpServer.Write("60", (UInt16)1);modbusTcpServer.Write("61", (UInt16)1);OperateResult <UInt16> intReg_100 = modbusTcpServer.ReadUInt16("50");                    if (intReg_100.IsSuccess){Console.WriteLine("success!");Console.WriteLine("");}else{Console.WriteLine("failed:" + intReg_100.Message);}}}
}
要求很简单就是要一个 界面带按钮可以修改 模拟TcpServer(PLC);内指定寄存器的数值 读取指定数值即可.
但是那天出门只带了一个平板笔记本,且没转VS虽然有程序但无法编译,所以python登场.
.虽然python有modbus库 minimalmodbus pymodbus ;等但是没有hsl好用 因为之前用hsl ;
直接用pythonnet在python里面调用 .net 版的hsl,实际python也有hsl但是需要授权,C# 版7.001以及以下版本是免费的,对于干这件事情是绰绰有余的,这里对hsl作者表示感谢;;;
于是就有了如下 产物: 有界面 有按钮 有结果显示 有数字显示 可以模拟 PLC的程序 且一共200行;
当然必须安装pythonnet ,且依赖的外部 .net dll文件要和.py程序在一个目录
import os,sys,time
import tkinter as tk
from tkinter import messagebox#import win32api,win32con,win32guifrom ctypes import *
#需要安装 pywin32
def cmd(s="pause"):os.system(s)
def p(s):print(s);return s
win = tk.Tk()
win.title("(汇川Easy521): PLC模拟器")
win.geometry('960x280')
win.config(background ="#00aa00")
winscrwidth=win.winfo_screenwidth()# 基础库
import os,sys,time
from ctypes import *
def cmd(s="pause"):os.system(s)
#C语言那一套 拿过来 C#那一套数据类型拿过来
import clr,System
from System import String, Char, Int32,UInt16, Int64, Environment, IntPtr#导包
print(clr.AddReference("HslCommunication"))
#现在可以当python自己的库来用了
import HslCommunicationmodbusTcpServer  = HslCommunication.ModBus.ModbusTcpServer();
modbusTcpServer.ServerStart(502);#必须指定泛型 否则无效 UInt16(65535)
#初始化寄存器 指定3区 设定初始值
modbusTcpServer.Write("x=3;100", UInt16(0));# 触发 1 2 3 4对应4流道
modbusTcpServer.Write("x=3;101", UInt16(0));# 料号 0 1 2
modbusTcpServer.Write("x=3;105", UInt16(0));# 结果 11(OK) 12(NG) 13(ERROR)
modbusTcpServer.Write("x=3;106", UInt16(0));# 心跳0/1# 获取时间的函数
def gettime():# 获取当前时间dstr.set(f"""{time.strftime("%H:%M:%S")}  >>127.0.0.1:502""")try: #必须try 否则要在界面控件创建完成后销毁前调用 图省事try完事intReg_100 = modbusTcpServer.ReadUInt16("100");#返回的是 Oper类型 不是int数值 intReg_101 = modbusTcpServer.ReadUInt16("101");intReg_105 = modbusTcpServer.ReadUInt16("105");intReg_106 = modbusTcpServer.ReadUInt16("106");entry1.delete(0, "end");entry1.insert(0,f'{intReg_100.Content}')#entry2.delete(0, "end");entry2.insert(0,f'{intReg_101.Content}')#entry3.delete(0, "end");entry3.insert(0,f'{intReg_105.Content}')#entry4.delete(0, "end");entry4.insert(0,f'{intReg_106.Content}')#    Reg=intReg_105.Contentif(Reg==0):rrr.config(text='None'); rrr.config(bg='#00aa00')if(Reg==11):rrr.config(text='ok');   rrr.config(bg='#00ff00')if(Reg==12):rrr.config(text='ng');   rrr.config(bg='#ff0000')if(Reg==13):rrr.config(text='Error');rrr.config(bg='#ffff00')##except:pass# 每隔 1s 调用一次 gettime()函数来获取时间win.after(200, gettime)
# 生成动态字符串
dstr = tk.StringVar()
# 利用 textvariable 来实现文本变化
lb = tk.Label(win,textvariable=dstr,fg='green',font=("微软雅黑",18))
lb.pack()
gettime()# 调用生成时间的函数tk.Label(win,text='触发(D100[1]):',fg='black',font=("微软雅黑",15)).place (x=0,y=40, width=150, height=30)
entry1 = tk.Entry(win)# 创建输入框控件
entry1.place (x=300,y=40, width=60, height=30)#relx=0.01,relheight=0.4
#.pack(padx=20, pady=20)# 放置输入框,并设置位置
entry1.delete(0, "end")
entry1.insert(0,'0')# 插入默认文本
print(entry1.get())# 得到输入框字符串
# entry1.delete(0, tk.END)# 删除所有字符#-----------------------------------------------------------------------------
def button_click_100():#按钮modbusTcpServer.Write("x=3;105", UInt16(0));#结果清零modbusTcpServer.Write("x=3;100", UInt16(1));pass
button_100 = tk.Button(win,text="触发写1",command=button_click_100)
button_100.place (x=380,y=40, width=60, height=30)def button_click_100_2():modbusTcpServer.Write("x=3;105", UInt16(0));#结果清零modbusTcpServer.Write("x=3;100", UInt16(2));pass
button_100 = tk.Button(win,text="触发写2",command=button_click_100_2)
button_100.place (x=380+80,y=40, width=60, height=30)def button_click_100_3():modbusTcpServer.Write("x=3;105", UInt16(0));#结果清零modbusTcpServer.Write("x=3;100", UInt16(3));pass
button_100 = tk.Button(win,text="触发写3",command=button_click_100_3)
button_100.place (x=380+80+80,y=40, width=60, height=30)def button_click_100_4():modbusTcpServer.Write("x=3;105", UInt16(0));#结果清零modbusTcpServer.Write("x=3;100", UInt16(4));pass
button_100 = tk.Button(win,text="触发写4",command=button_click_100_4)
button_100.place (x=380+80+80+80,y=40, width=60, height=30)def button_click_101():#按钮 触发写0modbusTcpServer.Write("x=3;100", UInt16(0));pass
button_100 = tk.Button(win,text="触发写0",command=button_click_101)
button_100.place (x=380+80+80+80+80,y=40, width=60, height=30)def button_click_102():#按钮 触发写0modbusTcpServer.Write("x=3;105", UInt16(0));#结果清零modbusTcpServer.Write("x=3;100", UInt16(1));time.sleep(0.2)modbusTcpServer.Write("x=3;100", UInt16(0));pass
button_100 = tk.Button(win,text="触发写1(延时200)写0",command=button_click_102)
button_100.place (x=380+80+80+80+80+80,y=40, width=160, height=30)
#-----------------------------------------------------------------------------
#-----------------------------------------------------------------------------
def button_click_200():#按钮modbusTcpServer.Write("x=3;101", UInt16(0));pass
button_100 = tk.Button(win,text="料号写0",command=button_click_200)
button_100.place (x=380,y=40+40, width=60, height=30)def button_click_201():#按钮 触发写0modbusTcpServer.Write("x=3;101", UInt16(1));pass
button_100 = tk.Button(win,text="料号写1",command=button_click_201)
button_100.place (x=380+80,y=40+40, width=60, height=30)def button_click_202():#按钮 触发写0modbusTcpServer.Write("x=3;101", UInt16(2));pass
button_100 = tk.Button(win,text="料号写2",command=button_click_202)
button_100.place (x=380+80+80,y=40+40, width=160, height=30)
#-----------------------------------------------------------------------------tk.Label(win,text='料号(D101[0/1/2]):',fg='black',font=("微软雅黑",15)).place (x=0,y=40+40, width=180, height=30)
entry2 = tk.Entry(win)# 创建输入框控件
entry2.place (x=300,y=40+40, width=60, height=30)#relx=0.01,relheight=0.4
#.pack(padx=20, pady=20)# 放置输入框,并设置位置
entry2.delete(0, "end")# 插入默认文本
entry2.insert(0,'0')
print(entry2.get())# 得到输入框字符串
# entry1.delete(0, tk.END)# 删除所有字符
#relx、rely relheight、relwidth anchor=NEtk.Label(win,text='结果:(D105[11(OK)/12(NG)]):',fg='black',font=("微软雅黑",15)).place (x=0,y=40+40+40, width=280, height=30)entry3 = tk.Entry(win)# 创建输入框控件
entry3.place (x=300,y=40+40+40, width=60, height=30)#relx=0.01,relheight=0.4
#.pack(padx=20, pady=20)# 放置输入框,并设置位置
entry3.delete(0, "end")# 插入默认文本
entry3.insert(0,'0')
print(entry3.get())# 得到输入框字符串rrr=tk.Label(win,text='ok',fg='black',font=("微软雅黑",15))
rrr.place (x=400,y=40+40+40, width=150, height=30)
#rrr.config(text='ok');rrr.config(bg='#00ff00')
#rrr.config(text='ng');rrr.config(bg='#ff0000')
rrr.config(text='None');rrr.config(bg='#00aa00')tk.Label(win,text='心跳:(D106[0/1]):',fg='black',font=("微软雅黑",15)).place (x=0,y=40+40+40+40, width=180, height=30)entry4 = tk.Entry(win)# 创建输入框控件
entry4.place (x=300,y=40+40+40+40, width=60, height=30)#relx=0.01,relheight=0.4
#.pack(padx=20, pady=20)# 放置输入框,并设置位置
entry4.delete(0, "end")# 插入默认文本
entry4.insert(0,'0')
print(entry4.get())# 得到输入框字符串def QueryWindow():if messagebox.showwarning("窗口关闭?"):win.destroy()
win.protocol('WM_DELETE_WINDOW', QueryWindow)
win.mainloop()
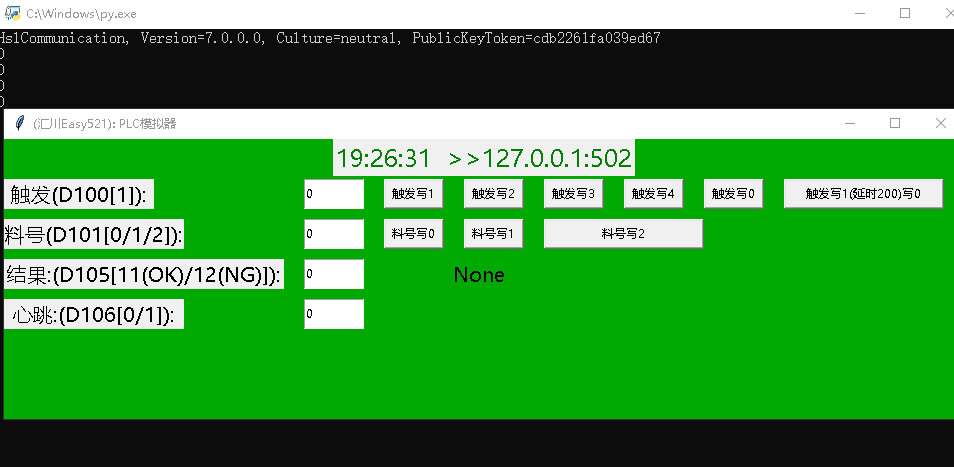
这样VM 写电脑IP 或者 127.0.0.1:502 就可以把这个程序当成PLC连接了.
在手上没有PLC的情况下很方便使用.
接下来分享一下其他用法:
比如监视PLC值:(为了方便不写界面): 这样就可以实时观察到PLC的值
import os,sys,time,win32api,win32con,win32gui
def cmd(s="pause"):os.system(s)
from ctypes import *
import clr,System#C语言那一套 拿过来 C#那一套数据类型拿过来
from System import String, Char, Int32,UInt16, Int64, Environment, IntPtr
print(clr.AddReference("HslCommunication"))#导包
import HslCommunication#现在可以当python自己的库来用了
modbus = HslCommunication.ModBus.ModbusTcpNet( "192.168.1.10" );#modbus = HslCommunication.ModBus.ModbusTcpNet( "127.0.0.1" );
while 1:cmd("cls")time.sleep(0.5)for i in range(15):time.sleep(0.3)intReg_100 = modbus.ReadUInt16("100");Reg_100 = intReg_100.Content;intReg_101 = modbus.ReadUInt16("101");Reg_101 = intReg_101.Content;intReg_105 = modbus.ReadUInt16("105");Reg_105 = intReg_105.Content;intReg_106 = modbus.ReadUInt16("106"); Reg_106 = intReg_106.Content;print(f"""{time.strftime("%H:%M:%S")}   \n\nD100:{Reg_100}  D101:{Reg_100}  D105:{Reg_100}  D106:{Reg_100}   \n""")#intReg_100.IsSuccess,intReg_100.Content, #     intReg_101.IsSuccess,intReg_101.Content,#     intReg_105.IsSuccess,intReg_105.Content,#     intReg_106.IsSuccess,intReg_106.Content)>#pip install pywin32 numpy pythonnet -i https://pypi.tuna.tsinghua.edu.cn/simple
下来在分享一个socket的脚本 用来调试VM很方便.
def p(P):print(P);
import os,sys,time,socket,_thread,threading关闭时间=60*2
from threading import Timer
def close_window():print("cl")os._exit(0)#root.destroy()  # 销毁主窗口#print("窗口已关闭")
Timer(关闭时间, close_window).start()#def thread_it(func, *args):t = threading.Thread(target=func, args=args)t.setDaemon(True);t.start();
def Thread_ConnectSocket(ip="",prot=0,sendData="",recv_flag=True):是否发送成功标志=Falsewhile True:try:global tcp_client_sockettcp_client_socket = socket.socket(socket.AF_INET, socket.SOCK_STREAM)tcp_client_socket.connect((ip, prot))while True:try:tcp_client_socket.send(sendData.encode("utf-8"))#发送print(f'>>{ip}:({prot})"{sendData}"!')if (recv_flag):#print(f'等待对方回复!')recv_content = tcp_client_socket.recv(1024)#接收result = recv_content.decode("utf-8")print(f'收到对方发来的"{result}"!')   print(f'done!')是否发送成功标志=Truebreakexcept:是否发送成功标志=Falsebreakexcept socket.error:print("未连接,尝试重连中..")time .sleep(1)if (是否发送成功标志):print(f'finish!')breakipport=("127.0.0.1", 7930)#右侧IP=ipport[0]
PROT=ipport[1] #IP,PROT def Tcp_Send(S=""):#B_左(7931)thread_it(Thread_ConnectSocket,IP,PROT,S)import tkinter as tkroot = tk.Tk()#root.iconbitmap('mfc.ico')
root.geometry('400x400+100+100')
#root.resizable(0,0)
root.title("")
lb__a = tk.Label(root,text=f"(7931) :{IP} : {PROT}",fg='green',font=("微软雅黑",16))
lb__a.pack()def gettime():dstr.set(time.strftime("%H:%M:%S"))try:passroot.after(1000, gettime)# 每隔 1s 调用一次.except:passdstr = tk.StringVar()# 定义动态字符串
lb = tk.Label(root,textvariable=dstr,fg='green',font=("微软雅黑",20))
lb.pack()
gettime()# 0 800V 一体轭
# 1 800V 中柱
# 2 800V 边柱
##------------------------------料号0---------------------------------------------------------
#---------------------------------------------------------------------------------------------
def Cam0():Tcp_Send("0")
button = tk.Button(root,text=' 料号0:800V 一体轭',bg='#7CCD7C',width=20, height=2,command=Cam0)
button.place(relx=0.15,rely=0.2, width=260, height=30)#------------------------------料号1---------------------------------------------------------
#---------------------------------------------------------------------------------------------def Cam1():Tcp_Send("1")#Tcp_SendB Tcp_SendA #B_左(7931)  A_右(7930)
button = tk.Button(root,text='料号1:800V 中柱',bg='#7CCD7C',width=20, height=2,command=Cam1)
#button.pack()
button.place(relx=0.15,rely=0.3, width=260, height=30)#------------------------------料号2---------------------------------------------------------
#---------------------------------------------------------------------------------------------def Cam2():Tcp_Send("2")#Tcp_SendB Tcp_SendA #B_左(7931)  A_右(7930)
button = tk.Button(root,text='料号2:800V 边柱',bg='#7CCD7C',width=20, height=2,command=Cam2)
#button.pack()
button.place(relx=0.15,rely=0.4, width=260, height=30)#------------------------------料号:    噢噢噢噢---------------------------------------------------------
#---------------------------------------------------------------------------------------------def CamT1():Tcp_Send("T1")
button = tk.Button(root,text='拍照1',bg='#7CCD7C',width=20, height=2,command=CamT1)
button.place(relx=0.15,rely=0.5, width=260, height=30)def CamT2():Tcp_Send("T2")
button = tk.Button(root,text='拍照2',bg='#7CCD7C',width=20, height=2,command=CamT2)
button.place(relx=0.15,rely=0.6, width=260, height=30)def CamT3():Tcp_Send("T3")
button = tk.Button(root,text='拍照3',bg='#7CCD7C',width=20, height=2,command=CamT3)
button.place(relx=0.15,rely=0.7, width=260, height=30)def CamT4():Tcp_Send("T4")
button = tk.Button(root,text='拍照4',bg='#7CCD7C',width=20, height=2,command=CamT4)
button.place(relx=0.15,rely=0.8, width=260, height=30)#---------------------------------------------------------------------------------------------
#------------------------------料号2---------------------------------------------------------
#---------------------------------------------------------------------------------------------root.mainloop()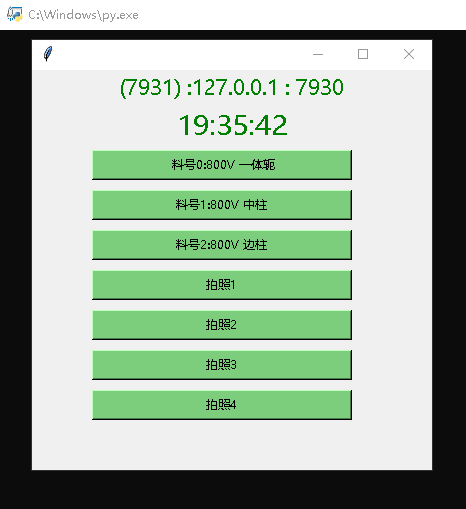
虽然是工作用到的,但只是自己测试工具;放出来也不影响..