<template><div id="webgl" class="webgl"></div><div id="toolbar" class="nameButton"><el-breadcrumb><el-breadcrumb-item>创建3D场景</el-breadcrumb-item></el-breadcrumb></div>
</template>
<script setup>
import * as THREE from 'three';
import {getCurrentInstance, onMounted} from 'vue';
// 引入轨道控制器扩展库OrbitControls.js
import {OrbitControls} from 'three/addons/controls/OrbitControls.js';const {proxy} = getCurrentInstance();let scene = undefined;
let renderer = undefined;
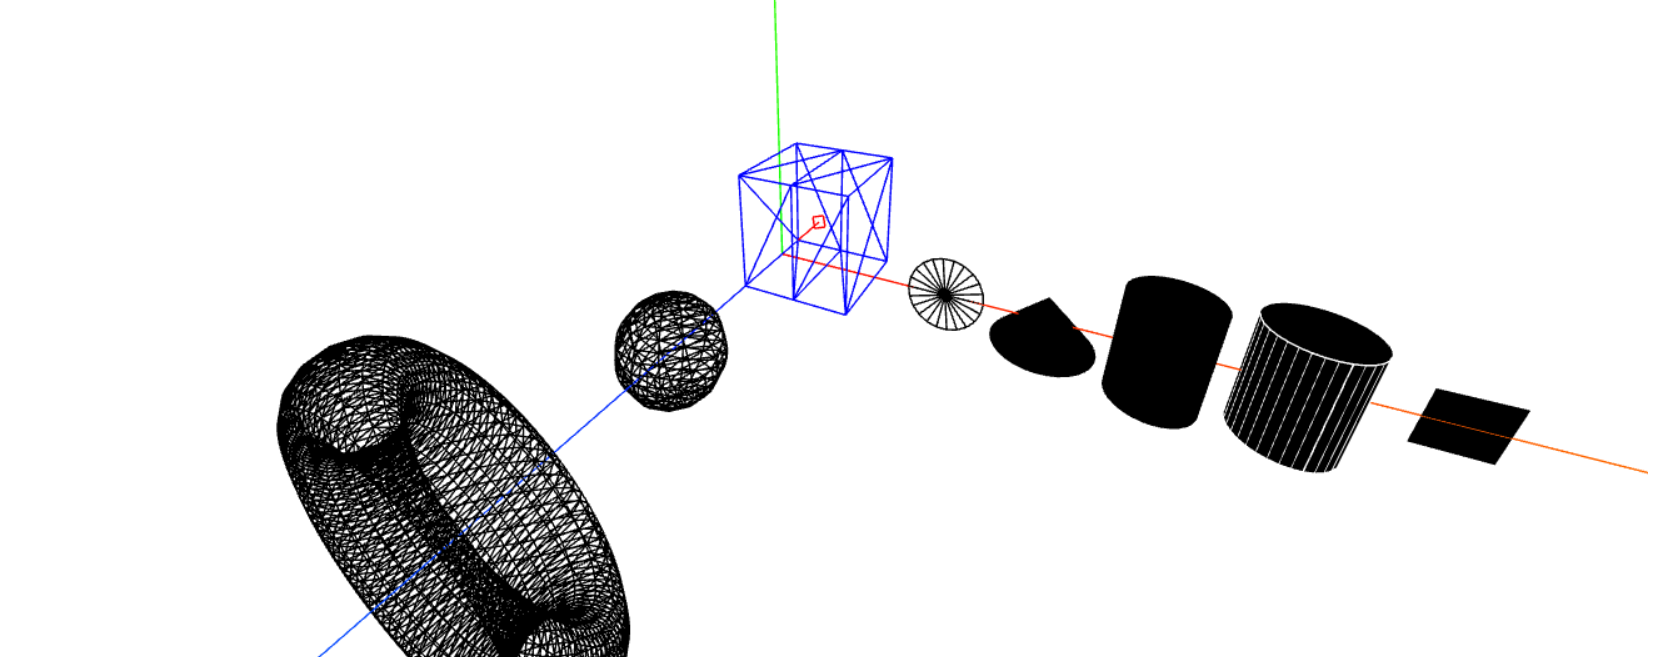
let camera = undefined;onMounted(() => {// 创建场景scene = new THREE.Scene();const axesHelper = new THREE.AxesHelper(1000);//设置坐标轴线段尺寸scene.add(axesHelper);// 创建几何体// const geometry = new THREE.BoxGeometry(100, 100, 100);// 这个立方体的每一个面都是有两个三角形组成的,如果我们把widthSegments 的值设置为2// 我们发现,在宽度方向上,立方体从宽度的中间被一分为二了,这就是分段数的意思。如果设置为3,则在宽度方向上被一分为三const geometry = new THREE.BoxGeometry(100, 100, 100, 2);// 材质const material = new THREE.MeshBasicMaterial({color: 0x0000ff,/* transparent: true,//开启透明opacity: 0.5,//设置透明度 */wireframe: true,//线条模式渲染mesh对应的三角形数据});// 模型const boxMesh = new THREE.Mesh(geometry, material);// 模型位置boxMesh.position.set(100, 100, 100);// 将模型 添加到 场景scene.add(boxMesh);// 圆形几何体// CircleGeometry接收四个参数,各参数定义如下// radius — 圆形的半径,默认值为1// segments — 分段(三角面)的数量,最小值为3,默认值为8。// thetaStart — 第一个分段的起始角度,默认为0。(three o’clock position)// thetaLength — 圆形扇区的中心角,通常被称为“θ”(西塔)。默认值是2*Pi,这使其成为一个完整的圆。const circleGeometry = new THREE.CircleGeometry(40, 22);const circleMaterial = new THREE.MeshLambertMaterial({color: 0x00ffff,//设置颜色wireframe: true,})const circleMesh = new THREE.Mesh(circleGeometry, circleMaterial);circleMesh.position.set(200, 0, 0);scene.add(circleMesh);// 创建圆锥缓冲几何体const coneGeometry = new THREE.ConeGeometry(50, 50, 32);const coneMaterial = new THREE.MeshLambertMaterial({color: 0x00ffff,//设置颜色// wireframe:true,//线条模式渲染mesh对应的三角形数据})const coneMesh = new THREE.Mesh(coneGeometry, coneMaterial)coneMesh.position.set(300, 0, 0);scene.add(coneMesh);// 圆柱const cylinderGeometry = new THREE.CylinderGeometry(40, 40, 100, 32);const cylinderMaterial = new THREE.MeshLambertMaterial({color: 0x00ffff,//设置颜色})const cylinderMesh = new THREE.Mesh(cylinderGeometry, cylinderMaterial)cylinderMesh.position.set(400, 0, 0);scene.add(cylinderMesh);// 边缘几何体const geometry1 = new THREE.CylinderGeometry(40, 40, 100, 32);const edges = new THREE.EdgesGeometry(geometry1);const line = new THREE.LineSegments(edges, new THREE.LineBasicMaterial({color: 0xffffff}));const material1 = new THREE.MeshLambertMaterial({color: 0x000fff,//设置颜色})const mesh1 = new THREE.Mesh(geometry1, material1)line.position.set(500, 0, 0);scene.add(line)mesh1.position.set(500, 0, 0);scene.add(mesh1)// 平面缓冲几何体const geometry2 = new THREE.PlaneGeometry(50, 50);const material2 = new THREE.MeshLambertMaterial({color: 0x00ffff,//设置颜色})const mesh2 = new THREE.Mesh(geometry2, material2)mesh2.position.set(600, 0, 0);scene.add(mesh2)// 球体const geometry3 = new THREE.SphereGeometry(50, 12, 16);const material3 = new THREE.MeshLambertMaterial({color: 0x00ffff,//设置颜色wireframe: true,})const mesh3 = new THREE.Mesh(geometry3, material3)mesh3.position.set(0, 0, 200);scene.add(mesh3)// 圆环const geometry4 = new THREE.TorusGeometry(100, 30, 16, 100);const material4 = new THREE.MeshLambertMaterial({color: 0x00ffff,//设置颜色wireframe: true,})const mesh4 = new THREE.Mesh(geometry4, material4)mesh4.position.set(0, 0, 400);scene.add(mesh4)// 聚光灯源const directionalLight = new THREE.SpotLight(0xffffff, 1, 100);directionalLight.position.set(100, 100, 100);const dirLightHelper = new THREE.DirectionalLightHelper(directionalLight, 5, 0xff0000);scene.add(dirLightHelper);// 创建相机 透视投影相机的四个参数fov, aspect, near, far构成一个四棱台3D空间,被称为视锥体,只有视锥体之内的物体,才会渲染出来,视锥体范围之外的物体不会显示在Canvas画布上。camera = new THREE.PerspectiveCamera(75, window.innerWidth / window.innerHeight, 30, 1000);//相机在Three.js三维坐标系中的位置// 根据需要设置相机位置具体值camera.position.set(300, 300, 500);camera.lookAt(boxMesh.position);//指向mesh对应的位置// 创建渲染器对象renderer = new THREE.WebGLRenderer({antialias: true, alpha: true});renderer.setClearAlpha(0);// 定义threejs输出画布的尺寸(单位:像素px)const width = window.innerWidth - 210; //宽度const height = window.innerHeight - 61; //高度renderer.setSize(width, height); //设置three.js渲染区域的尺寸(像素px)renderer.render(scene, camera); //执行渲染操作document.getElementById('webgl').appendChild(renderer.domElement);
})</script>
<style>
.webgl {margin: 0;
}.nameButton {position: fixed;top: 70px;left: 220px;
}
</style>