(10)Vue3核心语法大全
本系列教程目录:Vue3+Element Plus全套学习笔记-目录大纲
文章目录
- 第1章 Vue3核心语法
- 1.1 响应式
- 1.1.1 ref
- 1.1.2 reactive
- 1.1.3 响应式总结
- 1.2 Vue属性
- 1.2.1 监听属性 - watch
- 1.2.2 监听属性 - watchEffect
- 1.2.3 计算属性 - computed
- 1.3 组件传值
- 1.3.1 父子传值 - Props
- 1.3.2 子父传值 - Emit
- 1.4 插槽 - Slots
- 1.4.1 默认插槽
- 1.4.2 具名插槽
- 1.4.3 作用域插槽
- 1.4 setup
- 1.4.1 Options 与 Composition
- 1)Options API
- 2)Composition API
- 1.4.2 Composition API的特殊用法
第1章 Vue3核心语法
1.1 响应式
Vue 3 的响应式系统是其核心特性之一,它允许开发者以声明式的方式构建用户界面。如果数据不是响应式数据,当数据的值发生改变时,页面上的数据是不会发生改变的。
Vue 3 引入了两种主要的响应式 API:ref 和 reactive。下面将详细介绍这两种 API 的用法、区别以及在修改对象属性和修改整个对象时的不同表现。
1.1.1 ref
ref 用于定义基本类型数据和对象类型数据。使用 ref 创建的变量必须通过 .value 属性访问和修改其值。
语法:
let xxx=ref(初始值)
ref()函数将返回一个RefImpl的实例对象,简称ref对象或ref,ref对象中的value属性是响应式的。在JS中操作数据需要使用 "xxx.value"的形式,但在模板中不需要用. value,直接使用即可。
Tips:推荐使用 const(常量) 接收ref对象。代表代理对象不可变,但是内部值变化会被追踪。
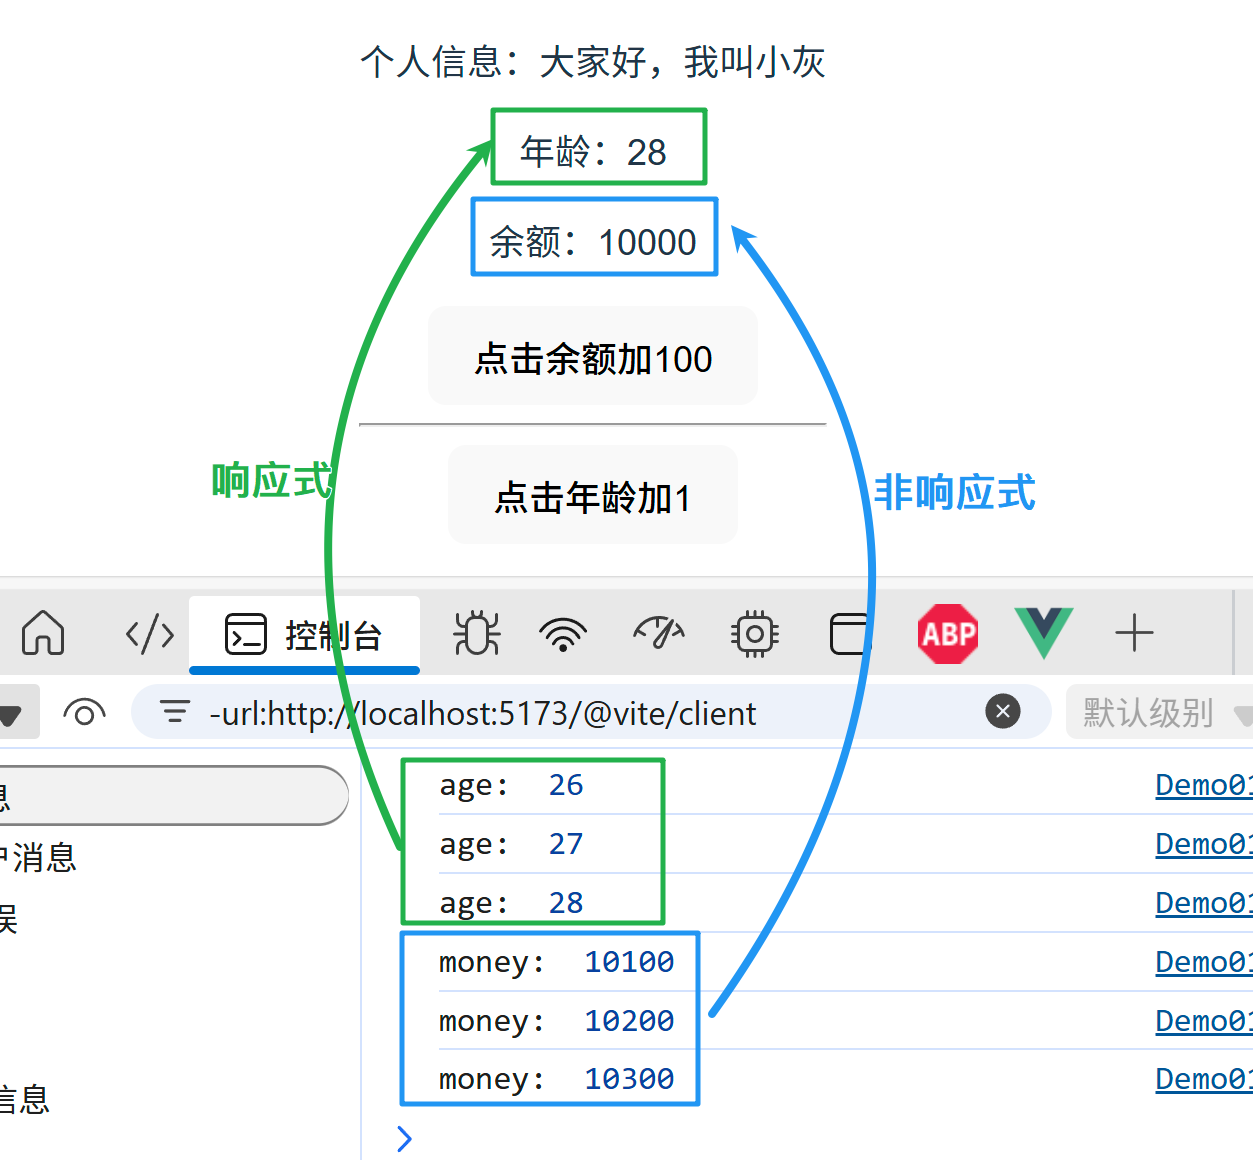
观察如下案例:
<template><p>个人信息:</p><p>年龄:{{ age }}</p><p>余额:{{ money }}</p><button @click="moneyChange">点击余额加100</button><hr><button @click="ageChange">点击年龄加1</button></template><script setup>
import {ref} from "vue";// 数据
let info = "大家好,我叫小灰"
let money = 10000;
let age = ref(25);// 方法
function moneyChange() {money += 100;console.log('money: ', money);
}function ageChange() {age.value += 1;console.log('age: ', age.value);
}
</script>
效果如下:
另外,ref也可以创建对象类型的响应式数据。
<template><p>个人信息: {{ info.name }}</p><p>小灰的年龄是:{{ info.age }} 岁</p><p>小灰的身高是:{{ info.height }} cm</p><button @click="ageChange">点击年龄加1</button><button @click="heightChange">点击身高加1</button><br /><button @click="nameChange">改变名称</button><input type="text" v-model="name" />
</template><script setup>
import { ref } from "vue";let name = "";// 数据
let info = ref({name: "小灰",age: 20,height: 165,
});
let Constellation = ref([{ id: 1, star: "双子座" },{ id: 2, star: "狮子座" },{ id: 3, star: "巨蟹座" },
]);// 方法
function ageChange() {info.value.age += 1;
}
function heightChange() {info.value.height += 1;
}
function nameChange() {info.value.name = name;
}
</script>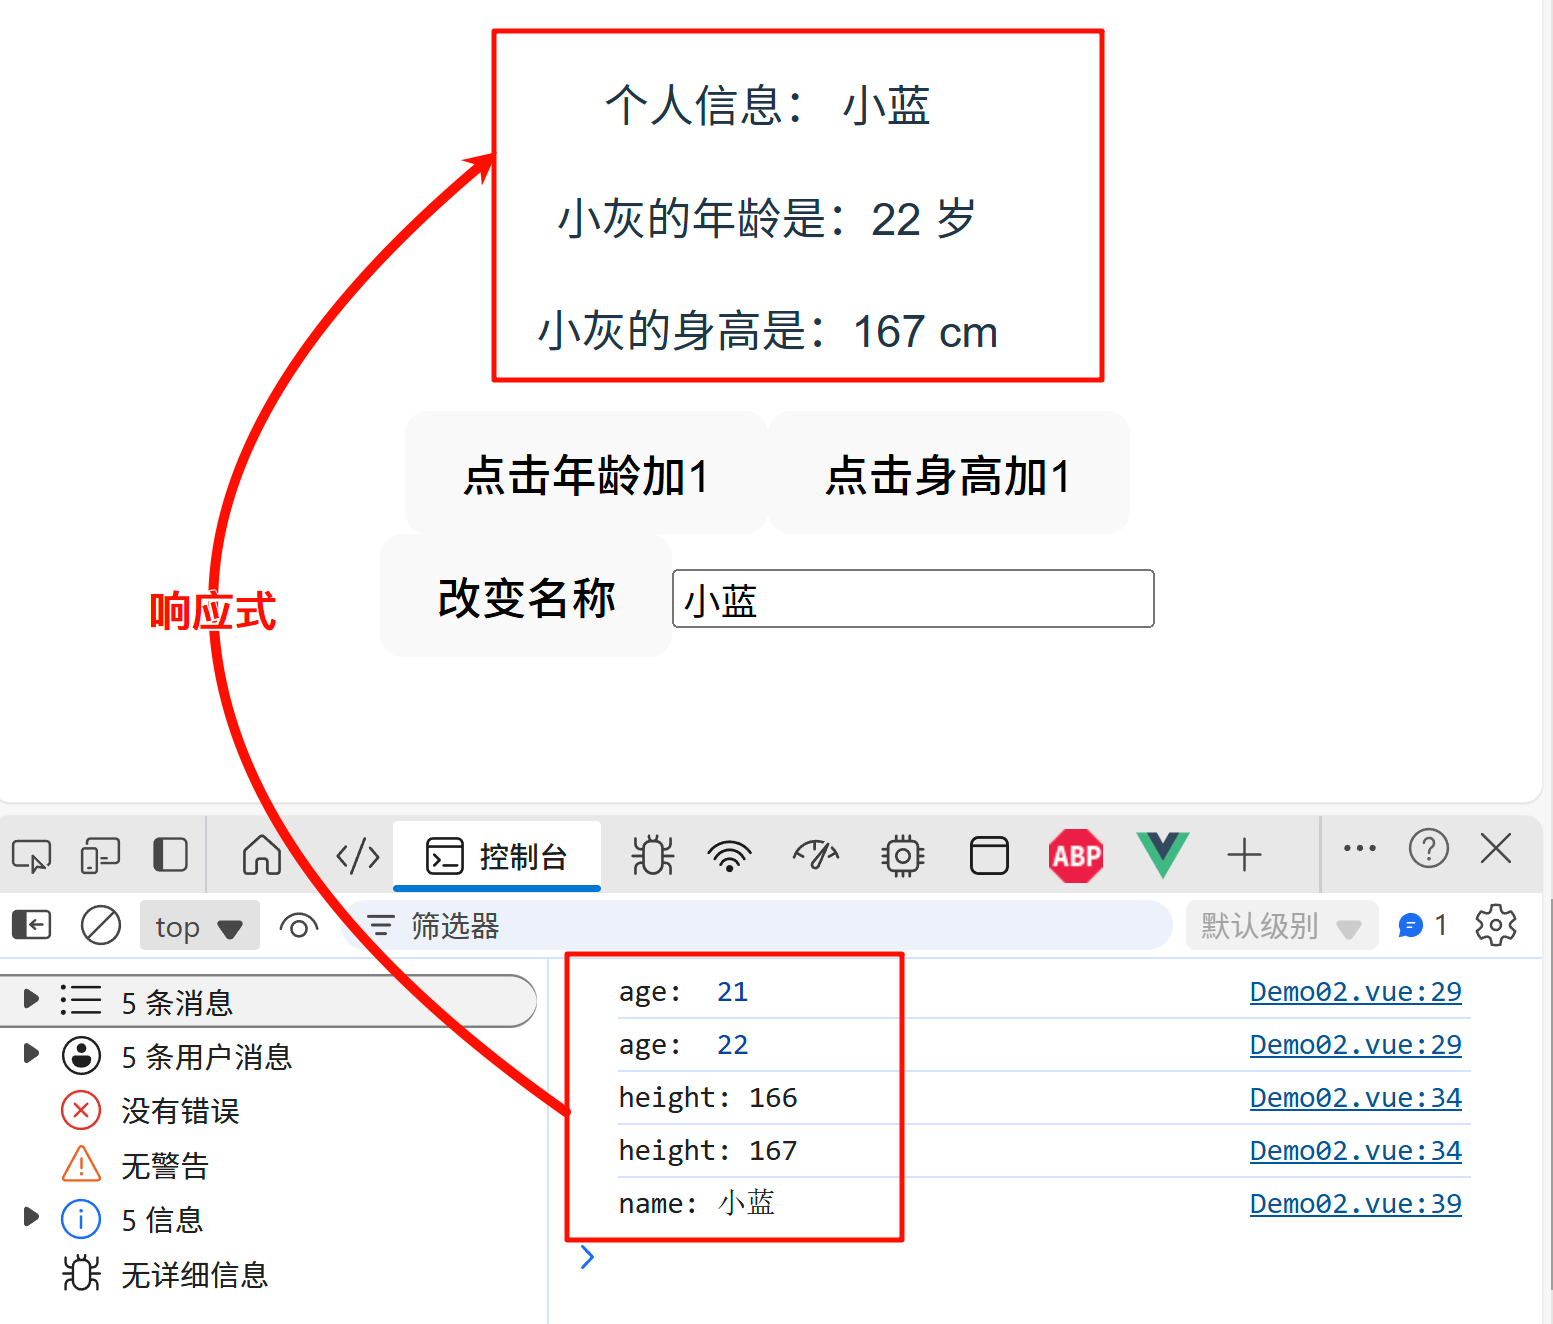
推荐使用 const(常量) 接收ref对象。代表代理对象不可变,但是内部值变化会被追踪。
观察如下案例:
<template><p><!-- 绑定的是link.value,而不是link -->链接:<a :href="link">{{ link }}</a></p><button @click="linkChange">改变链接</button></template><script setup>
import {ref} from "vue";let link = ref("http://www.jd.com");// 最好使用const来声明变量,避免变量被修改
// const link = ref("http://www.jd.com");function linkChange() {// 改变了link指向的引用,原来的link.value并不会改变link = ref("http://www.taobao.com")/*link.value的值为http://www.taobao.com但页面上显示的仍然是http://www.jd.com(页面上绑定的仍是之前的link)*/console.log(link.value);
}</script>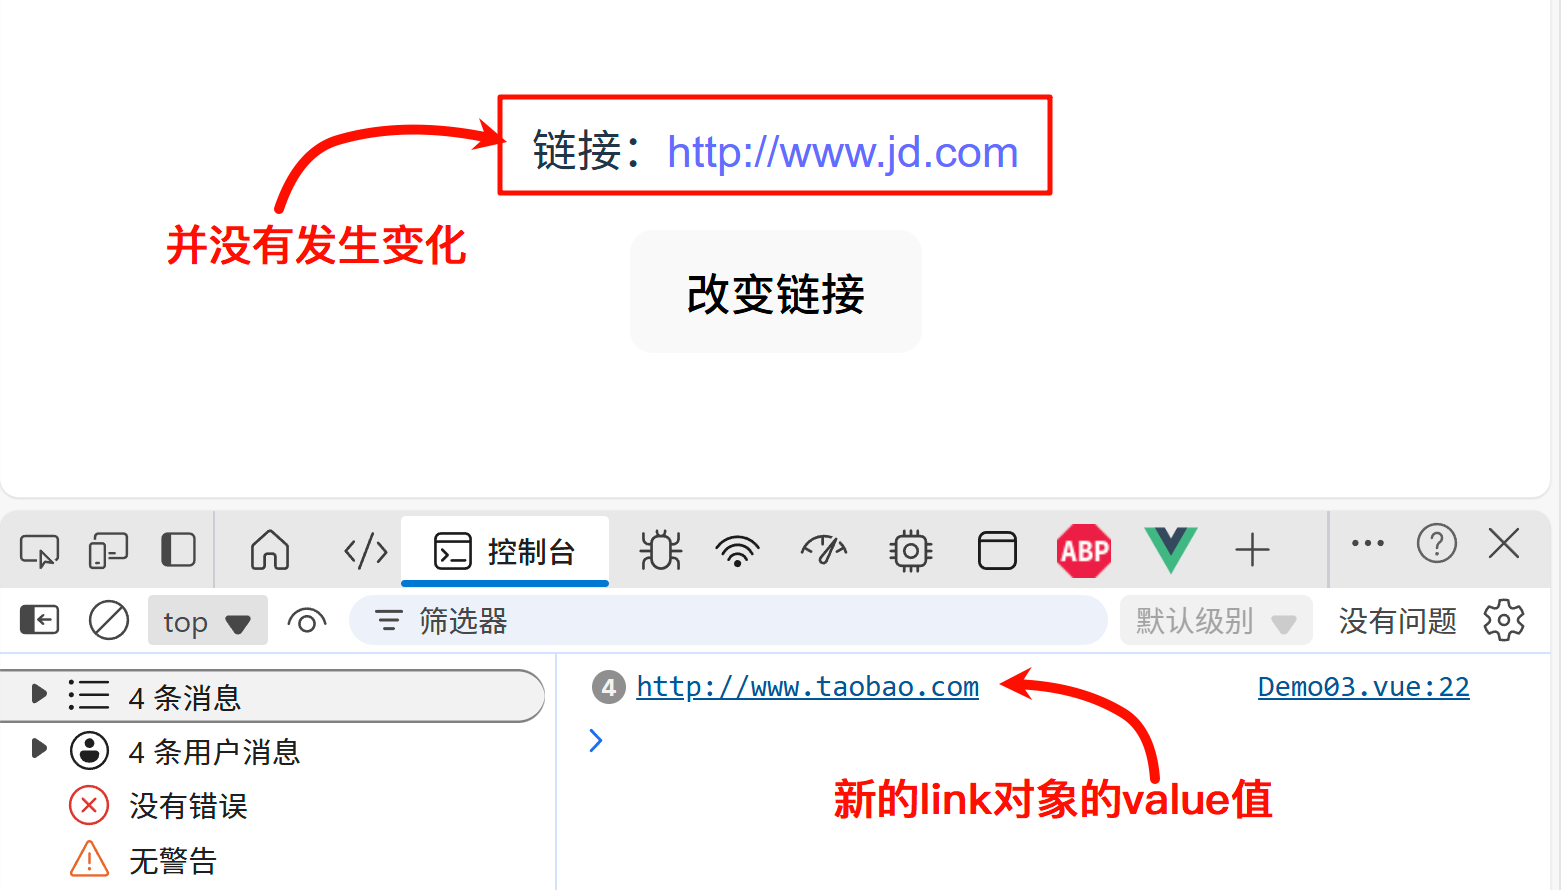
1.1.2 reactive
reactive 不能将基本类型的数据变为响应式,只适用于引用类型的数据(对象)。
reactive响应式数据由于是 proxy 代理的对象数据,可以直接获取到数据,不必添加 .value,即不论是在模板中还是JS中,不需要加.value即可访问或修改reactive响应式数据的值。
使用示例:
<template><p>个人信息: {{ info.name }}</p><p>年龄是:{{ info.age }} 岁</p><p>身高是:{{ info.height }} cm</p><button @click="ageChange">点击年龄加1</button><button @click="heightChange">点击身高加1</button></template><script setup>
import {reactive} from "vue";// 数据
let info = reactive({name: "小灰",age: 20,height: 165,
});// 方法
function ageChange() {// 不用加valueinfo.age += 1;console.log("age: ", info.age);
}function heightChange() {// 不用加valueinfo.height += 1;console.log("height: " + info.height);
}
</script>
需要注意,当reactive响应式数据重新分配一个新对象时, 将会失去响应式(ref并不会s);
使用示例:
<template><p>个人信息: {{ info.name }}</p><p>年龄是:{{ info.age }} 岁</p><p>身高是:{{ info.height }} cm</p><button @click="ageChange">点击年龄加1</button><button @click="heightChange">点击身高加1</button><hr><button @click="infoChange">重置</button></template><script setup>
import {reactive} from "vue";// 数据
let info = reactive({name: "小灰",age: 20,height: 185,
});// 方法
function ageChange() {// 不用加valueinfo.age += 1;console.log("age: ", info.age);
}function heightChange() {// 不用加valueinfo.height += 1;console.log("height: " + info.height);
}function infoChange() {// 重置所有数据后,将失去响应式info = {name: "小蓝",age: 25,height: 155,};
}
</script>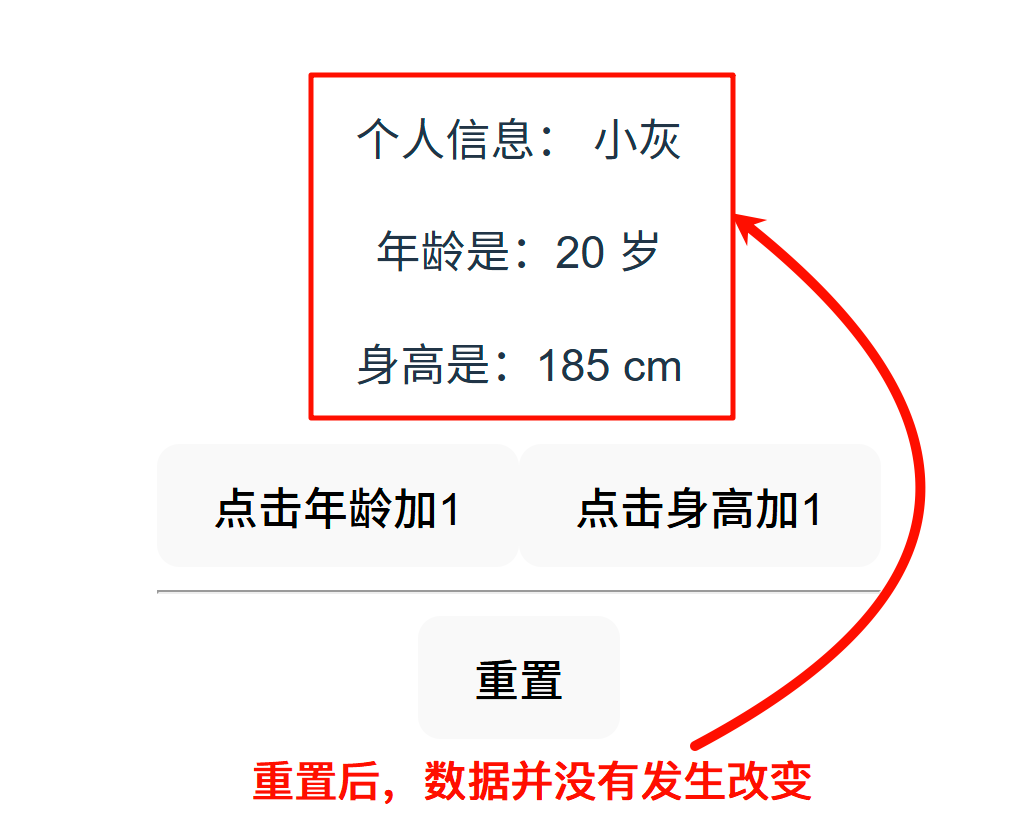
1.1.3 响应式总结
- ref:返回一个
RefImpl对象,通过.value访问或修改值。为基本数据类型(string,number,boolean等)提供响应式能力,也可包装对象/数组(内部自动调用reactive)。应用场景:- 当需要包装基本数据类型(如计数器、开关状态)。
- 当需要灵活的类型支持(如联合类型
string | number)。 - 当需要将值作为组合式函数的返回值(方便其他组件使用)。
- reactive():直接操作对象的属性,无需
.value。为对象或数组创建深层次的响应式代理。应用场景:- 当处理复杂对象或嵌套结构(如表单数据、配置对象)。
- 当需要直接操作属性(避免频繁使用
.value)。 - 当需要与
watch或watchEffect配合监听整个对象的变化。
综合对比如下:
| 特性 | ref() | reactive() |
|---|---|---|
| 数据类型 | 基本类型 + 对象/数组(自动转换) | 仅对象/数组 |
| 访问方式 | 需 .value(模板中自动解包) | 直接访问属性 |
| 响应式层级 | 浅层(包装值本身) | 深层(递归代理所有嵌套属性) |
| 类型支持 | 更灵活(支持联合类型、泛型) | 需明确对象结构 |
| 解构响应式 | 解构会丢失响应式(需用 toRefs) | 解构会丢失响应式(需用 toRefs) |
1.2 Vue属性
1.2.1 监听属性 - watch
watch 的作用是用于监测响应式属性的变化,并在属性发生改变时执行特定的操作,它是 Vue 中的一种响应式机制,允许你在数据发生变化时做出相应的响应,执行自定义的逻辑。
Tips:需要注意,watch监听的是响应式属性的变化。
使用示例:
<template><p>年龄: {{age}}</p><p>{{info}}</p><hr><button @click="age++">年龄+1</button></template><script setup>
// 导入ref和watch
import {ref, watch} from "vue";let age = ref(15);
let info = ref('未成年');
/*
参数1: 需要监听的变量
参数2: 监听函数,参数1是新值,参数2是旧值*/
watch(age, (newVal, oldVal) => {console.log("newVal:", newVal, "oldVal:", oldVal);if(age.value >= 18){info.value = "成年";}})
</script>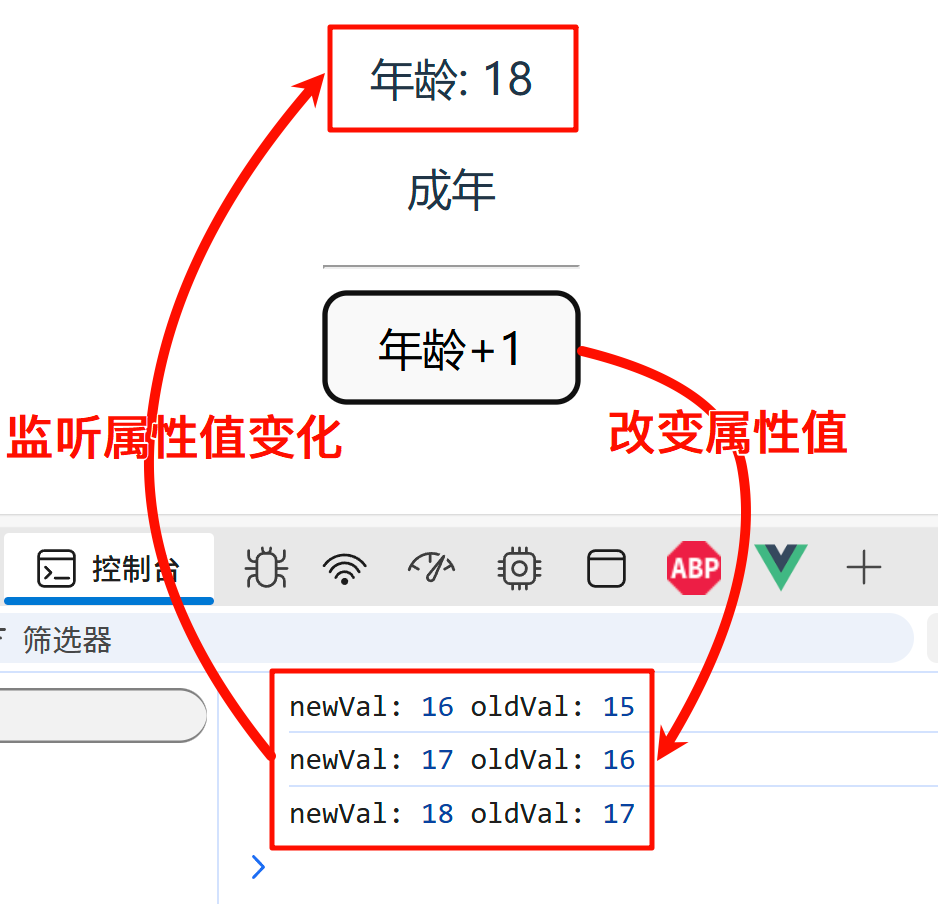
1.2.2 监听属性 - watchEffect
watchEffect 也是一个帧听器,只不过不像watch那样明确监听某一个响应数据,watchEffecx 是隐式的监听所有的响应数据。不需要具体到某个属性,一旦运行就会立即监听,组件卸载的时候会停止监听。
在使用 watchEffect 时我们只需要传递一个回调函数给它,在这个回调函数当中,它会自动监听响应数据,当回调函数里面的响应数据发生变化,回调函数就会立即执行。
使用示例:
<template><p>年龄: {{ age }}</p><p>{{ info }}</p><hr><button @click="age++">年龄+1</button></template><script setup>
// 导入ref和watch
import {ref, watch, watchEffect} from "vue";let age = ref(15);
let info = ref('未成年');// 监听所有的响应式数据变化
watchEffect(() => {// 由于console.log('age:', age.value);console.log('info:', info.value);if (age.value >= 18) {info.value = '成年';} else {info.value = '未成年';}
})</script>
上述代码中,当我们第一次进入页面时,info和age响应数据从无到有,这个时候就会触发一次 watchEffect 的回调函数。
1.2.3 计算属性 - computed
computed计算属性用于计算某些响应式数据的结果集,在使用computed计算属性时我们需要传递一个函数给computed,该函数必须有返回值,返回值就是计算属性的值。在计算属性函数中会监听所使用到的响应式数据,当响应式数据发送变化后计算属性的函数会自动触发。
Tips:计算属性本身也是一种响应式数据。
使用示例:
<template><h3>商品单价: {{ goods.price }}</h3><h3>购买数量: {{ goods.count }}</h3><h3>商品单价: {{ totalPrice }}</h3><hr><button @click="goods.count++">购买数量+1</button><button @click="goods.price+=10">商品单价+10</button></template><script setup>
// 导入computed和reactive
import {computed, reactive} from "vue";// 定义响应式商品数据
let goods = reactive({price: 25.00,count: 10
})/*定义计算属性totalPrice,当商品单价或购买数量发生变化时,totalPrice会自动更新另外,price和count属性从无到有,也会触发一次计算属性的函数*/let totalPrice = computed(() => {console.log("商品单价", goods.price, "购买数量", goods.count, "总价", goods.price * goods.count)return goods.price * goods.count;
})</script>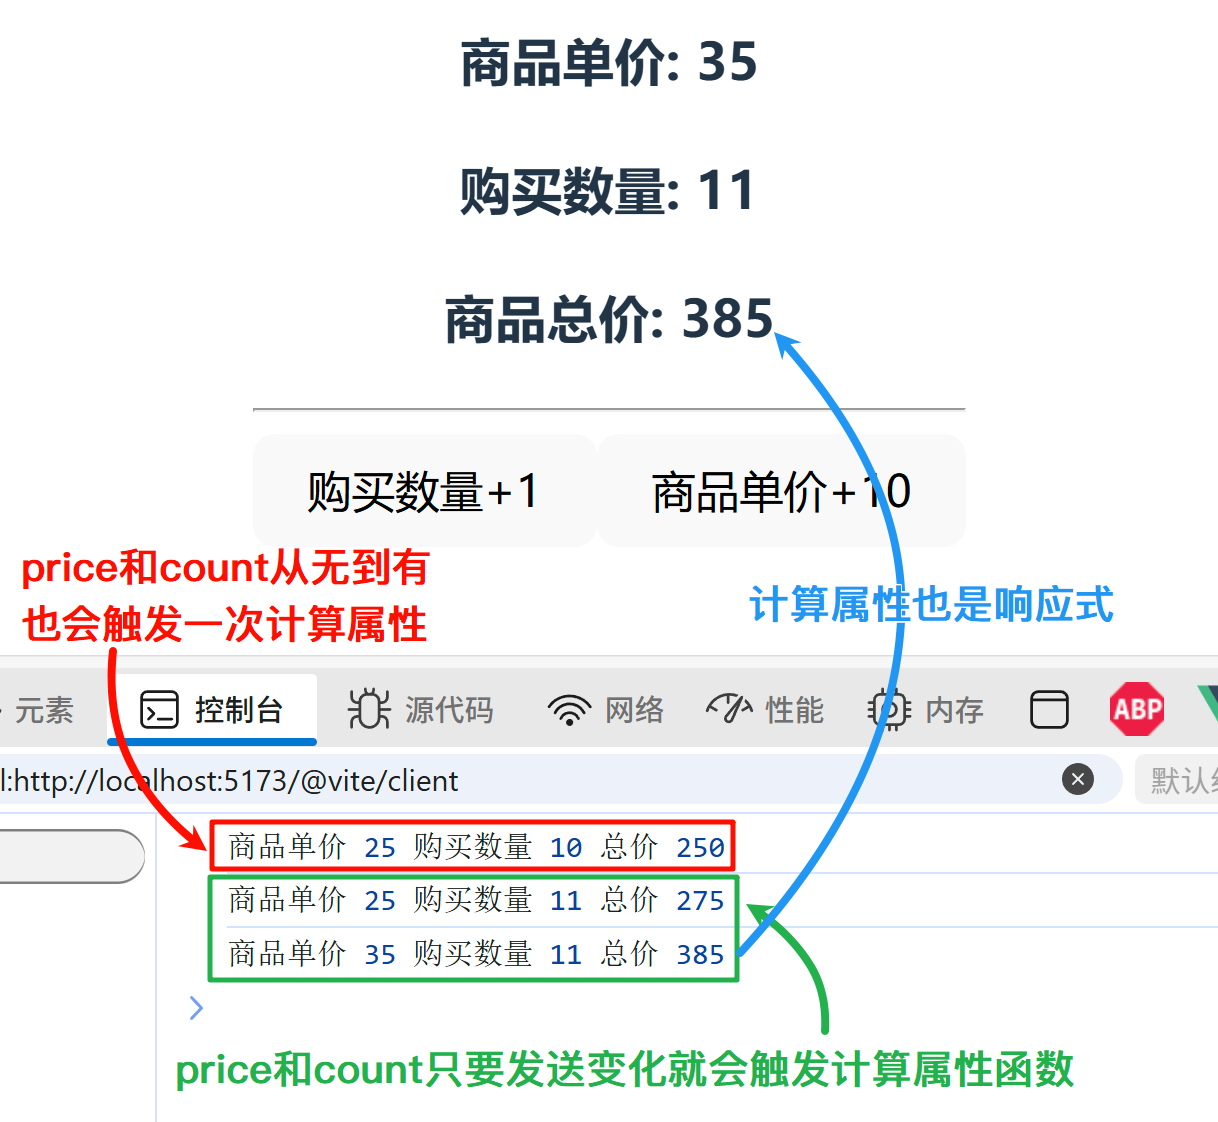
1.3 组件传值
在Vue中整个组件的入口为App.vue组件,在该组件中我们可以导入很多其他的组件,这些被导入到App.vue中的组件都是App.vue的子组件。在实际开发中,我们可能会有组件的嵌套。例如我们在App.vue中编写如下代码:
App.vue:
<template><A /><D />
</template>-------------------
A.vue:
<template><B />
</template>-------------------
B.vue:
<template><C />
</template>
A是B的父组件,B是C的父组件,A与D是兄弟组件。这样就形成很多的父子组件,这些组件之间经常需要进行值的传递,分为父组件给子组件传递以及子组件给父组件传递。
vue中的父子组件传值遵守单向数据流原则。所谓单向数据流原则,简单的说就是父组件的数据可以传递给子组件,子组件也可以正常获取并使用由父组件传过来的数据;但是,子组件中不能直接修改父组件传过来的数据,必须要向父组件传递一个事件来父组件需要修改数据,即通过子组件的操作,在父组件中修改数据;这就是单项数据流。
1.3.1 父子传值 - Props
定义父组件Parent.vue:
<script setup>
// 1 引入子组件
import Child from './Child.vue'
import {ref} from "vue";const money = ref(100)
</script><template><div id="Outer"><h2>我是Parent</h2><button @click="money+=10">加钱</button><!--使用子组件,通过属性向子组件传值,向子组件传递的参数对于子组件来说是只读的,不能修改--><Child title="Hello Child" :money="money"></Child></div></template><style>#Outer{padding: 30px;background-color: #ccc;}
</style>
定义子组件Child.vue:
<script setup>
// 接受父组件传递过来的title和money属性
let parent= defineProps(['title','money']);function buy(){parent.money -= 10;console.log(parent.money);
}
</script><template><div id="inner"><h2>我是Child</h2><button @click="buy()">买东西</button><h3>父组件的title --- {{ parent.title }}</h3><h3>父组件的money --- {{ parent.money }}</h3></div></template><style>
#inner{padding: 30px;background-color: #99FF99;
}
</style>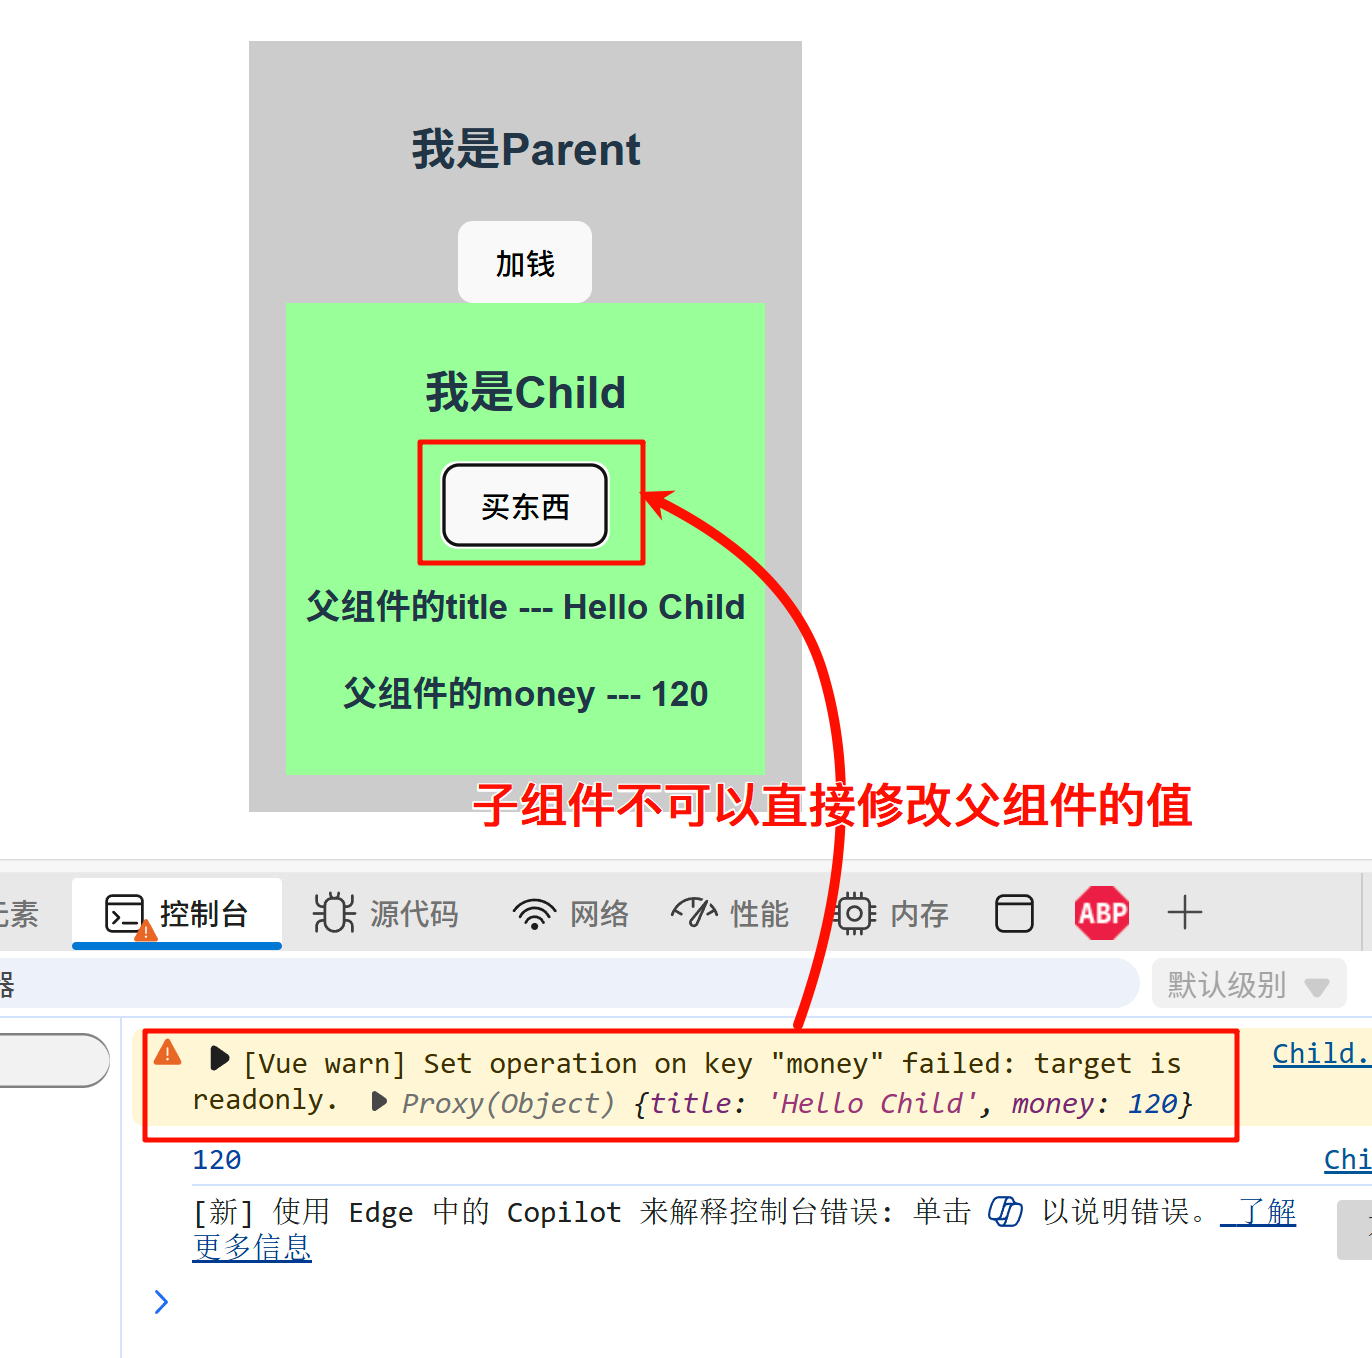
1.3.2 子父传值 - Emit
子组件无法直接修改父组件传递过来的值,但是可以通过“事件感知”的方式通知父组件,将修改的值传递给父组件,然后由父组件自身来修改值,最后再传回子组件完成数据的修改。
父组件Parent.vue:
<script setup>
// 1 引入子组件
import Child from './Child.vue'
import {ref} from "vue";const money = ref(100)// 当子组件的money值发生变化时,触发父组件的childBuy事件
function childBuy(){money.value -= 10
}
</script><template><div id="Outer"><h2>我是Parent</h2><button @click="money+=10">加钱</button><!--使用子组件,通过属性向子组件传值,向子组件传递的参数对于子组件来说是只读的,不能修改@buy: 子组件的事件,子组件通过调用父组件的buy方法来修改父组件的money值--><Child title="Hello Child" :money="money" @buy="childBuy"></Child></div></template><style>#Outer{padding: 20px;background-color: #ccc;}
</style>
子组件Child.vue:
<script setup>// 接受父组件传递过来的title和money属性
let parent= defineProps(['title','money']);// 定义一个事件,通知父组件修改money属性
let moneyChangeEmits = defineEmits(['moneyChange'])function buy(){// 不能直接修改父组件的money属性,需要通过emit事件通知父组件修改money属性// parent.money -= 10;// console.log(parent.money);// 通知父组件修改money属性(以函数的方式), 并传递参数-10给父组件moneyChangeEmits('buy', -10);
}
</script><template><div id="inner"><h2>我是Child</h2><button @click="buy()">买东西</button><h3>父组件的title --- {{ parent.title }}</h3><h3>父组件的money --- {{ parent.money }}</h3></div></template><style>
#inner{padding: 10px;background-color: #99FF99;
}
</style>
1.4 插槽 - Slots
Vue 的 插槽(Slots) 是一种组件间内容分发的机制,允许父组件向子组件传递模板片段(HTML 结构或其他组件),实现更灵活的组件复用和组合。
插槽 slot 是写在子组件的代码中,供父组件使用的占位符进行填充。子组件中使用插槽 slot 后,父组件可以在这个占位符中填充内容,包括数据、html代码、组件等,也就是说,当子组件的某部分内容是根父组件填充的不同而变化的,那我们就可以使用插槽slot,具体填充什么,由父组件而定。
插槽 slot 主要分为三大类:默认插槽、具名插槽和作用域插槽。
1.4.1 默认插槽
- 子组件:用
<slot>标签定义占位符,未提供内容时显示默认值。 - 父组件:在子组件标签内部直接传递内容。
子组件:
<!-- 子组件 Child.vue -->
<template><div><slot>默认内容(当父组件不传内容时显示)</slot></div></template>
父组件:
<script setup>
import Child from './Child.vue'
</script><template><!-- 父组件 --><Child><h3>这是父组件插入的内容</h3>  <!-- 替换默认插槽 --></Child></template>
1.4.2 具名插槽
- 子组件:通过
name属性定义多个插槽。 - 父组件:用
v-slot:name或#name指令指定内容分发的目标插槽。
子组件:
<!-- 子组件 Layout.vue -->
<template><div><header><slot name="header"></slot></header><main><slot></slot></main>  <!-- 默认插槽 --><footer><slot name="footer"></slot></footer></div></template>
父组件:
<script setup>
import Child from './Child.vue'
</script><template><Child><template #header>  <!-- 简写语法(v-slot:header) --><h3>这是标题</h3></template><h2>这是主内容(自动放入默认插槽)</h2><template v-slot:footer><h3>这是页脚</h3></template></Child></template>
1.4.3 作用域插槽
- 子组件:通过
<slot>绑定数据(类似 props),允许父组件访问子组件内部状态。 - 父组件:用
v-slot:name="props"接收数据。
作用域插槽实际上是父组件访问子组件的一种形式,此时若子组件的值发送变化则父组件的值也会发送变化。因此作用域插槽可以当做子组件为父组件传递参数的一种方式。
子组件:
<!-- 子组件 Child.vue -->
<script setup>
import {reactive, ref} from "vue";let user = reactive({name: "小灰",age: 20,sex: "男"
});
</script><template><div><h3>我是子组件</h3><!--  传递数据给父组件  --><slot :message="user"></slot><hr><!-- 修改用户数据之后父组件也会跟着变化   --><button @click="user.age++">修改用户数据</button></div></template>
父组件:
<script setup>
import Child from './Child.vue'</script><template><!-- 父组件 --><h2>我是父组件</h2><Child><template #default="{message}"><h3>子组件传递的值:{{message.name}}</h3><h3>子组件传递的值:{{message.age}}</h3><h3>子组件传递的值:{{message.sex}}</h3></template></Child></template>
1.4 setup
setup 是 Vue 3 新增的语法糖,可以让我们使用更简洁的代码来编写组件。它在编译时会将代码转换为使用 setup 函数的形式,省略了传统 Vue 组件中的 data、methods 等属性的定义。
1.4.1 Options 与 Composition
Options API被称为选项式API,是Vue2的API设计风格。Composition API被称为组合式API,是Vue3的API设计风格。
1)Options API
Options API将数据、方法、生命周期等分散到不同的选项中,适合简单组件。复杂组件中,同一功能的逻辑可能分散在 data、methods、mounted 等不同选项中,导致代码碎片化。
代码示例:
<script>
export default {// 数据data() {// 在Options API中,data 返回的对象自动成为响应式,通过 this 访问属性。return { count: 0 };},// 方法methods: {increment() {this.count++;}},// 计算属性computed: {doubleCount() {return this.count * 2;}},// 生命周期钩子mounted() {console.log("Component mounted");}
};
</script><template><div><h3>{{count}}</h3><button @click="increment()">增加</button></div></template>
Tips:在Options API中,data 返回的对象自动成为响应式,通过
this访问属性。
2)Composition API
Composition API是Vue 3引入的,基于函数式编程,允许将逻辑按功能组织,提高复用性。
代码示例:
<script>
import {ref} from "vue";export default {setup() {// setup定义的属性默认不是响应式的,需要手动设置为响应式的let count = ref(0);const increment = () => {count.value++;// setup中不可以访问this(undefined)console.log("this: " + this);};// 导出return {count, increment};},// 生命周期方法mounted() {console.log("Component mounted");}
}
</script><template><div><h3>{{ count }}</h3><button @click="increment()">增加</button></div></template>
Tips:在setup()中定义的数据,方法都需要 return 返回出去,不然会报错。
1.4.2 Composition API的特殊用法
Composition API是Vue3推荐的语法,但Composition API与Options API仍存在一些特殊的小问题,虽然这些小问题不影响我们的开发,但是我们还是了解一下比较好。
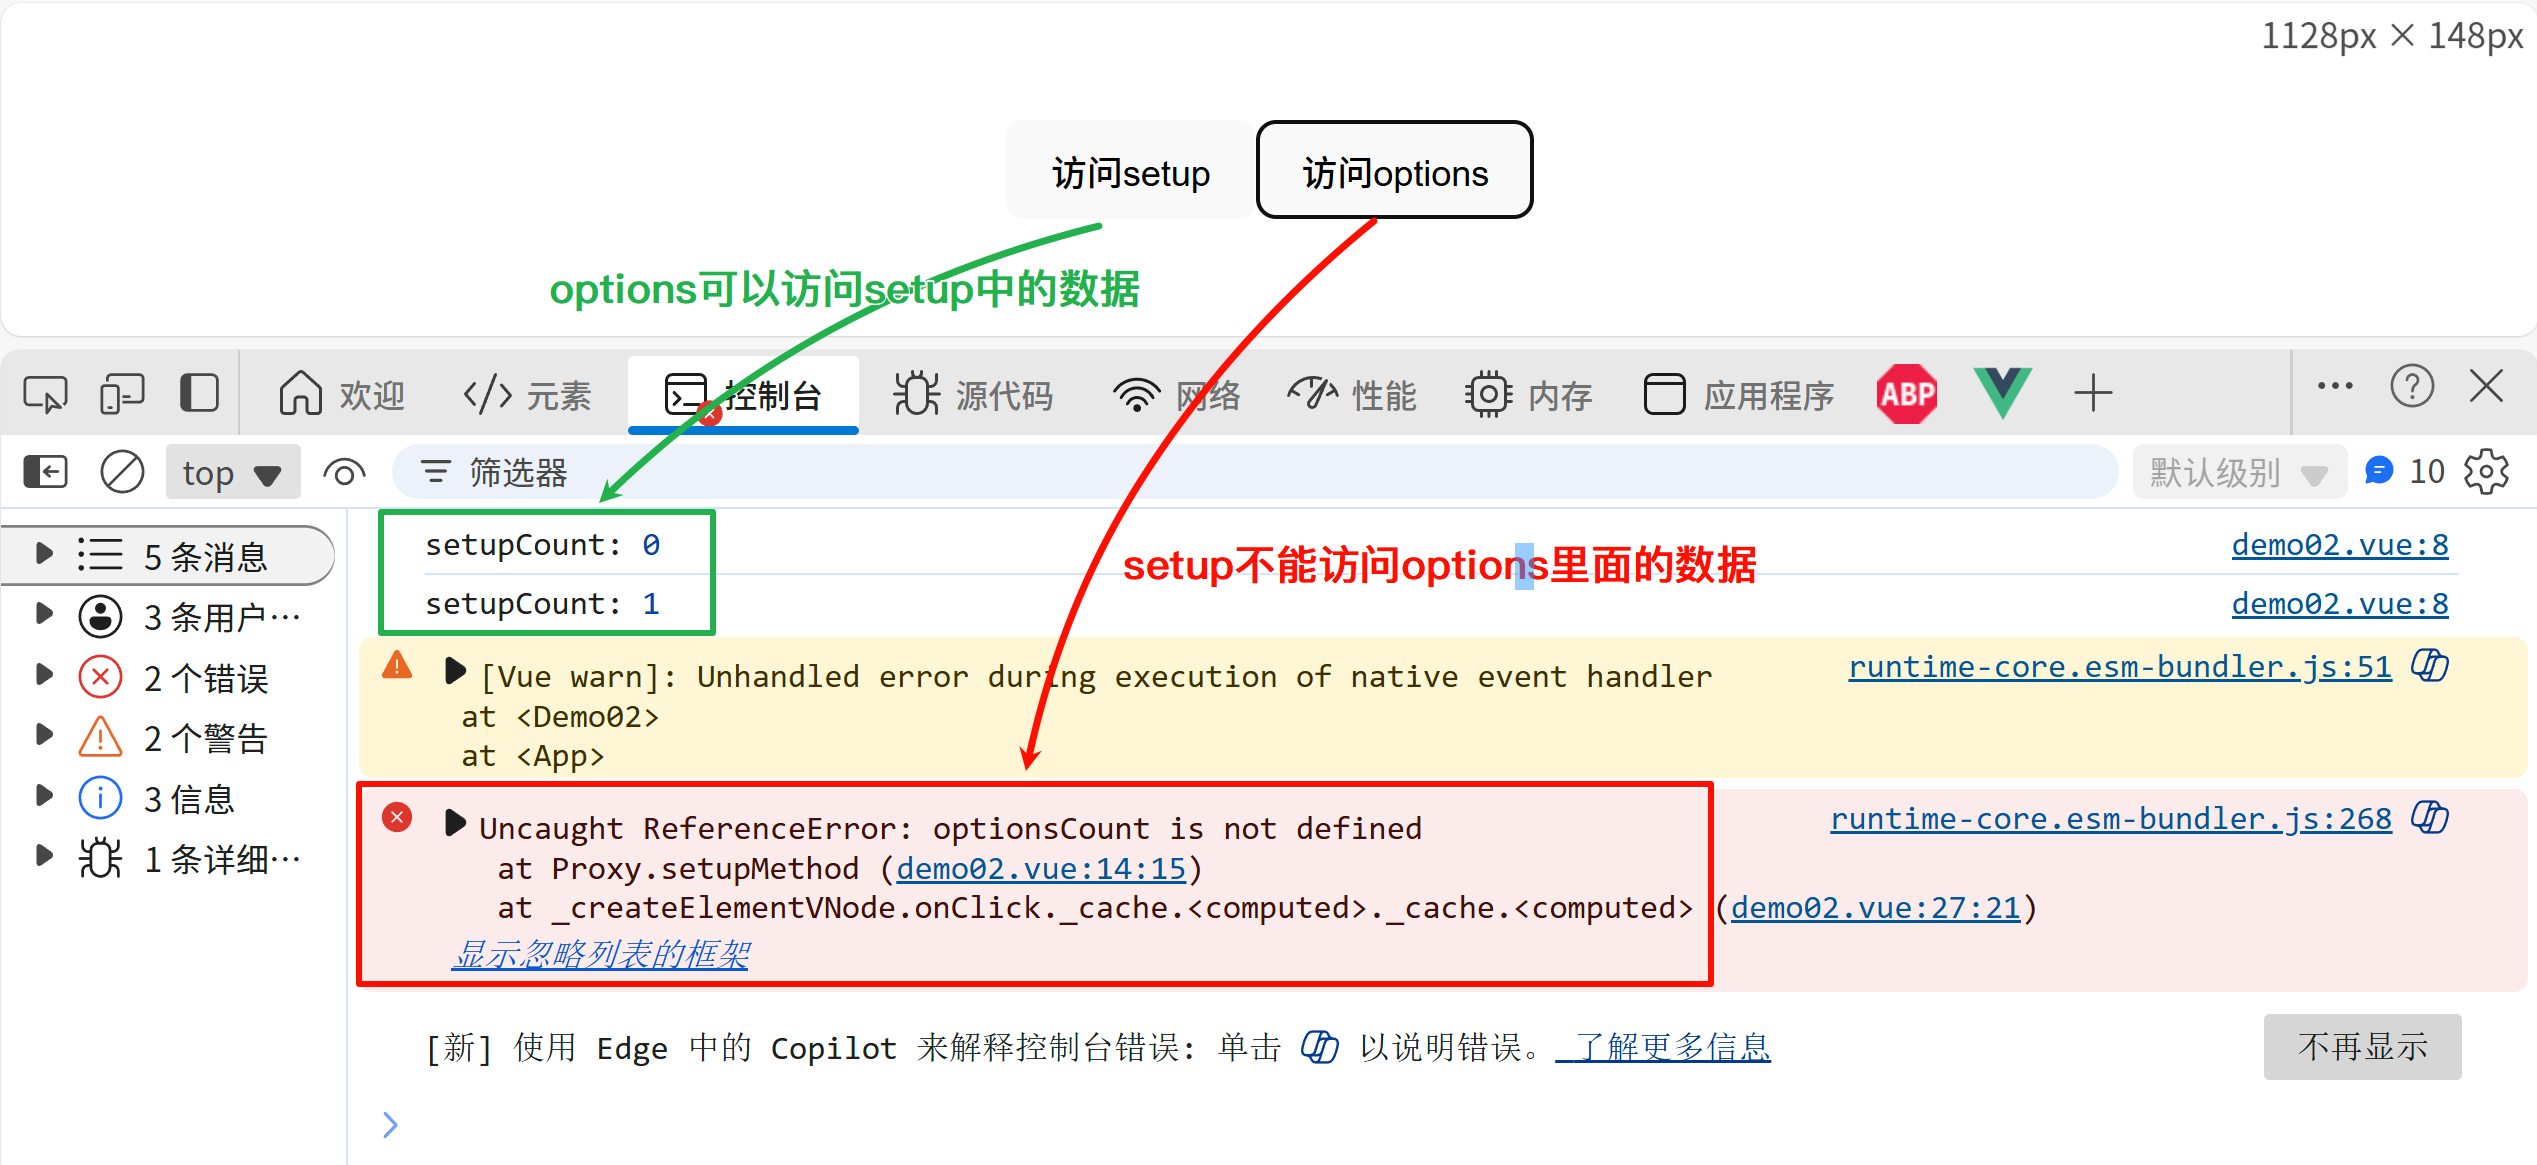
(1)Composition API与不能访问到Options API中的数据,但Options API可以访问到Composition API中的数据;
示例代码:
<script>
export default {data() {return { optionsCount: 0 };},methods: {optionsMethod() {// 访问setup中的数据console.log('setupCount:',this.setupCount++)}},setup() {let setupCount = 0;const setupMethod = () => {// 访问options中的数据console.log('optionsCount:',optionsCount++)};return {setupCount,setupMethod};}
};
</script><template><div><button @click="optionsMethod">访问setup</button><button @click="setupMethod">访问options</button></div></template>
效果如下:
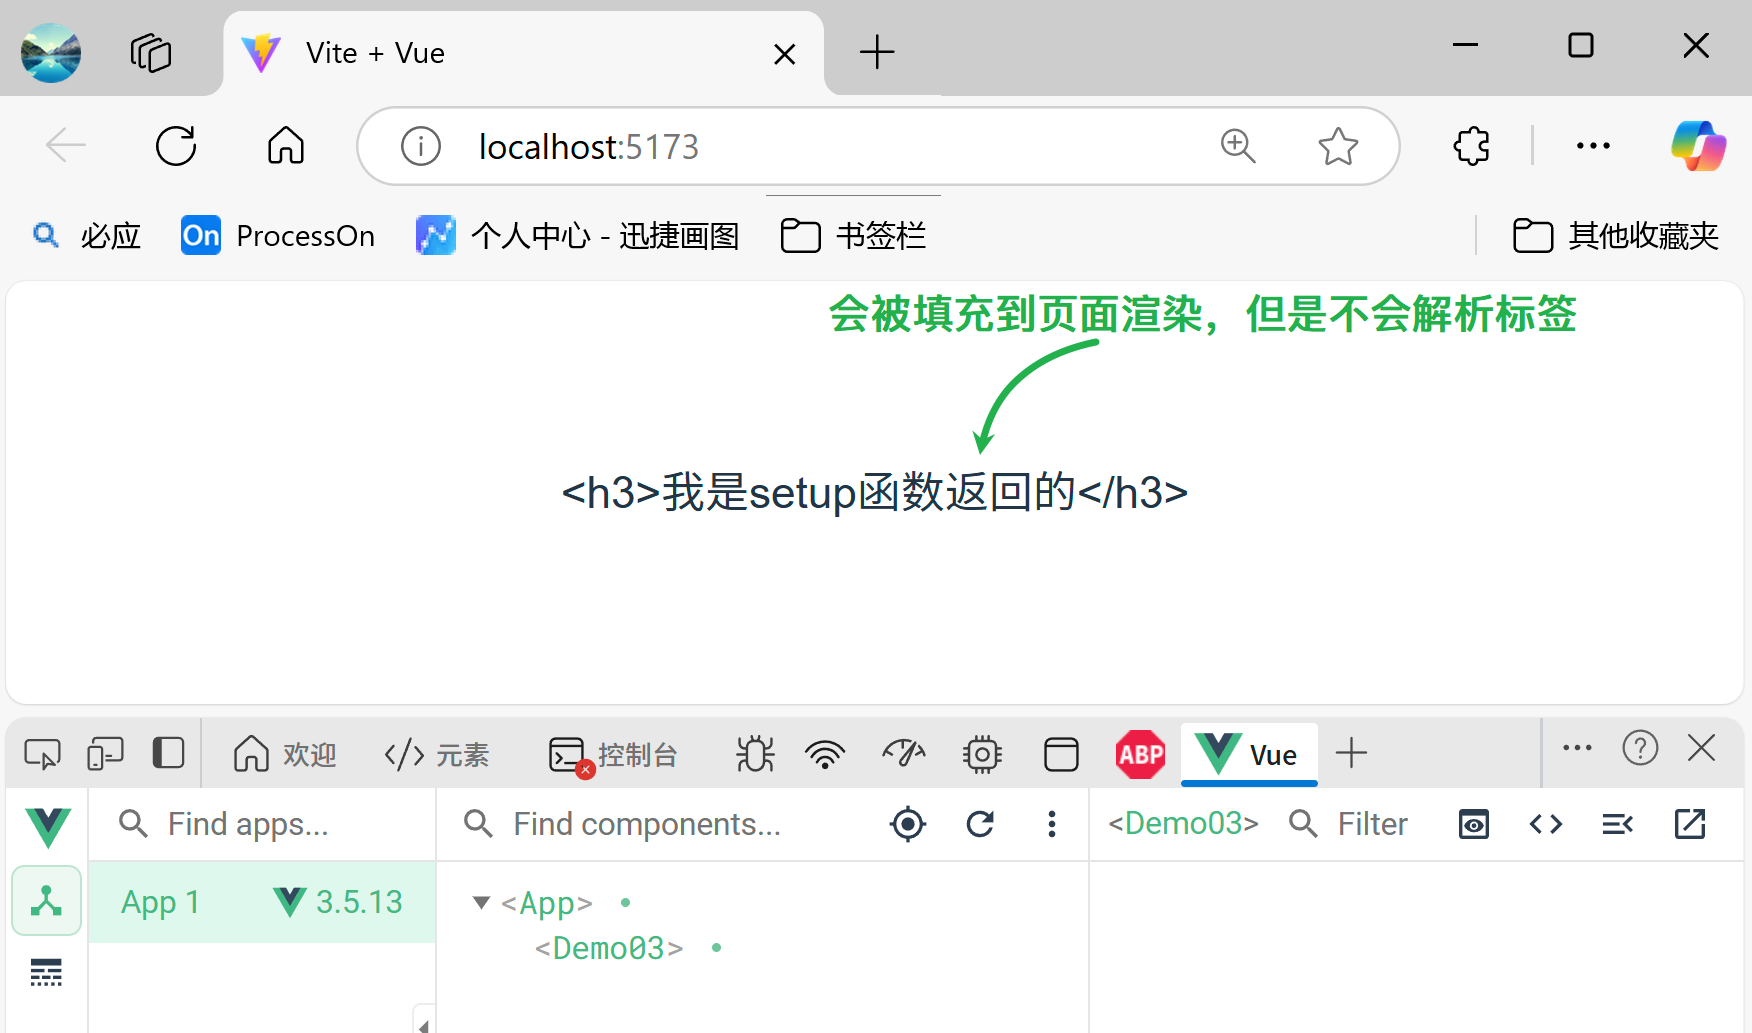
(2)Composition API 中的返回值若是一个函数,那么该函数的返回值会被填充到页面渲染。
示例代码:
<script>
export default {setup() {return ()=> {return "<h1>This is Demo03</h1>"}}
};
</script><template><div>This is Demo03</div></template>
效果如下:
(3)setup 语法糖写法,可以让我们将setup函数中的代码独立出来,这个写法也是我们之前一直使用的写法。
示例代码:
<!--不要忘了在script标签中引入setup语法-->
<script setup>
import { ref, computed, onMounted } from "vue";// count是非响应式数据
// let count = 0;
// 响应式数据
let count = ref(0);
// 方法
const increment = () => count.value++;
// 计算属性
let doubleCount = computed(() => count.value * 2);
// 生命周期
onMounted(() => {console.log("Component mounted");
});
</script><template><div><h3>{{count}}</h3><button @click="increment()">增加</button></div></template>