Spring Boot 数据库最佳实践:从自动配置到高性能优化
引言
在传统 Spring 应用中,开发者需要手动配置数据源、事务管理器、ORM 框架等组件,导致大量重复代码和配置工作。
Spring Boot 通过“约定优于配置”的理念,重构了数据库操作的模式:
-
自动配置:基于类路径智能推断组件依赖。
-
工程化封装:将事务管理、连接池优化等处理封装为 Starter。
-
生态选择:深度集成 JPA、MyBatis、Flyway 等主流技术栈。
一、Spring Boot 数据库操作的核心优势
1.1 自动配置的底层原理
Spring Boot 通过 spring-boot-autoconfigure模块实现智能化配置,其核心机制包括:
-
条件化装配:@ConditionalOnClass检测类路径是否存在特定依赖,如 DataSource 或 Hibernate。
-
属性驱动:通过 application.properties覆盖默认配置(如更换数据库驱动)。
-
失败快速 (Fail-Fast):若检测到配置冲突(如同时存在多个 DataSource Bean),启动时直接抛出异常。
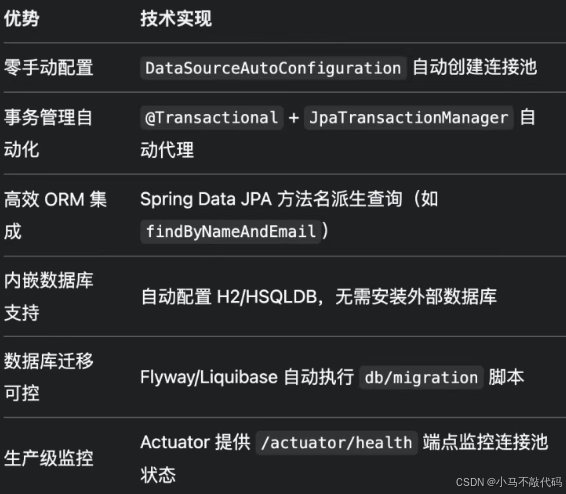
1.2 六大核心优势
二、Spring Boot数据库操作全流程实战
2.1 项目初始化与依赖管理
在pom.xml添加如下依赖:
<!-- 必需依赖 -->
<dependency><groupId>org.springframework.boot</groupId><artifactId>spring-boot-starter-data-jpa</artifactId>
</dependency>
<dependency><groupId>com.h2database</groupId><artifactId>h2</artifactId><scope>runtime</scope>
</dependency><!-- 可选增强组件 -->
<dependency><groupId>org.flywaydb</groupId><artifactId>flyway-core</artifactId>
</dependency>
<dependency><groupId>org.projectlombok</groupId><artifactId>lombok</artifactId><optional>true</optional>
</dependency>
上述依赖引入了 Spring Data JPA 和 H2 数据库,适用于测试环境。
2.2 数据源与JPA配置
在application.properties添加数据库连接配置:
# application.properties
# 数据源配置
spring.datasource.url=jdbc:h2:mem:testdb
spring.datasource.driver-class-name=org.h2.Driver
spring.datasource.username=sa
spring.datasource.password=
spring.jpa.database-platform=org.hibernate.dialect.H2Dialect# JPA 高级配置
spring.jpa.hibernate.ddl-auto=update    # 自动同步实体与表结构
spring.jpa.show-sql=true                # 开发阶段显示 SQL
spring.jpa.properties.hibernate.format_sql=true  # 格式化 SQL 日志
2.3 实体类与Repository设计
//创建实体类
@Data @Entity @NoArgsConstructor
public class User {@Id@GeneratedValue(strategy = GenerationType.IDENTITY)private Long id;private String name;private String email;
}
// 创建 Repository
public interface UserRepository extends JpaRepository<User, Long> {// 方法名派生查询:自动生成 JPQLList<User> findByNameContainingIgnoreCase(String keyword);// 自定义 SQL 查询@Query("SELECT u FROM User u WHERE u.email LIKE %:domain")List<User> findByEmailDomain(@Param("domain") String domain);
}
解析:
-
该User实体类映射到数据库表,@Entity指定为 JPA 实体,@Id设定主键。
-
JpaRepository 提供了 CRUD 方法,findByName实现基于名称查询。
2.4 事务管理与Service层优化
@Service
@RequiredArgsConstructor
public class UserService {private final UserRepository userRepository;@Transactional(rollbackFor = Exception.class)public User createUser(UserDto userDto) {User user = new User();user.setName(userDto.getName());user.setEmail(userDto.getEmail());return userRepository.save(user);}@Transactional(readOnly = true)  // 优化查询性能public Page<User> searchUsers(String keyword, Pageable pageable) {return userRepository.findByNameContaining(keyword, pageable);}
}
@Transactional 确保数据库操作具有 ACID 特性。
2.5 控制器层与API设计
@RestController
@RequestMapping("/api/users")
@RequiredArgsConstructor
public class UserController {private final UserService userService;@PostMappingpublic ResponseEntity<User> createUser(@Valid @RequestBody UserDto userDto) {return ResponseEntity.ok(userService.createUser(userDto));}@GetMappingpublic ResponseEntity<Page<User>> listUsers(@RequestParam(defaultValue = "") String keyword,@PageableDefault(sort = "id", direction = DESC) Pageable pageable) {return ResponseEntity.ok(userService.searchUsers(keyword, pageable));}
}
2.6 运行与测试
启动 Spring Boot 应用,在 IDE 中运行main方法,启动 Spring Boot 应用。
@SpringBootApplication
public class Application {public static void main(String[] args) {SpringApplication.run(Application.class, args);}
}
测试 API,使用 Postman 或 curl 进行测试:
curl -X POST "http://localhost:8080/users?name=John&email=john@example.com"
获取用户列表:
curl -X GET "http://localhost:8080/users"
三、Spring Boot vs传统Spring:数据库操作对比

四、Spring Boot数据库性能调优指南
4.1 连接池参数调优
HikariCP 生产建议配置
# HikariCP 生产建议配置
spring.datasource.hikari.maximum-pool-size=20
spring.datasource.hikari.minimum-idle=5
spring.datasource.hikari.idle-timeout=30000
spring.datasource.hikari.connection-timeout=2000
解析:
1. maximum-pool-size=20
• 默认值:10
• 作用:连接池允许的最大活跃连接数。
调优依据:
• 连接池最大连接数的设置需要根据CPU 核心数和外部依赖数量进行计算。通常采用以下公式:
• maximum-pool-size = (CPU核心数 × 2) + 外部依赖数量
• 例如,4 核 CPU + 2 个外部 API 依赖 →20 = (4×2) + 12(保守预留)。
监控指标:
• 使用/actuator/metrics/hikaricp.connections.active监控活跃连接数,确保其不超过数据库最大承载能力。
调优依据:
• 过小:连接数不足会导致请求排队,增加延迟(如抛出ConnectionTimeoutException)。
• 过大:连接数过多可能耗尽数据库资源,导致数据库连接数达到上限(如 MySQL 的max_connections默认为 151)。
2. minimum-idle=5
• 默认值:与maximum-pool-size相同。
• 作用:连接池中保持的最小空闲连接数。
调优依据:
• 保持适量空闲连接可以减少高并发时创建新连接的延迟(建立连接通常需 50~200 毫秒)。
生产建议:
• 非高并发应用:minimum-idle = maximum-pool-size × 20%,例如20 × 20% = 4。
• 高并发应用:关闭minimum-idle,完全依赖动态伸缩。
3. idle-timeout=30000(单位:毫秒)
• 默认值:600000 毫秒(10 分钟)
• 作用:空闲连接在池中保持的最长时间,超过该时间未被使用的连接将被回收。
调优依据:
• 在流量波动大的场景(如电商秒杀)中,及时释放空闲连接可以避免占用数据库资源。
• 过短(如 10 秒)会导致连接频繁创建/销毁,增加开销;过长则会导致资源浪费。
监控参考:
• 通过/actuator/metrics/hikaricp.connections.idle监控空闲连接数,确保其在合理范围内。
4. connection-timeout=2000(单位:毫秒)
• 默认值:30000 毫秒(30 秒)
• 作用:获取连接的最大等待时间。
调优依据:
• 快速失败(Fail-Fast):避免线程长时间等待连接,避免出现雪崩效应(如 HTTP 请求线程池耗尽)。
• 如果超时,将抛出SQLTransientConnectionException,可以配合降级策略(如返回缓存数据)。
调优建议:
• 确保connection-timeout < HTTP 请求超时时间,例如:
• connection-timeout=2s < HTTP 超时 = 5s < 前端超时 = 10s
5. 监控与调整
监控指标:
• 活跃连接数:hikaricp.connections.active
• 空闲连接数:hikaricp.connections.idle
• 等待连接线程数:hikaricp.connections.pending
告警阈值:
• 若pending长时间大于 0,说明连接池过小或存在慢查询。
• 若active长期接近maximum-pool-size,需要扩容或优化 SQL。
动态调整:
• 根据监控数据逐步优化参数,避免一次性大幅调整。
示例优化流程:
1.初始值:maximum-pool-size=10
2.监控发现峰值:active=8
3.调整为:maximum-pool-size=15
4.继续监控并观察效果。
4.2 JPA 二级缓存集成
1. Ehcache 依赖与配置
依赖配置
在pom.xml中添加以下依赖(确保版本与 Spring Boot 兼容):
<!-- Spring 缓存抽象层 -->
<dependency><groupId>org.springframework.boot</groupId><artifactId>spring-boot-starter-cache</artifactId>
</dependency><!-- Ehcache 实现 -->
<dependency><groupId>net.sf.ehcache</groupId><artifactId>ehcache</artifactId><version>2.10.9.2</version> <!-- 生产建议使用 3.x+ 版本 -->
</dependency><!-- Hibernate 二级缓存支持 -->
<dependency><groupId>org.hibernate</groupId><artifactId>hibernate-ehcache</artifactId>
</dependency>
配置类:
@Configuration
@EnableCaching  // 启用 Spring 缓存抽象
public class CacheConfig {@Beanpublic EhCacheManagerFactoryBean ehCacheManagerFactory() {EhCacheManagerFactoryBean factory = new EhCacheManagerFactoryBean();// 指定 Ehcache 配置文件路径(默认加载 classpath:ehcache.xml)factory.setConfigLocation(new ClassPathResource("ehcache.xml"));// 设置共享模式,确保多个 EntityManagerFactory 共用同一缓存实例factory.setShared(true);return factory;}
}
核心作用:
• 创建EhCacheManager实例,管理缓存区域(如实体缓存、查询缓存)。
• 使用ehcache.xml配置每个缓存区的策略(过期时间、最大条目等)。
ehcache.xml 示例:
<!-- ehcache.xml 示例 -->
<ehcache><diskStore path="java.io.tmpdir"/><defaultCachemaxEntriesLocalHeap="10000"eternal="false"timeToIdleSeconds="300"timeToLiveSeconds="600"memoryStoreEvictionPolicy="LRU"/><!-- 为 User 实体定义独立缓存策略 --><cache name="com.example.User"maxEntriesLocalHeap="5000"eternal="false"timeToIdleSeconds="1800"timeToLiveSeconds="3600"/>
</ehcache>
2.实体类缓存配置
@Entity
@Cacheable  // ① 声明该实体启用二级缓存
@Cache(usage = CacheConcurrencyStrategy.READ_WRITE)  // ② 指定缓存并发策略
public class User {// 实体字段定义
}
注解解析:
• @Cacheable(JPA 标准注解)
启用二级缓存,默认按实体ID缓存完整对象,缓存区域使用实体类全限定名。
• @Cache(Hibernate 扩展注解)
定义缓存的并发策略(如:READ_WRITE)来确保多线程的一致性。
常见策略:
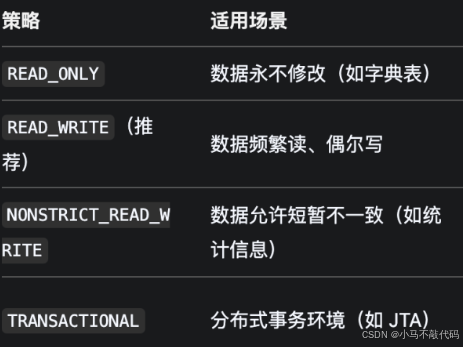
3. 二级缓存工作原理
缓存层级:
• 一级缓存(Session 级):属于 Hibernate Session 生命周期,事务提交后失效。
• 二级缓存(应用级):跨 Session 共享,使用 Ehcache 等第三方库实现。
缓存触发时机:
• 读操作:
1.查询一级缓存;
2.若未命中,查询二级缓存;
3.若仍未命中,访问数据库并将结果写入缓存。
• 写操作:
1.更新数据库;
2.根据@Cache策略,更新或失效二级缓存。
4. 生产注意事项
• 缓存一致性:
使用READ_WRITE策略时,确保所有更新操作通过 Hibernate 进行,否则缓存可能与数据库不一致(如直接使用 JDBC 更新数据不会触发缓存失效)。
• 缓存失效:
手动清除缓存
@Autowired
private CacheManager cacheManager;public void evictUserCache(Long userId) {Cache userCache = cacheManager.getCache("com.example.User");userCache.evict(userId);  // 清除指定 ID 缓存// userCache.clear();     // 清除整个缓存区域
}
5. 监控缓存命中率
启用 Hibernate 统计信息,查看缓存命中率:
spring.jpa.properties.hibernate.generate_statistics=true
查看日志:
Hibernate: 2nd level cache hits: 153, misses: 20
4.3 批量操作优化
@Transactional
public void batchInsert(List<User> users) {int batchSize = 50;for (int i = 0; i < users.size(); i++) {entityManager.persist(users.get(i));  // 持久化单个用户实体// 每处理 50 条数据,刷新并清除缓存if (i % batchSize == 0 && i > 0) {entityManager.flush();  // 将批次中的数据同步到数据库entityManager.clear();  // 清除持久化上下文缓存,防止内存溢出}}
}
解析:
• @Transactional:确保方法执行过程中对数据库的操作具备事务特性。
• entityManager.persist:将每个User实体持久化到数据库。
• entityManager.flush():将内存中的数据刷新到数据库,确保数据持久化。
•entityManager.clear():清除持久化上下文缓存,释放内存,防止数据量大时内存溢出。
五、总结与最佳实践
5.1 核心要点
• 自动配置:Spring Boot 通过自动配置简化了数据库操作,减少了手动配置的工作量。
• 事务管理:使用@Transactional注解,确保数据库操作具备 ACID 特性。
• 性能优化:HikariCP 和 JPA 二级缓存提升了数据库连接和查询性能。
• 灵活集成:Spring Boot 深度集成了 JPA、MyBatis、Flyway 等技术栈。
• 批量操作优化:通过flush和clear,有效减少内存占用并优化批量操作。