Centos7使用lamp架构部署wordpress
Centos7使用lamp架构部署wordpress
1、修改主机名
[root@ws ~]# hostnamectl set-hostname lamp.example.com
[root@ws ~]# bash
2.关闭防火墙和selinux
[root@lamp ~]# systemctl stop firewalld
[root@lamp ~]# systemctl disable firewalld
Removed symlink /etc/systemd/system/multi-user.target.wants/firewalld.service.
Removed symlink /etc/systemd/system/dbus-org.fedoraproject.FirewallD1.service.
[root@lamp ~]# vim /etc/selinux/config
[root@lamp ~]# reboot
3、时钟同步服务器
[root@lamp ~]# rpm -q chrony
chrony-3.2-2.el7.x86_64
[root@lamp ~]# vim /etc/chrony.conf
[root@lamp ~]# systemctl restart chronyd.service
[root@lamp ~]# systemctl enable chronyd.service
Created symlink from /etc/systemd/system/multi-user.target.wants/chronyd.service to /usr/lib/systemd/system/chronyd.service.
[root@lamp ~]# hwclock -w
4.下载源 在浏览器找阿里源
[root@lamp yum.repos.d]# wget -O /etc/yum.repos.d/CentOS-Base.repo https://mirrors.aliyun.com/repo/Centos-7.repo
--2025-08-18 17:01:26--  https://mirrors.aliyun.com/repo/Centos-7.repo
正在解析主机 mirrors.aliyun.com (mirrors.aliyun.com)... 117.92.155.46, 117.92.155.14, 111.173.118.62
正在连接 mirrors.aliyun.com (mirrors.aliyun.com)|117.92.155.46|:443... 已连接。
已发出 HTTP 请求,正在等待回应... 200 OK
长度:2523 (2.5K) [application/octet-stream]
正在保存至: “/etc/yum.repos.d/CentOS-Base.repo”100%[============================================================================>] 2,523       --.-K/s 用时 0s      2025-08-18 17:01:26 (546 MB/s) - 已保存 “/etc/yum.repos.d/CentOS-Base.repo” [2523/2523])
[root@lamp yum.repos.d]# yum -y install epel-release
5.安装httpd和mariadb数据库
[root@lamp ~]# yum -y install httpd mariadb mariadb-server
6.初始化数据库
[root@lamp ~]# systemctl restart mariadb.service
[root@lamp ~]# systemctl enable mariadb.service
Created symlink from /etc/systemd/system/multi-user.target.wants/mariadb.service to /usr/lib/systemd/system/mariadb.service.
[root@lamp ~]# mysql_secure_installation NOTE: RUNNING ALL PARTS OF THIS SCRIPT IS RECOMMENDED FOR ALL MariaDBSERVERS IN PRODUCTION USE!  PLEASE READ EACH STEP CAREFULLY!In order to log into MariaDB to secure it, we'll need the current
password for the root user.  If you've just installed MariaDB, and
you haven't set the root password yet, the password will be blank,
so you should just press enter here.Enter current password for root (enter for none):
OK, successfully used password, moving on...Setting the root password ensures that nobody can log into the MariaDB
root user without the proper authorisation.Set root password? [Y/n] y
New password:
Re-enter new password:
Password updated successfully!
Reloading privilege tables..... Success!By default, a MariaDB installation has an anonymous user, allowing anyone
to log into MariaDB without having to have a user account created for
them.  This is intended only for testing, and to make the installation
go a bit smoother.  You should remove them before moving into a
production environment.Remove anonymous users? [Y/n] y... Success!Normally, root should only be allowed to connect from 'localhost'.  This
ensures that someone cannot guess at the root password from the network.Disallow root login remotely? [Y/n] n... skipping.By default, MariaDB comes with a database named 'test' that anyone can
access.  This is also intended only for testing, and should be removed
before moving into a production environment.Remove test database and access to it? [Y/n] y- Dropping test database...... Success!- Removing privileges on test database...... Success!Reloading the privilege tables will ensure that all changes made so far
will take effect immediately.Reload privilege tables now? [Y/n] y... Success!Cleaning up...All done!  If you've completed all of the above steps, your MariaDB
installation should now be secure.
7.安装php
[root@lamp yum.repos.d]# yum -y install  http://rpms.remirepo.net/enterprise/remi-release-7.rpm
[root@lamp yum.repos.d]# yum -y install yum-utils
[root@lamp ~]# yum-config-manager --enable remi-php70
[root@lamp yum.repos.d]# yum -y install php php-cli php-fpm php-gd php-curl php-zip php-mbstring php-opcache php-intl php-mysqlnd
[root@lamp yum.repos.d]# php -v
[root@lamp ~]# php -v
PHP 7.0.33 (cli) (built: Jun  5 2024 09:34:26) ( NTS )
Copyright (c) 1997-2017 The PHP Group
Zend Engine v3.0.0, Copyright (c) 1998-2017 Zend Technologieswith Zend OPcache v7.0.33, Copyright (c) 1999-2017, by Zend Technologies
查看php版本
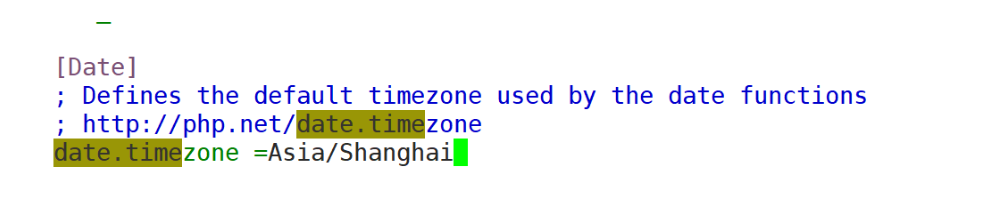
8.配置php,将时区改成亚洲/上海
[root@lamp ~]# vim /etc/php.ini
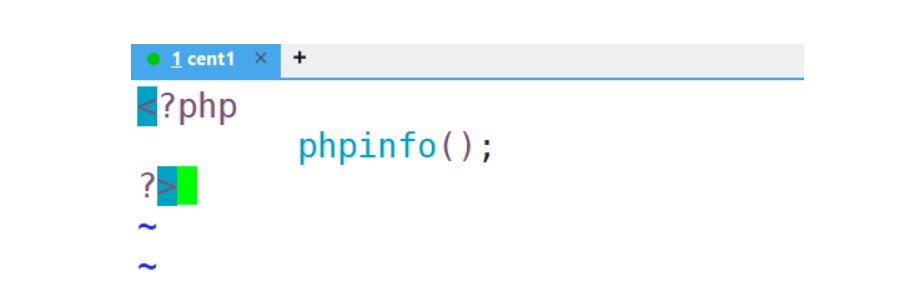
9.配置默认网页
[root@lamp ~]# vim /etc/httpd/conf/httpd.conf

[root@lamp ~]# cd /var/www/html/
[root@lamp html]# ls
[root@lamp html]# vim index.php
[root@lamp html]# systemctl restart httpd
[root@lamp html]# systemctl enable httpd.service
Created symlink from /etc/systemd/system/multi-user.target.wants/httpd.service to /usr/lib/systemd/system/httpd.service.
[root@lamp html]# systemctl restart mariadb.service
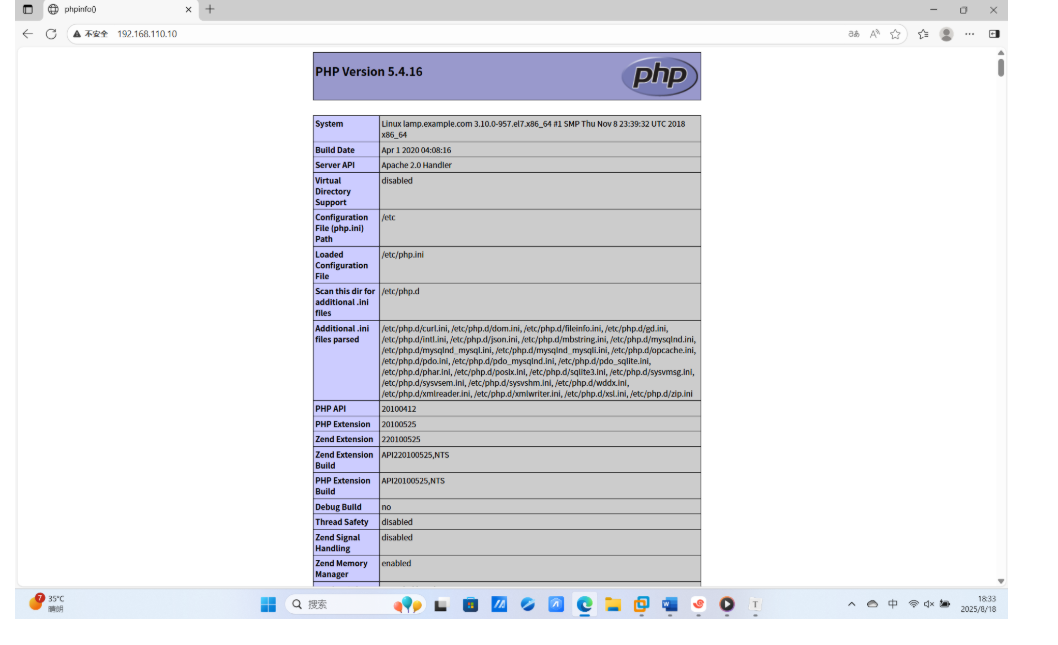
- 测试访问lamp基础架构
11.解压wordpress压缩包
[root@lamp ~]# tar -xzvf  wordpress-6.5.5.tar.gz
[root@lamp ~]# cp -R wordpress /var/www/html/
12.设置wordpress的权限
[root@lamp html]# chown -R apache:apache wordpress/
[root@lamp html]# chmod -R 755 wordpress/
[root@lamp html]# ll wordpress/
总用量 228
-rwxr-xr-x 1 apache apache 405 8月 18 18:38 index.php
-rwxr-xr-x 1 apache apache 19915 8月 18 18:38 license.txt
-rwxr-xr-x 1 apache apache 7401 8月 18 18:38 readme.html
-rwxr-xr-x 1 apache apache 7387 8月 18 18:38 wp-activate.php
drwxr-xr-x 9 apache apache 4096 8月 18 18:38 wp-admin
-rwxr-xr-x 1 apache apache 351 8月 18 18:38 wp-blog-header.php
-rwxr-xr-x 1 apache apache 2323 8月 18 18:38 wp-comments-post.php
-rwxr-xr-x 1 apache apache 3012 8月 18 18:38 wp-config-sample.php
drwxr-xr-x 4 apache apache 52 8月 18 18:38 wp-content
-rwxr-xr-x 1 apache apache 5638 8月 18 18:38 wp-cron.php
drwxr-xr-x 30 apache apache 12288 8月 18 18:38 wp-includes
-rwxr-xr-x 1 apache apache 2502 8月 18 18:38 wp-links-opml.php
-rwxr-xr-x 1 apache apache 3927 8月 18 18:38 wp-load.php
-rwxr-xr-x 1 apache apache 50917 8月 18 18:38 wp-login.php
-rwxr-xr-x 1 apache apache 8525 8月 18 18:38 wp-mail.php
-rwxr-xr-x 1 apache apache 28427 8月 18 18:38 wp-settings.php
-rwxr-xr-x 1 apache apache 34385 8月 18 18:38 wp-signup.php
-rwxr-xr-x 1 apache apache 4885 8月 18 18:38 wp-trackback.php
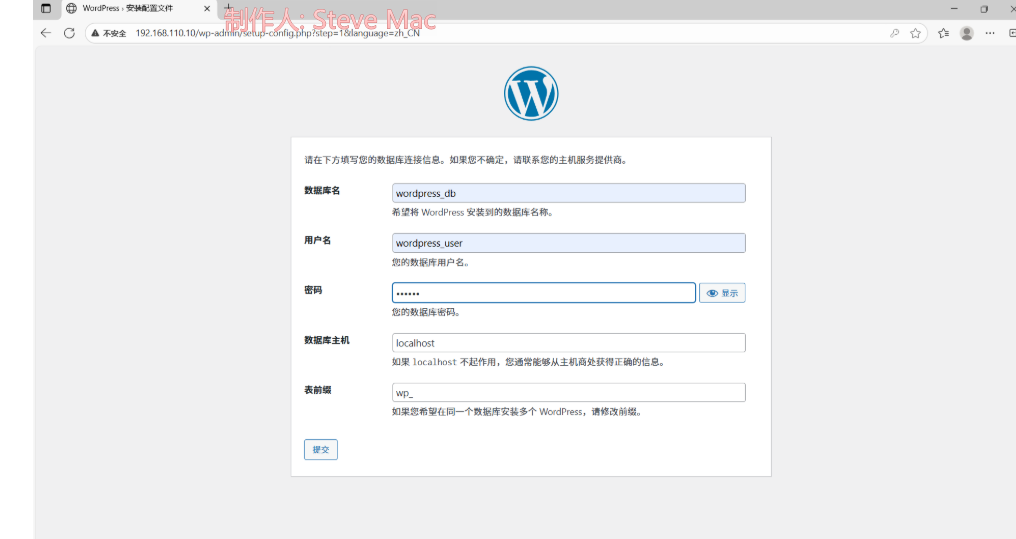
-rwxr-xr-x 1 apache apache 3246 8月 18 18:38 xmlrpc.php13.为wordpress配置数据库
[root@lamp ~]# mysql -uroot -p123456
Welcome to the MariaDB monitor. Commands end with ; or \g.
Your MariaDB connection id is 3
Server version: 5.5.68-MariaDB MariaDB ServerCopyright (c) 2000, 2018, Oracle, MariaDB Corporation Ab and others.Type 'help;' or '\h' for help. Type '\c' to clear the current input statement.MariaDB [(none)]> show databases;
+--------------------+
| Database |
+--------------------+
| information_schema |
| mysql |
| performance_schema |
+--------------------+
3 rows in set (0.00 sec)MariaDB [(none)]> creat database wordpress_db;
ERROR 1064 (42000): You have an error in your SQL syntax; check the manual that corresponds to your MariaDB server version for the right syntax to use near 'creat database wordpress_db' at line 1
MariaDB [(none)]> create database wordpress_db;
Query OK, 1 row affected (0.00 sec)MariaDB [(none)]> create user'wordpress_user'@'localhost' identified by '123456';
Query OK, 0 rows affected (0.00 sec)MariaDB [(none)]> grant all on wordpress_db.* to 'wordpress_user'@'localhost';
Query OK, 0 rows affected (0.00 sec)MariaDB [(none)]> flush privileges;
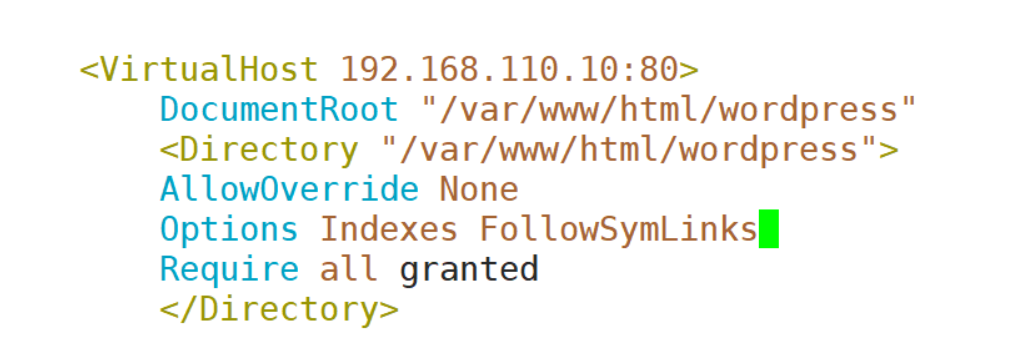
Query OK, 0 rows affected (0.00 sec)14.为wordpress配置站点
[root@lamp ~]# cp -p /usr/share/doc/httpd-2.4.6/httpd-vhosts.conf /etc/httpd/conf.d/
[root@lamp ~]# vim /etc/httpd/conf.d/httpd-vhosts.conf
[root@lamp ~]# systemctl restart httpd.service
[root@lamp ~]# systemctl enable httpd
[root@lamp ~]# systemctl restart mariadb.service
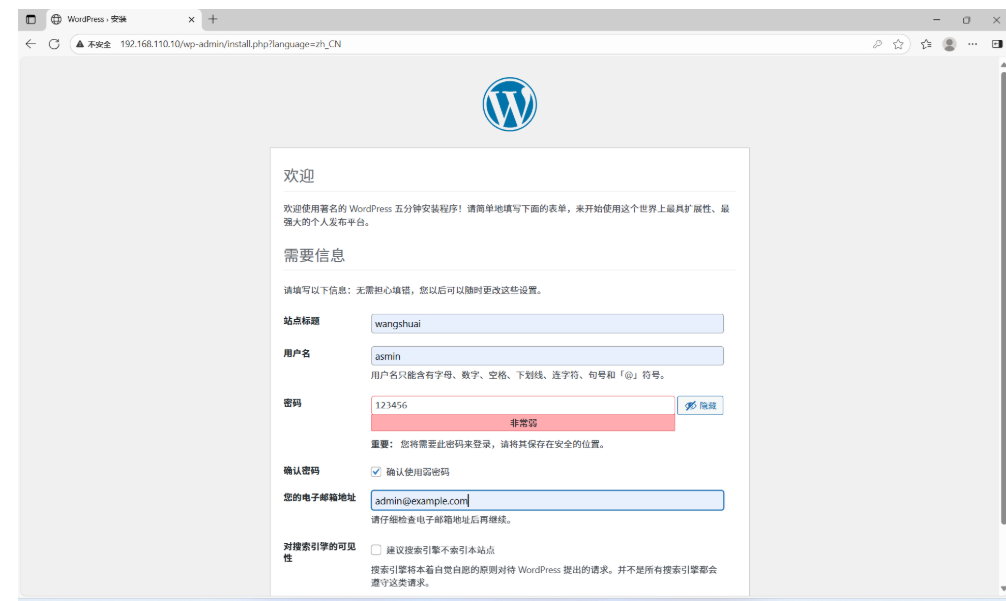
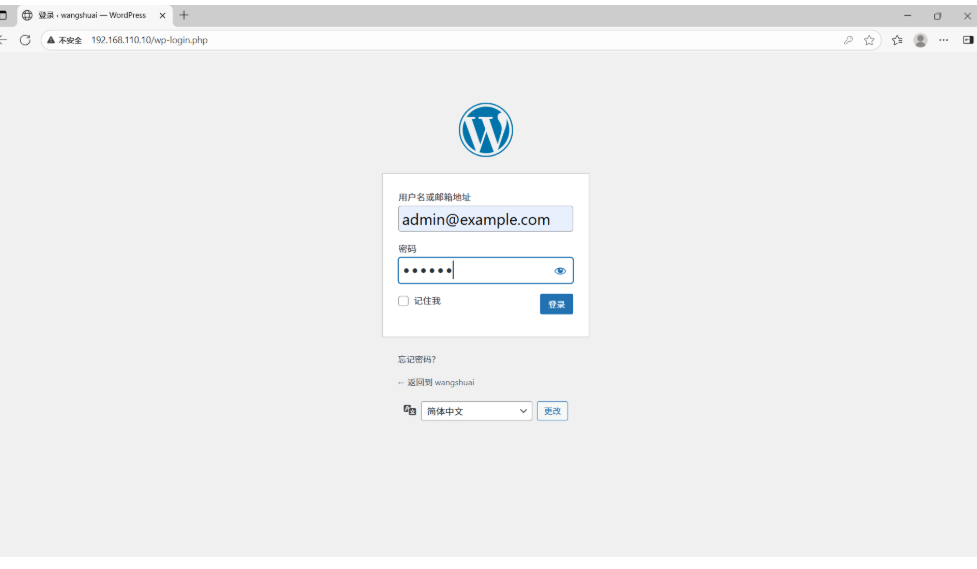
15.使用浏览器访问wordpress站点

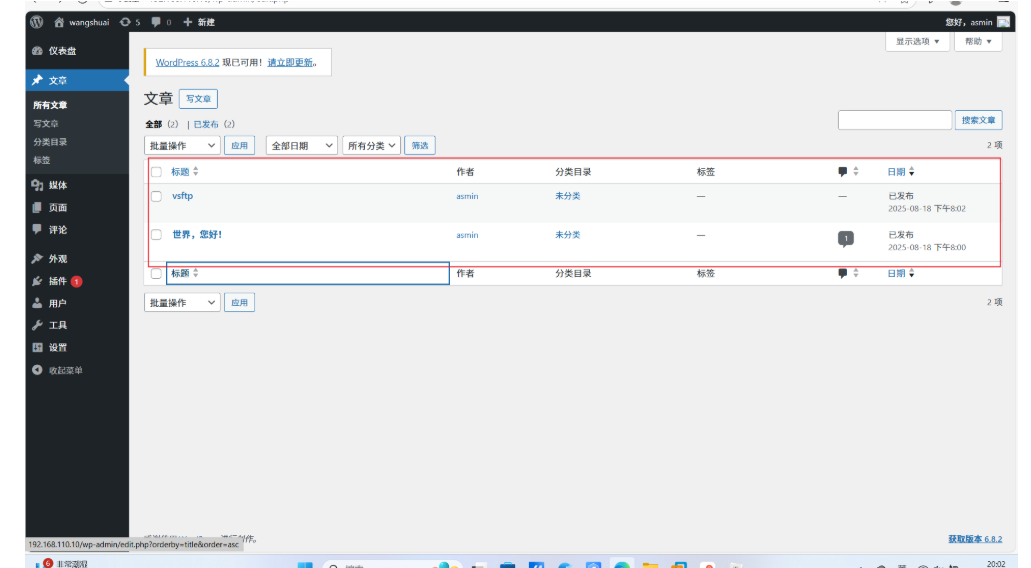
发布的文章