OVS练习笔记20250518
一、创建OVS交换机
1.1 安装OVS
在Ubuntu 系统中安装 Open vSwitch,运行apt-get update更新本地 apt 包索引,确保能获取到最新版本的软件包。运行apt-get install openvswitch-switch,安装 Open vSwitch 的主要组件,包括:
-
ovs-vsctl: 配置工具 -
ovsdb-server: 数据库服务 -
ovs-vswitchd: 数据通道守护进程 -
内核模块(通常已包含在内核中)
root@server1:~#apt-get update
root@server1:~#apt-get install openvswitch-switch
root@server1:~# ovs-vsctl show
49984c65-27c7-4afc-94b1-7fbd58c2f083ovs_version: "2.17.9"
root@server1:~#
当前的 Open vSwitch(OVS)数据库 的 UUID 是:
49984c65-27c7-4afc-94b1-7fbd58c2f083
- (这个 UUID 是
ovsdb-server数据库的唯一标识符,通常无须关注,除非做集群或状态同步。)当前运行的 OVS 版本 是:
2.17.9
- 这是一个相对较新的版本,具备较好的内核集成、OVN 支持、DPDK 兼容性、连接跟踪、Geneve/VXLAN 等现代功能。
运行 lsmod | grep openvswitch 命令列出当前内核中已加载的与 Open vSwitch 相关的内核模块:
root@server1:~# lsmod | grep openvswitch
openvswitch           176128  2
nsh                    16384  1 openvswitch
nf_conncount           24576  1 openvswitch
nf_nat                 49152  4 xt_nat,openvswitch,nft_chain_nat,xt_MASQUERADE
nf_conntrack          172032  8 xt_conntrack,nf_nat,nfnetlink_cttimeout,xt_nat,openvswitch,nf_conntrack_netlink,nf_conncount,xt_MASQUERADE
nf_defrag_ipv6         24576  2 nf_conntrack,openvswitch
libcrc32c              16384  6 nf_conntrack,nf_nat,openvswitch,btrfs,nf_tables,raid456
openvswitch是 Open vSwitch 的核心内核模块。nsh是网络服务头(Network Service Header)支持模块,通常用于 Service Function Chaining(服务函数链)。nf_conncount用于连接跟踪计数,是 Netfilter 的一个模块,用来跟踪连接数量,支持限流等功能。nf_nat模块实现了 NAT(网络地址转换)。nf_conntrack是连接跟踪的主模块,维护网络连接的状态。nf_defrag_ipv6提供 IPv6 分片重组功能。libcrc32c是 CRC32C 校验函数的通用库模块。
1.2 创建OVS交换机
ovs-vsctl add-br br0 是用于创建一个名为 br0 的 Open vSwitch 交换机(桥接设备)的命令。执行该命令后,系统中会出现一个新的虚拟网桥 br0,它的行为类似于传统的 Linux 网桥(如 brctl 创建的),但由 Open vSwitch 内核模块控制,可以通过ovs-vsctl show命令确认创建成功。
root@server1:~# ovs-vsctl add-br br0
root@server1:~# ovs-vsctl show
49984c65-27c7-4afc-94b1-7fbd58c2f083Bridge br0Port br0Interface br0type: internalovs_version: "2.17.9"
root@server1:~#
ovs-vsctl:Open vSwitch 的控制工具,用于配置 ovsdb 数据库。
查看端口:
root@server1:~# ip link show
...
7: ovs-system: <BROADCAST,MULTICAST> mtu 1500 qdisc noop state DOWN mode DEFAULT group default qlen 1000link/ether 9a:8b:05:63:dc:b9 brd ff:ff:ff:ff:ff:ff
8: br0: <BROADCAST,MULTICAST> mtu 1500 qdisc noop state DOWN mode DEFAULT group default qlen 1000link/ether aa:de:69:78:93:44 brd ff:ff:ff:ff:ff:ff
ovs-system是 OVS 内部使用的一个特殊桥接接口,用于 OVS 守护进程之间的通信。它不直接用于连接虚拟机或物理网络。qdisc noop: 这是接口的排队规则 (Queueing Discipline),设置为noop,表示没有特殊的排队策略。数据包会立即发送。qlen 1000: 这是接口的发送队列长度 (Queue Length),设置为 1000。这表示在数据包被发送之前,可以在该队列中等待的最大数据包数量。
二、虚机接入OVS交换机
通过 KVM 创建两台虚拟机,并将它们的虚拟网卡(vNIC)连接到 Open vSwitch 的 br0 虚拟交换机,实现虚拟机间的网络互通与网络功能扩展。
2.1 创建虚机
参考:Ubuntu22.04 KVM安装笔记
1、下载image
wget http://download.cirros-cloud.net/0.4.0/cirros-0.4.0-x86_64-disk.img
cirros-0.4.0-x86_64-disk.img这是一个 Cirros 的 QCOW2 格式的 云镜像(Cloud Image),通常用作 OpenStack 或 KVM 虚拟化环境中的轻量测试系统盘。它是可读写的,并带有 cloud-init 支持。
不能使用同一个 cirros-0.4.0-x86_64-disk.img 文件,创建多个独立运行的虚拟机,因为它会被多个虚机同时读写,导致文件系统损坏。推荐的做法是把这个.img文件作为一个基础镜像(只读),每个虚拟机都有自己的“差异盘”(写时复制(QCOW2)镜像)。
如果只读挂载该镜像(例如光盘镜像 .iso),则多个虚机可同时使用。
2、创建差异盘
qemu-img create -f qcow2 -b cirros-0.4.0-x86_64-disk.img -F qcow2 test1.img
qemu-img create -f qcow2 -b cirros-0.4.0-x86_64-disk.img -F qcow2 test2.img
root@server1:~# qemu-img create -f qcow2 -b cirros-0.4.0-x86_64-disk.img -F qcow2 test1.img
Formatting 'test1.img', fmt=qcow2 cluster_size=65536 extended_l2=off compression_type=zlib size=46137344 backing_file=cirros-0.4.0-x86_64-disk.img backing_fmt=qcow2 lazy_refcounts=off refcount_bits=16
root@server1:~# qemu-img create -f qcow2 -b cirros-0.4.0-x86_64-disk.img -F qcow2 test2.img
Formatting 'test2.img', fmt=qcow2 cluster_size=65536 extended_l2=off compression_type=zlib size=46137344 backing_file=cirros-0.4.0-x86_64-disk.img backing_fmt=qcow2 lazy_refcounts=off refcount_bits=16
root@server1:~# root@server1:~# ls -l *.img
-rw-r--r-- 1 root root 30146560 Mar 15 14:21 cirros-0.4.0-x86_64-disk-2.img
-rw-r--r-- 1 root root 30605312 Mar 15 14:24 cirros-0.4.0-x86_64-disk.img
-rw-r--r-- 1 root root   196616 May 16 22:31 test1.img
-rw-r--r-- 1 root root   196616 May 16 22:31 test2.img
root@server1:~#
参数说明:
-f qcow2:表示要创建的新镜像是 qcow2 格式;
-b cirros-0.4.0-x86_64-disk.img:指定基础镜像;
-F qcow2:明确声明基础镜像的格式,避免自动检测时出警告。
3、使用差异盘创建虚机:
virt-install --name=test1 --ram=512 --vcpus=1 --disk path=test1.img,format=qcow2 --import --network network:default --osinfo cirros0.4.0 --noautoconsole
root@server1:~# virt-install  --name=test1 --ram=512 --vcpus=1 --disk path=test1.img,format=qcow2 --import --network network:default --osinfo cirros0.4.0 --noautoconsole      Starting install...
Creating domain...                                                                                                                                                                                                                       |    0 B  00:00:00
Domain creation completed.
root@server1:~#
root@server1:~# virt-install  --name=test2 --ram=512 --vcpus=1 --disk path=test2.img,format=qcow2 --import --network network:default --osinfo cirros0.4.0 --noautoconsole  Starting install...
Creating domain...                                                                                                                                                                                                                       |    0 B  00:00:00
Domain creation completed.
root@server1:~#
--import表示你已经准备好了磁盘镜像,不再从 ISO 光盘或网络引导安装系统。VM 会从磁盘直接启动
--noautoconsole虚拟机启动后不自动连接控制台,命令会直接退出,不会进入virsh console模式
4、查看虚机网络连接
root@server1:~# ip link
...
4: ovs-system: <BROADCAST,MULTICAST> mtu 1500 qdisc noop state DOWN mode DEFAULT group default qlen 1000link/ether 9a:8b:05:63:dc:b9 brd ff:ff:ff:ff:ff:ff
5: br0: <BROADCAST,MULTICAST> mtu 1500 qdisc noop state DOWN mode DEFAULT group default qlen 1000link/ether aa:de:69:78:93:44 brd ff:ff:ff:ff:ff:ff
6: virbr0: <BROADCAST,MULTICAST,UP,LOWER_UP> mtu 1500 qdisc noqueue state UP mode DEFAULT group default qlen 1000link/ether 52:54:00:ea:3b:39 brd ff:ff:ff:ff:ff:ff9: vnet0: <BROADCAST,MULTICAST,UP,LOWER_UP> mtu 1500 qdisc noqueue master virbr0 state UNKNOWN mode DEFAULT group default qlen 1000link/ether a6:4b:03:2b:eb:4b brd ff:ff:ff:ff:ff:ff
10: vnet1: <BROADCAST,MULTICAST,UP,LOWER_UP> mtu 1500 qdisc noqueue master virbr0 state UNKNOWN mode DEFAULT group default qlen 1000link/ether fe:54:00:d0:13:4d brd ff:ff:ff:ff:ff:ffroot@server1:~# brctl show
bridge name     bridge id               STP enabled     interfaces
docker0         8000.a2c5f603df9b       no              veth7369266
virbr0          8000.525400ea3b39       yes             vnet0vnet1
root@server1:~# ovs-vsctl show
49984c65-27c7-4afc-94b1-7fbd58c2f083Bridge br0Port br0Interface br0type: internalovs_version: "2.17.9"
root@server1:~# 当前的两个虚拟机网卡(vnet0 和 vnet1)连接在 libvirt 默认创建的 NAT 网桥 virbr0 上,而不是 Open vSwitch 网桥(如 br-ovs)。
可以通过virsh edit命令查看当前虚拟机的网卡配置,比如当前虚拟机 test1 的网卡配置如下:
root@server1:~# virsh net-listName      State    Autostart   Persistent
--------------------------------------------default   active   yes         yesroot@server1:~# virsh edit test1
...<interface type='network'><mac address='52:54:00:4a:c3:3b'/><source network='default'/><model type='virtio'/><address type='pci' domain='0x0000' bus='0x00' slot='0x03' function='0x0'/></interface>
2.2 虚机接入OVS交换机
1、虚机端口接入OVS交换机
通过virsh edit命令,编辑虚拟机的 XML 配置文件:
<interface type='bridge'> # 修改
<mac address='52:54:00:4a:c3:3b'/>
<source bridge='br0'/> # 修改
<virtualport type='openvswitch'/> # 新增
<model type='virtio'/>
<address type='pci' domain='0x0000' bus='0x00' slot='0x03' function='0x0'/>
</interface>
1、修改test1网卡配置:
root@server1:~# virsh edit test1
domain 'test1' XML configuration edited.修改内容:<interface type='bridge'> # 修改<mac address='52:54:00:4a:c3:3b'/><source bridge='br0'/>  # 修改<virtualport type='openvswitch'/> # 新增<model type='virtio'/><address type='pci' domain='0x0000' bus='0x00' slot='0x03' function='0x0'/></interface>2、修改test2网卡配置
root@server1:~# virsh edit test2
domain 'test2' XML configuration edited.
修改内容:<interface type='bridge'><mac address='52:54:00:d0:13:4d'/><source bridge='br0'/><virtualport type='openvswitch'><parameters interfaceid='8d50e578-b3f1-4f36-9359-38514776767e'/></virtualport><model type='virtio'/><address type='pci' domain='0x0000' bus='0x00' slot='0x03' function='0x0'/></interface>
- <interface type='bridge'> 表示该网卡类型是“桥接模式”,不是 NAT、网络池等。
- <source bridge='br0'/> 指定使用宿主机上的网桥 br0(你手动配置的 OVS 网桥名)来转发网络流量。
- <virtualport type='openvswitch'/> 告诉 libvirt:这个桥接口使用的是 Open vSwitch 类型的虚拟端口(不是 Linux 原生 bridge)。这让 libvirt 与 OVS 正确通信,并允许 OVS 特性如流表控制、生成功能端口名等。
2、重启虚拟机使更改生效
root@server1:~# virsh shutdown test1
Domain 'test1' is being shutdownroot@server1:~# virsh shutdown test2
Domain 'test2' is being shutdownroot@server1:~# virsh start test1
Domain 'test1' startedroot@server1:~# virsh start test2
Domain 'test2' startedroot@server1:~#
virsh shutdown和virsh destroy都可以关闭虚拟机,但作用方式和后果有本质区别:
- virsh shutdown请求虚拟机正常关机,相当于在虚拟机关机按钮上点击“关机”。安全、可保存状态、文件系统干净关闭。
- virsh destroy强制断电,相当于直接拔电源。立刻终止虚拟机进程,不经过客系统任何交互。
3、 查看虚机网络连接
root@server1:~# brctl show
bridge name bridge id STP enabled interfaces
docker0 8000.a2c5f603df9b no veth7369266
virbr0 8000.525400ea3b39 yes
root@server1:~# ovs-vsctl show
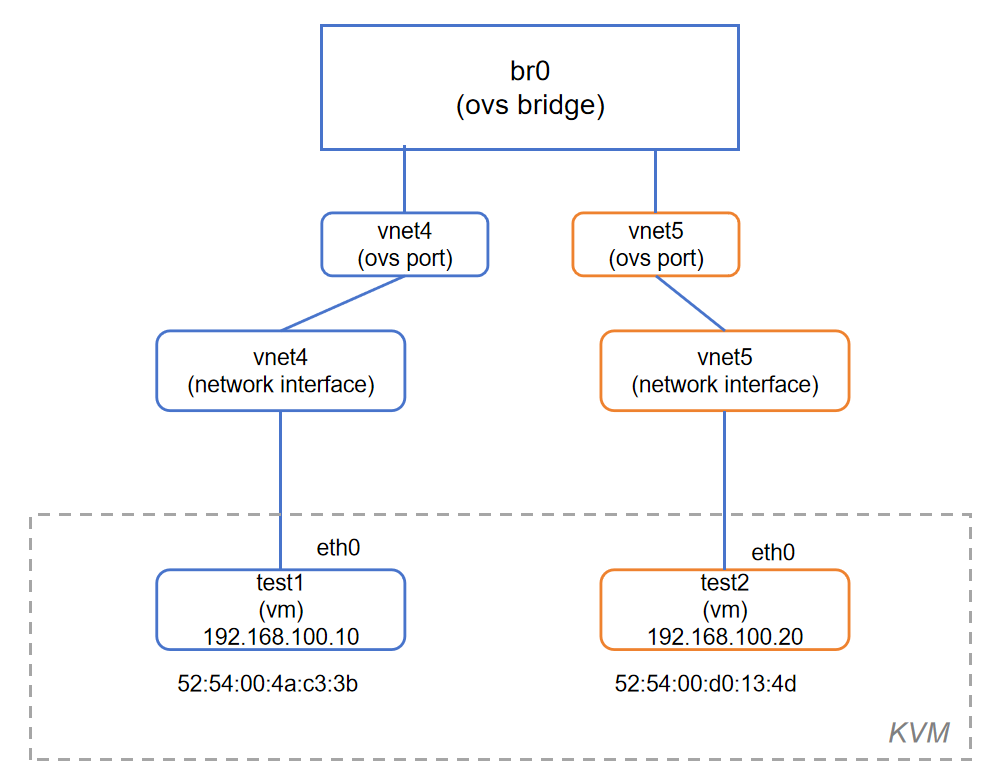
49984c65-27c7-4afc-94b1-7fbd58c2f083Bridge br0Port vnet4Interface vnet4Port br0Interface br0type: internalPort vnet5Interface vnet5ovs_version: "2.17.9"
root@server1:~# Port vnet4 / vnet5 说明已经有两台虚拟机的虚拟网卡(由 libvirt 分配)成功加入了 br0
查看主机中所有网络接口的基本信息:
root@server1:~# ip link show
1: lo: <LOOPBACK,UP,LOWER_UP> mtu 65536 qdisc noqueue state UNKNOWN mode DEFAULT group default qlen 1000link/loopback 00:00:00:00:00:00 brd 00:00:00:00:00:00
2: ens32: <BROADCAST,MULTICAST,UP,LOWER_UP> mtu 1500 qdisc fq_codel state UP mode DEFAULT group default qlen 1000link/ether 00:50:56:22:d0:b4 brd ff:ff:ff:ff:ff:ffaltname enp2s0
3: ens34: <BROADCAST,MULTICAST,UP,LOWER_UP> mtu 1500 qdisc fq_codel state UP mode DEFAULT group default qlen 1000link/ether 00:0c:29:f4:b7:f9 brd ff:ff:ff:ff:ff:ffaltname enp2s2
4: ovs-system: <BROADCAST,MULTICAST> mtu 1500 qdisc noop state DOWN mode DEFAULT group default qlen 1000link/ether 9a:8b:05:63:dc:b9 brd ff:ff:ff:ff:ff:ff
5: br0: <BROADCAST,MULTICAST> mtu 1500 qdisc noop state DOWN mode DEFAULT group default qlen 1000link/ether aa:de:69:78:93:44 brd ff:ff:ff:ff:ff:ff
6: virbr0: <NO-CARRIER,BROADCAST,MULTICAST,UP> mtu 1500 qdisc noqueue state DOWN mode DEFAULT group default qlen 1000link/ether 52:54:00:ea:3b:39 brd ff:ff:ff:ff:ff:ff
7: docker0: <BROADCAST,MULTICAST,UP,LOWER_UP> mtu 1500 qdisc noqueue state UP mode DEFAULT group default link/ether a2:c5:f6:03:df:9b brd ff:ff:ff:ff:ff:ff
8: veth7369266@if2: <BROADCAST,MULTICAST,UP,LOWER_UP> mtu 1500 qdisc noqueue master docker0 state UP mode DEFAULT group default link/ether 32:01:06:5b:84:a9 brd ff:ff:ff:ff:ff:ff link-netnsid 0
13: vnet4: <BROADCAST,MULTICAST,UP,LOWER_UP> mtu 1500 qdisc fq_codel master ovs-system state UNKNOWN mode DEFAULT group default qlen 1000link/ether fe:54:00:4a:c3:3b brd ff:ff:ff:ff:ff:ff
14: vnet5: <BROADCAST,MULTICAST,UP,LOWER_UP> mtu 1500 qdisc fq_codel master ovs-system state UNKNOWN mode DEFAULT group default qlen 1000link/ether 0e:81:44:ec:c6:9f brd ff:ff:ff:ff:ff:ff
root@server1:~#
vnet4,只会显示 master ovs-system,不能分辨具体是哪个 OVS 桥
4、查看虚拟机的虚拟网卡(vNIC)与 Open vSwitch(OVS)交换机端口之间的对应关系。
root@server1:~# ovs-vsctl list-ports br0
vnet4
vnet5
root@server1:~# ovs-vsctl list-ifaces br0
vnet4
vnet5
root@server1:~# virsh domiflist test1Interface   Type     Source   Model    MAC
-----------------------------------------------------------vnet4       bridge   br0      virtio   52:54:00:4a:c3:3broot@server1:~# virsh domiflist test2Interface   Type     Source   Model    MAC
-----------------------------------------------------------vnet5       bridge   br0      virtio   52:54:00:d0:13:4droot@server1:~#
2.3 虚机ping测试
1、虚机test1配置IP
root@server1:~# virsh console test1
$ sudo ip addr add 192.168.100.10/24 dev eth0
$ ip a
1: lo: <LOOPBACK,UP,LOWER_UP> mtu 65536 qdisc noqueue qlen 1link/loopback 00:00:00:00:00:00 brd 00:00:00:00:00:00inet 127.0.0.1/8 scope host lovalid_lft forever preferred_lft foreverinet6 ::1/128 scope host valid_lft forever preferred_lft forever
2: eth0: <BROADCAST,MULTICAST,UP,LOWER_UP> mtu 1500 qdisc pfifo_fast qlen 1000link/ether 52:54:00:4a:c3:3b brd ff:ff:ff:ff:ff:ffinet 192.168.100.10/24 scope global eth0valid_lft forever preferred_lft foreverinet6 fe80::5054:ff:fe4a:c33b/64 scope link valid_lft forever preferred_lft forever
$
2、虚机test2配置IP
root@server1:~# virsh console test2
$ sudo ip addr add 192.168.100.20/24 dev eth0
$ ip a
1: lo: <LOOPBACK,UP,LOWER_UP> mtu 65536 qdisc noqueue qlen 1link/loopback 00:00:00:00:00:00 brd 00:00:00:00:00:00inet 127.0.0.1/8 scope host lovalid_lft forever preferred_lft foreverinet6 ::1/128 scope host valid_lft forever preferred_lft forever
2: eth0: <BROADCAST,MULTICAST,UP,LOWER_UP> mtu 1500 qdisc pfifo_fast qlen 1000link/ether 52:54:00:d0:13:4d brd ff:ff:ff:ff:ff:ffinet 192.168.100.20/24 scope global eth0valid_lft forever preferred_lft foreverinet6 fe80::5054:ff:fed0:134d/64 scope link valid_lft forever preferred_lft forever
3、ping之前,查看OVS转发表
运行ovs-appctl fdb/show br0查看 Open vSwitch(OVS) 网桥 br0 的 FDB(转发表 / forwarding database)内容。
root@server1:~# ovs-appctl fdb/show br0port  VLAN  MAC                Age
root@server1:~#
结果为空,表示当前:
br0上 没有学习到任何 MAC 地址
4、开启tcpdump
使用 tcpdump 命令同时抓取 ARP 和 ICMP 包,在接口 vnet4 上:
tcpdump -i vnet4 arp or icmp
5、test1 ping test2
$ ping -c 4 192.168.100.20
PING 192.168.100.20 (192.168.100.20): 56 data bytes
64 bytes from 192.168.100.20: seq=0 ttl=64 time=6.874 ms
64 bytes from 192.168.100.20: seq=1 ttl=64 time=0.427 ms
64 bytes from 192.168.100.20: seq=2 ttl=64 time=0.445 ms
64 bytes from 192.168.100.20: seq=3 ttl=64 time=0.359 ms--- 192.168.100.20 ping statistics ---
4 packets transmitted, 4 packets received, 0% packet loss
round-trip min/avg/max = 0.359/2.026/6.874 ms
$
tcpdump显示:
root@server1:~# tcpdump -i vnet4 arp or icmp
tcpdump: verbose output suppressed, use -v[v]... for full protocol decode
listening on vnet4, link-type EN10MB (Ethernet), snapshot length 262144 bytes
07:47:42.315211 ARP, Request who-has 192.168.100.20 tell 192.168.100.10, length 28
07:47:42.317953 ARP, Reply 192.168.100.20 is-at 52:54:00:d0:13:4d (oui Unknown), length 28
07:47:42.318408 IP 192.168.100.10 > 192.168.100.20: ICMP echo request, id 16641, seq 0, length 64
07:47:42.319229 IP 192.168.100.20 > 192.168.100.10: ICMP echo reply, id 16641, seq 0, length 64
07:47:43.321990 IP 192.168.100.10 > 192.168.100.20: ICMP echo request, id 16641, seq 1, length 64
07:47:43.322217 IP 192.168.100.20 > 192.168.100.10: ICMP echo reply, id 16641, seq 1, length 64
07:47:44.323116 IP 192.168.100.10 > 192.168.100.20: ICMP echo request, id 16641, seq 2, length 64
07:47:44.323369 IP 192.168.100.20 > 192.168.100.10: ICMP echo reply, id 16641, seq 2, length 64
07:47:45.323914 IP 192.168.100.10 > 192.168.100.20: ICMP echo request, id 16641, seq 3, length 64
07:47:45.324110 IP 192.168.100.20 > 192.168.100.10: ICMP echo reply, id 16641, seq 3, length 64
07:47:47.329644 ARP, Request who-has 192.168.100.10 tell 192.168.100.20, length 28
07:47:47.329809 ARP, Reply 192.168.100.10 is-at 52:54:00:4a:c3:3b (oui Unknown), length 28
查看ovs转发表:
root@server1:~# ovs-appctl fdb/show br0port  VLAN  MAC                Age3     0  52:54:00:4a:c3:3b  1604     0  52:54:00:d0:13:4d  160
root@server1:~#
OVS 成功学习到了test1/test2虚机MAC 地址,说明它们最近有过通信(例如 DHCP 请求、ARP、ping 等)
三、虚机固定接口名接入OVS交换机
3.1 虚机端口添加固定接口名
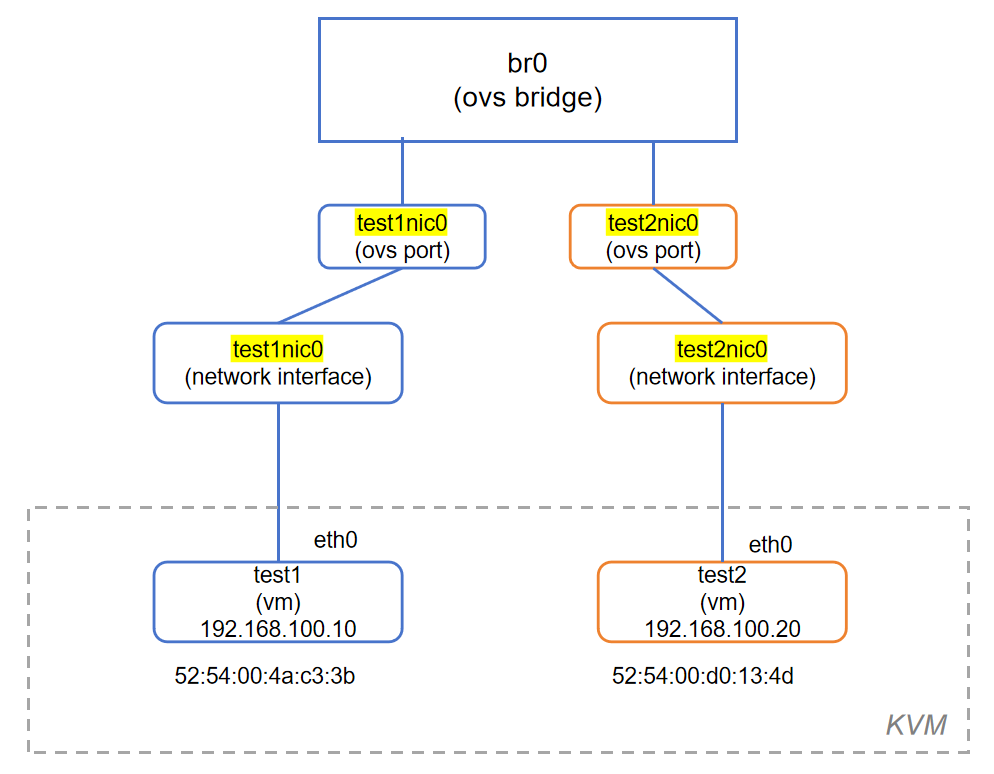
虚拟机启动时生成的 vnetX 名字由内核分配,不一定固定。
在 libvirt XML 中,可以通过 <target dev='xxx'/> 元素为虚拟机的虚拟网卡(通常是 tap 设备)指定一个固定的接口名,这样在宿主机上就不会再出现自动分配的 vnet0/vnet1,而是你指定的名字,比如 test1nic0。
在 virsh edit test1 中配置如下段落(test2相应修改):
<interface type='bridge'>
<mac address='52:54:00:aa:bb:cc'/>
<source bridge='br0'/>
<model type='virtio'/>
<target dev='test1nic0'/> # 新增
<virtualport type='openvswitch'/>
</interface>
root@server1:~# virsh edit test1
Domain 'test1' XML configuration edited.
增加:<interface type='bridge'>...<target dev='test1nic0'/> # 新增...</interface>root@server1:~# virsh shutdown test1
Domain 'test1' is being shutdownroot@server1:~# virsh start test1
Domain 'test1' startedroot@server1:~#
root@server1:~# root@server1:~# virsh edit test2
Domain 'test2' XML configuration edited.
增加:<interface type='bridge'>...<target dev='test2nic0'/> # 新增...</interface>root@server1:~# virsh shutdown test2
Domain 'test2' is being shutdownroot@server1:~# virsh start test2
Domain 'test2' startedroot@server1:~#
3.2 检查修改结果
root@server1:~# ovs-vsctl show
49984c65-27c7-4afc-94b1-7fbd58c2f083Bridge br0Port br0Interface br0type: internalPort test1nic0Interface test1nic0Port test2nic0Interface test2nic0ovs_version: "2.17.9"
root@server1:~# ip link4: ovs-system: <BROADCAST,MULTICAST> mtu 1500 qdisc noop state DOWN mode DEFAULT group default qlen 1000link/ether 9a:8b:05:63:dc:b9 brd ff:ff:ff:ff:ff:ff
5: br0: <BROADCAST,MULTICAST> mtu 1500 qdisc noop state DOWN mode DEFAULT group default qlen 1000link/ether aa:de:69:78:93:44 brd ff:ff:ff:ff:ff:ff
6: virbr0: <NO-CARRIER,BROADCAST,MULTICAST,UP> mtu 1500 qdisc noqueue state DOWN mode DEFAULT group default qlen 1000link/ether 52:54:00:ea:3b:39 brd ff:ff:ff:ff:ff:ff15: test1nic0: <BROADCAST,MULTICAST,UP,LOWER_UP> mtu 1500 qdisc fq_codel master ovs-system state UNKNOWN mode DEFAULT group default qlen 1000link/ether fe:54:00:4a:c3:3b brd ff:ff:ff:ff:ff:ff
16: test2nic0: <BROADCAST,MULTICAST,UP,LOWER_UP> mtu 1500 qdisc fq_codel master ovs-system state UNKNOWN mode DEFAULT group default qlen 1000link/ether fe:54:00:d0:13:4d brd ff:ff:ff:ff:ff:ff
root@server1:~#
- 当前的输出信息说明虚拟机的网卡接口已经成功通过固定名称接入 OVS 交换机
br0。br0的状态为DOWN只说明没有 IP 或没有直接物理接口加入它,不影响虚拟机通信。因为 OVS 控制的是 L2 交换,虚机之间仍能通信,只要它们连到了br0。
3.3 查看OVS port的编号和名称对应关系
test1 ping test2后,查看转发表:
root@server1:~# ovs-appctl fdb/show br0port  VLAN  MAC                Age5     0  52:54:00:4a:c3:3b   196     0  52:54:00:d0:13:4d   19
root@server1:~# port编号和名称对应关系,可以运行ovs-ofctl show br0查看,这条命令的输出会列出每个 port 的编号、名称和状态。
1、查看端口编号和端口名称关系:
root@server1:~# ovs-ofctl show br0
OFPT_FEATURES_REPLY (xid=0x2): dpid:0000aade69789344
n_tables:254, n_buffers:0
capabilities: FLOW_STATS TABLE_STATS PORT_STATS QUEUE_STATS ARP_MATCH_IP
actions: output enqueue set_vlan_vid set_vlan_pcp strip_vlan mod_dl_src mod_dl_dst mod_nw_src mod_nw_dst mod_nw_tos mod_tp_src mod_tp_dst5(test1nic0): addr:fe:54:00:4a:c3:3bconfig:     0state:      0current:    10MB-FD COPPERspeed: 10 Mbps now, 0 Mbps max6(test2nic0): addr:fe:54:00:d0:13:4dconfig:     0state:      0current:    10MB-FD COPPERspeed: 10 Mbps now, 0 Mbps maxLOCAL(br0): addr:aa:de:69:78:93:44config:     PORT_DOWNstate:      LINK_DOWNspeed: 0 Mbps now, 0 Mbps max
OFPT_GET_CONFIG_REPLY (xid=0x4): frags=normal miss_send_len=0
root@server1:~# 2、具体查看某个端口名称的编号:
root@server1:~# ovs-ofctl show br0 | grep -A 1 'test1nic0'5(test1nic0): addr:fe:54:00:4a:c3:3bconfig:     0
root@server1:~#
OVS(Open vSwitch)中的 port 编号(port number) 是由 OVS 动态分配的,无法直接在配置中手动指定或固定。
四、相同VLAN虚机接入相同OVS交换机
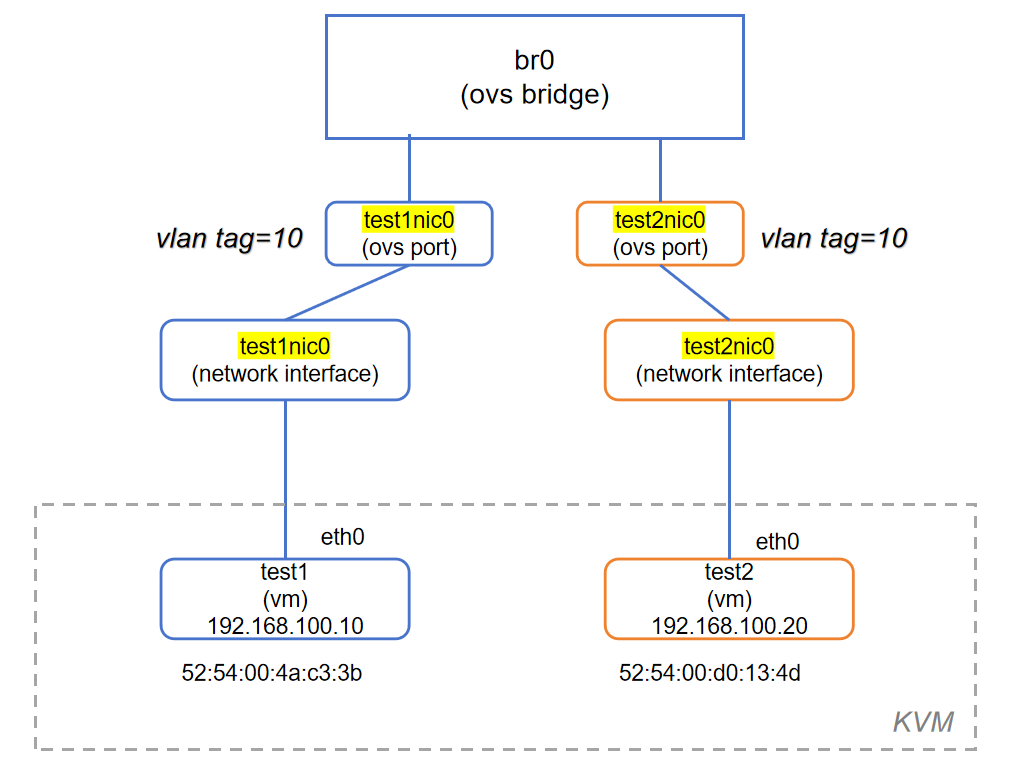
4.1 虚机端口添加VALN Tag
在 KVM/Libvirt 虚拟化环境中,如果你希望虚拟机的网卡接口通过 VLAN Tagging(打 VLAN 标签)接入某个 VLAN,可以通过 virsh edit <vm-name> 修改其网络接口配置来实现。
<interface type='bridge'>
<mac address='52:54:00:4a:c3:3b'/>
<source bridge='br0'/>
<virtualport type='openvswitch'>
<parameters interfaceid='12743ed2-6dee-4f93-bbf2-61b77a2f76a9'/>
</virtualport>
<vlan> # 新增
<tag id='10'/>
</vlan>
<target dev='test1nic0'/>
<model type='virtio'/>
<address type='pci' domain='0x0000' bus='0x00' slot='0x03' function='0x0'/>
</interface>
1、test1修改:
root@server1:~# virsh edit test1
Domain 'test1' XML configuration edited.
修改:<interface type='bridge'>...<vlan> # 增加<tag id='10'/></vlan>...</interface>root@server1:~# virsh shutdown test1
Domain 'test1' is being shutdownroot@server1:~# virsh start test1
Domain 'test1' started2、test2修改:
root@server1:~# virsh edit test2
Domain 'test2' XML configuration edited.
修改:<interface type='bridge'>...<vlan> # 增加<tag id='10'/></vlan>...</interface>root@server1:~# virsh shutdown test2
Domain 'test2' is being shutdownroot@server1:~# virsh start
error: command 'start' requires <domain> option
root@server1:~# virsh start test2
Domain 'test2' started
4.2 检查修改结果
root@server1:~# ovs-vsctl show
49984c65-27c7-4afc-94b1-7fbd58c2f083Bridge br0Port test1nic0tag: 10Interface test1nic0Port test2nic0tag: 10Interface test2nic0Port br0Interface br0type: internalovs_version: "2.17.9"
已经成功地将两个虚拟机网卡
test1nic0和test2nic0接入到了 OVS 的br0虚拟交换机中,并都打上了 VLAN tag 10。
root@server1:~# ovs-vsctl list port test1nic0
_uuid               : 788c894c-04e0-45a2-ac46-391db534aa04
bond_active_slave   : []
bond_downdelay      : 0
bond_fake_iface     : false
bond_mode           : []
bond_updelay        : 0
cvlans              : []
external_ids        : {}
fake_bridge         : false
interfaces          : [495c3cb8-8db4-4dbd-9948-29b397a22527]
lacp                : []
mac                 : []
name                : test1nic0
other_config        : {}
protected           : false
qos                 : []
rstp_statistics     : {}
rstp_status         : {}
statistics          : {}
status              : {}
tag                 : 10  <----说明是一个access port
trunks              : []
vlan_mode           : []
root@server1:~#
4.3 虚机ping测试
1、虚机配置IP地址
由于test1/test2重启,需重新配置IP地址:
test1: 192.168.100.10/24
test2: 192.168.100.20/24
2、ping之前,查看转发表
root@server1:~# ovs-appctl fdb/show br0port VLAN MAC Age3、开启tcpdump
root@server1:~# tcpdump -i test1nic0 arp or icmp
tcpdump: verbose output suppressed, use -v[v]... for full protocol decode
listening on test1nic0, link-type EN10MB (Ethernet), snapshot length 262144 bytes
4、test1 ping test2
(test1 ping test2)
$ ping -c 4 192.168.100.20
PING 192.168.100.20 (192.168.100.20): 56 data bytes
64 bytes from 192.168.100.20: seq=0 ttl=64 time=6.871 ms
64 bytes from 192.168.100.20: seq=1 ttl=64 time=0.386 ms
64 bytes from 192.168.100.20: seq=2 ttl=64 time=0.389 ms
64 bytes from 192.168.100.20: seq=3 ttl=64 time=0.313 ms--- 192.168.100.20 ping statistics ---
4 packets transmitted, 4 packets received, 0% packet loss
round-trip min/avg/max = 0.313/1.989/6.871 ms
$
tcpdump:
root@server1:~# tcpdump -i test1nic0 arp or icmp
tcpdump: verbose output suppressed, use -v[v]... for full protocol decode
listening on test1nic0, link-type EN10MB (Ethernet), snapshot length 262144 bytes
09:34:34.876873 ARP, Request who-has 192.168.100.20 tell 192.168.100.10, length 28
09:34:34.879861 ARP, Reply 192.168.100.20 is-at 52:54:00:d0:13:4d (oui Unknown), length 28
09:34:34.880302 IP 192.168.100.10 > 192.168.100.20: ICMP echo request, id 16129, seq 0, length 64
09:34:34.881401 IP 192.168.100.20 > 192.168.100.10: ICMP echo reply, id 16129, seq 0, length 64
09:34:35.878179 IP 192.168.100.10 > 192.168.100.20: ICMP echo request, id 16129, seq 1, length 64
09:34:35.878306 IP 192.168.100.20 > 192.168.100.10: ICMP echo reply, id 16129, seq 1, length 64
09:34:36.878886 IP 192.168.100.10 > 192.168.100.20: ICMP echo request, id 16129, seq 2, length 64
09:34:36.879009 IP 192.168.100.20 > 192.168.100.10: ICMP echo reply, id 16129, seq 2, length 64
09:34:37.879772 IP 192.168.100.10 > 192.168.100.20: ICMP echo request, id 16129, seq 3, length 64
09:34:37.879913 IP 192.168.100.20 > 192.168.100.10: ICMP echo reply, id 16129, seq 3, length 64
09:34:39.890194 ARP, Request who-has 192.168.100.10 tell 192.168.100.20, length 28
09:34:39.890414 ARP, Reply 192.168.100.10 is-at 52:54:00:4a:c3:3b (oui Unknown), length 28
OVS转发表:
root@server1:~# ovs-appctl fdb/show br0port  VLAN  MAC                Age7    10  52:54:00:4a:c3:3b   948    10  52:54:00:d0:13:4d   94
root@server1:~# root@server1:~# ovs-ofctl show br0 | grep test7(test1nic0): addr:56:ec:dc:68:6d:9a8(test2nic0): addr:fe:54:00:d0:13:4d
root@server1:~#
4.4 小结
处于相同 VLAN(即带有相同 VLAN tag)的虚拟机,或处于默认 VLAN(即 untagged VLAN)的虚拟机,可以依靠以太网交换机的核心机制 —— 学习(Learning)、转发(Forwarding) 和 泛洪(Flooding),实现二层网络通信,无需额外配置。
五、不同VLAN虚机接入相同OVS交换机
将test2的网卡VLAN Tag修改为20,查看test1和test2的通信情况。

5.1 修改test2网卡VLAN Tag
root@server1:~# virsh edit test2...<interface type='bridge'><vlan><tag id='20'/>  # 修改为20</vlan></interface>root@server1:~# virsh shutdown test2
Domain 'test2' is being shutdownroot@server1:~# virsh start test2
Domain 'test2' startedroot@server1:~# root@server1:~# ovs-vsctl show
49984c65-27c7-4afc-94b1-7fbd58c2f083Bridge br0Port test1nic0tag: 10Interface test1nic0Port test2nic0tag: 20     # 已成功修改Interface test2nic0Port br0Interface br0type: internalovs_version: "2.17.9"
root@server1:~#
5.2 OVS支持OpenFlow
OVS 的强大之处在于它不仅是一个二层交换机,还支持 OpenFlow,因此能实现基于各种条件的精细流控。
在 OVS 或 OpenFlow 环境中,我们通过配置流表规则(flow entries)来精确控制数据包的处理方式。如果不设规则,OVS 会使用默认的 NORMAL 行为,像普通交换机那样自动学习 MAC 地址并转发数据包。
ovs-ofctl 是 OVS 中的一个命令行工具,用于管理 OpenFlow 流表规则,可以下发、查看、删除规则。
命令 ovs-ofctl dump-flows br0 的作用是查看指定网桥(如 br0)中的所有 OpenFlow 流表(flow entries)规则。
root@server1:~# ovs-ofctl dump-flows br0cookie=0x0, duration=36625.169s, table=0, n_packets=184, n_bytes=23076, priority=0 actions=NORMAL
cookie=0x0:标识此条 flow 的 ID,一般由控制器设定,用于区分不同流。
duration=36625.169s:这条流表规则已存在的时间(单位为秒)。
table=0:当前流表在 flow table 0 中(OVS 默认只有 table 0,除非你使用高级控制器)。
n_packets=184:匹配这条规则的总数据包数。
n_bytes=23076:总的字节数。
priority=0:优先级最低的默认规则。
actions=NORMAL:这条规则的动作为 NORMAL,即执行传统的交换机行为(MAC 学习、转发等)。
在未添加任何自定义流表规则的情况下,OVS 交换机默认会执行类似传统二层交换机的行为。尽管 test1 和 test2 接入的是同一个虚拟交换机(例如 OVS 的 br0),但由于它们分别被配置了不同的 VLAN 标签,虚拟交换机会将其划分到不同的 VLAN 广播域中。这样,广播帧和未知单播帧将不会在不同 VLAN 之间转发,从而有效实现 test1 与 test2 间的二层逻辑隔离,防止它们直接通信。
5.3 流表规则练习1
在 Open vSwitch(OVS)的 br0 虚拟交换机中添加两个简单流表规则,实现 test1 和 test2 网卡之间的双向通信。
1、添加简单流表规则
ovs-ofctl add-flow br0 "in_port=test1nic0,actions=output:test2nic0"
ovs-ofctl add-flow br0 "in_port=test2nic0,actions=output:test1nic0"
root@server1:~# ovs-ofctl add-flow br0 "in_port=test1nic0,actions=output:test2nic0"
root@server1:~# ovs-ofctl add-flow br0 "in_port=test2nic0,actions=output:test1nic0"
root@server1:~# ovs-ofctl dump-flows br0cookie=0x0, duration=22.570s, table=0, n_packets=0, n_bytes=0, in_port=test1nic0 actions=output:test2nic0cookie=0x0, duration=16.193s, table=0, n_packets=0, n_bytes=0, in_port=test2nic0 actions=output:test1nic0cookie=0x0, duration=38866.067s, table=0, n_packets=184, n_bytes=23076, priority=0 actions=NORMAL
root@server1:~#
2、虚机ping测试
test1 ping test2,开启tcpdump -i test1nic0 arp or icmp。
test1 成功ping通test2:
(virsh console test1)$ ping -c 2 192.168.100.20
PING 192.168.100.20 (192.168.100.20): 56 data bytes
64 bytes from 192.168.100.20: seq=0 ttl=64 time=5.944 ms
64 bytes from 192.168.100.20: seq=1 ttl=64 time=0.448 ms--- 192.168.100.20 ping statistics ---
2 packets transmitted, 2 packets received, 0% packet loss
round-trip min/avg/max = 0.448/3.196/5.944 ms
$
tcpdump抓包:
root@server1:~# tcpdump -i test1nic0 arp or icmp
tcpdump: verbose output suppressed, use -v[v]... for full protocol decode
listening on test1nic0, link-type EN10MB (Ethernet), snapshot length 262144 bytes
15:26:26.684587 ARP, Request who-has 192.168.100.20 tell 192.168.100.10, length 28
15:26:26.687710 ARP, Reply 192.168.100.20 is-at 52:54:00:d0:13:4d (oui Unknown), length 28
15:26:26.688172 IP 192.168.100.10 > 192.168.100.20: ICMP echo request, id 17409, seq 0, length 64
15:26:26.689116 IP 192.168.100.20 > 192.168.100.10: ICMP echo reply, id 17409, seq 0, length 64
15:26:27.685482 IP 192.168.100.10 > 192.168.100.20: ICMP echo request, id 17409, seq 1, length 64
15:26:27.685691 IP 192.168.100.20 > 192.168.100.10: ICMP echo reply, id 17409, seq 1, length 64
15:26:31.691154 ARP, Request who-has 192.168.100.10 tell 192.168.100.20, length 28
15:26:31.691374 ARP, Reply 192.168.100.10 is-at 52:54:00:4a:c3:3b (oui Unknown), length 28
tcpdump捕获结果(test1nic0 上):
有从
192.168.100.10向192.168.100.20的 ARP 请求和 ICMP ping。收到
192.168.100.20的 ARP 回复和 ICMP 回显响应。
✅ 说明网络双向通信已建立。
此时,查看流表规则命中情况:
root@server1:~# ovs-ofctl dump-flows br0cookie=0x0, duration=529.787s, table=0, n_packets=4, n_bytes=280, in_port=test1nic0 actions=output:test2nic0cookie=0x0, duration=523.410s, table=0, n_packets=4, n_bytes=280, in_port=test2nic0 actions=output:test1nic0cookie=0x0, duration=39373.284s, table=0, n_packets=184, n_bytes=23076, priority=0 actions=NORMAL第一、二条是添加的简单流表规则(test1 → test2,test2 → test1):
n_packets=4:表明每条规则都已经被使用了 4 次,说明ARP和 ICMP 请求和回复确实经过了这些流表。
5.4 流表规则练习2
添加匹配具体协议字段的流表规则,比如ARP、ICMP、SSH等。
1、删去之前添加的流表规则
ovs-ofctl del-flows br0 "in_port=test1nic0"
ovs-ofctl del-flows br0 "in_port=test2nic0"
root@server1:~# ovs-ofctl del-flows br0 "in_port=test1nic0"
root@server1:~# ovs-ofctl del-flows br0 "in_port=test2nic0"
root@server1:~# ovs-ofctl dump-flows br0cookie=0x0, duration=41346.897s, table=0, n_packets=184, n_bytes=23076, priority=0 actions=NORMAL
root@server1:~#
此时,只有默认的流表规则,转发行为为NORMAL,根据传统交换机规则转发,test1和test2处于不同vlan,所以此时test1无法ping通test2。
2、添加ARP/ICMP协议流表规则
以太网帧中的类型字段为 0x0806 时,表示该帧携带的是ARP协议的数据。
以太网帧的类型字段值为 0x0800 时,表示该帧封装的是IPv4协议的数据:
-
在IP协议的头部中,有一个8位的字段称为“协议字段”(Protocol Field)。
-
ICMP是IP协议的一个重要组成部分,主要用于发送控制消息和错误报告。
-
在IP协议中,ICMP的协议号被分配为 1。
根据这些信息,填加允许ARP和ICMP报文转发的具体协议流表规则:
ovs-ofctl add-flow br0 "in_port=test1nic0,dl_type=0x0806,actions=output:test2nic0"
ovs-ofctl add-flow br0 "in_port=test1nic0,dl_type=0x0800,nw_proto=1,actions=output:test2nic0"
ovs-ofctl add-flow br0 "in_port=test2nic0,dl_type=0x0806,actions=output:test1nic0"
ovs-ofctl add-flow br0 "in_port=test2nic0,dl_type=0x0800,nw_proto=1,actions=output:test1nic0"
root@server1:~# ovs-ofctl add-flow br0 "in_port=test1nic0,dl_type=0x0806,actions=output:test2nic0"
root@server1:~# ovs-ofctl add-flow br0 "in_port=test1nic0,dl_type=0x0800,nw_proto=1,actions=output:test2nic0"
root@server1:~# ovs-ofctl add-flow br0 "in_port=test2nic0,dl_type=0x0806,actions=output:test1nic0"
root@server1:~# ovs-ofctl add-flow br0 "in_port=test2nic0,dl_type=0x0800,nw_proto=1,actions=output:test1nic0"
root@server1:~# ovs-ofctl dump-flows br0cookie=0x0, duration=36.618s, table=0, n_packets=0, n_bytes=0, arp,in_port=test1nic0 actions=output:test2nic0cookie=0x0, duration=25.449s, table=0, n_packets=0, n_bytes=0, arp,in_port=test2nic0 actions=output:test1nic0cookie=0x0, duration=30.970s, table=0, n_packets=0, n_bytes=0, icmp,in_port=test1nic0 actions=output:test2nic0cookie=0x0, duration=18.549s, table=0, n_packets=0, n_bytes=0, icmp,in_port=test2nic0 actions=output:test1nic0cookie=0x0, duration=42054.346s, table=0, n_packets=189, n_bytes=23398, priority=0 actions=NORMAL
root@server1:~#
只允许 ARP(0x0806)和 ICMP(0x0800 + nw_proto=1)报文 在 test1nic0 和 test2nic0 之间单向转发,各加了 2 条流表
这些新加的 4 条流表都 还没有匹配到任何数据包,也就是说:没有数据走定义的这些流表
3、虚机ping测试
test1 ping test2,可以成功ping通:
$ ping -c 2 192.168.100.20
PING 192.168.100.20 (192.168.100.20): 56 data bytes
64 bytes from 192.168.100.20: seq=0 ttl=64 time=3.277 ms
64 bytes from 192.168.100.20: seq=1 ttl=64 time=0.605 ms--- 192.168.100.20 ping statistics ---
2 packets transmitted, 2 packets received, 0% packet loss
round-trip min/avg/max = 0.605/1.941/3.277 ms
$
tcpdump:
root@server1:~# tcpdump -i test1nic0 arp or icmp
tcpdump: verbose output suppressed, use -v[v]... for full protocol decode
listening on test1nic0, link-type EN10MB (Ethernet), snapshot length 262144 bytes
23:55:34.761400 ARP, Request who-has 192.168.100.20 tell 192.168.100.10, length 28
23:55:34.762666 ARP, Reply 192.168.100.20 is-at 52:54:00:d0:13:4d (oui Unknown), length 28
23:55:34.762999 IP 192.168.100.10 > 192.168.100.20: ICMP echo request, id 18177, seq 0, length 64
23:55:34.763620 IP 192.168.100.20 > 192.168.100.10: ICMP echo reply, id 18177, seq 0, length 64
23:55:35.762216 IP 192.168.100.10 > 192.168.100.20: ICMP echo request, id 18177, seq 1, length 64
23:55:35.762378 IP 192.168.100.20 > 192.168.100.10: ICMP echo reply, id 18177, seq 1, length 64
23:55:39.777994 ARP, Request who-has 192.168.100.10 tell 192.168.100.20, length 28
23:55:39.778418 ARP, Reply 192.168.100.10 is-at 52:54:00:4a:c3:3b (oui Unknown), length 28
ARP 与 ICMP 报文已经成功双向传输
- ARP Request + Reply
- ICMP Echo Request + Reply
说明添加的流表(只允许 ARP 和 ICMP)已经 生效了,现在 OVS 只允许这两种协议在
test1nic0和test2nic0之间通信。不匹配的会走NORMAL行为,即按照传统交换机转发。
流表统计信息:
root@server1:~# ovs-ofctl dump-flows br0cookie=0x0, duration=535.469s, table=0, n_packets=2, n_bytes=84, arp,in_port=test1nic0 actions=output:test2nic0cookie=0x0, duration=524.300s, table=0, n_packets=2, n_bytes=84, arp,in_port=test2nic0 actions=output:test1nic0cookie=0x0, duration=529.821s, table=0, n_packets=2, n_bytes=196, icmp,in_port=test1nic0 actions=output:test2nic0cookie=0x0, duration=517.400s, table=0, n_packets=2, n_bytes=196, icmp,in_port=test2nic0 actions=output:test1nic0cookie=0x0, duration=42553.197s, table=0, n_packets=189, n_bytes=23398, priority=0 actions=NORMAL
root@server1:~#
添加的具体协议流表已经开始被命中(n_packets=2),ICMP 和 ARP 确实是通过定义的 flow 转发的,数据包成功匹配到了这些规则。
4、 添加SSH流表规则
SSH(Secure Shell)并不是一个直接在IP层定义的协议,而是运行在传输层的协议,基于TCP(传输控制协议)来实现,TCP的IP协议号为6。SSH本身并没有一个独立的“IP协议号”,而是使用TCP的端口号来标识。SSH服务通常在TCP端口22上运行。当客户端尝试通过SSH连接到服务器时,它会通过TCP协议与服务器的22端口建立连接。
目前,从test1 ssh test2是不能通信的。填加允许SSH报文转发的具体协议流表规则:
ovs-ofctl add-flow br0 "in_port=test1nic0,dl_type=0x0800,nw_proto=6,tp_dst=22,actions=output:test2nic0"
ovs-ofctl add-flow br0 "in_port=test2nic0,dl_type=0x0800,nw_proto=6,tp_src=22,actions=output:test1nic0"
root@server1:~# ovs-ofctl add-flow br0 "in_port=test1nic0,dl_type=0x0800,nw_proto=6,tp_dst=22,actions=output:test2nic0"
root@server1:~# ovs-ofctl add-flow br0 "in_port=test2nic0,dl_type=0x0800,nw_proto=6,tp_src=22,actions=output:test1nic0"
root@server1:~# ovs-ofctl dump-flows br0cookie=0x0, duration=2317.335s, table=0, n_packets=2, n_bytes=84, arp,in_port=test1nic0 actions=output:test2nic0cookie=0x0, duration=2306.166s, table=0, n_packets=2, n_bytes=84, arp,in_port=test2nic0 actions=output:test1nic0cookie=0x0, duration=2311.687s, table=0, n_packets=2, n_bytes=196, icmp,in_port=test1nic0 actions=output:test2nic0cookie=0x0, duration=2299.266s, table=0, n_packets=2, n_bytes=196, icmp,in_port=test2nic0 actions=output:test1nic0cookie=0x0, duration=20.753s, table=0, n_packets=0, n_bytes=0, tcp,in_port=test1nic0,tp_dst=22 actions=output:test2nic0cookie=0x0, duration=12.596s, table=0, n_packets=0, n_bytes=0, tcp,in_port=test2nic0,tp_src=22 actions=output:test1nic0cookie=0x0, duration=44335.063s, table=0, n_packets=189, n_bytes=23398, priority=0 actions=NORMAL
root@server1:~#
5、test1 ssh test2测试
test1可以成功ssh到test2:
(virsh console test1)
$ ssh 192.168.100.20Host '192.168.100.20' is not in the trusted hosts file.
(ecdsa-sha2-nistp521 fingerprint md5 7b:97:77:d0:ab:85:de:d6:ea:32:55:b2:17:55:44:c0)
Do you want to continue connecting? (y/n) y
cirros@192.168.100.20's password:
$ ip a
1: lo: <LOOPBACK,UP,LOWER_UP> mtu 65536 qdisc noqueue qlen 1link/loopback 00:00:00:00:00:00 brd 00:00:00:00:00:00inet 127.0.0.1/8 scope host lovalid_lft forever preferred_lft foreverinet6 ::1/128 scope host valid_lft forever preferred_lft forever
2: eth0: <BROADCAST,MULTICAST,UP,LOWER_UP> mtu 1500 qdisc pfifo_fast qlen 1000link/ether 52:54:00:d0:13:4d brd ff:ff:ff:ff:ff:ffinet 192.168.100.20/24 scope global eth0valid_lft forever preferred_lft foreverinet6 fe80::5054:ff:fed0:134d/64 scope link valid_lft forever preferred_lft forever
$
tcpdump -i test1nic0 arp or icmp or tcp:
root@server1:~# tcpdump -i test1nic0 arp or icmp or tcp
tcpdump: verbose output suppressed, use -v[v]... for full protocol decode
listening on test1nic0, link-type EN10MB (Ethernet), snapshot length 262144 bytes
00:28:34.328564 IP 192.168.100.10.54488 > 192.168.100.20.ssh: Flags [S], seq 1844320459, win 29200, options [mss 1460,sackOK,TS val 4374806 ecr 0,nop,wscale 6], length 0
00:28:34.331552 IP 192.168.100.20.ssh > 192.168.100.10.54488: Flags [S.], seq 485124627, ack 1844320460, win 28960, options [mss 1460,sackOK,TS val 2569404 ecr 4374806,nop,wscale 6], length 0
00:28:34.332337 IP 192.168.100.10.54488 > 192.168.100.20.ssh: Flags [.], ack 1, win 457, options [nop,nop,TS val 4374807 ecr 2569404], length 0
00:28:34.332948 IP 192.168.100.10.54488 > 192.168.100.20.ssh: Flags [P.], seq 1:635, ack 1, win 457, options [nop,nop,TS val 4374807 ecr 2569404], length 634: SSH: SSH-2.0-dropbear_2015.67
00:28:34.333095 IP 192.168.100.20.ssh > 192.168.100.10.54488: Flags [.], ack 635, win 473, options [nop,nop,TS val 2569405 ecr 4374807], length 0
00:28:34.344487 IP 192.168.100.20.ssh > 192.168.100.10.54488: Flags [P.], seq 1:547, ack 635, win 473, options [nop,nop,TS val 2569408 ecr 4374807], length 546: SSH: SSH-2.0-dropbear_2015.67
00:28:34.344619 IP 192.168.100.10.54488 > 192.168.100.20.ssh: Flags [.], ack 547, win 474, options [nop,nop,TS val 4374810 ecr 2569408], length 0
...
表示 test1 和 test2 之间完成三次握手并建立 SSH 连接,说明 OVS 允许 TCP 通信。
流表统计信息:
root@server1:~# ovs-ofctl dump-flows br0cookie=0x0, duration=2604.416s, table=0, n_packets=2, n_bytes=84, arp,in_port=test1nic0 actions=output:test2nic0cookie=0x0, duration=2593.247s, table=0, n_packets=2, n_bytes=84, arp,in_port=test2nic0 actions=output:test1nic0cookie=0x0, duration=2598.768s, table=0, n_packets=2, n_bytes=196, icmp,in_port=test1nic0 actions=output:test2nic0cookie=0x0, duration=2586.347s, table=0, n_packets=2, n_bytes=196, icmp,in_port=test2nic0 actions=output:test1nic0cookie=0x0, duration=307.834s, table=0, n_packets=40, n_bytes=4386, tcp,in_port=test1nic0,tp_dst=22 actions=output:test2nic0cookie=0x0, duration=299.677s, table=0, n_packets=29, n_bytes=5588, tcp,in_port=test2nic0,tp_src=22 actions=output:test1nic0cookie=0x0, duration=44622.144s, table=0, n_packets=189, n_bytes=23398, priority=0 actions=NORMAL
root@server1:~#
test1 ssh test2的流量已经匹配了SSH(TCP/22)通信的规则(查看n_packets)
5.5 小结
通过 OpenFlow 流表规则控制流量,丰富了交换机在数据转发过程中的处理手段。相比传统交换机交换机制(Learning/Forwarding/Flooding),OpenFlow 提供了灵活、可编程、可精确控制的数据转发能力。这为构建现代数据中心、SDN 网络、云平台中的租户隔离、安全策略等场景奠定了基础。
六、 OVS Patch Port
OVS Patch Port 是 Open vSwitch 提供的一种特殊类型的虚拟端口,用于连接同一台主机上的两个 OVS Bridge(桥),起到“打通桥之间数据通路”的作用。你可以把它理解为在两个虚拟交换机之间打了一根“网线”,但是这根线是完全内核级别的高速连接,不经过物理网卡。
Patch Port 的特点
高效:转发完全在内核空间进行,性能极高;
无需物理网卡:不会占用实际物理设备资源;
常用于多桥接结构:例如 provider/tenant 网络分离、OVN 内部结构、K8s CNI 插件等。
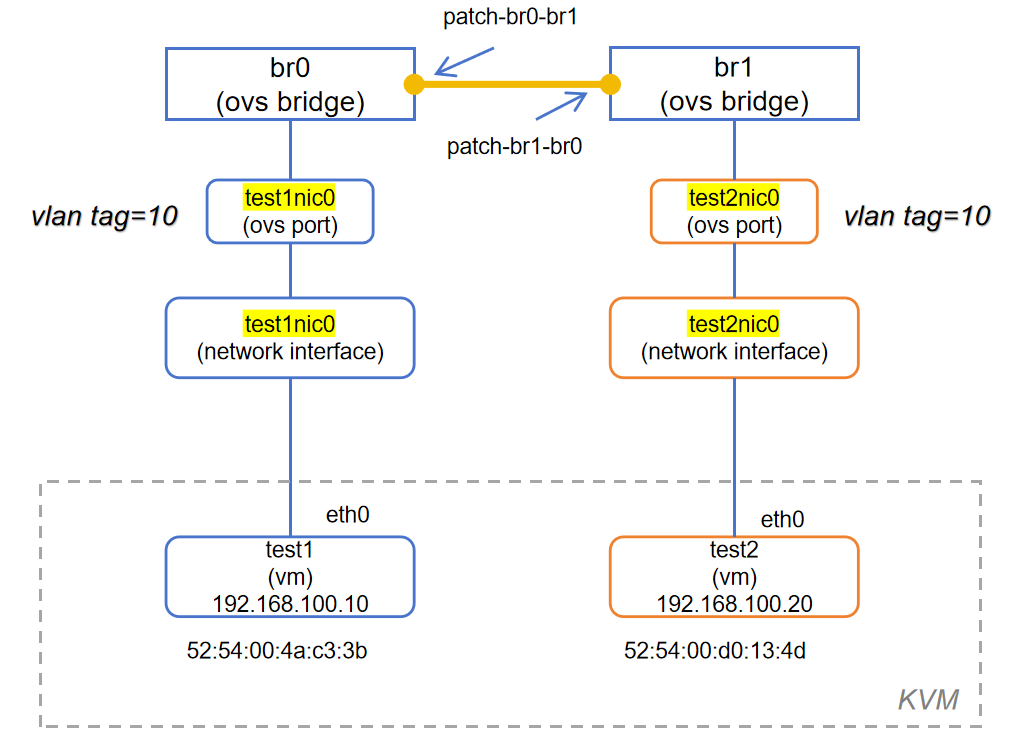
6.1 创建Patch Port
1、创建br1
root@server1:~# ovs-vsctl add-br br1
root@server1:~# ovs-vsctl show
49984c65-27c7-4afc-94b1-7fbd58c2f083Bridge br1Port br1Interface br1type: internalBridge br0Port test1nic0tag: 10Interface test1nic0Port test2nic0tag: 20Interface test2nic0Port br0Interface br0type: internalovs_version: "2.17.9"
root@server1:~#
2、test2接入br1
修改test2网卡配置,接入br1,vlan tag修改为10:
root@server1:~# virsh edit test2
Domain 'test2' XML configuration edited.
修改内容:<interface type='bridge'><mac address='52:54:00:d0:13:4d'/><source bridge='br1'/> # 已修改<vlan><tag id='10'/> # 已修改</vlan><virtualport type='openvswitch'><parameters interfaceid='8d50e578-b3f1-4f36-9359-38514776767e'/></virtualport><target dev='test2nic0'/><model type='virtio'/><address type='pci' domain='0x0000' bus='0x00' slot='0x03' function='0x0'/></interface>root@server1:~# virsh shutdown test2
Domain 'test2' is being shutdownroot@server1:~# virsh listId   Name    State
-----------------------9    test1   runningroot@server1:~# virsh start test2
Domain 'test2' startedroot@server1:~# ovs-vsctl show
49984c65-27c7-4afc-94b1-7fbd58c2f083Bridge br1Port br1Interface br1type: internalPort test2nic0tag: 10Interface test2nic0Bridge br0Port test1nic0tag: 10Interface test1nic0Port br0Interface br0type: internalovs_version: "2.17.9"
root@server1:~#
3、创建pathc ports
ovs-vsctl add-port br0 patch-br0-br1 -- set interface patch-br0-br1 type=patch options:peer=patch-br1-br0
ovs-vsctl add-port br1 patch-br1-br0 -- set interface patch-br1-br0 type=patch options:peer=patch-br0-br1
root@server1:~# ovs-vsctl add-port br0 patch-br0-br1 -- set interface patch-br0-br1 type=patch options:peer=patch-br1-br0
root@server1:~# ovs-vsctl add-port br1 patch-br1-br0 -- set interface patch-br1-br0 type=patch options:peer=patch-br0-br1
root@server1:~# ovs-vsctl show
49984c65-27c7-4afc-94b1-7fbd58c2f083Bridge br1Port patch-br1-br0Interface patch-br1-br0type: patchoptions: {peer=patch-br0-br1}Port br1Interface br1type: internalPort test2nic0tag: 10Interface test2nic0Bridge br0Port patch-br0-br1Interface patch-br0-br1type: patchoptions: {peer=patch-br1-br0}Port test1nic0tag: 10Interface test1nic0Port br0Interface br0type: internalovs_version: "2.17.9"
root@server1:~#
options:peer=patch-br1-br0 设置这个 patch 接口的“对端”接口是 patch-br1-br0(它应该在另一座 bridge 上)
6.2 虚机ping测试
1、删去br0的流表规则,只保留缺省的NORMAL规则
root@server1:~# ovs-ofctl del-flows br0 "arp"
root@server1:~# ovs-ofctl del-flows br0 "icmp"
root@server1:~# ovs-ofctl del-flows br0 "tcp"
root@server1:~# ovs-ofctl dump-flows br0      cookie=0x0, duration=49513.361s, table=0, n_packets=189, n_bytes=23398, priority=0 actions=NORMAL
root@server1:~#
2、br1目前也只有NORMAL规则
root@server1:~# ovs-ofctl dump-flows br1cookie=0x0, duration=1426.912s, table=0, n_packets=11, n_bytes=1674, priority=0 actions=NORMAL
root@server1:~#
这意味着br0、br1都是按照传统交换机进行交换。
test1位于br0 vlan10,
test2位于br1 vlan10,
接下来测试test1是否能ping通test2
3、ping之前,br0/br1转发表检查
root@server1:~# ovs-appctl fdb/show br0port  VLAN  MAC                Age
root@server1:~# ovs-appctl fdb/show br1port  VLAN  MAC                Age
root@server1:~#
4、test1 ping test2
(virsh console test1)
$ ping -c 4 192.168.100.20
PING 192.168.100.20 (192.168.100.20): 56 data bytes
64 bytes from 192.168.100.20: seq=0 ttl=64 time=3.138 ms
64 bytes from 192.168.100.20: seq=1 ttl=64 time=0.392 ms
64 bytes from 192.168.100.20: seq=2 ttl=64 time=0.489 ms
64 bytes from 192.168.100.20: seq=3 ttl=64 time=16.336 ms--- 192.168.100.20 ping statistics ---
4 packets transmitted, 4 packets received, 0% packet loss
round-trip min/avg/max = 0.392/5.088/16.336 ms
$
5、tcpdump信息
root@server1:~# tcpdump -i test1nic0 arp or icmp
tcpdump: verbose output suppressed, use -v[v]... for full protocol decode
listening on test1nic0, link-type EN10MB (Ethernet), snapshot length 262144 bytes
02:27:41.740215 ARP, Request who-has 192.168.100.20 tell 192.168.100.10, length 28
02:27:41.741669 ARP, Reply 192.168.100.20 is-at 52:54:00:d0:13:4d (oui Unknown), length 28
02:27:41.741939 IP 192.168.100.10 > 192.168.100.20: ICMP echo request, id 18945, seq 0, length 64
02:27:41.742568 IP 192.168.100.20 > 192.168.100.10: ICMP echo reply, id 18945, seq 0, length 64
02:27:42.741994 IP 192.168.100.10 > 192.168.100.20: ICMP echo request, id 18945, seq 1, length 64
02:27:42.742195 IP 192.168.100.20 > 192.168.100.10: ICMP echo reply, id 18945, seq 1, length 64
02:27:43.742588 IP 192.168.100.10 > 192.168.100.20: ICMP echo request, id 18945, seq 2, length 64
02:27:43.742810 IP 192.168.100.20 > 192.168.100.10: ICMP echo reply, id 18945, seq 2, length 64
02:27:44.743462 IP 192.168.100.10 > 192.168.100.20: ICMP echo request, id 18945, seq 3, length 64
02:27:44.759542 IP 192.168.100.20 > 192.168.100.10: ICMP echo reply, id 18945, seq 3, length 64
02:27:46.743928 ARP, Request who-has 192.168.100.10 tell 192.168.100.20, length 28
02:27:46.744118 ARP, Reply 192.168.100.10 is-at 52:54:00:4a:c3:3b (oui Unknown), length 28
6、转发表信息
root@server1:~# ovs-appctl fdb/show br0port  VLAN  MAC                Age7    10  52:54:00:4a:c3:3b   6012    10  52:54:00:d0:13:4d   60
root@server1:~# ovs-appctl fdb/show br1port  VLAN  MAC                Age2    10  52:54:00:4a:c3:3b   651    10  52:54:00:d0:13:4d   65
root@server1:~# ovs-ofctl show br0
OFPT_FEATURES_REPLY (xid=0x2): dpid:0000aade69789344
n_tables:254, n_buffers:0
capabilities: FLOW_STATS TABLE_STATS PORT_STATS QUEUE_STATS ARP_MATCH_IP
actions: output enqueue set_vlan_vid set_vlan_pcp strip_vlan mod_dl_src mod_dl_dst mod_nw_src mod_nw_dst mod_nw_tos mod_tp_src mod_tp_dst7(test1nic0): addr:56:ec:dc:68:6d:9aconfig:     0state:      0current:    10MB-FD COPPERspeed: 10 Mbps now, 0 Mbps max12(patch-br0-br1): addr:3a:70:11:70:11:f9config:     0state:      0speed: 0 Mbps now, 0 Mbps maxLOCAL(br0): addr:aa:de:69:78:93:44config:     PORT_DOWNstate:      LINK_DOWNspeed: 0 Mbps now, 0 Mbps max
OFPT_GET_CONFIG_REPLY (xid=0x4): frags=normal miss_send_len=0
root@server1:~# ovs-ofctl show br1
OFPT_FEATURES_REPLY (xid=0x2): dpid:00006e847354c146
n_tables:254, n_buffers:0
capabilities: FLOW_STATS TABLE_STATS PORT_STATS QUEUE_STATS ARP_MATCH_IP
actions: output enqueue set_vlan_vid set_vlan_pcp strip_vlan mod_dl_src mod_dl_dst mod_nw_src mod_nw_dst mod_nw_tos mod_tp_src mod_tp_dst1(test2nic0): addr:fe:54:00:d0:13:4dconfig:     0state:      0current:    10MB-FD COPPERspeed: 10 Mbps now, 0 Mbps max2(patch-br1-br0): addr:52:3e:f8:c1:69:f4config:     0state:      0speed: 0 Mbps now, 0 Mbps maxLOCAL(br1): addr:6e:84:73:54:c1:46config:     PORT_DOWNstate:      LINK_DOWNspeed: 0 Mbps now, 0 Mbps max
OFPT_GET_CONFIG_REPLY (xid=0x4): frags=normal miss_send_len=0
root@server1:~#
br0已经学习到了 test1 和 test2 的 MAC 地址,并知道 test2 的 MAC 是通过 patch 端口12转发的。
br1同样学习到了 test1 和 test2 的 MAC 地址,知道 test1 的 MAC 应通过 patch 端口转发。说明 OVS 已经正确通过 Patch Port 实现了两桥互通。
6.3 Patch Port的工作机制
1、问题:为什么 patch 端口无法用 tcpdump 抓包?
-
tcpdump是基于 Linux 系统的网络接口(/sys/class/net/下的设备)工作的。 -
而
patch-br0-br1虽然被添加到了 OVS 的桥中,但它 并不会在主机上创建一个可见的网络接口设备。 -
所以你在
ifconfig或ip link中也找不到patch-br0-br1,因此tcpdump报“设备不存在”是合理的。
root@server1:~# tcpdump -i patch-br0-br1 arp or icmp
tcpdump: patch-br0-br1: No such device exists
(SIOCGIFHWADDR: No such device)
root@server1:~#
因为 OVS Patch Port 并不是一个系统级的网络接口设备(Linux netdev),而是 Open vSwitch 内部的一种“虚拟连接”,它只存在于 OVS 的内部数据路径中。
root@server1:~# ip link
1: lo: <LOOPBACK,UP,LOWER_UP> mtu 65536 qdisc noqueue state UNKNOWN mode DEFAULT group default qlen 1000link/loopback 00:00:00:00:00:00 brd 00:00:00:00:00:00
2: ens32: <BROADCAST,MULTICAST,UP,LOWER_UP> mtu 1500 qdisc fq_codel state UP mode DEFAULT group default qlen 1000link/ether 00:50:56:22:d0:b4 brd ff:ff:ff:ff:ff:ffaltname enp2s0
3: ens34: <BROADCAST,MULTICAST,UP,LOWER_UP> mtu 1500 qdisc fq_codel state UP mode DEFAULT group default qlen 1000link/ether 00:0c:29:f4:b7:f9 brd ff:ff:ff:ff:ff:ffaltname enp2s2
4: ovs-system: <BROADCAST,MULTICAST> mtu 1500 qdisc noop state DOWN mode DEFAULT group default qlen 1000link/ether 9a:8b:05:63:dc:b9 brd ff:ff:ff:ff:ff:ff
5: br0: <BROADCAST,MULTICAST> mtu 1500 qdisc noop state DOWN mode DEFAULT group default qlen 1000link/ether aa:de:69:78:93:44 brd ff:ff:ff:ff:ff:ff
6: virbr0: <NO-CARRIER,BROADCAST,MULTICAST,UP> mtu 1500 qdisc noqueue state DOWN mode DEFAULT group default qlen 1000link/ether 52:54:00:ea:3b:39 brd ff:ff:ff:ff:ff:ff
7: docker0: <BROADCAST,MULTICAST,UP,LOWER_UP> mtu 1500 qdisc noqueue state UP mode DEFAULT group default link/ether a2:c5:f6:03:df:9b brd ff:ff:ff:ff:ff:ff
8: veth7369266@if2: <BROADCAST,MULTICAST,UP,LOWER_UP> mtu 1500 qdisc noqueue master docker0 state UP mode DEFAULT group default link/ether 32:01:06:5b:84:a9 brd ff:ff:ff:ff:ff:ff link-netnsid 0
17: test1nic0: <BROADCAST,MULTICAST,UP,LOWER_UP> mtu 1500 qdisc fq_codel master ovs-system state UNKNOWN mode DEFAULT group default qlen 1000link/ether 56:ec:dc:68:6d:9a brd ff:ff:ff:ff:ff:ff
22: br1: <BROADCAST,MULTICAST> mtu 1500 qdisc noop state DOWN mode DEFAULT group default qlen 1000link/ether 6e:84:73:54:c1:46 brd ff:ff:ff:ff:ff:ff
23: test2nic0: <BROADCAST,MULTICAST,UP,LOWER_UP> mtu 1500 qdisc fq_codel master ovs-system state UNKNOWN mode DEFAULT group default qlen 1000link/ether fe:54:00:d0:13:4d brd ff:ff:ff:ff:ff:ff
root@server1:~#
这条
ip link输出确认了之前的问题:patch 端口在 Linux 系统网络接口中是不可见的,因此tcpdump -i patch-br0-br1会报错。
2、patch port工作机制参考
参考1:
Re: [ovs-discuss] ovs-tcpdump doesn't work on patch ports?
这里提到patch port工作机制:
"A patch port is not the same as a veth pair. It is not used to "send" and "receive" traffic. When we process an upcall and have to determine what actions to perform on a packet, a patch_port is basically an equivalent to "continue processing openflow flows on this other bridge"。
参考2:
[ovs-discuss] Why is OVS patch used instead of veth pairs to connect OVS bridges?
In the kernel module, all of the bridges in a given Open vSwitch
instance are represented by a single construct called a "datapath".  A
datapath isn't divided into bridges in any way.  Userspace can implement
patch ports without needing any special support from the kernel.  If a
flow sends a packet across a patch port, userspace can implement
whatever happens on the bridge at the other end of the patch port in
terms of the datapath.  From the kernel's point of view, the patch port
doesn't exist at all, and no additional trips to userspace are incurred
by a flow that traverses patch ports.
3、Patch Port vs veth pair 对比一览
| 特性 | Patch Port | veth pair |
|---|---|---|
| 类型 | OVS 内部虚拟端口 | Linux 内核提供的虚拟网卡对 |
| 是否为 Linux 设备 | ❌ 不可见于 ip link / ifconfig | ✅ 可见于 ip link,可抓包 |
| 连接对象 | OVS 内部两座 bridge | 两个 Linux 网络命名空间,或 bridge 与 namespace 等 |
| 数据转发方式 | 直接在 OVS 数据平面中转发 | 通过 Linux 网络栈转发 |
| 性能 | 极高(不出 OVS) | 相对较低(需要内核态支持) |
| 是否能抓包(tcpdump) | ❌ 不行(Linux 看不到) | ✅ 可以 |
| 典型用途 | OVS 内部桥接(如 br-int ↔ br-tun) | 容器/虚机与 bridge 互联 |
| 配置方式 | 通过 ovs-vsctl,需设置 peer | 通过 ip link add ... type veth |
| 是否支持 OpenFlow 控制 | ✅ 完全支持 | 仅在接入 OVS 后才支持 |
| 是否需要 Linux 协调 | ❌ 完全 OVS 内部逻辑 | ✅ 属于 Linux 网络结构 |
4、patch port工作机制总结
OVS 中 patch port(补丁端口) 的工作机制可以总结如下:
本质概念:
-
Patch port 是 Open vSwitch 内部桥接用的虚拟端口对,将两个 OVS bridge 逻辑上连接在一起。
-
它类似于一根“虚拟网线”,完全在 OVS 数据平面内处理,不会经过 Linux 内核网络栈。
-
每对 patch port 都有两个接口:你必须设置
peer=来互相指向对方,形成一对。
转发机制:
-
一个桥收到包后匹配流表,决定通过 patch port 转发。
-
数据包会“瞬移”到对端 patch port 所在的 另一座桥。
-
在对端桥上,该包像是“刚刚到达”一样,继续匹配并执行 OpenFlow 流表动作。
-
整个过程不经过任何物理或虚拟网卡,也不进入内核网络协议栈,效率极高。