【7.5 Unity AssetPostprocessor】
7.5 Unity AssetPostprocessor 介绍
AssetPostprocessor 是 Unity 资源管道的核心扩展点,它提供了一系列回调方法,允许开发者在资源导入流程的不同阶段插入自定义逻辑。这些回调方法构成了强大的资源处理框架,下面是关键回调方法表:
AssetPostprocessor 回调方法详解)
| 方法签名 | 触发时机 | 参数说明 | 核心作用 |
|---|---|---|---|
void OnPreprocessAsset() | 在导入任何类型资产之前 | 无 | 通用预处理入口,可获取 assetPath |
static void OnPostprocessAllAssets(string[] importedAssets, string[] deletedAssets, string[] movedAssets, string[] movedFromAssetPaths) | 批量资产操作(导入/删除/移动)完成后 | importedAssets:新导入资产deletedAssets:已删除资产movedAssets:移动后路径movedFromAssetPaths:移动前路径 | 全局后处理(依赖管理/资源索引更新) |
void OnPreprocessAnimation() | 导入独立 .anim 文件前 | 无 | 配置 AnimationClip 导入设置 |
void OnPostprocessAnimation(GameObject root, AnimationClip clip) | 从模型文件(如FBX)导入动画后 | root:模型根对象clip:导入的动画片段 | 处理嵌入模型的动画 |
void OnPreprocessTexture() | 导入纹理(PNG/JPG等)前 | 无 | 配置 TextureImporter(压缩格式/mipmap) |
void OnPostprocessTexture(Texture2D texture) | 纹理导入完成后 | texture:生成的纹理对象 | 纹理后处理(质量检查/生成衍生图) |
void OnPreprocessModel() | 导入3D模型(FBX/OBJ)前 | 无 | 配置 ModelImporter(缩放/动画类型/优化) |
void OnPostprocessModel(GameObject root) | 模型导入完成后 | root:模型根对象 | 模型后处理(添加碰撞体/生成LOD) |
void OnPreprocessAudio() | 导入音频(WAV/MP3)前 | 无 | 配置 AudioImporter(压缩格式/加载类型) |
void OnPostprocessAudio(AudioClip audioClip) | 音频导入完成后 | audioClip:生成的音频对象 | 音频后处理(音量标准化/频谱分析) |
void OnPreprocessMaterialDescription() | 从模型导入材质前(Unity 2018.3+) | 无 | 修改材质描述(Shader/纹理分配) |
void OnPostprocessMaterial(Material material) | 材质导入完成后 | material:生成的材质对象 | 材质后处理(属性调整/关键字添加) |
void OnPostprocessSprites(Texture2D texture, Sprite[] sprites) | 精灵图集导入完成后 | texture:图集纹理sprites:生成的精灵数组 | 精灵后处理(Pivot设置/碰撞体生成) |
void OnPostprocessPrefab(GameObject prefabRoot) | 预制体(Prefab)导入完成后 | prefabRoot:预制体根对象 | 预制体后处理(组件检查/引用设置) |
void OnPostprocessCubemap(Cubemap cubemap) | 立方体贴图导入完成后 | cubemap:生成的立方体贴图 | 立方体贴图后处理 |
void OnPostprocessGameObjectWithUserProperties(GameObject root, string[] propNames, object[] values) | 导入包含自定义属性的模型后 | root:根对象propNames:属性名数组values:属性值数组 | 处理模型中的静态自定义属性(如元数据) |
void OnPostprocessGameObjectWithAnimatedUserProperties(GameObject root, AnimationClip clip, EditorCurveBinding[] properties) | 导入包含动画自定义属性的模型后 | root:根对象clip:动画片段properties:动画属性绑定 | 处理模型中的动画自定义属性 |
void OnPostprocessMeshHierarchy(GameObject root) | 模型层级导入完成后 | root:模型根对象 | 最终层级处理(添加全局组件/清理空对象) |
关键说明:
- 位置: 包含这些回调方法的脚本必须放在项目的
Assets/Editor文件夹(或其子文件夹)中才能生效。 assetImporter和assetPath: 在非静态的实例方法中,基类AssetPostprocessor提供了assetImporter(当前导入器对象) 和assetPath(当前资产路径) 属性,用于获取关键信息。- 类型特定导入器: 在预处理方法中,可以将
assetImporter转换为具体的导入器类型(如TextureImporter,ModelImporter,AudioImporter)来访问和修改特定于该类型资产的导入设置。 OnPostprocessAllAssets: 这是唯一的静态回调方法,用于处理批量操作后的逻辑。- 触发时机: “预处理”方法在 Unity 实际执行导入操作之前调用,允许修改导入设置。“后处理”方法在 Unity 完成导入并创建了 Unity 内部对象(如
Texture2D,GameObject,AudioClip)之后调用,允许修改这些对象或执行基于它们的逻辑。 - 避免循环导入: 在后处理方法中修改资产或其元数据可能导致 Unity 重新导入该资产,形成循环。需谨慎处理或使用标志位避免。
这个表格提供了 AssetPostprocessor 主要回调方法的概览及其作用。开发者可以根据项目需求选择实现特定的回调方法来定制资源导入流程。
举个栗子,这是书本上的一个例子,主要纹理导入的例子,手动对纹理一个一个导入,费时费力,我们可以通过使用ScriptsableObjcet,制作导入设置,通过设置批量操作。
第一步, ScriptableObject 实现了一个可配置的纹理预处理系统
代码如下
using System.IO;
using UnityEngine;
using UnityEditor;// 在Unity的Asset创建菜单中添加选项,用于创建此配置资源
[CreateAssetMenu]
public class TexturePreprocessSettings : ScriptableObject
{// ==============================// 纹理基础设置// ==============================// 纹理类型(默认、法线贴图、精灵等)[SerializeField] private TextureImporterType textureType = TextureImporterType.Default;// 纹理形状(2D、立方体贴图等)[SerializeField] private TextureImporterShape textureShape = TextureImporterShape.Texture2D;// 是否为sRGB颜色空间(颜色纹理应为true,非颜色纹理如法线贴图应为false)[SerializeField] private bool sRGBTexture = true;// Alpha通道来源(从输入获取、无Alpha等)[SerializeField] private TextureImporterAlphaSource alphaSource = TextureImporterAlphaSource.FromInput;// Alpha通道是否表示透明度[SerializeField] private bool alphaIsTransparency;// 是否忽略PNG文件的Gamma值[SerializeField] private bool ignorePNGFileGamma;// ==============================// 高级设置// ==============================// 标题分组[Header("Advanced")]// 非2的幂次方纹理缩放处理方式[SerializeField] private TextureImporterNPOTScale nonPowerOf2= TextureImporterNPOTScale.ToNearest;// 是否启用读写访问(会增加内存使用)[SerializeField] private bool readWriteEnabled;// 是否启用Mipmap流式加载(减少内存占用)[SerializeField] private bool streamingMipmaps;// 是否仅用于虚拟纹理(需要Unity的虚拟纹理系统)[SerializeField] private bool vitrualTextureOnly;// 是否生成Mipmap(多级渐远纹理)[SerializeField] private bool generateMipMaps = true;// Mipmap是否使用边框[SerializeField] private bool borderMipMaps;// Mipmap过滤算法[SerializeField] private TextureImporterMipFilter mipmapFilter= TextureImporterMipFilter.BoxFilter;// Mipmap是否保留覆盖范围(用于Alpha测试)[SerializeField] private bool mipMapsPreserveCoverage;// Mipmap是否启用淡出效果[SerializeField] private bool fadeoutMipMaps;// ==============================// 纹理采样设置// ==============================// 纹理环绕模式(重复、夹取等)[SerializeField] private TextureWrapMode wrapMode= TextureWrapMode.Repeat;// 纹理过滤模式(点过滤、双线性、三线性)[SerializeField] private FilterMode filterMode = FilterMode.Bilinear;// 各向异性过滤级别(0-16)[SerializeField, Range(0, 16)] private int anisoLevel = 1;// ==============================// 压缩与尺寸设置// ==============================// 纹理最大尺寸(长宽最大值)[SerializeField] private int maxSize = 2048;// 纹理格式(自动、RGBA32等)[SerializeField] private TextureImporterFormat format= TextureImporterFormat.Automatic;// 压缩方式(无压缩、压缩等)[SerializeField] private TextureImporterCompression compression= TextureImporterCompression.Compressed;// 是否使用Crunch压缩(高压缩比的有损压缩)[SerializeField] private bool useCrunchCompression;// ==============================// 单例访问器实现// ==============================// 静态实例引用private static TexturePreprocessSettings m_Settings;// 单例访问器属性private static TexturePreprocessSettings Settings{get{// 如果实例未加载if (m_Settings == null){// 配置资源的标准路径var path = "Assets/Settings/" +"Texture Preprocess Settings.asset";// 尝试从AssetDatabase加载配置m_Settings = AssetDatabase.LoadAssetAtPath<TexturePreprocessSettings>(path);// 如果资源不存在,创建新实例if (m_Settings == null){// 创建新的ScriptableObject实例m_Settings = CreateInstance<TexturePreprocessSettings>();// 确保Settings目录存在var directory = Application.dataPath + "/Settings";if (!Directory.Exists(directory))Directory.CreateDirectory(Application.dataPath + "/Settings");// 创建资产并刷新数据库AssetDatabase.CreateAsset(m_Settings, path);AssetDatabase.Refresh();}}return m_Settings;}}// ==============================// 公共静态访问器// 提供对私有字段的安全访问// ==============================// 基础设置访问器public static TextureImporterType TextureType => Settings.textureType;public static TextureImporterShape TextureShape => Settings.textureShape;public static bool SRGBTexture => Settings.sRGBTexture;public static TextureImporterAlphaSource AlphaSource => Settings.alphaSource;public static bool AlphaIsTransparency => Settings.alphaIsTransparency;public static bool IgnorePNGFileGamma => Settings.ignorePNGFileGamma;// 高级设置访问器public static TextureImporterNPOTScale NonPowerOf2 => Settings.nonPowerOf2;public static bool ReadWriteEnabled => Settings.readWriteEnabled;public static bool StreamingMipmaps => Settings.streamingMipmaps;public static bool VitrualTextureOnly => Settings.vitrualTextureOnly;public static bool GenerateMipMaps => Settings.generateMipMaps;public static bool BorderMipMaps => Settings.borderMipMaps;public static TextureImporterMipFilter MipmapFilter => Settings.mipmapFilter;public static bool MipMapsPreserveCoverage => Settings.mipMapsPreserveCoverage;public static bool FadeoutMipMaps => Settings.fadeoutMipMaps;// 采样设置访问器public static TextureWrapMode WrapMode => Settings.wrapMode;public static FilterMode FilterMode => Settings.filterMode;public static int AnisoLevel => Settings.anisoLevel;// 压缩设置访问器public static int MaxSize => Settings.maxSize;public static TextureImporterFormat Format => Settings.format;public static TextureImporterCompression Compression => Settings.compression;public static bool UseCrunchCompression => Settings.useCrunchCompression;
}

第二步,使用第一步创建好的设置,代码如下
using UnityEngine;
using UnityEditor;// 纹理后处理器类,继承自Unity的AssetPostprocessor
public class TexturePostprocessor : AssetPostprocessor
{// 在纹理导入前调用的方法private void OnPreprocessTexture(){// 将当前资源导入器转换为纹理导入器TextureImporter importer = assetImporter as TextureImporter;// 如果转换失败(即当前导入的不是纹理),直接返回if (importer == null)return;// =============================================// 应用全局纹理预处理设置// =============================================// 设置纹理形状(2D、Cube等)importer.textureShape = TexturePreprocessSettings.TextureShape;// 设置是否为sRGB颜色空间importer.sRGBTexture = TexturePreprocessSettings.SRGBTexture;// 设置Alpha通道来源importer.alphaSource = TexturePreprocessSettings.AlphaSource;// 设置Alpha通道是否表示透明度importer.alphaIsTransparency = TexturePreprocessSettings.AlphaIsTransparency;// 设置是否忽略PNG文件的Gamma值importer.ignorePngGamma = TexturePreprocessSettings.IgnorePNGFileGamma;// 设置非2的幂次方纹理的缩放处理方式importer.npotScale = TexturePreprocessSettings.NonPowerOf2;// 设置是否启用CPU读写访问(会增加内存占用)importer.isReadable = TexturePreprocessSettings.ReadWriteEnabled;// 设置是否启用Mipmap流式加载importer.streamingMipmaps = TexturePreprocessSettings.StreamingMipmaps;// 设置是否仅用于虚拟纹理importer.vtOnly = TexturePreprocessSettings.VitrualTextureOnly;// 设置是否生成Mipmapimporter.mipmapEnabled = TexturePreprocessSettings.GenerateMipMaps;// 设置Mipmap是否使用边框importer.borderMipmap = TexturePreprocessSettings.BorderMipMaps;// 设置Mipmap过滤算法importer.mipmapFilter = TexturePreprocessSettings.MipmapFilter;// 设置Mipmap是否保留覆盖范围importer.mipMapsPreserveCoverage = TexturePreprocessSettings.MipMapsPreserveCoverage;// 设置Mipmap是否启用淡出效果importer.fadeout = TexturePreprocessSettings.FadeoutMipMaps;// 设置纹理环绕模式importer.wrapMode = TexturePreprocessSettings.WrapMode;// 设置纹理过滤模式importer.filterMode = TexturePreprocessSettings.FilterMode;// 设置各向异性过滤级别importer.anisoLevel = TexturePreprocessSettings.AnisoLevel;// 设置纹理最大尺寸importer.maxTextureSize = TexturePreprocessSettings.MaxSize;// 设置纹理压缩方式importer.textureCompression = TexturePreprocessSettings.Compression;// 设置是否使用Crunch压缩importer.crunchedCompression = TexturePreprocessSettings.UseCrunchCompression;// 设置纹理类型(Default、NormalMap、Sprite等)importer.textureType = TexturePreprocessSettings.TextureType;}// =============================================// 模型导入后处理方法(当前为空实现)// =============================================/// <summary>/// 在导入带有用户自定义属性的模型后调用/// </summary>/// <param name="gameObject">导入的模型根对象</param>/// <param name="propNames">属性名称数组</param>/// <param name="values">属性值数组</param>private void OnPostprocessGameObjectWithUserProperties(GameObject gameObject,string[] propNames,object[] values){// 可在此处添加处理自定义属性的逻辑// 例如根据属性自动添加组件或设置参数}// =============================================// 模型层级后处理方法(当前为空实现)// =============================================/// <summary>/// 在模型层级导入完成后调用/// </summary>/// <param name="root">模型根对象</param>private void OnPostprocessMeshHierarchy(GameObject root){// 可在此处添加处理模型层级的逻辑// 例如优化层级结构、添加LOD组件等}
}
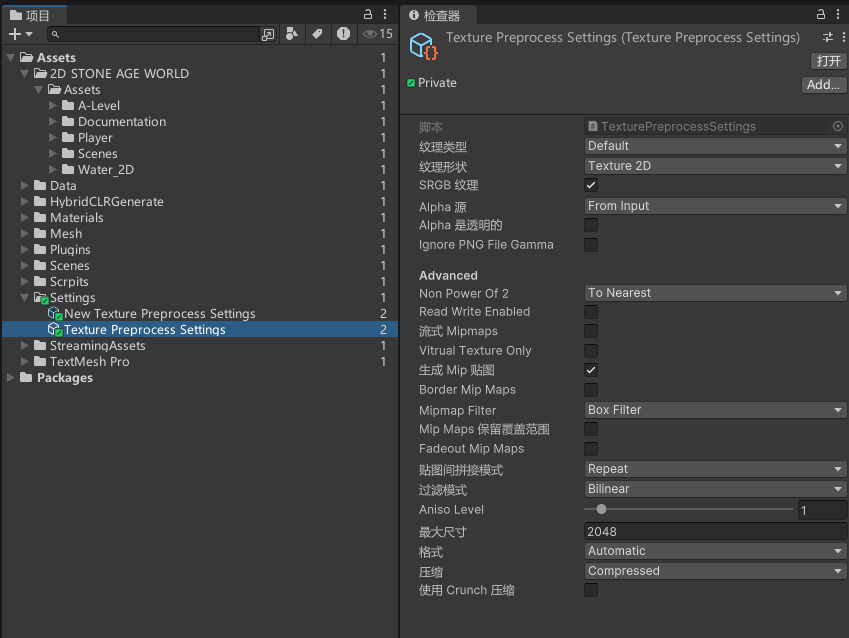
这个时候就会发现所有的Texture就会被设置为上图那样,不要在实际项目中测试,这个脚本没撤回功能。