【服务器与部署 12】数据库生产环境部署实战:MySQL、PostgreSQL、Redis高可用配置全攻略
【服务器与部署 12】数据库生产环境部署实战:MySQL、PostgreSQL、Redis高可用配置全攻略
关键词:数据库部署、MySQL主从复制、PostgreSQL流复制、Redis集群、高可用、读写分离、数据库优化、生产环境配置、数据库监控、备份策略
摘要:本文深入探讨MySQL、PostgreSQL、Redis三大主流数据库在生产环境中的部署配置策略。从基础安装到高可用架构,从性能优化到监控告警,提供完整的数据库部署解决方案。通过实战案例和最佳实践,帮助运维工程师构建稳定、高效、可扩展的数据库服务。
文章目录
- 【服务器与部署 12】数据库生产环境部署实战:MySQL、PostgreSQL、Redis高可用配置全攻略
- 一、引言:数据库部署的重要性与挑战
- 二、数据库选型:选择合适的工具
- 2.1 三大数据库特性对比
- MySQL:可靠的主力军
- PostgreSQL:功能强大的专业设备
- Redis:高速的专用工具
- 2.2 选型决策矩阵
- 三、MySQL生产环境部署
- 3.1 基础安装与配置
- 3.2 生产环境配置优化
- 3.3 MySQL主从复制配置
- 3.4 读写分离实现
- 3.5 MySQL监控脚本
- 4.2 PostgreSQL生产环境配置
- 4.3 PostgreSQL流复制配置
- 4.4 连接池配置 (PgBouncer)
- 4.5 PostgreSQL监控脚本
- 五、Redis生产环境部署
- 5.1 基础安装与配置
- 5.2 Redis生产环境配置
- 5.3 Redis集群配置
- 5.4 Redis Sentinel高可用配置
- 5.5 Redis监控脚本
- 六、数据库监控与备份策略
- 6.1 统一监控方案
- 七、性能优化最佳实践
- 7.1 MySQL性能优化
- 7.2 PostgreSQL性能优化
- 7.3 Redis性能优化
- 八、总结与最佳实践
- 8.1 核心要点回顾
- 8.2 实施建议
- 8.3 未来发展趋势
- 参考资料
一、引言:数据库部署的重要性与挑战
想象一下,你的电商网站在双11当天突然因为数据库故障而无法访问,数百万用户无法下单,每分钟损失可能高达数十万元。这种灾难性的后果往往源于一个看似简单的问题:数据库没有正确部署和配置。
数据库作为应用系统的核心组件,其稳定性直接决定了整个系统的可用性。在生产环境中,我们面临着诸多挑战:
- 高可用性要求:系统需要7×24小时不间断运行
- 性能压力:需要处理大量并发请求和海量数据
- 数据安全:确保数据不丢失、不泄露
- 扩展性需求:随着业务增长能够平滑扩容
本文将通过"做菜"的类比来解释数据库部署:如果说应用程序是一道美味的菜肴,那么数据库就是厨房的核心设备。一个设计良好的厨房需要合理的布局、优质的设备、完善的供应链,以及有效的管理制度。
二、数据库选型:选择合适的工具
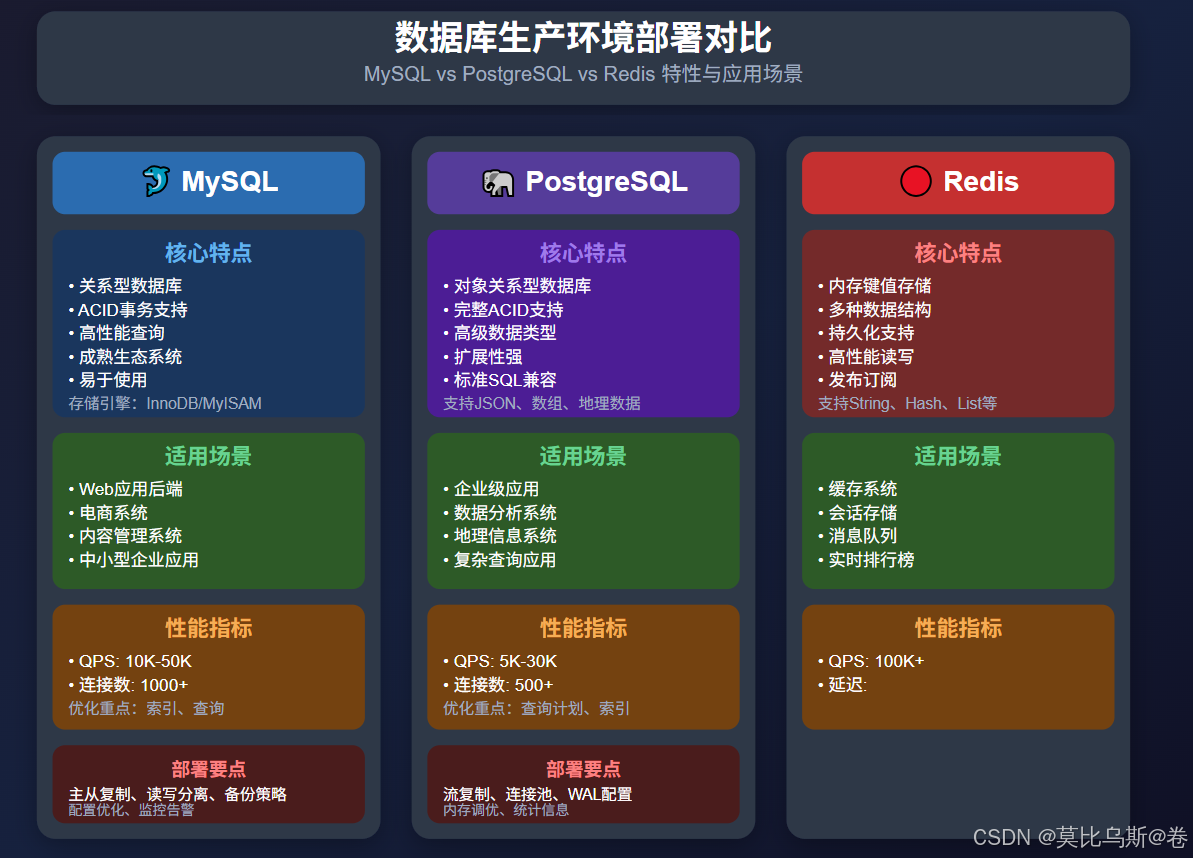
2.1 三大数据库特性对比
在开始部署之前,我们需要了解不同数据库的特点,就像选择厨房设备一样,每种工具都有其最适合的使用场景。
MySQL:可靠的主力军
MySQL就像厨房里的燃气灶,稳定可靠,使用简单,是最常见的选择:
# MySQL特点总结
特性:
- 关系型数据库,ACID事务支持
- 丰富的存储引擎(InnoDB、MyISAM)
- 成熟的生态系统和工具链
- 优秀的读写性能
- 易于学习和使用适用场景:
- Web应用后端数据存储
- 电商系统订单管理
- 内容管理系统
- 中小型企业应用性能指标:
- QPS: 10K-50K
- 连接数: 1000+
- 存储容量: TB级别
PostgreSQL:功能强大的专业设备
PostgreSQL像专业的多功能料理机,功能丰富,适合复杂的处理需求:
# PostgreSQL特点总结
特性:
- 对象关系型数据库
- 完整的ACID支持和MVCC
- 丰富的数据类型(JSON、数组、地理数据)
- 强大的查询优化器
- 高度可扩展性适用场景:
- 企业级应用系统
- 数据分析和商业智能
- 地理信息系统(GIS)
- 需要复杂查询的应用性能指标:
- QPS: 5K-30K
- 连接数: 500+
- 存储容量: TB级别
Redis:高速的专用工具
Redis就像厨房里的微波炉,速度极快,专门处理特定任务:
# Redis特点总结
特性:
- 内存键值存储
- 多种数据结构(String、Hash、List、Set、ZSet)
- 持久化支持(RDB、AOF)
- 发布订阅功能
- 集群支持适用场景:
- 缓存系统
- 会话存储
- 消息队列
- 实时排行榜
- 计数器性能指标:
- QPS: 100K+
- 延迟: <1ms
- 存储容量: 内存限制
2.2 选型决策矩阵
根据不同的业务需求,我们可以制定选型策略:
# 数据库选型决策工具
class DatabaseSelector:def __init__(self):self.criteria = {'data_complexity': 0,    # 数据复杂度 1-5'read_write_ratio': 0,   # 读写比例 1-10 (1=写多,10=读多)'consistency_requirement': 0,  # 一致性要求 1-5'performance_requirement': 0,  # 性能要求 1-5'scalability_requirement': 0,  # 扩展性要求 1-5}def evaluate_mysql(self, criteria):score = 0if criteria['data_complexity'] <= 3:score += 2if criteria['consistency_requirement'] >= 4:score += 2if criteria['performance_requirement'] <= 4:score += 2return scoredef evaluate_postgresql(self, criteria):score = 0if criteria['data_complexity'] >= 3:score += 2if criteria['consistency_requirement'] >= 4:score += 2if criteria['scalability_requirement'] >= 3:score += 1return scoredef evaluate_redis(self, criteria):score = 0if criteria['performance_requirement'] >= 4:score += 3if criteria['read_write_ratio'] >= 7:score += 2if criteria['data_complexity'] <= 2:score += 1return scoredef recommend(self, criteria):scores = {'MySQL': self.evaluate_mysql(criteria),'PostgreSQL': self.evaluate_postgresql(criteria),'Redis': self.evaluate_redis(criteria)}return sorted(scores.items(), key=lambda x: x[1], reverse=True)# 使用示例
selector = DatabaseSelector()# 电商系统场景
ecommerce_criteria = {'data_complexity': 3,'read_write_ratio': 6,'consistency_requirement': 5,'performance_requirement': 4,'scalability_requirement': 4
}recommendations = selector.recommend(ecommerce_criteria)
print("电商系统推荐:", recommendations)
# 输出: [('MySQL', 6), ('PostgreSQL', 5), ('Redis', 1)]
三、MySQL生产环境部署
3.1 基础安装与配置
MySQL的安装就像搭建厨房的基础设施,需要考虑位置、空间和基本配置:
# CentOS/RHEL MySQL 8.0 安装
# 1. 添加MySQL官方仓库
sudo dnf install https://dev.mysql.com/get/mysql80-community-release-el8-1.noarch.rpm# 2. 安装MySQL服务器
sudo dnf install mysql-community-server# 3. 启动MySQL服务
sudo systemctl start mysqld
sudo systemctl enable mysqld# 4. 获取临时密码
sudo grep 'temporary password' /var/log/mysqld.log# 5. 安全初始化
sudo mysql_secure_installation
3.2 生产环境配置优化
生产环境的MySQL配置需要精心调优,就像调节厨房设备的火候一样:
# /etc/mysql/mysql.conf.d/mysqld.cnf
[mysqld]
# 基础配置
port = 3306
socket = /var/run/mysqld/mysqld.sock
datadir = /var/lib/mysql
tmpdir = /tmp# 连接配置
max_connections = 1000
max_connect_errors = 100000
wait_timeout = 28800
interactive_timeout = 28800# 内存配置 (假设服务器有16GB内存)
innodb_buffer_pool_size = 12G
innodb_buffer_pool_instances = 8
innodb_log_buffer_size = 64M
key_buffer_size = 256M
max_heap_table_size = 256M
tmp_table_size = 256M# InnoDB配置
innodb_file_per_table = 1
innodb_flush_log_at_trx_commit = 1
innodb_log_file_size = 1G
innodb_log_files_in_group = 2
innodb_max_dirty_pages_pct = 75
innodb_lock_wait_timeout = 50# 查询缓存 (MySQL 8.0已移除,这里是5.7的配置)
# query_cache_type = 1
# query_cache_size = 256M# 日志配置
log_error = /var/log/mysql/error.log
slow_query_log = 1
slow_query_log_file = /var/log/mysql/slow.log
long_query_time = 2
log_queries_not_using_indexes = 1# 二进制日志配置
log_bin = /var/log/mysql/mysql-bin
binlog_format = ROW
expire_logs_days = 7
max_binlog_size = 100M# 字符集配置
character_set_server = utf8mb4
collation_server = utf8mb4_unicode_ci# 安全配置
local_infile = 0
3.3 MySQL主从复制配置
主从复制就像在厨房里设置备用设备,确保一台设备故障时其他设备能够接管:
# 主库配置 (Master)
# 1. 编辑主库配置文件
sudo vim /etc/mysql/mysql.conf.d/mysqld.cnf# 添加以下配置
[mysqld]
server-id = 1
log_bin = /var/log/mysql/mysql-bin
binlog_do_db = production_db
binlog_ignore_db = mysql,information_schema,performance_schema# 2. 重启MySQL服务
sudo systemctl restart mysqld# 3. 创建复制用户
mysql -u root -p
CREATE USER 'replication'@'%' IDENTIFIED BY 'StrongPassword123!';
GRANT REPLICATION SLAVE ON *.* TO 'replication'@'%';
FLUSH PRIVILEGES;# 4. 获取主库状态
SHOW MASTER STATUS;
# 记录 File 和 Position 值
# 从库配置 (Slave)
# 1. 编辑从库配置文件
sudo vim /etc/mysql/mysql.conf.d/mysqld.cnf# 添加以下配置
[mysqld]
server-id = 2
relay_log = /var/log/mysql/mysql-relay-bin
log_slave_updates = 1
read_only = 1# 2. 重启MySQL服务
sudo systemctl restart mysqld# 3. 配置主从关系
mysql -u root -p
CHANGE MASTER TOMASTER_HOST='192.168.1.100',MASTER_USER='replication',MASTER_PASSWORD='StrongPassword123!',MASTER_LOG_FILE='mysql-bin.000001',MASTER_LOG_POS=154;# 4. 启动从库复制
START SLAVE;# 5. 检查复制状态
SHOW SLAVE STATUS\G
# 确保 Slave_IO_Running 和 Slave_SQL_Running 都是 Yes
3.4 读写分离实现
使用ProxySQL实现读写分离,就像在厨房里设置专门的准备台和烹饪台:
# 安装ProxySQL
sudo dnf install proxysql# 配置ProxySQL
sudo vim /etc/proxysql.cnf
# ProxySQL配置文件
{"datadir": "/var/lib/proxysql","admin_variables": {"admin_credentials": "admin:admin","mysql_ifaces": "0.0.0.0:6032"},"mysql_variables": {"threads": 4,"max_connections": 2048,"default_query_delay": 0,"default_query_timeout": 36000000,"have_compress": true,"poll_timeout": 2000,"interfaces": "0.0.0.0:6033","default_schema": "information_schema","stacksize": 1048576,"server_version": "5.5.30","connect_timeout_server": 3000,"monitor_username": "monitor","monitor_password": "monitor","monitor_history": 600000,"monitor_connect_interval": 60000,"monitor_ping_interval": 10000,"ping_interval_server_msec": 120000,"ping_timeout_server": 500,"commands_stats": true,"sessions_sort": true}
}
-- ProxySQL管理配置
-- 连接到ProxySQL管理界面
mysql -u admin -padmin -h 127.0.0.1 -P6032 --prompt='Admin> '-- 添加MySQL服务器
INSERT INTO mysql_servers(hostgroup_id, hostname, port, weight, comment) VALUES
(0, '192.168.1.100', 3306, 1000, 'Master'),
(1, '192.168.1.101', 3306, 900, 'Slave1'),
(1, '192.168.1.102', 3306, 900, 'Slave2');-- 添加MySQL用户
INSERT INTO mysql_users(username, password, default_hostgroup) VALUES
('app_user', 'app_password', 0);-- 配置查询路由规则
INSERT INTO mysql_query_rules(rule_id, active, match_pattern, destination_hostgroup, apply) VALUES
(1, 1, '^SELECT.*', 1, 1),
(2, 1, '^INSERT|UPDATE|DELETE.*', 0, 1);-- 加载配置到运行时
LOAD MYSQL SERVERS TO RUNTIME;
LOAD MYSQL USERS TO RUNTIME;
LOAD MYSQL QUERY RULES TO RUNTIME;-- 保存配置到磁盘
SAVE MYSQL SERVERS TO DISK;
SAVE MYSQL USERS TO DISK;
SAVE MYSQL QUERY RULES TO DISK;
3.5 MySQL监控脚本
#!/usr/bin/env python3
# mysql_monitor.py - MySQL监控脚本import mysql.connector
import time
import json
import logging
from datetime import datetimeclass MySQLMonitor:def __init__(self, config):self.config = configself.connection = Nonedef connect(self):"""连接到MySQL"""try:self.connection = mysql.connector.connect(**self.config)return Trueexcept mysql.connector.Error as err:logging.error(f"MySQL连接失败: {err}")return Falsedef get_status(self):"""获取MySQL状态信息"""if not self.connection or not self.connection.is_connected():if not self.connect():return Nonecursor = self.connection.cursor(dictionary=True)status_info = {}# 获取基本状态cursor.execute("SHOW GLOBAL STATUS")for row in cursor.fetchall():status_info[row['Variable_name']] = row['Value']# 获取进程列表cursor.execute("SHOW PROCESSLIST")status_info['process_count'] = len(cursor.fetchall())# 获取主从状态try:cursor.execute("SHOW SLAVE STATUS")slave_status = cursor.fetchone()if slave_status:status_info['slave_io_running'] = slave_status['Slave_IO_Running']status_info['slave_sql_running'] = slave_status['Slave_SQL_Running']status_info['seconds_behind_master'] = slave_status['Seconds_Behind_Master']except:passcursor.close()return status_infodef check_health(self):"""健康检查"""status = self.get_status()if not status:return {'healthy': False, 'message': '无法连接到MySQL'}issues = []# 检查连接数max_connections = int(status.get('max_connections', 0))current_connections = int(status.get('Threads_connected', 0))connection_usage = (current_connections / max_connections) * 100if connection_usage > 80:issues.append(f"连接使用率过高: {connection_usage:.1f}%")# 检查慢查询slow_queries = int(status.get('Slow_queries', 0))total_queries = int(status.get('Questions', 1))slow_query_rate = (slow_queries / total_queries) * 100if slow_query_rate > 5:issues.append(f"慢查询比例过高: {slow_query_rate:.2f}%")# 检查主从延迟if 'seconds_behind_master' in status:delay = status['seconds_behind_master']if delay and int(delay) > 10:issues.append(f"主从延迟过高: {delay}秒")return {'healthy': len(issues) == 0,'message': '; '.join(issues) if issues else 'MySQL运行正常','metrics': {'connection_usage': connection_usage,'slow_query_rate': slow_query_rate,'current_connections': current_connections,'total_queries': total_queries}}# 使用示例
if __name__ == "__main__":config = {'host': 'localhost','port': 3306,'user': 'monitor','password': 'monitor_password','database': 'information_schema'}monitor = MySQLMonitor(config)while True:health = monitor.check_health()print(f"[{datetime.now()}] {health['message']}")if not health['healthy']:print("⚠️  MySQL健康检查失败!")# 这里可以添加告警逻辑time.sleep(60)  # 每分钟检查一次## 四、PostgreSQL生产环境部署### 4.1 基础安装与配置PostgreSQL的安装就像搭建一个专业的烹饪工作站,需要更多的精细配置:```bash
# CentOS/RHEL PostgreSQL 14 安装
# 1. 安装PostgreSQL仓库
sudo dnf install -y https://download.postgresql.org/pub/repos/yum/reporpms/EL-8-x86_64/pgdg-redhat-repo-latest.noarch.rpm# 2. 安装PostgreSQL 14
sudo dnf install -y postgresql14-server postgresql14# 3. 初始化数据库
sudo /usr/pgsql-14/bin/postgresql-14-setup initdb# 4. 启动并启用服务
sudo systemctl enable postgresql-14
sudo systemctl start postgresql-14# 5. 设置postgres用户密码
sudo -u postgres psql
\password postgres
\q
4.2 PostgreSQL生产环境配置
# /var/lib/pgsql/14/data/postgresql.conf
# 连接和认证
listen_addresses = '*'
port = 5432
max_connections = 200
superuser_reserved_connections = 3# 内存配置 (假设16GB内存)
shared_buffers = 4GB
effective_cache_size = 12GB
work_mem = 64MB
maintenance_work_mem = 512MB# WAL配置
wal_level = replica
max_wal_size = 2GB
min_wal_size = 80MB
checkpoint_completion_target = 0.9
wal_buffers = 16MB# 查询规划器
random_page_cost = 1.1
effective_io_concurrency = 200# 日志配置
logging_collector = on
log_directory = 'log'
log_filename = 'postgresql-%Y-%m-%d_%H%M%S.log'
log_rotation_age = 1d
log_rotation_size = 100MB
log_min_duration_statement = 1000
log_line_prefix = '%t [%p]: [%l-1] user=%u,db=%d,app=%a,client=%h '
log_statement = 'ddl'# 统计信息
track_activities = on
track_counts = on
track_io_timing = on
track_functions = pl# 自动清理
autovacuum = on
autovacuum_max_workers = 3
autovacuum_naptime = 1min
# /var/lib/pgsql/14/data/pg_hba.conf
# 客户端认证配置
# TYPE  DATABASE        USER            ADDRESS                 METHOD# 本地连接
local   all             postgres                                peer
local   all             all                                     md5# IPv4本地连接
host    all             all             127.0.0.1/32            md5# 应用连接
host    production_db   app_user        10.0.0.0/8              md5# 复制连接
host    replication     replicator      10.0.0.0/8              md5
4.3 PostgreSQL流复制配置
PostgreSQL的流复制就像建立一条实时的数据传输管道:
# 主库配置 (Primary)
# 1. 创建复制用户
sudo -u postgres psql
CREATE ROLE replicator WITH REPLICATION LOGIN PASSWORD 'ReplicatorPassword123!';# 2. 修改postgresql.conf
sudo vim /var/lib/pgsql/14/data/postgresql.conf# 添加以下配置
wal_level = replica
max_wal_senders = 3
max_replication_slots = 3
synchronous_commit = on
synchronous_standby_names = 'standby1'# 3. 重启PostgreSQL
sudo systemctl restart postgresql-14
# 备库配置 (Standby)
# 1. 停止备库服务
sudo systemctl stop postgresql-14# 2. 清除备库数据目录
sudo rm -rf /var/lib/pgsql/14/data/*# 3. 使用pg_basebackup创建备库
sudo -u postgres pg_basebackup -h 192.168.1.100 -D /var/lib/pgsql/14/data -U replicator -P -v -R -X stream -C -S standby1# 4. 创建standby.signal文件
sudo -u postgres touch /var/lib/pgsql/14/data/standby.signal# 5. 配置recovery参数
sudo -u postgres vim /var/lib/pgsql/14/data/postgresql.conf# 添加以下配置
hot_standby = on
max_standby_streaming_delay = 30s
wal_receiver_status_interval = 10s
hot_standby_feedback = on# 6. 启动备库
sudo systemctl start postgresql-14
4.4 连接池配置 (PgBouncer)
# 安装PgBouncer
sudo dnf install pgbouncer# 配置PgBouncer
sudo vim /etc/pgbouncer/pgbouncer.ini
# /etc/pgbouncer/pgbouncer.ini
[databases]
production_db = host=localhost port=5432 dbname=production_db[pgbouncer]
listen_port = 6432
listen_addr = *
auth_type = md5
auth_file = /etc/pgbouncer/userlist.txt
logfile = /var/log/pgbouncer/pgbouncer.log
pidfile = /var/run/pgbouncer/pgbouncer.pid
admin_users = postgres
stats_users = stats, postgres# 连接池配置
pool_mode = transaction
max_client_conn = 1000
default_pool_size = 25
max_db_connections = 50
max_user_connections = 50# 服务器配置
server_reset_query = DISCARD ALL
server_check_query = select 1
server_check_delay = 30
# 创建用户列表文件
sudo vim /etc/pgbouncer/userlist.txt# 格式: "username" "password"
"app_user" "md5hashed_password"
"postgres" "md5hashed_password"# 启动PgBouncer
sudo systemctl enable pgbouncer
sudo systemctl start pgbouncer
4.5 PostgreSQL监控脚本
#!/usr/bin/env python3
# postgresql_monitor.py - PostgreSQL监控脚本import psycopg2
import time
import json
import logging
from datetime import datetimeclass PostgreSQLMonitor:def __init__(self, config):self.config = configself.connection = Nonedef connect(self):"""连接到PostgreSQL"""try:self.connection = psycopg2.connect(**self.config)return Trueexcept psycopg2.Error as err:logging.error(f"PostgreSQL连接失败: {err}")return Falsedef get_status(self):"""获取PostgreSQL状态信息"""if not self.connection or self.connection.closed:if not self.connect():return Nonecursor = self.connection.cursor()status_info = {}# 获取数据库大小cursor.execute("""SELECT datname, pg_size_pretty(pg_database_size(datname)) as sizeFROM pg_database WHERE datistemplate = false;""")status_info['database_sizes'] = dict(cursor.fetchall())# 获取连接信息cursor.execute("""SELECT count(*) as total_connections,count(*) FILTER (WHERE state = 'active') as active_connections,count(*) FILTER (WHERE state = 'idle') as idle_connectionsFROM pg_stat_activity;""")conn_stats = cursor.fetchone()status_info['total_connections'] = conn_stats[0]status_info['active_connections'] = conn_stats[1]status_info['idle_connections'] = conn_stats[2]# 获取复制状态cursor.execute("""SELECT client_addr, state, sent_lsn, write_lsn, flush_lsn, replay_lsnFROM pg_stat_replication;""")replication_info = cursor.fetchall()status_info['replication_slots'] = len(replication_info)# 获取长时间运行的查询cursor.execute("""SELECT count(*) FROM pg_stat_activity WHERE state = 'active' AND now() - query_start > interval '5 minutes';""")status_info['long_running_queries'] = cursor.fetchone()[0]cursor.close()return status_infodef check_health(self):"""健康检查"""status = self.get_status()if not status:return {'healthy': False, 'message': '无法连接到PostgreSQL'}issues = []# 检查连接数total_connections = status['total_connections']if total_connections > 150:  # 假设max_connections=200issues.append(f"连接数过高: {total_connections}")# 检查长时间运行的查询long_queries = status['long_running_queries']if long_queries > 5:issues.append(f"长时间运行查询过多: {long_queries}")# 检查复制状态replication_slots = status['replication_slots']if replication_slots == 0:issues.append("没有检测到复制连接")return {'healthy': len(issues) == 0,'message': '; '.join(issues) if issues else 'PostgreSQL运行正常','metrics': {'total_connections': total_connections,'active_connections': status['active_connections'],'long_running_queries': long_queries,'replication_slots': replication_slots}}# 使用示例
if __name__ == "__main__":config = {'host': 'localhost','port': 5432,'user': 'postgres','password': 'postgres_password','database': 'postgres'}monitor = PostgreSQLMonitor(config)while True:health = monitor.check_health()print(f"[{datetime.now()}] {health['message']}")if not health['healthy']:print("⚠️  PostgreSQL健康检查失败!")time.sleep(60)
五、Redis生产环境部署
5.1 基础安装与配置
Redis就像厨房里的高速处理器,专门处理需要快速响应的任务:
# CentOS/RHEL Redis 6.2 安装
# 1. 安装EPEL仓库
sudo dnf install epel-release# 2. 安装Redis
sudo dnf install redis# 3. 启动并启用服务
sudo systemctl enable redis
sudo systemctl start redis# 或者编译安装最新版本
wget https://download.redis.io/redis-stable.tar.gz
tar xzf redis-stable.tar.gz
cd redis-stable
make
sudo make install
5.2 Redis生产环境配置
# /etc/redis/redis.conf
# 基础配置
bind 0.0.0.0
port 6379
protected-mode yes
requirepass StrongRedisPassword123!# 内存配置
maxmemory 8gb
maxmemory-policy allkeys-lru# 持久化配置
# RDB配置
save 900 1
save 300 10
save 60 10000
stop-writes-on-bgsave-error yes
rdbcompression yes
rdbchecksum yes
dbfilename dump.rdb
dir /var/lib/redis# AOF配置
appendonly yes
appendfilename "appendonly.aof"
appendfsync everysec
no-appendfsync-on-rewrite no
auto-aof-rewrite-percentage 100
auto-aof-rewrite-min-size 64mb# 网络配置
tcp-backlog 511
timeout 300
tcp-keepalive 300# 日志配置
loglevel notice
logfile /var/log/redis/redis-server.log
syslog-enabled yes
syslog-ident redis# 客户端配置
maxclients 10000# 安全配置
rename-command FLUSHDB ""
rename-command FLUSHALL ""
rename-command EVAL ""
rename-command DEBUG ""
rename-command CONFIG "CONFIG_9f2c8d5a7b1e"
5.3 Redis集群配置
Redis集群就像建立一个分布式的高速处理网络:
# 创建集群节点目录
sudo mkdir -p /etc/redis/cluster/{7000,7001,7002,7003,7004,7005}# 为每个节点创建配置文件
for port in {7000..7005}; do
sudo tee /etc/redis/cluster/$port/redis.conf > /dev/null <<EOF
port $port
cluster-enabled yes
cluster-config-file nodes-$port.conf
cluster-node-timeout 5000
appendonly yes
appendfilename appendonly-$port.aof
dbfilename dump-$port.rdb
logfile /var/log/redis/redis-$port.log
pidfile /var/run/redis/redis-$port.pid
dir /var/lib/redis/cluster/$port
bind 0.0.0.0
protected-mode no
daemonize yes
EOF
done# 创建数据目录
for port in {7000..7005}; dosudo mkdir -p /var/lib/redis/cluster/$portsudo chown redis:redis /var/lib/redis/cluster/$port
done# 启动所有节点
for port in {7000..7005}; doredis-server /etc/redis/cluster/$port/redis.conf
done# 创建集群
redis-cli --cluster create 127.0.0.1:7000 127.0.0.1:7001 127.0.0.1:7002 127.0.0.1:7003 127.0.0.1:7004 127.0.0.1:7005 --cluster-replicas 1
5.4 Redis Sentinel高可用配置
# /etc/redis/sentinel.conf
port 26379
sentinel announce-ip 192.168.1.100
sentinel announce-port 26379# 监控主节点
sentinel monitor mymaster 192.168.1.100 6379 2
sentinel auth-pass mymaster StrongRedisPassword123!
sentinel down-after-milliseconds mymaster 5000
sentinel parallel-syncs mymaster 1
sentinel failover-timeout mymaster 10000# 日志配置
logfile /var/log/redis/sentinel.log
loglevel notice# 启动Sentinel
redis-sentinel /etc/redis/sentinel.conf
5.5 Redis监控脚本
#!/usr/bin/env python3
# redis_monitor.py - Redis监控脚本import redis
import time
import json
import logging
from datetime import datetimeclass RedisMonitor:def __init__(self, config):self.config = configself.connection = Nonedef connect(self):"""连接到Redis"""try:self.connection = redis.Redis(**self.config)self.connection.ping()return Trueexcept redis.RedisError as err:logging.error(f"Redis连接失败: {err}")return Falsedef get_status(self):"""获取Redis状态信息"""if not self.connection:if not self.connect():return Nonetry:info = self.connection.info()status_info = {'version': info['redis_version'],'uptime_seconds': info['uptime_in_seconds'],'connected_clients': info['connected_clients'],'used_memory': info['used_memory'],'used_memory_human': info['used_memory_human'],'used_memory_peak': info['used_memory_peak'],'used_memory_peak_human': info['used_memory_peak_human'],'keyspace_hits': info['keyspace_hits'],'keyspace_misses': info['keyspace_misses'],'total_commands_processed': info['total_commands_processed'],'instantaneous_ops_per_sec': info['instantaneous_ops_per_sec'],'role': info['role']}# 计算命中率hits = info['keyspace_hits']misses = info['keyspace_misses']if hits + misses > 0:status_info['hit_rate'] = (hits / (hits + misses)) * 100else:status_info['hit_rate'] = 0# 获取数据库信息status_info['databases'] = {}for key, value in info.items():if key.startswith('db'):status_info['databases'][key] = valuereturn status_infoexcept redis.RedisError as err:logging.error(f"获取Redis状态失败: {err}")return Nonedef check_health(self):"""健康检查"""status = self.get_status()if not status:return {'healthy': False, 'message': '无法连接到Redis'}issues = []# 检查内存使用used_memory = status['used_memory']if used_memory > 8 * 1024 * 1024 * 1024:  # 8GBissues.append(f"内存使用过高: {status['used_memory_human']}")# 检查连接数connected_clients = status['connected_clients']if connected_clients > 1000:issues.append(f"连接数过高: {connected_clients}")# 检查命中率hit_rate = status['hit_rate']if hit_rate < 80:issues.append(f"缓存命中率过低: {hit_rate:.1f}%")# 检查QPSops_per_sec = status['instantaneous_ops_per_sec']if ops_per_sec > 50000:issues.append(f"QPS过高: {ops_per_sec}")return {'healthy': len(issues) == 0,'message': '; '.join(issues) if issues else 'Redis运行正常','metrics': {'used_memory': used_memory,'connected_clients': connected_clients,'hit_rate': hit_rate,'ops_per_sec': ops_per_sec,'role': status['role']}}def get_cluster_info(self):"""获取集群信息"""try:cluster_info = self.connection.cluster_info()cluster_nodes = self.connection.cluster_nodes()return {'cluster_state': cluster_info['cluster_state'],'cluster_slots_assigned': cluster_info['cluster_slots_assigned'],'cluster_slots_ok': cluster_info['cluster_slots_ok'],'cluster_slots_pfail': cluster_info['cluster_slots_pfail'],'cluster_slots_fail': cluster_info['cluster_slots_fail'],'cluster_known_nodes': cluster_info['cluster_known_nodes'],'cluster_size': cluster_info['cluster_size'],'nodes': len(cluster_nodes)}except:return None# 使用示例
if __name__ == "__main__":config = {'host': 'localhost','port': 6379,'password': 'StrongRedisPassword123!','decode_responses': True}monitor = RedisMonitor(config)while True:health = monitor.check_health()print(f"[{datetime.now()}] {health['message']}")if not health['healthy']:print("⚠️  Redis健康检查失败!")# 如果是集群模式,显示集群信息cluster_info = monitor.get_cluster_info()if cluster_info:print(f"集群状态: {cluster_info['cluster_state']}")print(f"集群节点数: {cluster_info['nodes']}")time.sleep(60)
六、数据库监控与备份策略
6.1 统一监控方案
#!/usr/bin/env python3
# unified_db_monitor.py - 统一数据库监控import asyncio
import aiohttp
import json
from datetime import datetime
import loggingclass UnifiedDBMonitor:def __init__(self):self.monitors = {}self.alert_thresholds = {'mysql': {'connection_usage': 80,'slow_query_rate': 5,'replication_delay': 10},'postgresql': {'connection_count': 150,'long_running_queries': 5},'redis': {'memory_usage': 8 * 1024**3,  # 8GB'hit_rate': 80,'connection_count': 1000}}def add_monitor(self, name, monitor):"""添加监控实例"""self.monitors[name] = monitorasync def check_all_databases(self):"""检查所有数据库"""results = {}for name, monitor in self.monitors.items():try:health = monitor.check_health()results[name] = health# 发送告警if not health['healthy']:await self.send_alert(name, health['message'])except Exception as e:results[name] = {'healthy': False,'message': f'监控异常: {str(e)}'}return resultsasync def send_alert(self, db_name, message):"""发送告警"""alert_data = {'timestamp': datetime.now().isoformat(),'database': db_name,'message': message,'severity': 'high'}# 这里可以集成各种告警渠道print(f"🚨 数据库告警: {db_name} - {message}")# 发送到钉钉/企微/邮件等# await self.send_to_dingtalk(alert_data)# await self.send_email(alert_data)def generate_report(self, results):"""生成监控报告"""report = {'timestamp': datetime.now().isoformat(),'summary': {'total_databases': len(results),'healthy_count': sum(1 for r in results.values() if r['healthy']),'unhealthy_count': sum(1 for r in results.values() if not r['healthy'])},'details': results}return report# 备份策略实现
class DatabaseBackupManager:def __init__(self):self.backup_configs = {}def add_backup_config(self, db_name, config):"""添加备份配置"""self.backup_configs[db_name] = configasync def backup_mysql(self, config):"""MySQL备份"""import subprocessbackup_file = f"/backup/mysql_{datetime.now().strftime('%Y%m%d_%H%M%S')}.sql"cmd = ['mysqldump',f"--host={config['host']}",f"--user={config['user']}",f"--password={config['password']}",'--single-transaction','--routines','--triggers',config['database']]try:with open(backup_file, 'w') as f:subprocess.run(cmd, stdout=f, check=True)# 压缩备份文件subprocess.run(['gzip', backup_file], check=True)return f"{backup_file}.gz"except subprocess.CalledProcessError as e:raise Exception(f"MySQL备份失败: {e}")async def backup_postgresql(self, config):"""PostgreSQL备份"""import subprocessbackup_file = f"/backup/postgresql_{datetime.now().strftime('%Y%m%d_%H%M%S')}.sql"env = {'PGPASSWORD': config['password']}cmd = ['pg_dump',f"--host={config['host']}",f"--port={config['port']}",f"--username={config['user']}",'--format=custom','--compress=9','--verbose',config['database']]try:with open(backup_file, 'wb') as f:subprocess.run(cmd, stdout=f, env=env, check=True)return backup_fileexcept subprocess.CalledProcessError as e:raise Exception(f"PostgreSQL备份失败: {e}")async def backup_redis(self, config):"""Redis备份"""import subprocessbackup_file = f"/backup/redis_{datetime.now().strftime('%Y%m%d_%H%M%S')}.rdb"try:# 执行BGSAVE命令import redisr = redis.Redis(**config)r.bgsave()# 等待备份完成while r.lastsave() == r.lastsave():await asyncio.sleep(1)# 复制RDB文件import shutilshutil.copy('/var/lib/redis/dump.rdb', backup_file)# 压缩备份文件subprocess.run(['gzip', backup_file], check=True)return f"{backup_file}.gz"except Exception as e:raise Exception(f"Redis备份失败: {e}")async def run_backup(self, db_name):"""执行备份"""if db_name not in self.backup_configs:raise Exception(f"未找到 {db_name} 的备份配置")config = self.backup_configs[db_name]db_type = config['type']if db_type == 'mysql':return await self.backup_mysql(config)elif db_type == 'postgresql':return await self.backup_postgresql(config)elif db_type == 'redis':return await self.backup_redis(config)else:raise Exception(f"不支持的数据库类型: {db_type}")
七、性能优化最佳实践
7.1 MySQL性能优化
-- MySQL性能优化查询
-- 1. 查看慢查询
SELECT * FROM mysql.slow_log
WHERE start_time > DATE_SUB(NOW(), INTERVAL 1 HOUR)
ORDER BY query_time DESC
LIMIT 10;-- 2. 分析表空间使用
SELECT table_schema,table_name,ROUND(((data_length + index_length) / 1024 / 1024), 2) AS 'Size(MB)'
FROM information_schema.tables
WHERE table_schema NOT IN ('information_schema', 'mysql', 'performance_schema')
ORDER BY (data_length + index_length) DESC;-- 3. 检查索引使用情况
SELECT t.table_schema,t.table_name,s.index_name,s.column_name,s.cardinality
FROM information_schema.tables t
LEFT JOIN information_schema.statistics s ON t.table_name = s.table_name
WHERE t.table_schema NOT IN ('information_schema', 'mysql', 'performance_schema')
ORDER BY t.table_schema, t.table_name, s.seq_in_index;
7.2 PostgreSQL性能优化
-- PostgreSQL性能优化查询
-- 1. 查看慢查询
SELECT query,calls,total_time,mean_time,rows
FROM pg_stat_statements
ORDER BY total_time DESC
LIMIT 10;-- 2. 分析表大小
SELECT schemaname,tablename,pg_size_pretty(pg_total_relation_size(schemaname||'.'||tablename)) as size
FROM pg_tables
WHERE schemaname NOT IN ('information_schema', 'pg_catalog')
ORDER BY pg_total_relation_size(schemaname||'.'||tablename) DESC;-- 3. 检查索引使用情况
SELECT schemaname,tablename,indexname,idx_scan,idx_tup_read,idx_tup_fetch
FROM pg_stat_user_indexes
ORDER BY idx_scan DESC;
7.3 Redis性能优化
# Redis性能优化命令
# 1. 查看内存使用详情
redis-cli info memory# 2. 分析慢日志
redis-cli slowlog get 10# 3. 查看键空间分布
redis-cli info keyspace# 4. 内存分析
redis-cli --bigkeys# 5. 延迟监控
redis-cli --latency-history -h 127.0.0.1 -p 6379
八、总结与最佳实践
通过本文的深入探讨,我们全面了解了MySQL、PostgreSQL、Redis三大数据库在生产环境中的部署配置。
8.1 核心要点回顾
-
选型原则:
- MySQL:适合传统Web应用,易于使用和维护
- PostgreSQL:适合企业级应用,功能丰富,扩展性强
- Redis:适合缓存和高速读写场景
-
高可用配置:
- MySQL:主从复制 + 读写分离
- PostgreSQL:流复制 + 连接池
- Redis:集群模式 + Sentinel
-
监控告警:
- 建立统一监控平台
- 设置合理的告警阈值
- 实现自动化运维
-
备份策略:
- 定期全量备份
- 实时增量备份
- 异地备份存储
8.2 实施建议
- 循序渐进:从单机部署开始,逐步过渡到高可用架构
- 监控先行:在部署初期就建立完善的监控体系
- 文档完善:详细记录配置参数和操作流程
- 定期演练:定期进行故障恢复演练
- 持续优化:根据业务发展调整配置参数
8.3 未来发展趋势
-
云原生数据库:
- 容器化部署
- Kubernetes编排
- 自动伸缩
-
智能化运维:
- AI驱动的性能优化
- 自动故障恢复
- 预测性维护
-
多模数据库:
- 统一的数据访问层
- 混合存储架构
- 实时数据同步
记住,数据库部署不是一次性的工作,而是一个持续优化的过程。就像经营一家餐厅一样,需要不断调整菜单、改进设备、培训员工,才能为客户提供最佳的用餐体验。
参考资料
- MySQL官方文档
- PostgreSQL官方文档
- Redis官方文档
- ProxySQL文档
- PgBouncer文档
- 数据库高可用架构设计
- PostgreSQL性能调优指南