Spring Cloud Alibaba快速入门02-Nacos
文章目录
- 前言
- Nacos安装
- 启动nacos单机模式
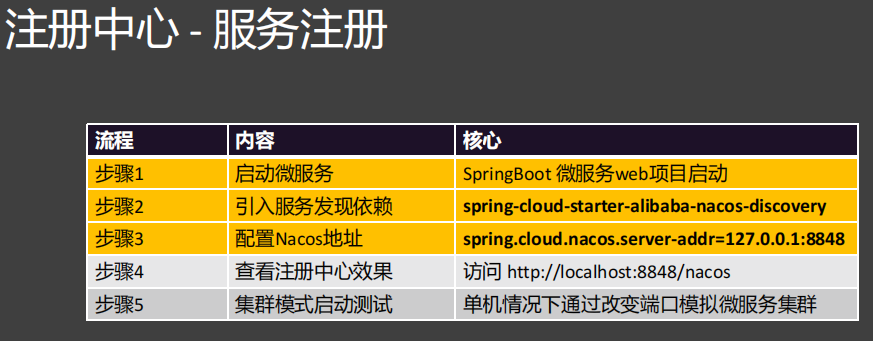
- 实现注册中心-服务注册
- 步骤1 - 启动微服务
- 步骤2 - 引入服务发现依赖
- 步骤3 - 配置Nacos地址
- 步骤4 - 查看注册中心效果
- 步骤5 - 集群模式启动测试
- 实现注册中心-服务发现
- 模拟掉线

前言
Nacos(Naming Configuration Service)是一个更易于构建云原生应用的动态服务发现、配置管理和服务管理平台。
它由阿里巴巴开源,并已成为 Spring Cloud Alibaba 生态系统的核心组件,同时完美集成到 Spring Cloud 体系中,可以替代 Netflix Eureka、Consul、ZooKeeper 等组件。
它的核心功能可以拆解为两个词:
- Naming (服务发现与注册)
- Configuration (配置管理)
Nacos安装
- Nacos /nɑ:kəʊs/ 是 Dynamic Naming and Configuration Service的首字母简称,一个更易于构建云原生应用的动态服务发现、配置管理和服务管理平台。
- 官网:https://nacos.io/zh-cn/docs/v2/quickstart/quick-start.html
- 安装:
- 下载安装包【2.4.3】
- 启动命令: startup.cmd -m standalone
nacos历史版本地址:https://nacos.io/download/release-history/?spm=5238cd80.47ee59c.0.0.189fcd36EUPree
启动nacos单机模式
1.解压nacos-server-2.4.3.zip后进入bin
2.cmd进入黑窗口
3.使用 startup.cmd -m standalone 命令启动nacos单机模式

实现注册中心-服务注册
步骤流程如下
步骤1 - 启动微服务
进入services-order
pom.xml依赖
<dependencies><dependency><groupId>org.springframework.boot</groupId><artifactId>spring-boot-starter-web</artifactId></dependency>
</dependencies>
步骤2 - 引入服务发现依赖
因为要把order注册到注册中心,所以导入nacos依赖(这里在services父项目中已经导入)
步骤3 - 配置Nacos地址
现在需要将当前项目注册到注册中心,所以需要在application.yml中配置nacos地址(告诉当前应用nacos在哪里)
启动类
import org.springframework.boot.SpringApplication;
import org.springframework.boot.autoconfigure.SpringBootApplication;@SpringBootApplication
public class OrderApplication {public static void main(String[] args) {SpringApplication.run(OrderApplication.class, args);}
}
application.yml
server:port: 8080servlet:context-path: /
spring:application:name: qf-service-order# 配置nacos地址(告诉当前应用nacos在哪里)cloud:nacos:server-addr: 127.0.0.1:8848
项目结构

步骤4 - 查看注册中心效果
访问:http://127.0.0.1:8848/nacos/index.html


步骤5 - 集群模式启动测试
打开左下角Services

如果没有添加(为空),则需要先添加

选择其中spring boot选项
出现以下情况

点击右键,复制一个服务
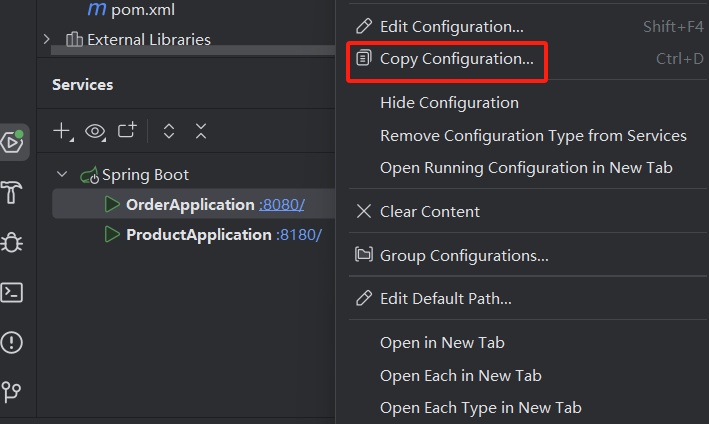
点击后修改服务名称,修改服务端口


完整配置
–server.port=8081

点击ok
配置完成后同一时间启动
1.shift选择要启动的项目
2.点击右键,选择Rerun
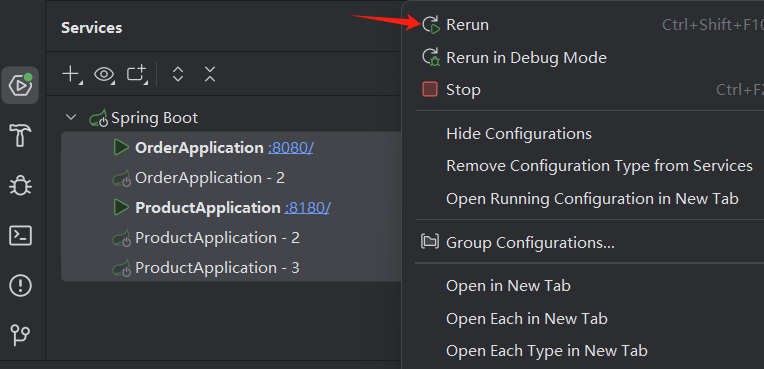
启动成功后可以在nacos上看到启动的服务

实现注册中心-服务发现
 使用@EnableDiscoveryClient开启服务发现功能
import org.springframework.boot.SpringApplication;
import org.springframework.boot.autoconfigure.SpringBootApplication;
import org.springframework.cloud.client.discovery.EnableDiscoveryClient;@EnableDiscoveryClient//开启服务发现功能
@SpringBootApplication
public class ProductApplication {public static void main(String[] args) {SpringApplication.run(ProductApplication.class, args);}
}
导入单元测试依赖
<dependency><groupId>org.springframework.boot</groupId><artifactId>spring-boot-starter-test</artifactId><scope>test</scope><!--只在test目录下生效-->
</dependency>
执行
import com.alibaba.cloud.nacos.discovery.NacosServiceDiscovery;
import com.alibaba.nacos.api.exception.NacosException;
import org.junit.jupiter.api.Test;
import org.springframework.beans.factory.annotation.Autowired;
import org.springframework.boot.test.context.SpringBootTest;
import org.springframework.cloud.client.ServiceInstance;
import org.springframework.cloud.client.discovery.DiscoveryClient;import java.util.List;@SpringBootTest
public class DiscoveryTest {@AutowiredDiscoveryClient discoveryClient;@Testvoid discoveryClientTest(){for (String service : discoveryClient.getServices()) {System.out.println("service = " + service);//获取ip+portList<ServiceInstance> instances = discoveryClient.getInstances(service);for (ServiceInstance instance : instances) {System.out.println("ip:"+instance.getHost()+";"+"port = " + instance.getPort());}}/*service = qf-service-orderip:192.168.109.1;port = 8080ip:192.168.109.1;port = 8081service = qf-service-productip:192.168.109.1;port = 8181ip:192.168.109.1;port = 8180ip:192.168.109.1;port = 8182*/}@AutowiredNacosServiceDiscovery nacosServiceDiscovery;@Testvoid  nacosServiceDiscoveryTest() throws NacosException {for (String service : nacosServiceDiscovery.getServices()) {System.out.println("service = " + service);List<ServiceInstance> instances = nacosServiceDiscovery.getInstances(service);for (ServiceInstance instance : instances) {System.out.println("ip:"+instance.getHost()+";"+"port = " + instance.getPort());}}/*service = qf-service-orderip:192.168.109.1;port = 8080ip:192.168.109.1;port = 8081service = qf-service-productip:192.168.109.1;port = 8181ip:192.168.109.1;port = 8180ip:192.168.109.1;port = 8182*/}
}
DiscoveryClient是spring的规范,NacosServiceDiscovery是nacos的
模拟掉线

运行nacosServiceDiscoveryTest()
service = qf-service-order
ip:192.168.109.1;port = 8080
service = qf-service-product
ip:192.168.109.1;port = 8181
ip:192.168.109.1;port = 8180
ip:192.168.109.1;port = 8182