Cilium动手实验室: 精通之旅---11.Advanced BGP Features - Lab
Cilium动手实验室: 精通之旅---11.Advanced BGP Features - Lab
- 1. 初始化集群
- 2. Cilium BGP Timer
- 2.1 准备工作
- 2.2 BGP设置
- 2.3 部署BGP对等网络CRD策略
- 2.4 默认BGP计时器
- 2.5 修改BGP计时器
- 3. Cilium eBGP多跳
- 4. BGP平滑重启
- 5. BGP MD5密码
- 5.1 创建密码
- 5.2 向远程对等体添加密码
- 5.3 Md5 密码
- 6. Cilium BGP Communities
- 6.1 BGP Communities
- 6.2 小测验
- 7. 测试
- 7.1 题目
- 7.2 解题
1. 初始化集群
LAB地址
https://isovalent.com/labs/advanced-bgp-features/
我们将使用 Kind 来设置我们的 Kubernetes 集群,并在该 Cilium 之上。
我们来看看它的配置:
root@server:~# yq cluster.yaml
kind: Cluster
name: clab-bgp-cplane-devel
apiVersion: kind.x-k8s.io/v1alpha4
networking:disableDefaultCNI: true
nodes:- role: control-planekubeadmConfigPatches:- |kind: InitConfigurationnodeRegistration:kubeletExtraArgs:node-ip: "172.0.0.2"
containerdConfigPatches:- |-[plugins."io.containerd.grpc.v1.cri".registry.mirrors."localhost:5000"]endpoint = ["http://kind-registry:5000"]
在 nodes 部分中,您可以看到集群由单个控制平面节点组成。
在配置文件的 networking 部分中,默认的 CNI 已被禁用,因此集群在启动时将没有任何 Pod 网络。相反,Cilium 将被部署到集群以提供此功能。
要查看是否安装了 Kind 集群,请验证节点是否已启动并加入:
root@server:~# kubectl get nodes
NAME                                  STATUS   ROLES           AGE    VERSION
clab-bgp-cplane-devel-control-plane   Ready    control-plane   115s   v1.31.0
在安装 Cilium 之前,我们使用了一个名为 containerlab 的平台来模拟 Cilium 将与之对等的网络主干。
在本实验中,containerlab 还负责为 Kubernetes 节点分配内部 IP。请注意,如果您运行以下命令,则尚未为节点分配 IP 地址:
root@server:~# kubectl get nodes -o wide
NAME                                  STATUS   ROLES           AGE     VERSION   INTERNAL-IP   EXTERNAL-IP   OS-IMAGE                         KERNEL-VERSION   CONTAINER-RUNTIME
clab-bgp-cplane-devel-control-plane   Ready    control-plane   2m18s   v1.31.0   172.0.0.2     <none>        Debian GNU/Linux 12 (bookworm)   6.8.0-1024-gcp   containerd://1.7.18
如果您好奇,可以详细查看我们作为实验室的一部分部署的 containerlab 拓扑。
root@server:~# yq topo.yaml
name: bgp-cplane-devel
topology:kinds:linux:cmd: bashnodes:tor:kind: linuximage: frrouting/frr:v8.2.2exec:# peer over this link with cilium- ip addr add 172.0.0.1/24 dev net0# Boiler plate to make FRR work- touch /etc/frr/vtysh.conf- touch /var/log/frr.log- chown frr:frr /var/log/frr.log- sed -i -e 's/bgpd=no/bgpd=yes/g' /etc/frr/daemons- /usr/lib/frr/frrinit.sh start- >-vtysh -c 'conf t' -c 'log file /var/log/frr.log' -c 'debug bgp neighbor-events' -c 'debug bgp updates' -c 'debug bgp zebra' -c '! peer with Cilium' -c 'router bgp 65000' -c ' no bgp ebgp-requires-policy'     -c ' bgp router-id 172.0.0.1' -c ' neighbor 172.0.0.2 remote-as 65001' -c ' address-family ipv6 unicast' -c '  neighbor 172.0.0.2  activate' -c ' exit-address-family' -c '!'cilium:kind: linuximage: nicolaka/netshoot:latestnetwork-mode: container:clab-bgp-cplane-devel-control-planeexec:# peer over this link with tor- ip addr add 172.0.0.2/24 dev net0links:- endpoints: ["tor:net0", "cilium:net0"]
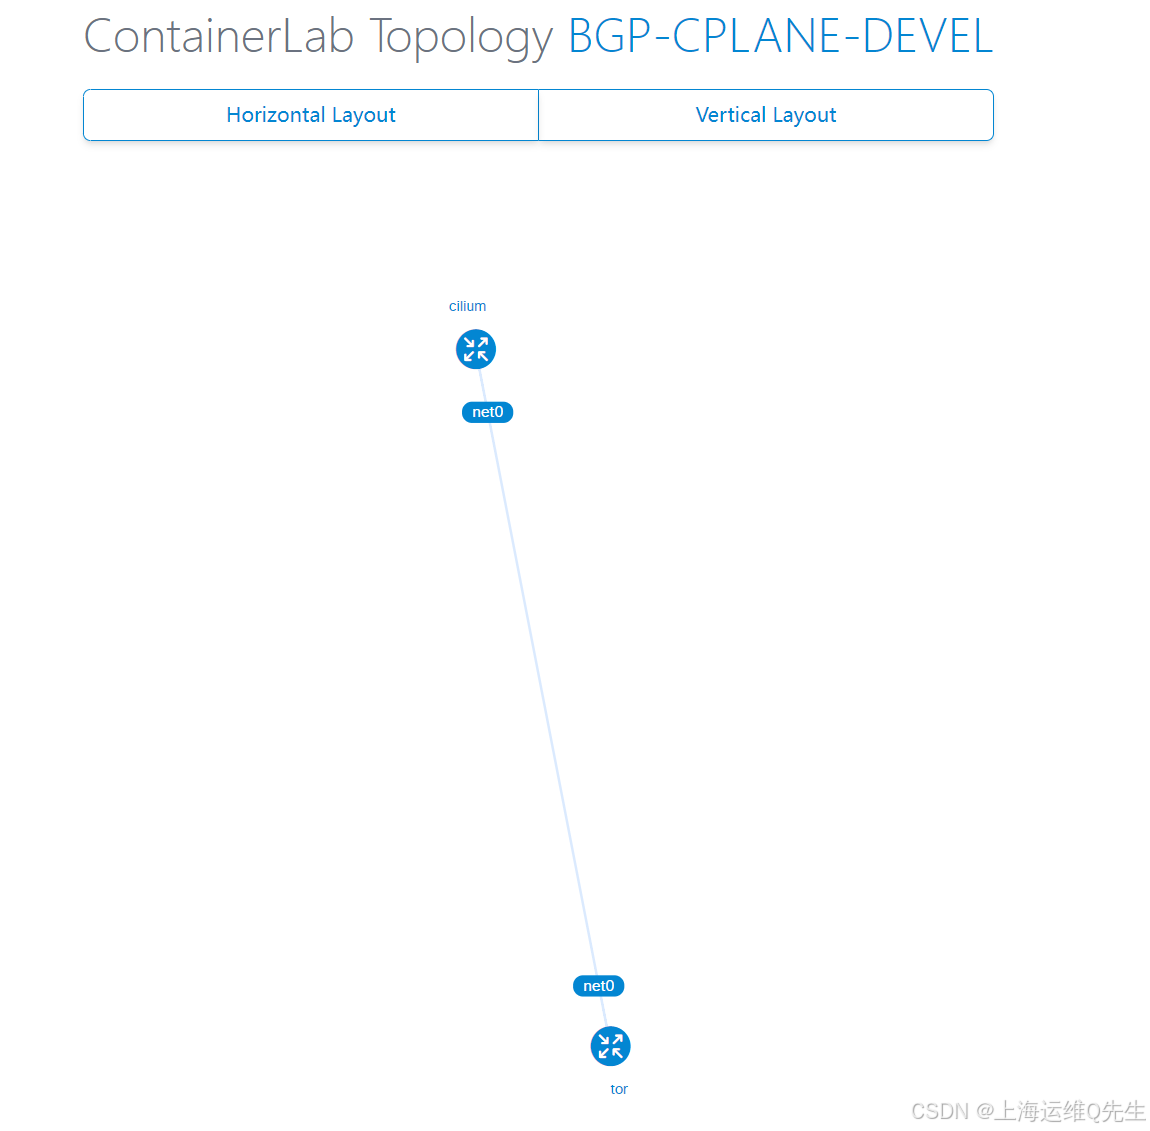
需要注意的主要一点是,我们正在部署 1 个路由节点:一个架顶式 (ToR) 路由器 (tor)。我们在引导时使用其 IP 和 BGP 配置对其进行预配置。在 YAML 文件的末尾,您还会注意到我们正在 Cilium 节点和 ToR 路由器之间建立虚拟链接。
在以下任务中,我们将配置为运行 BGP 并与 ToR 设备建立 BGP 对等连接。
Cilium 已安装在集群上,并带有以下标志以激活 BGP 控制平面:
--set bgpControlPlane.enabled=true
运行 cilium status 以验证 Cilium 的健康状况。几秒钟后,会看到命令的输出。Cilium 和 Operator 的状态都应该都是 OK:
root@server:~# cilium status --wait/¯¯\/¯¯\__/¯¯\    Cilium:             OK\__/¯¯\__/    Operator:           OK/¯¯\__/¯¯\    Envoy DaemonSet:    OK\__/¯¯\__/    Hubble Relay:       disabled\__/       ClusterMesh:        disabledDaemonSet              cilium                   Desired: 1, Ready: 1/1, Available: 1/1
DaemonSet              cilium-envoy             Desired: 1, Ready: 1/1, Available: 1/1
Deployment             cilium-operator          Desired: 1, Ready: 1/1, Available: 1/1
Containers:            cilium                   Running: 1cilium-envoy             Running: 1cilium-operator          Running: 1clustermesh-apiserver    hubble-relay
Cluster Pods:          3/3 managed by Cilium
Helm chart version:    1.17.1
Image versions         cilium             quay.io/cilium/cilium:v1.17.1@sha256:8969bfd9c87cbea91e40665f8ebe327268c99d844ca26d7d12165de07f702866: 1cilium-envoy       quay.io/cilium/cilium-envoy:v1.31.5-1739264036-958bef243c6c66fcfd73ca319f2eb49fff1eb2ae@sha256:fc708bd36973d306412b2e50c924cd8333de67e0167802c9b48506f9d772f521: 1cilium-operator    quay.io/cilium/operator-generic:v1.17.1@sha256:628becaeb3e4742a1c36c4897721092375891b58bae2bfcae48bbf4420aaee97: 1
让我们通过检查 Cilium 配置来验证 BGP 是否已成功启用:
root@server:~# cilium config view | grep enable-bgp
enable-bgp-control-plane                          true
enable-bgp-control-plane-status-report            true
接下来,我们将了解新的高级 BGP 功能。
2. Cilium BGP Timer
2.1 准备工作
首先,让我们在节点的 Cilium Agent pod 中安装 Wireshark 和 Termshark,以便我们可以检查 BGP 数据包(我们不建议您在生产中执行此作!
CILIUM_POD=$(kubectl -n kube-system get po -l k8s-app=cilium -o name)
echo $CILIUM_POD
现在,让我们在代理上运行 shell。
kubectl -n kube-system exec -ti $CILIUM_POD -- bash
现在,让我们安装数据包分析器 tcpdump 来检查一些流量以及 Termshark。Termshark 是一种类似于 Wireshark 的工具,可在 Linux 上使用,让我们可视化数据包捕获。
apt-get update
DEBIAN_FRONTEND=noninteractive apt-get -y install tcpdump termshark
开始使用 tcpdump 侦听 BGP 流量(BGP 数据包通过 TCP/179 发送)。我们将数据包捕获记录到名为 default-timers.pcap 的 PCAP 文件中:
tcpdump -n -i any tcp port 179 and src 172.0.0.2 -w default-timers.pcap
====
2.2 BGP设置
到目前为止,您应该已经熟悉 Cilium BGP 对等配置。
随着 Cilium 1.16.0 中引入 Cilium 的 BGP v2 控制平面,可以使用三个 Kubernetes CRD 的组合来配置对等策略:
CiliumBGPClusterConfig设置对等端点,并可以引用一个或多个CiliumBGPPeerConfig资源(使用资源名称)CiliumBGPPeerConfig配置对等连接的行为方式,并且可以引用一个或多个CiliumBGPAdvertisement资源(使用选择器)CiliumBGPAdvertisement指定应通过 BGP 公布哪些 CIDR。
使用以下方法查看策略:
root@server:~# yq bgp/cilium-bgp-cluster-config.yaml \bgp/cilium-bgp-peer-config.yaml \bgp/cilium-bgp-advertisement.yaml
---
apiVersion: "cilium.io/v2alpha1"
kind: CiliumBGPClusterConfig
metadata:name: tor
spec:nodeSelector:matchLabels:kubernetes.io/hostname: clab-bgp-cplane-devel-control-planebgpInstances:- name: "instance-65001"localASN: 65001peers:- name: "peer-65000-tor"peerASN: 65000peerAddress: "172.0.0.1"peerConfigRef:name: "peer-config-generic"
---
apiVersion: "cilium.io/v2alpha1"
kind: CiliumBGPPeerConfig
metadata:name: peer-config-generic
spec:families:- afi: ipv4safi: unicastadvertisements:matchLabels:advertise: "pod-cidr"# timers:#   connectRetryTimeSeconds: 12#   holdTimeSeconds: 9#   keepAliveTimeSeconds: 3---
apiVersion: "cilium.io/v2alpha1"
kind: CiliumBGPAdvertisement
metadata:name: pod-cidrlabels:advertise: pod-cidr
spec:advertisements:- advertisementType: "PodCIDR"
root@server:~#
该政策的关键方面是:
- 远程对等体 IP 地址 (
peerAddress) 和 AS 编号 (peerASN) - 您自己的本地 AS 编号 (
localASN)
请注意 exportPodCIDR: true 标志:它指示 Cilium 向 BGP 邻居公布 Pod CIDR。根据您的要求,可以启用或禁用此功能。
请注意,Cilium 上的 BGP 配置是基于标签的 - 只有具有匹配标签的 Cilium 托管节点才会部署虚拟路由器用于 BGP 对等连接。
在我们的示例中,只有带有标签的 kubernetes.io/hostname: clab-bgp-cplane-devel-control-plane 节点才会运行 BGP。
此实验室只有一个节点。运行以下命令 filtering,它应返回节点(意味着它被标记为 BGP 路由器):
root@server:~# kubectl get nodes -l kubernetes.io/hostname=clab-bgp-cplane-devel-control-plane
NAME                                  STATUS   ROLES           AGE   VERSION
clab-bgp-cplane-devel-control-plane   Ready    control-plane   28m   v1.31.0
2.3 部署BGP对等网络CRD策略
部署 BGP 对等策略:
kubectl apply \-f $HOME/bgp/cilium-bgp-cluster-config.yaml \-f $HOME/bgp/cilium-bgp-peer-config.yaml \-f $HOME/bgp/cilium-bgp-advertisement.yaml
现在我们已经设置了 BGP 对等连接,Cilium 节点和架顶式交换机之间的对等连接会话应该已成功建立。
让我们验证会话是否已建立,以及路由是否已成功获知(会话可能需要几秒钟才能启动)。
运行以下命令:
root@server:~# cilium bgp peers
Node                                  Local AS   Peer AS   Peer Address   Session State   Uptime   Family         Received   Advertised
clab-bgp-cplane-devel-control-plane   65001      65000     172.0.0.1      established     25s      ipv4/unicast   1          1
BGP 会话应在 Cilium 及其对等体 172.0.0.1 之间建立。一个网络 (PodCIDR) 已从 Cilium 通告到其 Peer 节点。让我们通过在 BGP 对等体上运行以下命令来验证是否已收到它:
root@server:~# docker exec -it clab-bgp-cplane-devel-tor vtysh -c 'show bgp ipv4'
BGP table version is 1, local router ID is 172.0.0.1, vrf id 0
Default local pref 100, local AS 65000
Status codes:  s suppressed, d damped, h history, * valid, > best, = multipath,i internal, r RIB-failure, S Stale, R Removed
Nexthop codes: @NNN nexthop's vrf id, < announce-nh-self
Origin codes:  i - IGP, e - EGP, ? - incomplete
RPKI validation codes: V valid, I invalid, N Not foundNetwork          Next Hop            Metric LocPrf Weight Path
*> 10.244.0.0/24    172.0.0.2                              0 65001 iDisplayed  1 routes and 1 total paths
您应该会看到我们的 BGP 对等体已获知 Pod CIDR 10.244.0.0/24。
2.4 默认BGP计时器
运行以下命令 - 它是之前执行的命令的扩展版本。这将显示我们的 BGP 计时器配置:
root@server:~# cilium bgp peers -o json
{"clab-bgp-cplane-devel-control-plane": [{"applied-hold-time-seconds": 90,"applied-keep-alive-time-seconds": 30,"configured-hold-time-seconds": 90,"configured-keep-alive-time-seconds": 30,"connect-retry-time-seconds": 120,"ebgp-multihop-ttl": 1,"families": [{"advertised": 1,"afi": "ipv4","received": 1,"safi": "unicast"}],"graceful-restart": {},"local-asn": 65001,"peer-address": "172.0.0.1","peer-asn": 65000,"peer-port": 179,"session-state": "established","uptime-nanoseconds": 94383561114}]
}
使用 Ctrl+C 停止 tcpdump。
准备 termshark 以使用深色主题:
mkdir -p /root/.config/termshark/
echo -e "[main]\ndark-mode = true" > /root/.config/termshark/termshark.toml
在 Pod 中启动 termshark 以可视化 tcpdump 捕获的 ARP 流量:
TERM=xterm-256color termshark -r default-timers.pcap
您可以看到 KEEPALIVE 消息之间有 30 秒的间隔(请参阅下图中的数据包 #5、#8 和 #11)。
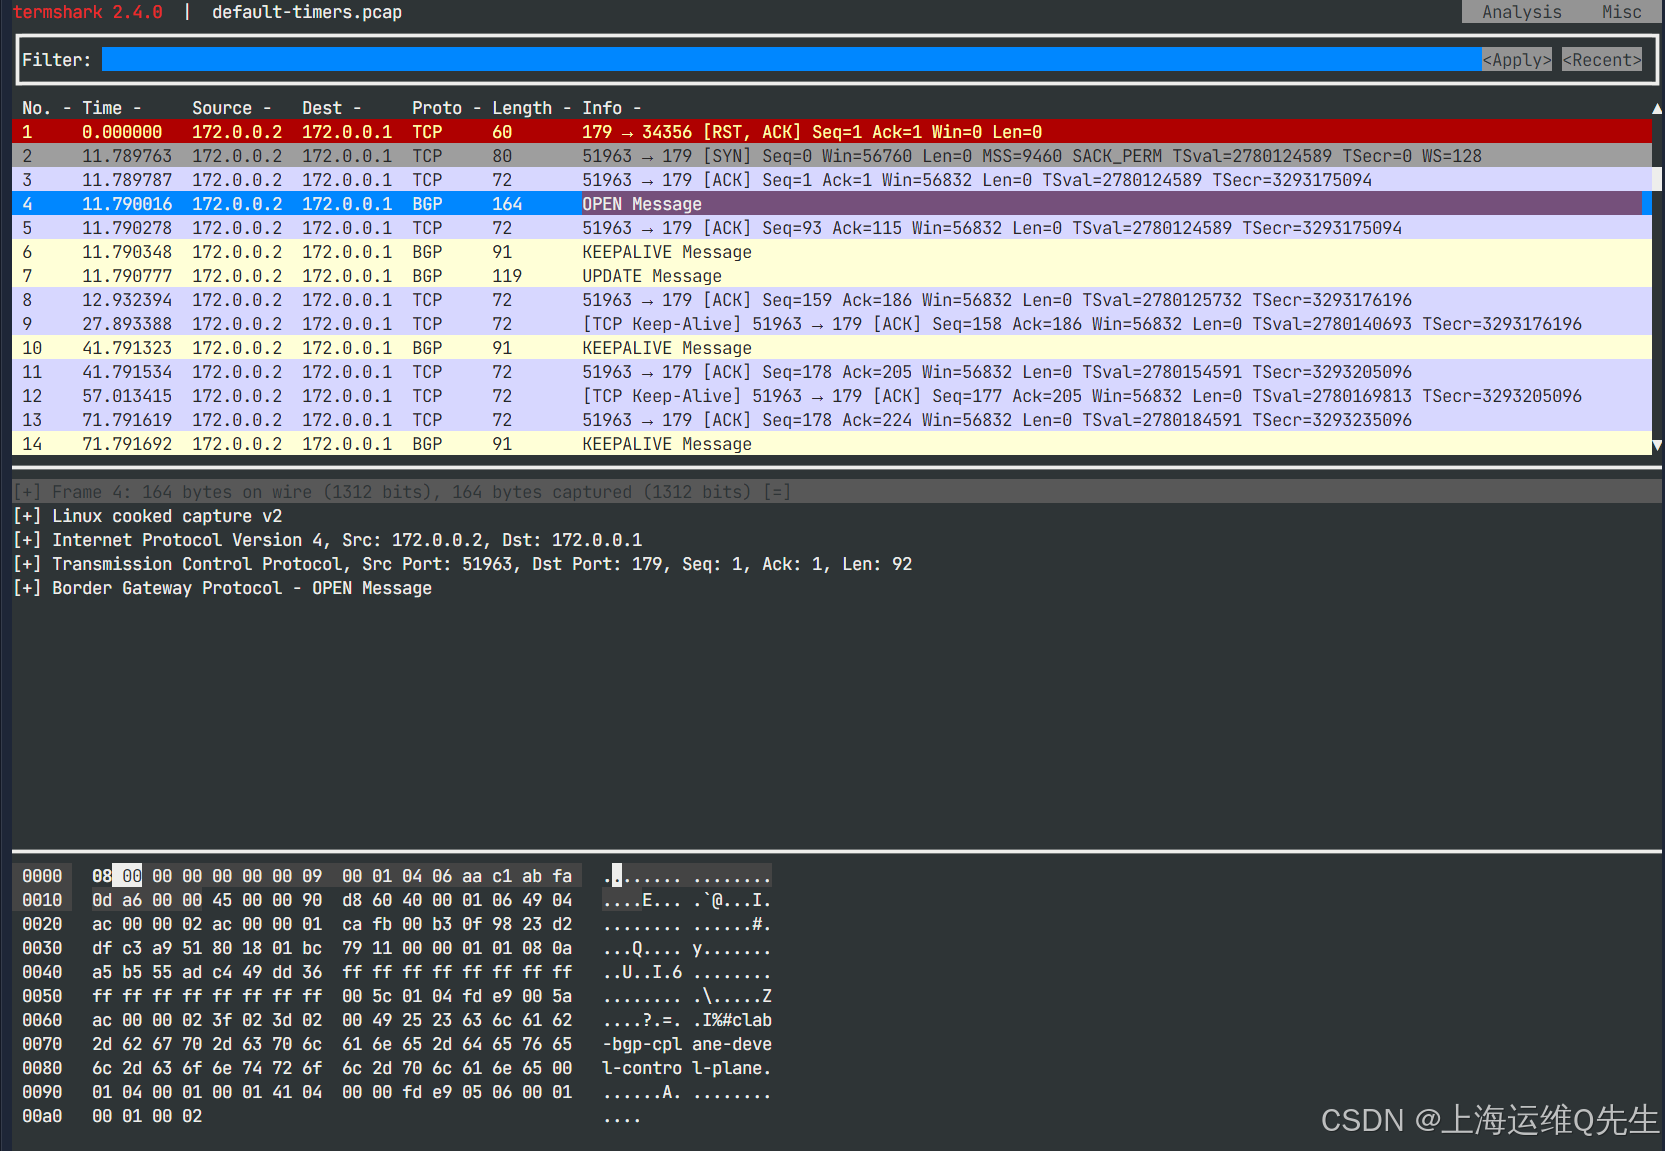
现在让我们更详细地解释这些计时器:
- Keepalive Interval:默认为 30 秒。Keepalive 用于维护邻居关系,如果在协商的保持时间内未收到 Keepalive 消息,则会导致 BGP 关闭邻居连接。
- 保持时间 :默认为 keepalive 间隔的 3 倍,即 90 秒。这是 BGP 在关闭连接之前从其对等体发出的连续消息之间等待的时间。换句话说 - 如果连续 3 条 keepalive 消息丢失,我们将假设无法访问远程对等体。
- 连接重试 :默认为 120 秒。在 BGP 对等过程中,如果初始 TCP 连接尝试失败,则连接重试计时器将起作用。它确定 BGP 路由器为其预期的 BGP 对等体建立 TCP 连接而进行的后续连接尝试之间的间隔。
许多 Cilium 用户可能希望减少这些计时器以实现更快的收敛时间。
2.5 修改BGP计时器
此部分现在应如下所示:
root@server:~# yq bgp/cilium-bgp-peer-config.yaml
---
apiVersion: "cilium.io/v2alpha1"
kind: CiliumBGPPeerConfig
metadata:name: peer-config-generic
spec:families:- afi: ipv4safi: unicastadvertisements:matchLabels:advertise: "pod-cidr"timers:connectRetryTimeSeconds: 12holdTimeSeconds: 9keepAliveTimeSeconds: 3
应用计时器应用更改的策略。
kubectl apply -f $HOME/bgp/cilium-bgp-peer-config.yaml
在新窗口内重新抓包
tcpdump -n -i any tcp port 179 and src 172.0.0.2 -w fast-timers.pcap
大约 10 秒后,按 Ctrl+C 停止,并使用 termshark 可视化数据包:
TERM=xterm-256color termshark -r fast-timers.pcap
您应该会看到 KEEPALIVE 数据包现在每 3 秒传输一次,而不是每 30 秒传输一次。
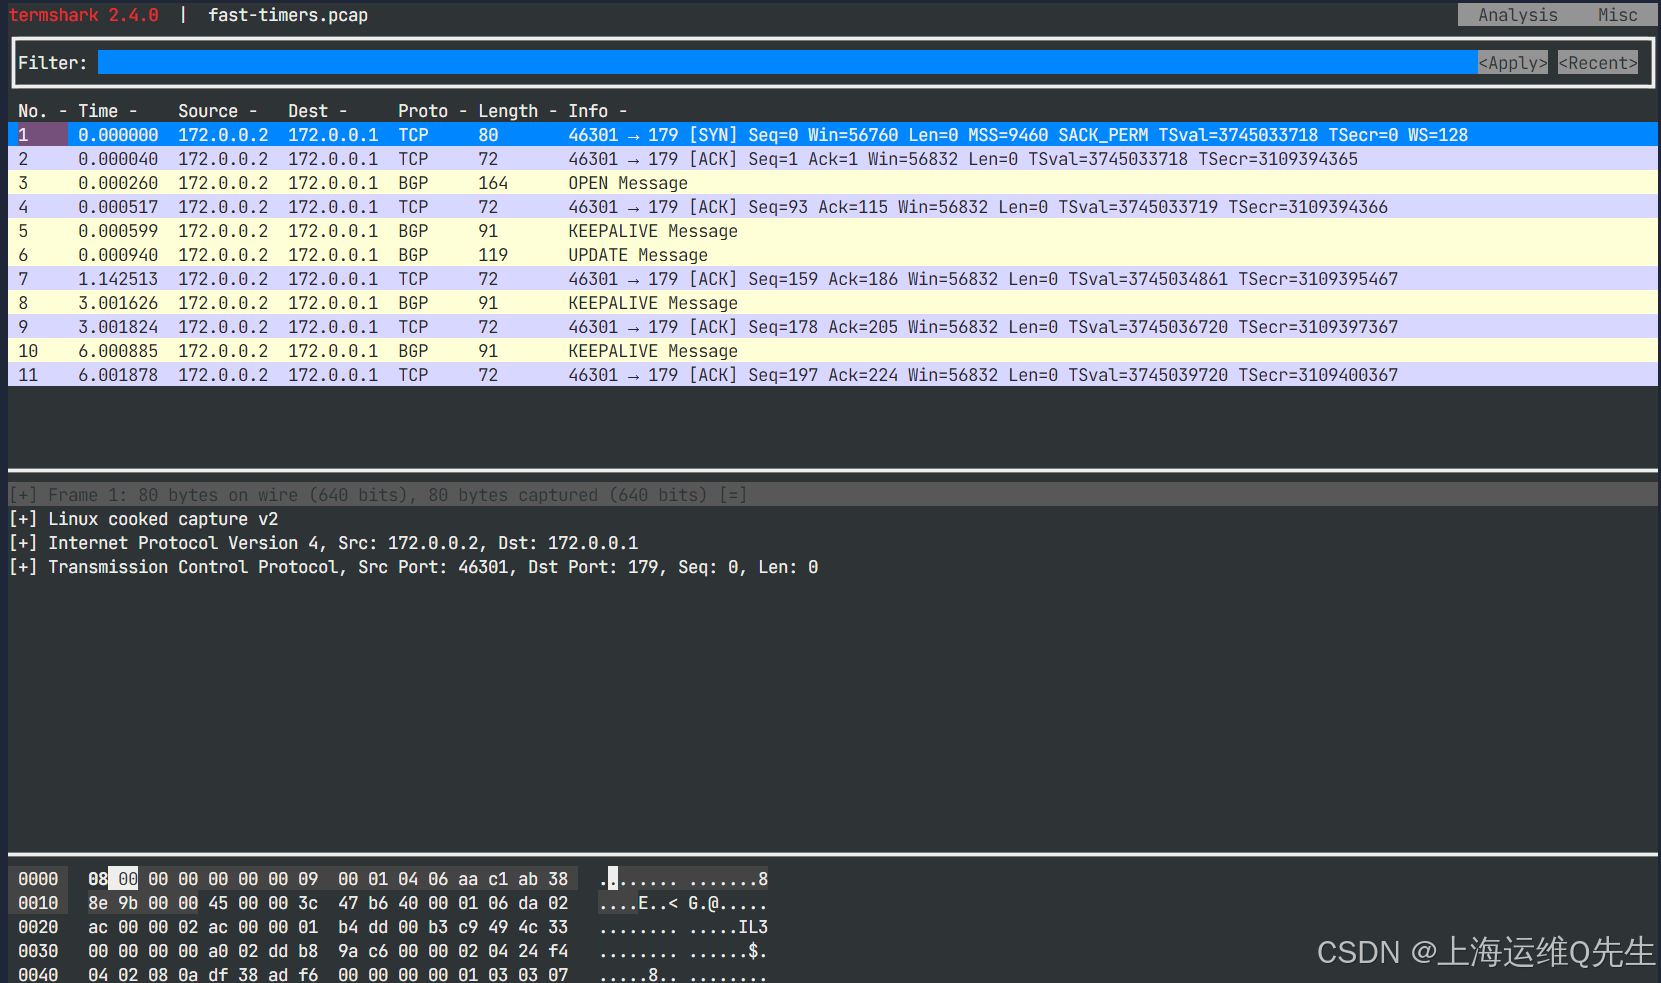
使用较短的 keepalive 意味着更快地检测无响应的 BGP 对等体。这使路由表能够快速重新收敛,并使流量能够从中断中快速恢复。
3. Cilium eBGP多跳
首先,让我们回到我们的 Cilium 代理来监控流量。我们将再次将 Wireshark 与 Termshark 结合使用,以可视化界面中的数据包。
CILIUM_POD=$(kubectl -n kube-system get po -l k8s-app=cilium -o name)
echo $CILIUM_POD
现在,让我们在代理上运行 shell。
kubectl -n kube-system exec -ti $CILIUM_POD -- bash
开始使用 tcpdump 侦听 BGP 流量。我们将数据包捕获记录到名为 traffic.pcap 的 PCAP 文件中:
tcpdump -n -i any tcp port 179 and src 172.0.0.2 -w traffic-no-multihop.pcap
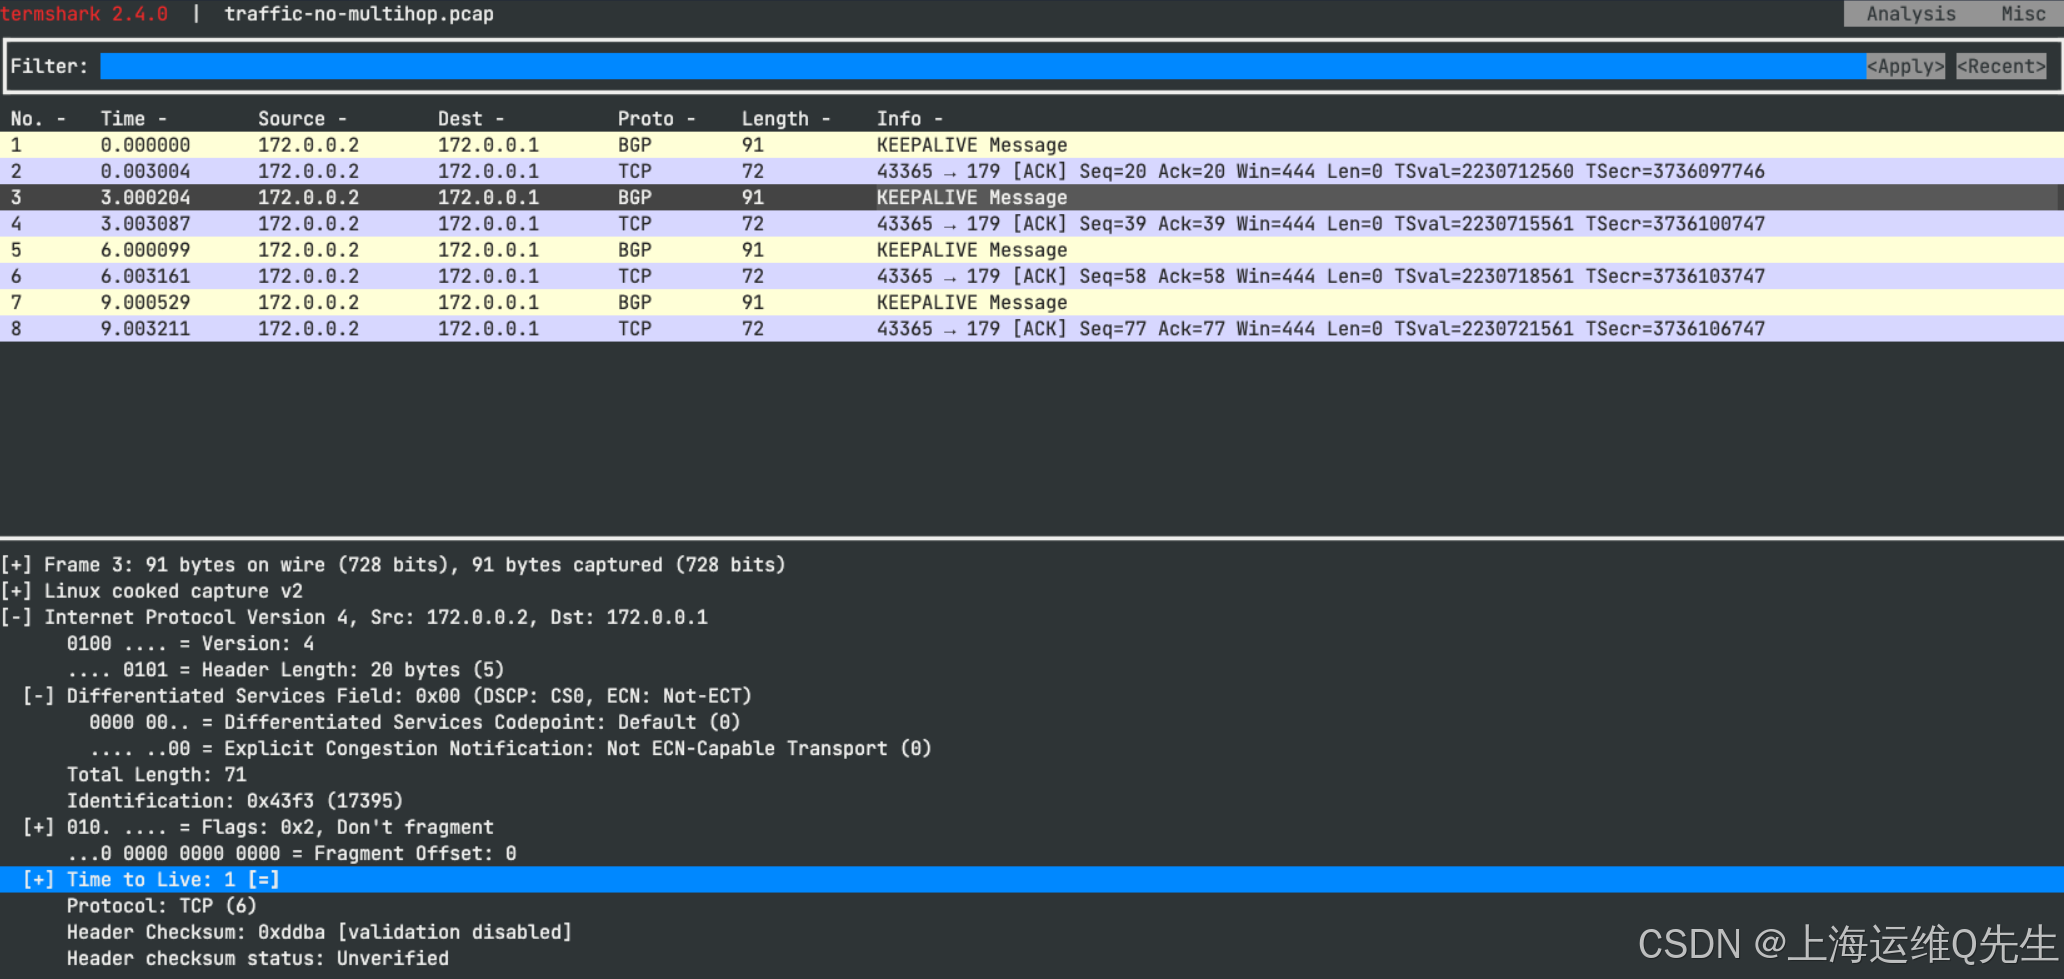
我们将检查数据包上的 TTL 字段。
至少 5 秒后,使用 Ctrl+C 停止 TCPDump,并使用 termshark 检查数据包捕获:
TERM=xterm-256color termshark -r traffic-no-multihop.pcap
选择其中一个数据包。通过单击其标题来展开中间窗格中的 [+] Internet Protocol Version 4 字段(不要单击 [+],而是单击文本)。
现在让我们更新 eBGP Multihop 设置。这将增加 BGP 数据包中 TTL 字段的值。
编辑 cilium-bgp-peer-config.yaml
root@server:~# yq bgp/cilium-bgp-peer-config.yaml
---
apiVersion: "cilium.io/v2alpha1"
kind: CiliumBGPPeerConfig
metadata:name: peer-config-generic
spec:families:- afi: ipv4safi: unicastadvertisements:matchLabels:advertise: "pod-cidr"timers:connectRetryTimeSeconds: 12holdTimeSeconds: 9keepAliveTimeSeconds: 3ebgpMultihop: 10
应用配置
kubectl apply -f $HOME/bgp/cilium-bgp-peer-config.yaml
另外个窗口再次开始使用 tcpdump 侦听 BGP 流量。我们将数据包捕获记录到名为 traffic-multihop.pcap 的 PCAP 文件中:
tcpdump -n -i any tcp port 179 and src 172.0.0.2 -w traffic-multihop.pcap
几秒钟后,使用 Ctrl+C 停止 TCPDump,并使用 termshark 检查数据包捕获:
TERM=xterm-256color termshark -r traffic-multihop.pcap
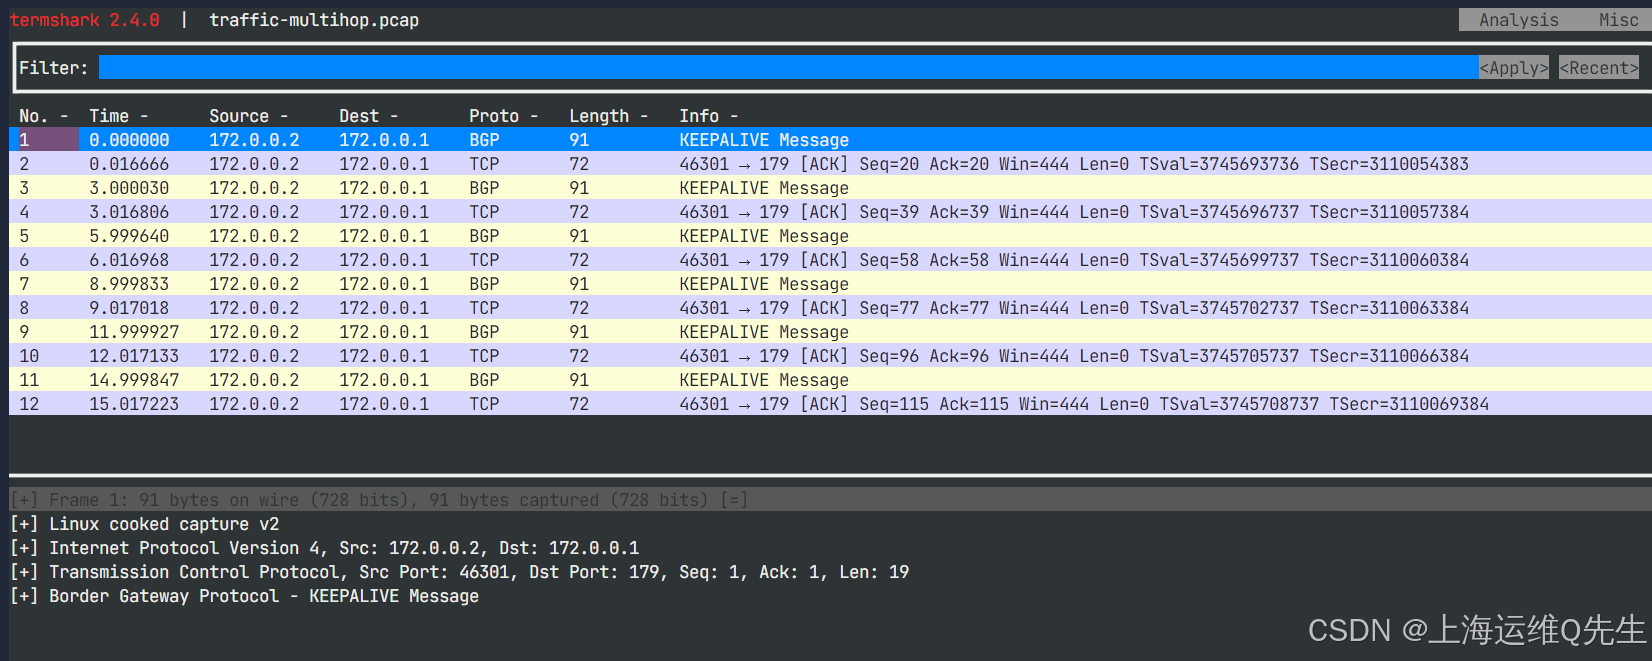
通过增加 TTL,我们可以在 Cilium 和未直接连接到 Cilium BGP 节点的 BGP 对等体之间建立 eBGP 会话。
4. BGP平滑重启
让我们检查一下在架顶式路由器上的 BGP 会话期间设置的当前平滑重启参数:
root@server:~# docker exec -it clab-bgp-cplane-devel-tor vtysh -c 'show bgp ipv4 neighbor' | \grep -A 10 "Graceful restart information"Graceful restart information:Local GR Mode: Helper*Remote GR Mode: DisableR bit: FalseTimers:Configured Restart Time(sec): 120Received Restart Time(sec): 0Message statistics:Inq depth is 0Outq depth is 0Sent Rcvd
需要注意的主要一点是,Top of Rack 开关已经启用了平滑重启(它处于 Helper 模式),但遥控器 (Cilium) 没有(“Remote GR Mode”:“Disable”)。
您可以通过重新启动 Cilium 代理并观察行为来尝试该行为。不过,你必须非常快。
首先,使用以下命令检查对等体上的 BGP 路由和整体路由表:
root@server:~# docker exec -it clab-bgp-cplane-devel-tor vtysh -c 'show bgp ipv4 '
echo "========================="
docker exec -it clab-bgp-cplane-devel-tor ip r
BGP table version is 3, local router ID is 172.0.0.1, vrf id 0
Default local pref 100, local AS 65000
Status codes:  s suppressed, d damped, h history, * valid, > best, = multipath,i internal, r RIB-failure, S Stale, R Removed
Nexthop codes: @NNN nexthop's vrf id, < announce-nh-self
Origin codes:  i - IGP, e - EGP, ? - incomplete
RPKI validation codes: V valid, I invalid, N Not foundNetwork          Next Hop            Metric LocPrf Weight Path
*> 10.244.0.0/24    172.0.0.2                              0 65001 iDisplayed  1 routes and 1 total paths
=========================
default via 172.20.20.1 dev eth0
10.244.0.0/24 nhid 17 via 172.0.0.2 dev net0 proto bgp metric 20
172.0.0.0/24 dev net0 proto kernel scope link src 172.0.0.1
172.20.20.0/24 dev eth0 proto kernel scope link src 172.20.20.2
如您所见,我们已经从 Cilium 学习了 BGP 上的 10.244.0.0/24(PodCIDR),并且它安装在路由表中。
重新启动代理
kubectl -n kube-system rollout restart daemonset cilium
立即再次运行相同的命令:
root@server:~# docker exec -it clab-bgp-cplane-devel-tor vtysh -c 'show bgp ipv4 '
echo "========================="
docker exec -it clab-bgp-cplane-devel-tor ip r
BGP table version is 5, local router ID is 172.0.0.1, vrf id 0
Default local pref 100, local AS 65000
Status codes:  s suppressed, d damped, h history, * valid, > best, = multipath,i internal, r RIB-failure, S Stale, R Removed
Nexthop codes: @NNN nexthop's vrf id, < announce-nh-self
Origin codes:  i - IGP, e - EGP, ? - incomplete
RPKI validation codes: V valid, I invalid, N Not foundNetwork          Next Hop            Metric LocPrf Weight Path
*> 10.244.0.0/24    172.0.0.2                              0 65001 iDisplayed  1 routes and 1 total paths
=========================
default via 172.20.20.1 dev eth0
10.244.0.0/24 nhid 19 via 172.0.0.2 dev net0 proto bgp metric 20
172.0.0.0/24 dev net0 proto kernel scope link src 172.0.0.1
172.20.20.0/24 dev eth0 proto kernel scope link src 172.20.20.2
虽然 Cilium 代理重新加载时间很短,并且 BGP 会话在 10-15 秒内重新建立,但我们可以通过启用正常重启来改进行为。
编辑 cilium-bgp-peer-config.yaml
root@server:~# yq bgp/cilium-bgp-peer-config.yaml
---
apiVersion: "cilium.io/v2alpha1"
kind: CiliumBGPPeerConfig
metadata:name: peer-config-generic
spec:families:- afi: ipv4safi: unicastadvertisements:matchLabels:advertise: "pod-cidr"timers:connectRetryTimeSeconds: 12holdTimeSeconds: 9keepAliveTimeSeconds: 3ebgpMultihop: 10gracefulRestart:enabled: truerestartTimeSeconds: 20
应用更新的策略。
kubectl apply -f $HOME/bgp/cilium-bgp-peer-config.yaml
现在,我们检查 Graceful Restart 参数并验证它是否已启用。您可能需要运行此命令几次,因为启用平滑重启会重置 BGP 会话:
root@server:~# docker exec -it clab-bgp-cplane-devel-tor vtysh -c 'show bgp ipv4 neighbor' | grep "Graceful Restart Capability" -A 8Graceful Restart Capability: advertised and receivedRemote Restart timer is 20 secondsAddress families by peer:IPv4 Unicast(preserved)Graceful restart information:End-of-RIB send: End-of-RIB received: IPv4 UnicastLocal GR Mode: Helper*Remote GR Mode: Restart
平滑重启现在由 2 个 BGP 对等体启用。
让我们验证一下它是否像宣传的那样工作。
再次重新启动代理。
kubectl -n kube-system rollout restart daemonset cilium
立即再次运行相同的命令:
root@server:~# docker exec -it clab-bgp-cplane-devel-tor vtysh -c 'show bgp ipv4 '
echo "========================="
docker exec -it clab-bgp-cplane-devel-tor ip r
echo "========================="
docker exec -it clab-bgp-cplane-devel-tor vtysh -c 'show bgp ipv4 neighbor' | grep "Graceful restart information" -A 10
BGP table version is 7, local router ID is 172.0.0.1, vrf id 0
Default local pref 100, local AS 65000
Status codes:  s suppressed, d damped, h history, * valid, > best, = multipath,i internal, r RIB-failure, S Stale, R Removed
Nexthop codes: @NNN nexthop's vrf id, < announce-nh-self
Origin codes:  i - IGP, e - EGP, ? - incomplete
RPKI validation codes: V valid, I invalid, N Not foundNetwork          Next Hop            Metric LocPrf Weight Path
S> 10.244.0.0/24    172.0.0.2                              0 65001 iDisplayed  1 routes and 1 total paths
=========================
default via 172.20.20.1 dev eth0
10.244.0.0/24 nhid 21 via 172.0.0.2 dev net0 proto bgp metric 20
172.0.0.0/24 dev net0 proto kernel scope link src 172.0.0.1
172.20.20.0/24 dev eth0 proto kernel scope link src 172.20.20.2
=========================Graceful restart information:The remaining time of restart timer is 17The remaining time of stalepath timer is 357Local GR Mode: Helper*Remote GR Mode: NotApplicableR bit: FalseTimers:Configured Restart Time(sec): 120Received Restart Time(sec): 20Restart Time Remaining(sec): 17Restart Time Remaining(sec): 17
如果您足够快,您会在输出中注意到:
-
10.244.0.0/24前缀仍通过 BGP 获知。 -
10.244.0.0/24前缀仍然存在于路由表中。 -
BGP 知道存在问题并将路由标记为过时 :
- 第一个命令显示路由条目的
S>前缀 - 在 Cilium 重启期间,BGP 对等体在重启期间保留路由。您还可以查看路由在路由表中保留路由的剩余时间(您应该会看到如下输出
The remaining time of restart timer is 17)。
- 第一个命令显示路由条目的
5. BGP MD5密码
5.1 创建密码
首先,让我们为我们的密码创建一个 Kubernetes 密钥:
kubectl -n kube-system create secret generic \--type=string secretname \--from-literal=password=my-secret-password
编辑 cilium-bgp-peer-config.yaml
root@server:~# yq bgp/cilium-bgp-peer-config.yaml
---
apiVersion: "cilium.io/v2alpha1"
kind: CiliumBGPPeerConfig
metadata:name: peer-config-generic
spec:families:- afi: ipv4safi: unicastadvertisements:matchLabels:advertise: "pod-cidr"timers:connectRetryTimeSeconds: 12holdTimeSeconds: 9keepAliveTimeSeconds: 3ebgpMultihop: 10gracefulRestart:enabled: truerestartTimeSeconds: 20authSecretRef: secretname
应用配置
kubectl apply -f $HOME/bgp/cilium-bgp-peer-config.yaml
5.2 向远程对等体添加密码
让我们执行到我们的远程对等节点:
docker exec -it clab-bgp-cplane-devel-tor vtysh
通过执行以下命令更新密码:
root@server:~# docker exec -it clab-bgp-cplane-devel-tor vtyshHello, this is FRRouting (version 8.2.2_git).
Copyright 1996-2005 Kunihiro Ishiguro, et al.tor# conf t
tor(config)# router bgp 65000
tor(config-router)# neighbor 172.0.0.2 password my-secret-password
tor(config-router)# exit
tor(config)# exit
tor#
当仍在远程对等体上时,让我们验证一下会话现在是否已重新建立。
tor# show bgp ipv4 summaryIPv4 Unicast Summary (VRF default):
BGP router identifier 172.0.0.1, local AS number 65000 vrf-id 0
BGP table version 9
RIB entries 1, using 184 bytes of memory
Peers 1, using 716 KiB of memoryNeighbor        V         AS   MsgRcvd   MsgSent   TblVer  InQ OutQ  Up/Down State/PfxRcd   PfxSnt Desc
172.0.0.2       4      65001       475       469        0    0    0 00:00:46            1        1 N/ATotal number of neighbors 1
tor#
会话已重新建立,现在已经过身份验证。
5.3 Md5 密码
让我们验证一下 BGP 对等体之间的 TCP 会话是否使用 MD5 进行身份验证。
首先,让我们回到我们的 Cilium 代理来监控流量。我们将再次将 Wireshark 与 Termshark 结合使用,以可视化界面中的数据包。
新窗口执行
CILIUM_POD=$(kubectl -n kube-system get po -l k8s-app=cilium -o name)
echo $CILIUM_POD
现在,让我们在代理上运行 shell。
kubectl -n kube-system exec -ti $CILIUM_POD -- bash
让我们重新安装 tcpdump 和 Termshark。
apt-get update
DEBIAN_FRONTEND=noninteractive apt-get -y install tcpdump termshark
让我们将来自邻居的 BGP 流量记录到名为 md5.pcap 的 PCAP 文件中:
tcpdump -n -i any tcp port 179 and src 172.0.0.2 -w md5.pcap
使用 Ctrl+C 停止 tcpdump 捕获,并使用 termshark 可视化数据包:
TERM=xterm-256color termshark -r md5.pcap
选择任何数据包并打开 “Transmission Control Protocol” 面板。向下滚动到 “Options” 并展开面板。您现在应该看到“TCP 选项 - TCP MD5 签名”行。展开它。
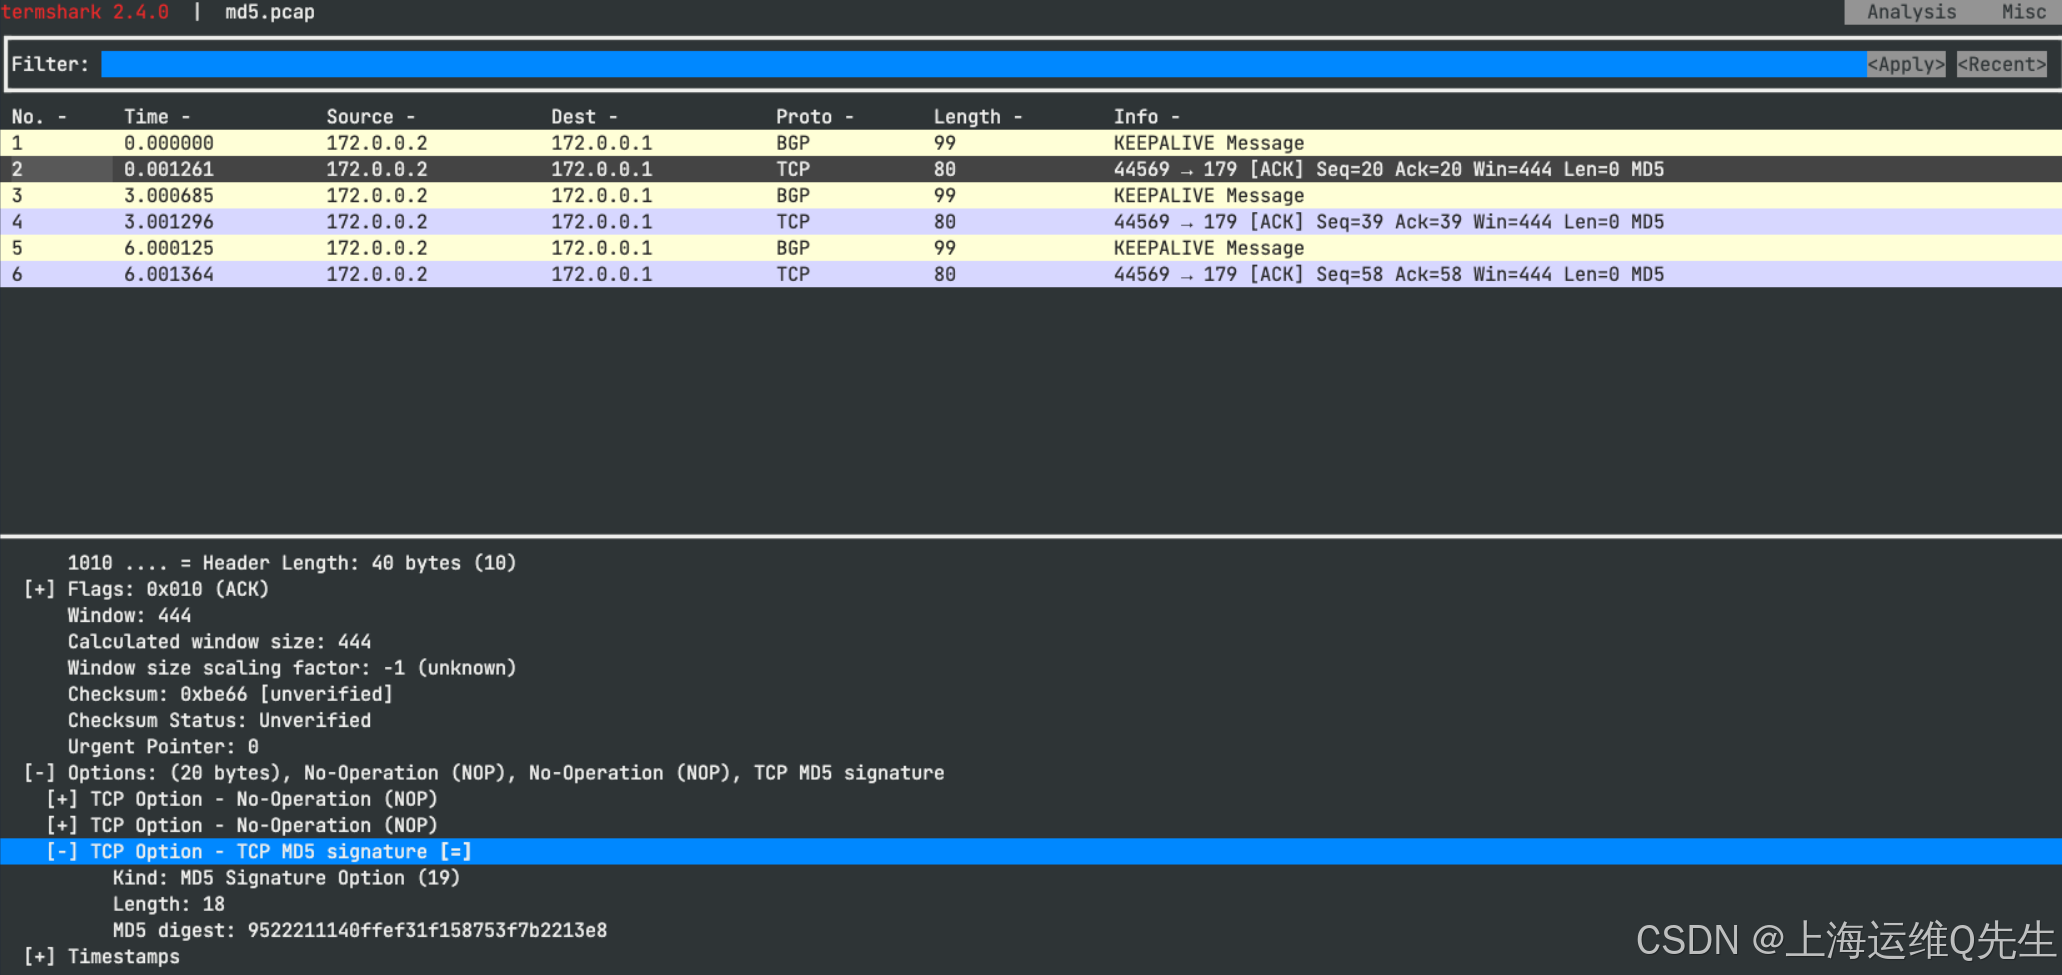
两台设备都使用其配置中的 BGP 密钥对 TCP 数据包信息进行哈希处理,并在 TCP 报头中将其作为编码的 MD5 发送。一旦他们比较收到的 MD5 值与他们的值匹配,会话就建立起来了。
6. Cilium BGP Communities
6.1 BGP Communities
BGP 社区用于标记通告给其他 BGP 对等体的路由。它们本质上是路由和策略元数据,主要用于流量工程。
首先,在开始使用 BGP 社区之前 ,我们看一下发送到对等节点的路由。
root@server:~# docker exec -it clab-bgp-cplane-devel-tor vtysh -c 'show bgp ipv4 10.244.0.0/24'
BGP routing table entry for 10.244.0.0/24, version 9
Paths: (1 available, best #1, table default)Advertised to non peer-group peers:172.0.0.265001172.0.0.2 from 172.0.0.2 (172.0.0.2)Origin IGP, valid, external, best (First path received)Last update: Thu May 29 03:22:31 2025
现在让我们向 Peer 节点添加一个 community 值。
编辑 cilium-bgp-advertisement.yaml
root@server:~# yq bgp/cilium-bgp-advertisement.yaml
---
apiVersion: "cilium.io/v2alpha1"
kind: CiliumBGPAdvertisement
metadata:name: pod-cidrlabels:advertise: pod-cidr
spec:advertisements:- advertisementType: "PodCIDR"attributes:communities:standard:- 65001:100
如您所见,我们将值为 65001:100 的社区应用于我们的 PodCIDR 前缀。请注意,我们可以使用基于 Services 的 selectorType 来将特定的 BGP 社区应用于我们选择的 Service。
重新应用对等互连策略:
kubectl apply -f $HOME/bgp/cilium-bgp-advertisement.yaml
让我们再看一下发送给 Peer 节点的路由:
root@server:~# docker exec -it clab-bgp-cplane-devel-tor vtysh -c 'show bgp ipv4 10.244.0.0/24'
BGP routing table entry for 10.244.0.0/24, version 10
Paths: (1 available, best #1, table default)Advertised to non peer-group peers:172.0.0.265001172.0.0.2 from 172.0.0.2 (172.0.0.2)Origin IGP, valid, external, best (First path received)Community: 65001:100Last update: Thu May 29 03:28:03 2025
6.2 小测验
√	eBGP sessions are not possible between routers not directly connected to each other, unless eBGP Multihop is enabled.
√	BGP timers can be customized on Cilium.
BGP Graceful Restart is enabled by default on Cilium.
eBPF is the evolution of eBGP.
√	BGP sessions can be secured using MD5 shared secrets between peers.
7. 测试
7.1 题目
您被要求为 Rebel Alliance 分析和改进 Kubernetes 集群。他们希望您提高 BGP 对等互连配置的可靠性和安全状况。
您需要修改 exam/ 目录中的 BGP 清单,并将其应用于 Kubernetes 集群,以匹配所有要求。
-
您可以使用以下方法验证 TOR 路由器上的 BGP 会话:
docker exec clab-bgp-cplane-devel-tor vtysh -c "show bgp ipv4 summary"
网络团队将路由器的 MD5 密码修改为 value theEmpireFallsBack 的。修改现有的 Kubernetes 密钥,为 Kubernetes 集群设置相同的密码。
-
密钥位于
kube-system命名空间中! -
Kubernetes 密钥中的值必须以 base64 为单位设置。你可以使用
echo -n “somestring” | base64来编码它。 -
或者,您可以选择删除并重新创建密码。
-
您可以通过以下方式验证 TOR 路由器上的 BGP 身份验证:
docker exec clab-bgp-cplane-devel-tor vtysh -c "show bgp ipv4 neighbor"
安全团队希望确保某些服务永远不会被公布到 网络。他们决定将这些关键服务分组到 无广告 BGP 社区。
您需要在 BGP 对等策略中创建一个社区设置,以标记级别为:top-secret 标签且社区为 no-advertise 的服务 IP 池。
我们在 endor 命名空间中部署了一个 Deathstar 应用程序。这 deathstar 服务是一个标记为 announced: secret-bgp 的 LoadBalancer 服务。使用 secret-bgp LB-IPAM 策略,已使用 BGP 为服务分配一个外部 IP 地址(在 192.168.42.0/24 范围内)。LB-IPAM 策略标有 level: top-secret,因此如果您正确配置了 BGP 对等连接,它应该继承无通告社区。
-
您可以通过以下方式验证服务是否已公布:
docker exec clab-bgp-cplane-devel-tor vtysh -c "show bgp ipv4" -
您可以使用服务的 IP 和掩码检查详细信息:
docker exec clab-bgp-cplane-devel-tor vtysh -c "show bgp ipv4 192.168.42.1/32"
此外,已经决定 Pod CIDR 不应传播到直接路由器之外。no-export 社区将用于此目的。确保 Pod CIDR 使用该社区进行标记,而不是使用当前设置的 CIDR 进行标记。
同样,请使用 wellKnown 字段而不是 standard 字段。
您可以通过以下方式验证 TOR 路由器上的 BGP 社区:
docker exec clab-bgp-cplane-devel-tor vtysh -c "show bgp ipv4 10.244.0.0/24"
在您最近对 BGP 计时器进行修改后,您的集群现在向路由器发送了过多的 BGP 请求,从而威胁到网络的稳定性。您需要将 keepAlive 计时器设置为 15 秒。保持计时器应为 3 倍,connectRetry 应为 4 倍。
此外,您的路由需要达到 4 个 BGP 跃点。将 TTLs 设置为 4 以实现此目的。
7.2 解题
- 收集信息
root@server:~# docker exec clab-bgp-cplane-devel-tor vtysh -c "show bgp ipv4 summary"IPv4 Unicast Summary (VRF default):
BGP router identifier 172.0.0.1, local AS number 65000 vrf-id 0
BGP table version 11
RIB entries 1, using 184 bytes of memory
Peers 1, using 716 KiB of memoryNeighbor        V         AS   MsgRcvd   MsgSent   TblVer  InQ OutQ  Up/Down State/PfxRcd   PfxSnt Desc
172.0.0.2       4      65001       603       593        0    0    0 00:07:55      Connect        0 N/ATotal number of neighbors 1
root@server:~# docker exec clab-bgp-cplane-devel-tor vtysh -c "show bgp ipv4 neighbor"
BGP neighbor is 172.0.0.2, remote AS 65001, local AS 65000, external link
Hostname: clab-bgp-cplane-devel-control-planeBGP version 4, remote router ID 0.0.0.0, local router ID 172.0.0.1BGP state = ConnectLast read 00:07:59, Last write 00:07:59Hold time is 180, keepalive interval is 60 secondsGraceful restart information:Local GR Mode: Helper*Remote GR Mode: NotApplicableR bit: FalseTimers:Configured Restart Time(sec): 120Received Restart Time(sec): 20Message statistics:Inq depth is 0Outq depth is 0Sent       RcvdOpens:                  6          6Notifications:          0          8Updates:               11         13Keepalives:           576        576Route Refresh:          0          0Capability:             0          0Total:                593        603Minimum time between advertisement runs is 0 secondsFor address family: IPv4 UnicastNot part of any update groupCommunity attribute sent to this neighbor(all)0 accepted prefixesFor address family: IPv6 UnicastNot part of any update groupCommunity attribute sent to this neighbor(all)0 accepted prefixesConnections established 6; dropped 6Last reset 00:07:59,   Notification received (Cease/Peer De-configured)
BGP Connect Retry Timer in Seconds: 120
Next connect timer due in 2 seconds
Peer Authentication Enabled
Read thread: off  Write thread: off  FD used: 26
- 替换秘钥
k -n kube-system delete secret secretname
kubectl -n kube-system create secret generic \--type=string secretname \--from-literal=password=theEmpireFallsBack
- 修改配置文件
root@server:~# yq /root/bgp/exam/cilium-bgp-advertisement.yaml
---
apiVersion: "cilium.io/v2alpha1"
kind: CiliumBGPAdvertisement
metadata:name: examlabels:advertise: exam
spec:advertisements:- advertisementType: "PodCIDR"attributes:communities:wellKnown:- "no-export"# - "internet"- advertisementType: "Service"service:addresses:- LoadBalancerIPselector:matchLabels:level: top-secretattributes:communities:wellKnown:- "no-advertise"#   - "internet"root@server:~# yq /root/bgp/exam/cilium-bgp-cluster-config.yaml
---
apiVersion: "cilium.io/v2alpha1"
kind: CiliumBGPClusterConfig
metadata:name: tor
spec:nodeSelector:matchLabels:kubernetes.io/hostname: clab-bgp-cplane-devel-control-planebgpInstances:- name: "instance-65001"localASN: 65001peers:- name: "peer-65000-tor"peerASN: 65000peerAddress: "172.0.0.1"peerConfigRef:name: exam
root@server:~# yq /root/bgp/exam/cilium-bgp-peer-config.yaml
---
apiVersion: "cilium.io/v2alpha1"
kind: CiliumBGPPeerConfig
metadata:name: exam
spec:families:- afi: ipv4safi: unicastadvertisements:matchLabels:advertise: examtimers:connectRetryTimeSeconds: 60holdTimeSeconds: 45keepAliveTimeSeconds: 15ebgpMultihop: 4gracefulRestart:enabled: truerestartTimeSeconds: 20authSecretRef: secretname
- 应用配置
k apply -f /root/bgp/exam
确认无误,提交!
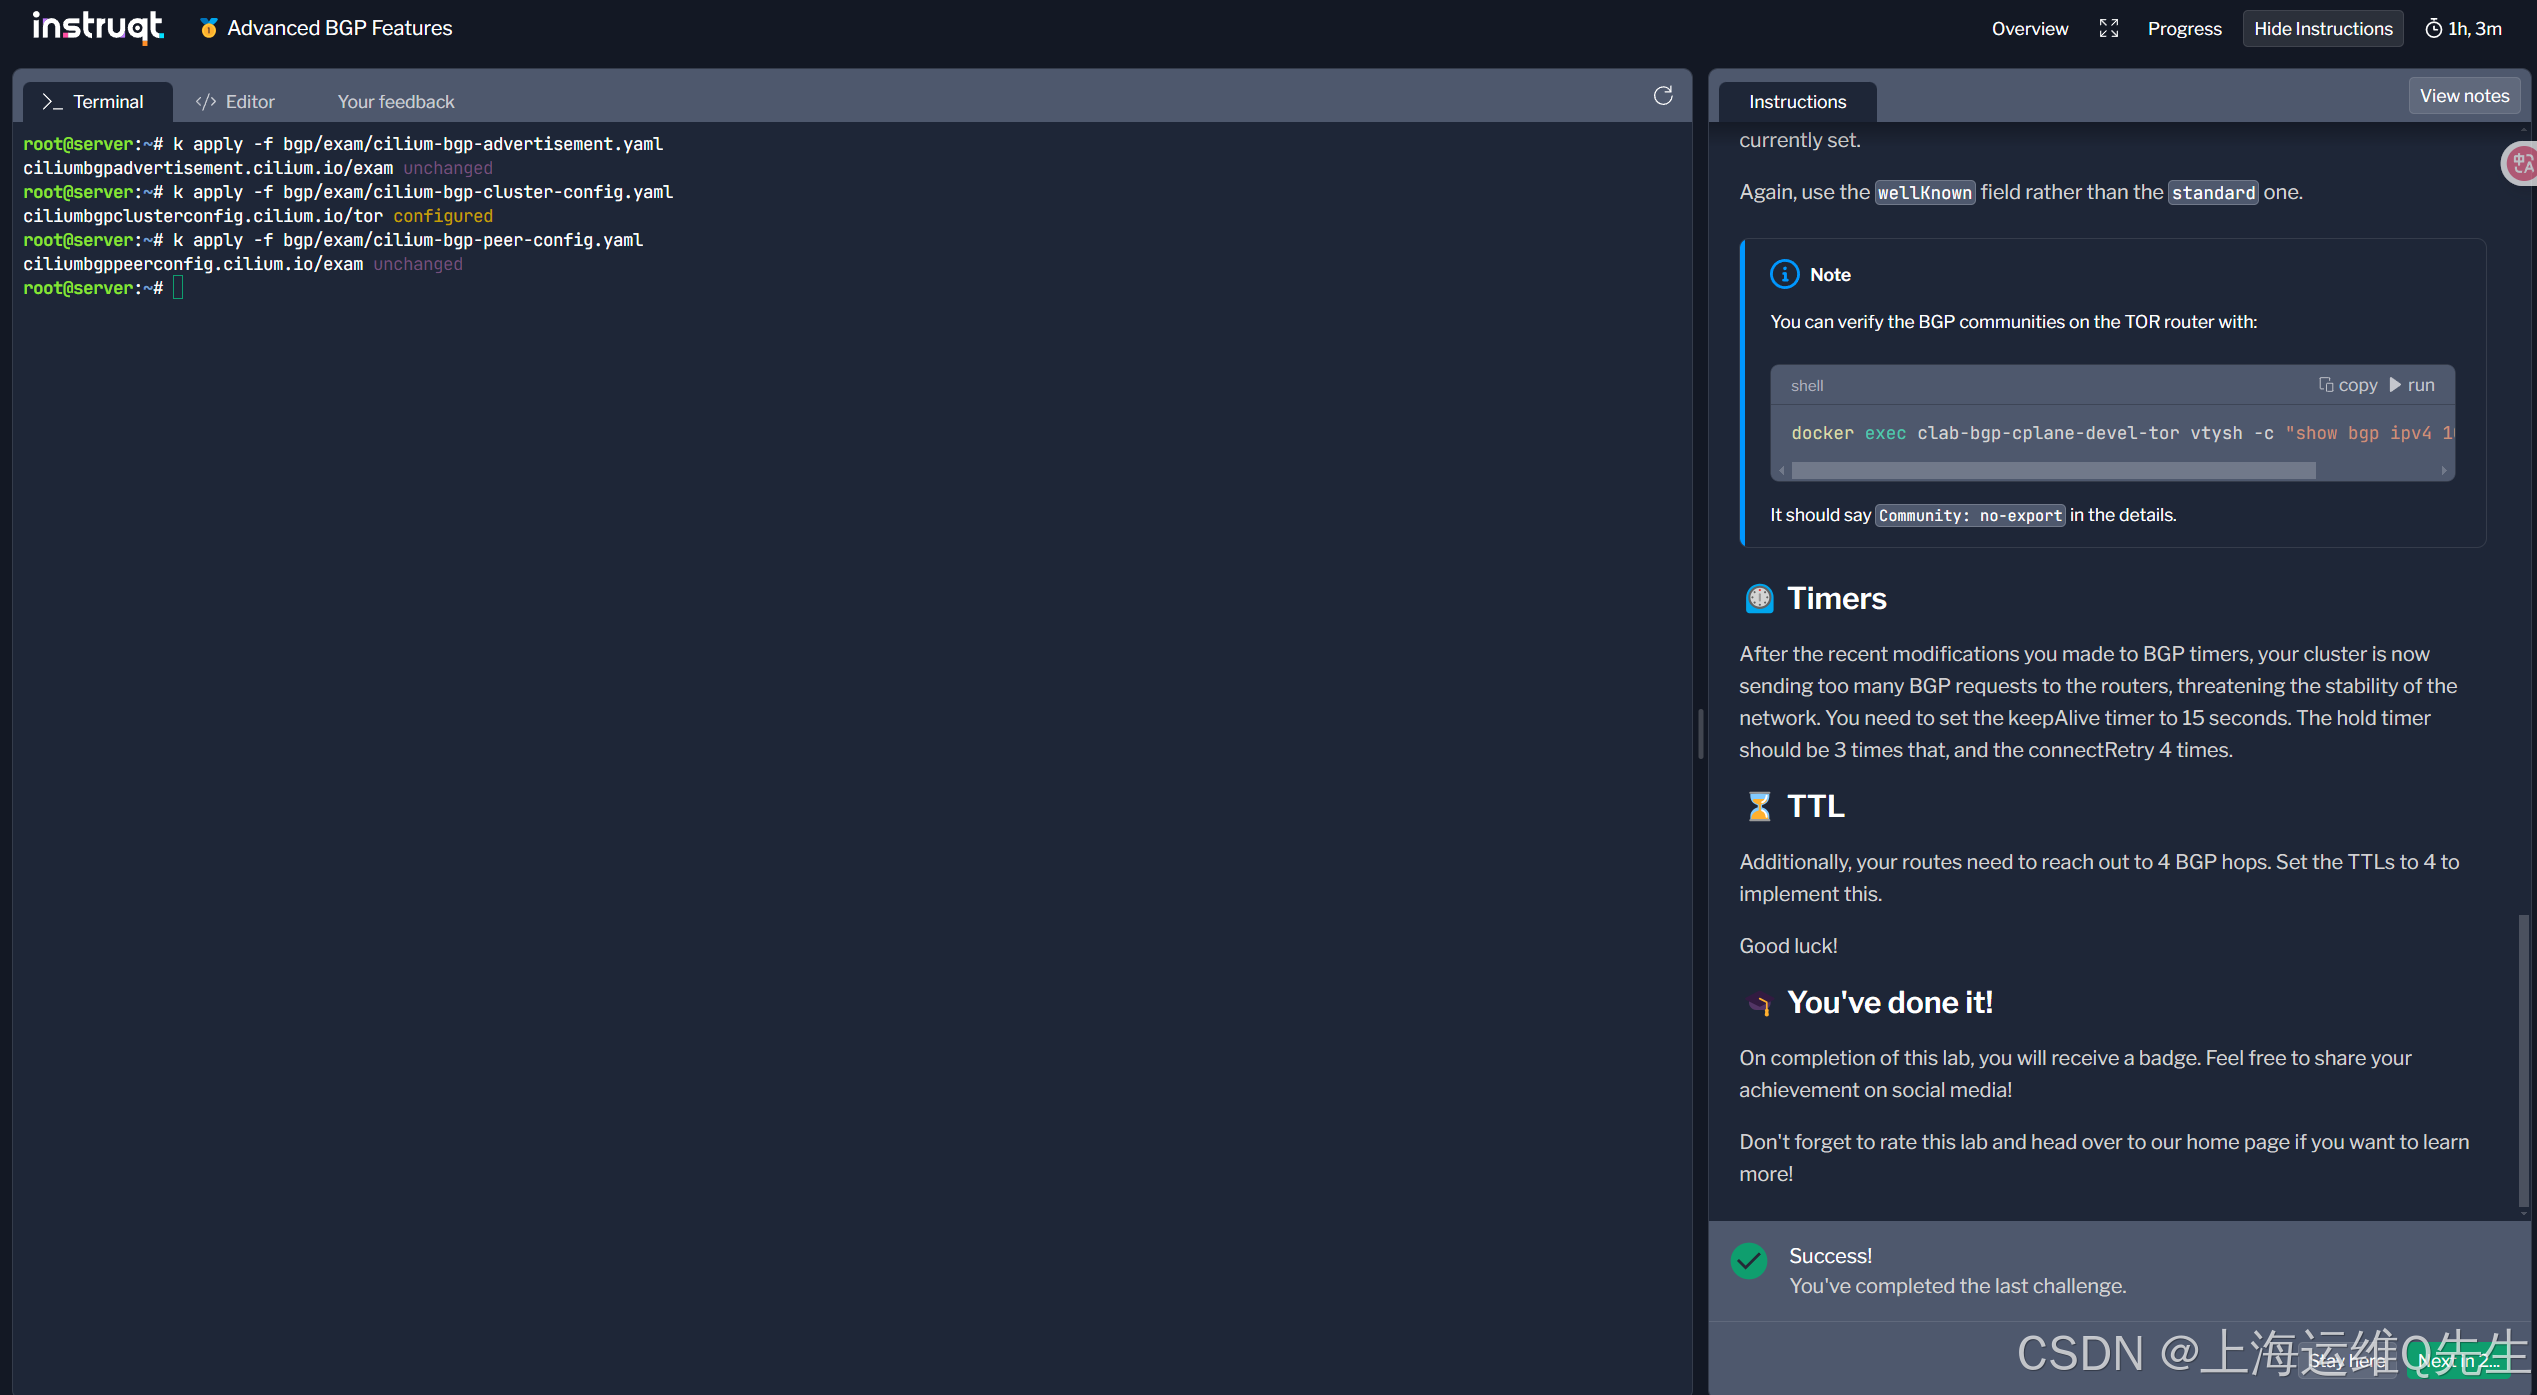
新技能GET!