docker容器部署应用
Go version: go1.24.5Git commit: e77ff99Built: Wed Jul 9 16:13:48 2025OS/Arch: linux/amd64Experimental: falsecontainerd:Version: 1.7.27GitCommit: 05044ec0a9a75232cad458027ca83437aae3f4darunc:Version: 1.2.5GitCommit: v1.2.5-0-g59923efdocker-init:Version: 0.19.0GitCommit: de40ad02.对原有的docker源文件进行备份处理:
[root@localhost ~]# cd /etc/docker/
[root@localhost docker]# mkdir daemon.bal
[root@localhost docker]# mv ./daemon.json  ./daemon.bak/
[root@localhost docker]# ll
总用量 4
drwxr-xr-x. 2 root root 25  7月 16 20:52 daemon.bak
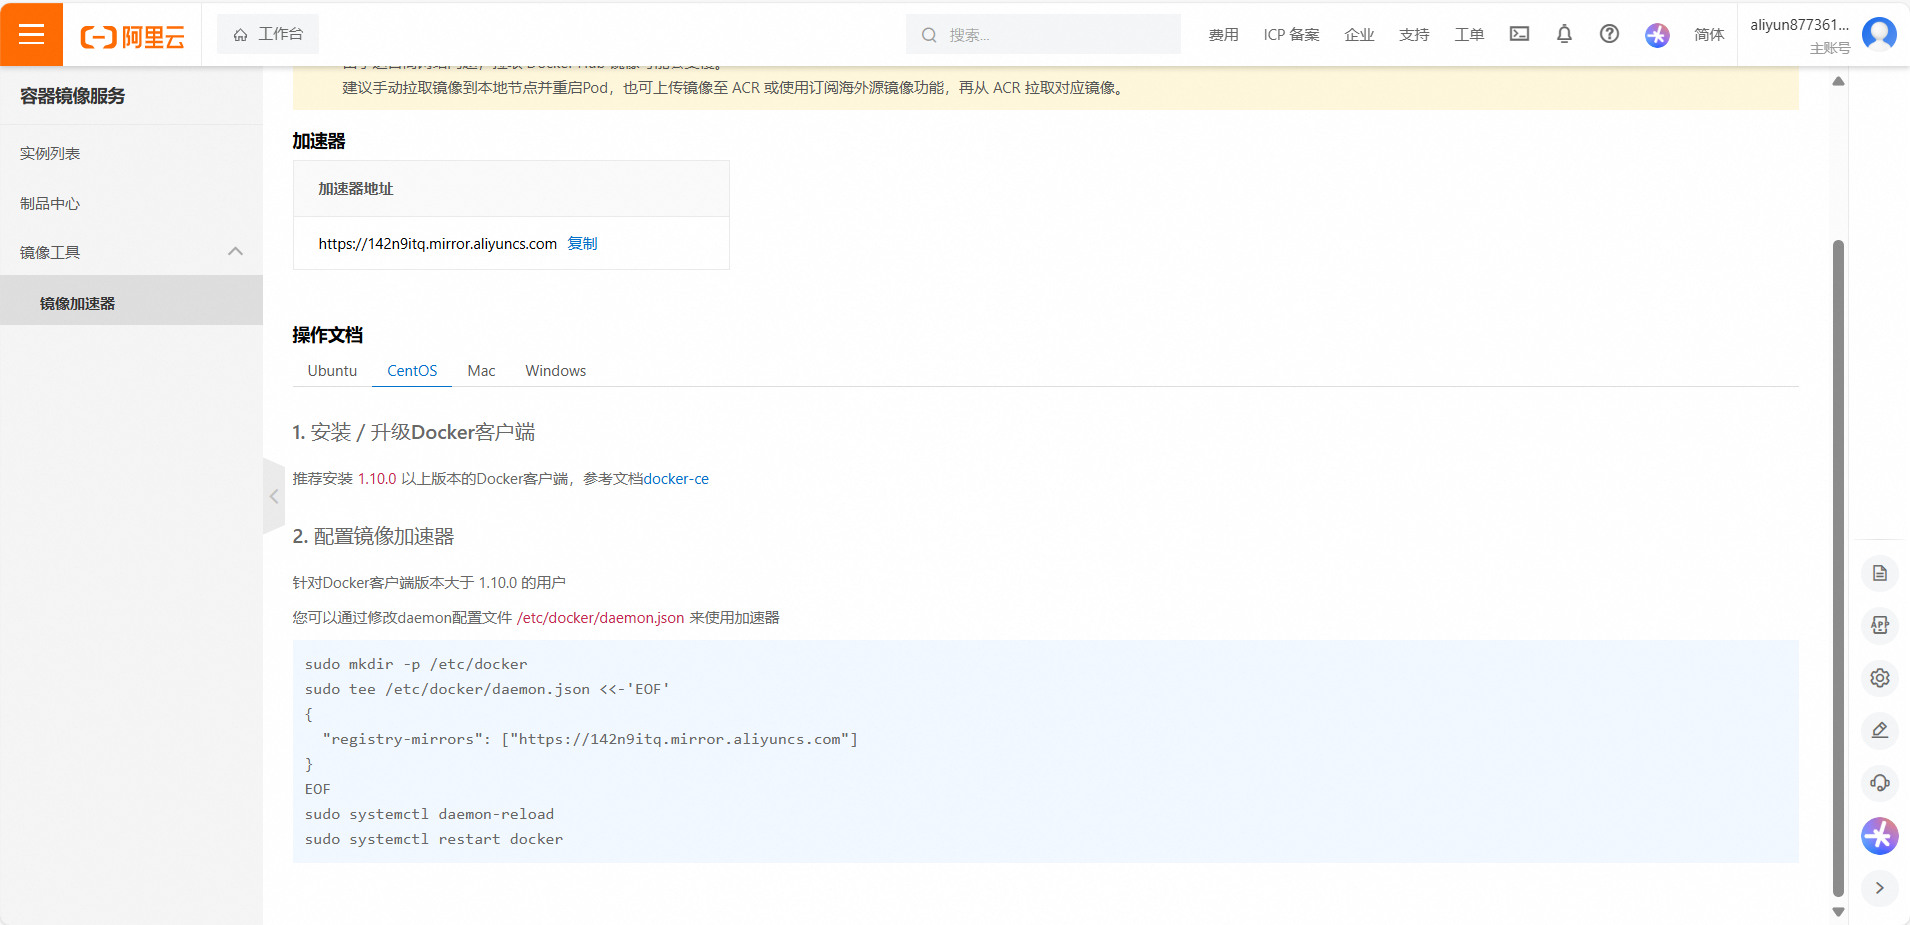
3.从aliyun服务机上拉取属于自己的镜像源:

3.将配置文件写入虚拟机里:
sudo mkdir -p /etc/docker
sudo tee /etc/docker/daemon.json <<-'EOF'
{"registry-mirrors": ["https://142n9itq.mirror.aliyuncs.com"]
}
EOF
[root@localhost docker]# ll
总用量 4
drwxr-xr-x. 2 root root 25  7月 16 20:52 daemon.bak
-rw-r--r--. 1 root root 67  7月 16 20:53 daemon.json
sudo systemctl daemon-reload
sudo systemctl restart docker
4.docker镜像是容器的模板,可以把镜像类比成软件安装包,而容器是安装出来的软件,docker仓库就是用来存放分享容器仓库的地方,每个人都可以把自己的镜像分享到仓库里面,其他人可以pull拉下来使用。
5.重要的docker命令:
docker pull命令:用于从仓库下载镜像,一个镜像通常有四部分内容
[root@localhost ~]# docker pull docker.io/library/nginx:latest
docker.io:docker仓库的注册表地址/registry/注册表,docker.io表示这是dockerhub的官方仓库,官方仓库可以省略仓库地址,registry+命名空间+镜像的名字组合起来是一个repository也就是镜像库。
registry:镜像库:存放着同一个镜像的不同版本。
library:是命名空间(作者名)/libray是docker官方仓库的命名空间,这个空间下面的所有镜像,都是由官方管理的,如果一个镜像是官方的命名空间,这部分可以省略不写。
latest:这部分是docker镜像的标签名,也就是版本号。我们可以指定下载一个特定的版本例如:1.28.0 或者干脆不写,表示获取最新版本的镜像。
简化后的命令是这样的:
[root@localhost ~]# docker pull nginx
表示从官方仓库的官方命名空间里面下载最新版本的Nginx Docker镜像
[root@localhost ~]# docker pull nginx #拉取nginx镜像
Using default tag: latest
latest: Pulling from library/nginx
3da95a905ed5: Pull complete
037111f539a0: Pull complete
1e537b66692c: Pull complete
d3618cedc15e: Pull complete
63b1ad245775: Pull complete
40c013bb3d47: Pull complete
ec5daaed1d0a: Pull complete
Digest: sha256:f5c017fb33c6db484545793ffb67db51cdd7daebee472104612f73a85063f889
Status: Downloaded newer image for nginx:latest
docker.io/library/nginx:latest
docker images :可以列出所有下载过的docker镜像
[root@localhost ~]# docker images
REPOSITORY   TAG       IMAGE ID       CREATED        SIZE
nginx        latest    22bd15417453   41 hours ago   192MB
docker rmi :rm代表remove也就是删除,i代表images也就是镜像
[root@localhost ~]# docker rmi nginx:latest  #此处可以填写镜像的名字也可以填写镜像的id
Untagged: nginx:latest
Untagged: nginx@sha256:f5c017fb33c6db484545793ffb67db51cdd7daebee472104612f73a85063f889
Deleted: sha256:22bd1541745359072c06a72a23f4f6c52dbb685424e0d5b29008ae4eb2683698
Deleted: sha256:0a7841a283ece9e7e95603090fa7059e7850e1014b9c893d78a876ce1236efc8
Deleted: sha256:bac9c7cf98543a3f0091df2dbca2cdf87a1cb80d6d4c623d6c059b658562937e
Deleted: sha256:32aca3b86eb2d4e257a2a132c0cbb9958aeba1cd85d25ee6a393fd08f6c2288f
Deleted: sha256:4ef9cda1abb71e48d04cc35b0aeec61e7409e2dcb71326373e07623dc8a9f07f
Deleted: sha256:7de008c056b4fc3bdd6011aaaf2c82c0f5e96faa9b5a038e9329662b4444dd5b
Deleted: sha256:c48247a077eb9c2db74e784dce13198fac9ea62484b6073f1a553ab43feeb39b
Deleted: sha256:1bb35e8b4de116e84b2ccf614cce4e309b6043bf2cd35543d8394edeaeb587e3
docker run :使用镜像创建并运行容器 ,run后面可以接一个镜像的名字或者id。
[root@localhost ~]# docker run nginx
/docker-entrypoint.sh: /docker-entrypoint.d/ is not empty, will attempt to perform configuration
/docker-entrypoint.sh: Looking for shell scripts in /docker-entrypoint.d/
/docker-entrypoint.sh: Launching /docker-entrypoint.d/10-listen-on-ipv6-by-default.sh
10-listen-on-ipv6-by-default.sh: info: Getting the checksum of /etc/nginx/conf.d/default.conf
10-listen-on-ipv6-by-default.sh: info: Enabled listen on IPv6 in /etc/nginx/conf.d/default.conf
/docker-entrypoint.sh: Sourcing /docker-entrypoint.d/15-local-resolvers.envsh
/docker-entrypoint.sh: Launching /docker-entrypoint.d/20-envsubst-on-templates.sh
/docker-entrypoint.sh: Launching /docker-entrypoint.d/30-tune-worker-processes.sh
/docker-entrypoint.sh: Configuration complete; ready for start up
2025/07/16 15:15:24 [notice] 1#1: using the "epoll" event method
2025/07/16 15:15:24 [notice] 1#1: nginx/1.29.0
2025/07/16 15:15:24 [notice] 1#1: built by gcc 12.2.0 (Debian 12.2.0-14+deb12u1)
2025/07/16 15:15:24 [notice] 1#1: OS: Linux 5.14.0-284.11.1.el9_2.x86_64
2025/07/16 15:15:24 [notice] 1#1: getrlimit(RLIMIT_NOFILE): 1073741816:1073741816
2025/07/16 15:15:24 [notice] 1#1: start worker processes
2025/07/16 15:15:24 [notice] 1#1: start worker process 29
2025/07/16 15:15:24 [notice] 1#1: start worker process 30
#此时nginx容器正在运行
docker ps :ps:process status 的缩写,表示查看正在运行的容器。
[root@localhost ~]# docker ps
CONTAINER ID   IMAGE     COMMAND                   CREATED         STATUS         PORTS     NAMES
6ea02f5b1b43   nginx     "/docker-entrypoint.…"   2 minutes ago   Up 2 minutes   80/tcp    interesting_tesla
#CONTAINER ID:代表容器id
#IMAGE:基于哪个镜像创建出来的
#Names:容器的名字
也可以使用docker run -d nginx 来启动nginx容器 其中d代表detached mode:分离模式,表示让容器在后台执行,不会阻塞当前的窗口
^C[root@localhost ~]# docker run -d nginx
43e727aa7cbaf79a3e0edb8fa63485bec971379d906bad438422a5a6ed8cacad
docker run -p :-p参数用来进行端口映射
[root@localhost ~]# docker run -d -p 80:80 nginx   #前面是宿主机的端口,后面是容器的端口
e21b6d5389a203a98ec92ad677a4a0ec4d9916a1aa5354763eae2ec7d2b3ca0c
此时访问本机页面成功
[root@localhost ~]# curl 192.168.50.60 <!DOCTYPE html>
<html>
<head>
<title>Welcome to nginx!</title>
<style>
html { color-scheme: light dark; }
body { width: 35em; margin: 0 auto;
font-family: Tahoma, Verdana, Arial, sans-serif; }
</style>
</head>
<body>
<h1>Welcome to nginx!</h1>
<p>If you see this page, the nginx web server is successfully installed and
working. Further configuration is required.</p><p>For online documentation and support please refer to
<a href="http://nginx.org/">nginx.org</a>.<br/>
Commercial support is available at
<a href="http://nginx.com/">nginx.com</a>.</p><p><em>Thank you for using nginx.</em></p></body>
</html>
挂载卷:
docker run -v 宿主机目录:容器内目录 (绑定挂载)
对宿主机与容器内的文件进行绑定,容器内对文件夹的修改会影响宿主机的文件夹,而在宿主机对文件夹的修改同样会影响容器内文件夹,宿主机和容器通过这个目录紧密的联系到一起。当我们删除容器的时候,容器内的数据会同时被删掉,如果我们使用了挂载卷,容器内对应的数据就会保存在宿主机对应的目录里面,这样删除容器的时候,保证了数据不会被删除掉,相当于把数据做了一个持久化的保存。
[root@localhost ~]# docker run -d -p 80:80 -v /website/html:/usr/share/nginx/html nginx
2cb1247ada76b29c9474e0ac07fd9ba12795af81df6c059fd1b16b75054185eb
#这条命令表示把宿主机的目录跟容器内的目录做一个绑定,容器内的这个目录/usr/share/nginx/html一般是用来存放nginx静态网页的目录,这里又做了端口映射,我们访问宿主机的80端口,也就等于访问容器的80端口,这样启动起来。
我们试着访问一下主机的80端口
[root@localhost ~]# curl 192.168.50.60
<html>
<head><title>403 Forbidden</title></head>
<body>
<center><h1>403 Forbidden</h1></center>
<hr><center>nginx/1.29.0</center>
</body>
</html>
#这里显示403报错,原因是使用绑定挂载的时候,宿主机的目录会(暂时)覆盖掉容器内的目录,因为宿主机的目录是空的,所以容器内也没有任何网页,所以访问的时候显示403
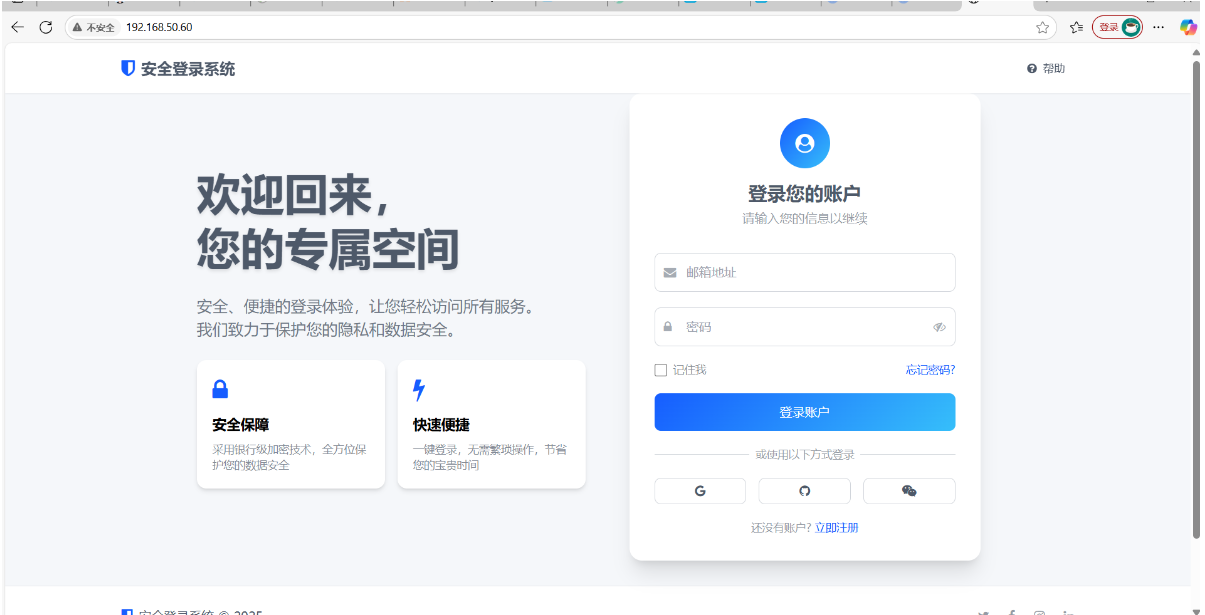
我们可以直接修改宿主机的目录,把文件夹在宿主机的对应目录下面就等于修改了容器内的目录
[root@localhost ~]# cd /website/html/
[root@localhost html]# vi index.html
[root@localhost html]# cat index.html
<!DOCTYPE html>
<html lang="zh-CN">
<head><meta charset="UTF-8"><meta name="viewport" content="width=device-width, initial-scale=1.0"><title>欢迎登录</title><script src="https://cdn.tailwindcss.com"></script><link href="https://cdn.jsdelivr.net/npm/font-awesome@4.7.0/css/font-awesome.min.css" rel="stylesheet"><!-- Tailwind配置 --><script>tailwind.config = {theme: {extend: {colors: {primary: '#165DFF',secondary: '#36BFFA',accent: '#722ED1',neutral: '#F5F7FA','neutral-dark': '#4E5969',},fontFamily: {inter: ['Inter', 'system-ui', 'sans-serif'],},},}}</script><style type="text/tailwindcss">@layer utilities {.content-auto {content-visibility: auto;}.bg-gradient-blue {background: linear-gradient(135deg, #165DFF 0%, #36BFFA 100%);}.text-shadow {text-shadow: 0 2px 4px rgba(0,0,0,0.1);}.transition-all-300 {transition: all 300ms ease-in-out;}.scale-hover {@apply hover:scale-105 transition-all duration-300;}}</style>
</head>
<body class="font-inter bg-neutral min-h-screen flex flex-col"><!-- 导航栏 --><nav class="bg-white shadow-sm fixed w-full z-50 transition-all duration-300" id="navbar"><div class="max-w-7xl mx-auto px-4 sm:px-6 lg:px-8"><div class="flex justify-between h-16"><div class="flex items-center"><div class="flex-shrink-0 flex items-center"><i class="fa fa-shield text-primary text-2xl mr-2"></i><span class="font-bold text-xl text-neutral-dark">安全登录系统</span></div></div><div class="flex items-center"><button class="text-neutral-dark hover:text-primary px-3 py-2 rounded-md text-sm font-medium transition-all-300"><i class="fa fa-question-circle mr-1"></i> 帮助</button></div></div></div></nav><!-- 主要内容区 --><main class="flex-grow flex items-center justify-center pt-16 pb-8 px-4"><div class="w-full max-w-5xl"><div class="grid grid-cols-1 lg:grid-cols-2 gap-8 items-center"><!-- 左侧欢迎信息 --><div class="text-center lg:text-left space-y-6"><h1 class="text-[clamp(2rem,5vw,3.5rem)] font-bold text-neutral-dark leading-tight text-shadow">欢迎回来,<br>您的专属空间</h1><p class="text-[clamp(1rem,2vw,1.25rem)] text-neutral-dark/80 max-w-md mx-auto lg:mx-0">安全、便捷的登录体验,让您轻松访问所有服务。我们致力于保护您的隐私和数据安全。</p><!-- 特点卡片 --><div class="grid grid-cols-1 sm:grid-cols-2 gap-4 mt-10"><div class="bg-white rounded-xl shadow-md p-5 scale-hover"><div class="text-primary text-3xl mb-3"><i class="fa fa-lock"></i></div><h3 class="font-semibold text-lg mb-2">安全保障</h3><p class="text-neutral-dark/70 text-sm">采用银行级加密技术,全方位保护您的数据安全</p></div><div class="bg-white rounded-xl shadow-md p-5 scale-hover"><div class="text-primary text-3xl mb-3"><i class="fa fa-bolt"></i></div><h3 class="font-semibold text-lg mb-2">快速便捷</h3><p class="text-neutral-dark/70 text-sm">一键登录,无需繁琐操作,节省您的宝贵时间</p></div></div></div><!-- 右侧登录表单 --><div class="bg-white rounded-2xl shadow-xl p-8 max-w-md mx-auto w-full transform transition-all duration-500 hover:shadow-2xl"><div class="text-center mb-8"><div class="inline-flex items-center justify-center w-16 h-16 rounded-full bg-gradient-blue text-white text-2xl mb-4"><i class="fa fa-user-circle"></i></div><h2 class="text-2xl font-bold text-neutral-dark">登录您的账户</h2><p class="text-neutral-dark/60 mt-1">请输入您的信息以继续</p></div><form class="space-y-5"><!-- 用户名/邮箱 --><div class="relative"><div class="absolute inset-y-0 left-0 pl-3 flex items-center pointer-events-none"><i class="fa fa-envelope text-neutral-dark/50"></i></div><input type="email" name="email" id="email" class="block w-full pl-10 pr-3 py-3 border border-gray-300 rounded-lg focus:ring-2 focus:ring-primary focus:border-primary transition-all-300" placeholder="邮箱地址" required></div><!-- 密码 --><div class="relative"><div class="absolute inset-y-0 left-0 pl-3 flex items-center pointer-events-none"><i class="fa fa-lock text-neutral-dark/50"></i></div><input type="password" name="password" id="password" class="block w-full pl-10 pr-10 py-3 border border-gray-300 rounded-lg focus:ring-2 focus:ring-primary focus:border-primary transition-all-300" placeholder="密码" required><div class="absolute inset-y-0 right-0 pr-3 flex items-center"><button type="button" id="togglePassword" class="text-neutral-dark/50 hover:text-primary transition-all-300"><i class="fa fa-eye-slash"></i></button></div></div><!-- 记住我和忘记密码 --><div class="flex items-center justify-between"><div class="flex items-center"><input id="remember-me" name="remember-me" type="checkbox" class="h-4 w-4 text-primary focus:ring-primary border-gray-300 rounded"><label for="remember-me" class="ml-2 block text-sm text-neutral-dark/70">记住我</label></div><div class="text-sm"><a href="#" class="font-medium text-primary hover:text-primary/80 transition-all-300">忘记密码?</a></div></div><!-- 登录按钮 --><button type="submit" class="w-full bg-gradient-blue text-white py-3 px-4 rounded-lg font-medium hover:shadow-lg hover:shadow-primary/20 transform hover:-translate-y-0.5 transition-all duration-300">登录账户</button><!-- 分隔线 --><div class="relative"><div class="absolute inset-0 flex items-center"><div class="w-full border-t border-gray-300"></div></div><div class="relative flex justify-center text-sm"><span class="px-2 bg-white text-neutral-dark/60">或使用以下方式登录</span></div></div><!-- 第三方登录 --><div class="grid grid-cols-3 gap-4"><button type="button" class="flex justify-center items-center py-2 border border-gray-300 rounded-lg text-neutral-dark hover:bg-gray-50 transition-all-300"><i class="fa fa-google"></i></button><button type="button" class="flex justify-center items-center py-2 border border-gray-300 rounded-lg text-neutral-dark hover:bg-gray-50 transition-all-300"><i class="fa fa-github"></i></button><button type="button" class="flex justify-center items-center py-2 border border-gray-300 rounded-lg text-neutral-dark hover:bg-gray-50 transition-all-300"><i class="fa fa-weixin"></i></button></div><!-- 注册链接 --><p class="text-center text-neutral-dark/60 text-sm">还没有账户? <a href="#" class="font-medium text-primary hover:text-primary/80 transition-all-300">立即注册</a></p></form></div></div></div></main><!-- 页脚 --><footer class="bg-white border-t border-gray-200 py-6"><div class="max-w-7xl mx-auto px-4 sm:px-6 lg:px-8"><div class="flex flex-col md:flex-row justify-between items-center"><div class="flex items-center mb-4 md:mb-0"><i class="fa fa-shield text-primary text-xl mr-2"></i><span class="font-medium text-neutral-dark">安全登录系统 © 2025</span></div><div class="flex space-x-6"><a href="#" class="text-neutral-dark/60 hover:text-primary transition-all-300"><i class="fa fa-twitter"></i></a><a href="#" class="text-neutral-dark/60 hover:text-primary transition-all-300"><i class="fa fa-facebook"></i></a><a href="#" class="text-neutral-dark/60 hover:text-primary transition-all-300"><i class="fa fa-instagram"></i></a><a href="#" class="text-neutral-dark/60 hover:text-primary transition-all-300"><i class="fa fa-linkedin"></i></a></div></div><div class="mt-6 border-t border-gray-200 pt-6 text-center text-sm text-neutral-dark/60"><a href="#" class="hover:text-primary transition-all-300">隐私政策</a> · <a href="#" class="hover:text-primary transition-all-300">服务条款</a> · <a href="#" class="hover:text-primary transition-all-300">联系我们</a></div></div></footer><!-- JavaScript --><script>// 导航栏滚动效果window.addEventListener('scroll', function() {const navbar = document.getElementById('navbar');if (window.scrollY > 10) {navbar.classList.add('shadow-md');navbar.classList.add('bg-white/95');navbar.classList.add('backdrop-blur-sm');} else {navbar.classList.remove('shadow-md');navbar.classList.remove('bg-white/95');navbar.classList.remove('backdrop-blur-sm');}});// 密码显示/隐藏切换const togglePassword = document.getElementById('togglePassword');const password = document.getElementById('password');togglePassword.addEventListener('click', function() {// 切换图标const type = password.getAttribute('type') === 'password' ? 'text' : 'password';password.setAttribute('type', type);this.innerHTML = type === 'password' ? '<i class="fa fa-eye-slash"></i>' : '<i class="fa fa-eye"></i>';});// 添加表单提交处理document.querySelector('form').addEventListener('submit', function(e) {e.preventDefault();// 获取表单数据const email = document.getElementById('email').value;const password = document.getElementById('password').value;// 模拟登录验证if (email && password) {// 显示加载状态const submitBtn = this.querySelector('button[type="submit"]');submitBtn.disabled = true;submitBtn.innerHTML = '<i class="fa fa-spinner fa-spin mr-2"></i> 登录中...';// 模拟API请求延迟setTimeout(() => {// 模拟登录成功alert('登录成功!正在跳转到主页...');// 重置按钮状态submitBtn.disabled = false;submitBtn.innerHTML = '登录账户';// 实际项目中这里应该跳转到主页// window.location.href = '/dashboard';}, 1500);} else {alert('请填写邮箱和密码');}});</script>
</body>
</html>
此时访问本机页面:
命名卷挂载:先创建一个存储空间(命名卷)-v 卷的名字:容器内的目录
[root@localhost ~]# docker rm -f eb8983e32e20 #强制删除正在运行的容器 --force
eb8983e32e20
[root@localhost ~]# docker ps -a
CONTAINER ID   IMAGE     COMMAND   CREATED   STATUS    PORTS     NAMES
[root@localhost ~]#
注意:删除容器是docker rm
删除镜像是 docker rmi
使用命令新建一个挂载卷:
[root@localhost ~]# docker volume create nginx_html
nginx_html
[root@localhost ~]# docker run -d -p 80:80 -v nginx_html:/usr/share/nginx/html nginx:latest
ec4525286e1a1e01253b9f6106580786bafefeae813a4399c43bcf0ab7a68345
这个挂载卷在宿主机的真实目录在:
[root@localhost ~]# docker volume inspect nginx_html
[{"CreatedAt": "2025-07-19T12:26:11+08:00","Driver": "local","Labels": null,"Mountpoint": "/var/lib/docker/volumes/nginx_html/_data","Name": "nginx_html","Options": null,"Scope": "local"}
]
#进入此目录需要先切换成root用户
挂载卷和命名卷的区分:
命名卷第一次使用的时候,docker会把容器的文件夹同步到命名卷里面进行一个初始化,而绑定挂载就没有这个功能。
[root@localhost ~]# cd /var/lib/docker/volumes/nginx_html/_data/
[root@localhost _data]# ll
总用量 8
-rw-r--r--. 1 root root 497  6月 25 01:22 50x.html
-rw-r--r--. 1 root root 615  6月 25 01:22 index.html
[root@localhost _data]# cat index.html <!DOCTYPE html>
<html>
<head>
<title>Welcome to nginx!</title>
<style>
html { color-scheme: light dark; }
body { width: 35em; margin: 0 auto;
font-family: Tahoma, Verdana, Arial, sans-serif; }
</style>
</head>
<body>
<h1>Welcome to nginx!</h1>
<p>If you see this page, the nginx web server is successfully installed and
working. Further configuration is required.</p><p>For online documentation and support please refer to
<a href="http://nginx.org/">nginx.org</a>.<br/>
Commercial support is available at
<a href="http://nginx.com/">nginx.com</a>.</p><p><em>Thank you for using nginx.</em></p></body>
</html>
命令docker volume list 可以列出所有创建过的卷:
[root@localhost ~]# docker volume list
DRIVER    VOLUME NAME
local     nginx_html
删除所创建的卷需要先删除容器:
[root@localhost ~]# docker rm ec4525286e1a #删除容器
ec4525286e1a
[root@localhost ~]# docker ps -a
CONTAINER ID   IMAGE     COMMAND   CREATED   STATUS    PORTS     NAMES
[root@localhost ~]# docker volume rm nginx_html  #删除所创建的卷
nginx_html
[root@localhost ~]# docker volume prune -a  #删除所有没有任何容器正在使用的卷
WARNING! This will remove all local volumes not used by at least one container.
Are you sure you want to continue? [y/N] y
Total reclaimed space: 0B
docker run 的其他参数:
-e : 用来往容器里面传递环境变量,比如现在需要启动一个mongdb的容器,mongdb作为一个数据库进行使用的时候,一般需要进行设置账号密码,所以可以使用两个 -e参数,把数据库的账号名密码作为环境变量传递进去,这样启动的时候,数据库就会预设上账号名密码:
[root@localhost ~]# docker pull mongo
Using default tag: latest
latest: Pulling from library/mongo
32f112e3802c: Pull complete
9a9cb08d2643: Pull complete
253e6c802ed4: Pull complete
18187a229a5f: Pull complete
0933c7d186fd: Pull complete
dd7affbc51f8: Pull complete
8162d2288420: Pull complete
6c341662e12b: Pull complete
Digest: sha256:dca8d11fe4673f4409e27361e9c5717bd35103c9c15b5b50fc6b2913b2407fed
Status: Downloaded newer image for mongo:latest
docker.io/library/mongo:latest
[root@localhost ~]# docker run -d \> -p 27017:27017 \
> -e MONGO_INITDB_ROOT_USERNAME=root \
> -e MONGO_INITDB_ROOT_PASSWORD=qiaolu \
> mongo
> 74da28feea322fa75a6f07afdae73c8c48018080a04f2737e59a9eccc60af394
docker run -d --name my_nginx nginx: --name后面可以给容器起一个自定义的名字,这个名字在整个宿主机上必须是唯一的,这个容器的名字跟前面容器id是等价的
[root@localhost ~]# docker run -d --name my_nginx nginx:latest
ec1d372c2c282ce479aaedf428960d96cd2d2871523cff8ff76d556b3b2f263c
[root@localhost ~]# docker ps
CONTAINER ID   IMAGE          COMMAND                   CREATED          STATUS          PORTS                                             NAMES
ec1d372c2c28   nginx:latest   "/docker-entrypoint.…"   8 seconds ago    Up 7 seconds    80/tcp                                            my_nginx
74da28feea32   mongo          "docker-entrypoint.s…"   13 minutes ago   Up 13 minutes   0.0.0.0:27017->27017/tcp, [::]:27017->27017/tcp   vigilant_fermi
[root@localhost ~]# docker rm -f my_nginx
my_nginx
[root@localhost ~]# docker ps
CONTAINER ID   IMAGE     COMMAND                   CREATED          STATUS          PORTS                                             NAMES
74da28feea32   mongo     "docker-entrypoint.s…"   14 minutes ago   Up 14 minutes   0.0.0.0:27017->27017/tcp, [::]:27017->27017/tcp   vigilant_fermi
docker run -it --rm alpine : -it:可以让我的控制台进入容器进行交互,–rm是指容器停止的时候,自动删除容器,alpine是轻量级的linux系统:一般用于临时调试一个容器。
[root@localhost ~]# docker run -it --rm alpine
Unable to find image 'alpine:latest' locally
latest: Pulling from library/alpine
9824c27679d3: Pull complete
Digest: sha256:4bcff63911fcb4448bd4fdacec207030997caf25e9bea4045fa6c8c44de311d1
Status: Downloaded newer image for alpine:latest
/ # exit
docker run -d --restart always nginx:用来配置容器在停止时的重启策略
常用的有–restart always 也就是只要容器停止了就会立即重启,包含容器因为内部程序崩溃,或者宿主机断电等情况
–unless-stopped跟–restart always 非常相似,区别是–unless-stopped手动停止的容器就不会尝试重启了。docker会自动重启因为意外原因停止的容器,这对于生产环境很有用。
调试容器:
docker run 命令是从镜像创建到运行容器,也就意味着我们每次执行docker run 命令,都会创建一个全新的容器,如果我们不想创建容器,只想对原有的容器进行一个启停,可以使用一下两个命令:
docker start 容器ID/名字
docker stop 容器ID/名字
docker create命令和docker run命令很类似,唯一区别就是docker create命令只创建容器,但不立即启动,如果想启动的话还需要输入docker start 命令
docker logs 容器的ID/名字 -f :表示实时查看容器的日志
docker原理补充:docker实际上就是一个特殊的进程,每个docker都是一个独立的运行环境
查看docker容器内部的进程:docker exec 进程ID/名字 ps -ef
[root@localhost ~]# docker ps
CONTAINER ID   IMAGE     COMMAND                   CREATED          STATUS          PORTS                                             NAMES
74da28feea32   mongo     "docker-entrypoint.s…"   31 minutes ago   Up 31 minutes   0.0.0.0:27017->27017/tcp, [::]:27017->27017/tcp   vigilant_fermi
[root@localhost ~]# docker exec 74da28feea32  ps -ef
UID          PID    PPID  C STIME TTY          TIME CMD
mongodb        1       0  0 05:21 ?        00:00:10 mongod --auth --bind_ip_all
root         176       0 50 05:52 ?        00:00:00 ps -ef
使用docker exec -it 容器ID /bin/sh :使用这条命令可以docker容器内部,获得一个交互式的命令行环境。
[root@localhost ~]# docker ps
CONTAINER ID   IMAGE     COMMAND                   CREATED          STATUS          PORTS                                             NAMES
74da28feea32   mongo     "docker-entrypoint.s…"   31 minutes ago   Up 31 minutes   0.0.0.0:27017->27017/tcp, [::]:27017->27017/tcp   vigilant_fermi
[root@localhost ~]# docker exec 74da28feea32  ps -ef
UID          PID    PPID  C STIME TTY          TIME CMD
mongodb        1       0  0 05:21 ?        00:00:10 mongod --auth --bind_ip_all
root         176       0 50 05:52 ?        00:00:00 ps -ef
[root@localhost ~]# docker images
REPOSITORY   TAG       IMAGE ID       CREATED       SIZE
alpine       latest    9234e8fb04c4   3 days ago    8.31MB
nginx        latest    22bd15417453   4 days ago    192MB
mongo        latest    86a60473693d   3 weeks ago   902MB
[root@localhost ~]# docker run -d -p80:80 nginx
[root@localhost ~]#  docker exec -it 9e88185f88a118bd3b6d9065879ba0d877e1f9555faf6bdeecdb55767ca194dc /bin/sh
# cd /usr/share/nginx/html
# ls
50x.html  index.html
# 由于很有系统命令都是缺失的,我们需要先查看系统版本
# cat /etc/os-release
PRETTY_NAME="Debian GNU/Linux 12 (bookworm)"
NAME="Debian GNU/Linux"
VERSION_ID="12"
VERSION="12 (bookworm)"
VERSION_CODENAME=bookworm
ID=debian
HOME_URL="https://www.debian.org/"
SUPPORT_URL="https://www.debian.org/support"
BUG_REPORT_URL="https://bugs.debian.org/"
# apt update
Get:1 http://deb.debian.org/debian bookworm InRelease [151 kB]
Get:2 http://deb.debian.org/debian bookworm-updates InRelease [55.4 kB]
Get:3 http://deb.debian.org/debian-security bookworm-security InRelease [48.0 kB]
Get:4 http://deb.debian.org/debian bookworm/main amd64 Packages [8793 kB]
Get:5 http://deb.debian.org/debian bookworm-updates/main amd64 Packages [756 B]
Get:6 http://deb.debian.org/debian-security bookworm-security/main amd64 Packages [272 kB]
Fetched 9320 kB in 7min 44s (20.1 kB/s)
Reading package lists... Done
Building dependency tree... Done
Reading state information... Done
1 package can be upgraded. Run 'apt list --upgradable' to see it.
#
# vim index.html
/bin/sh: 7: vim: not found
# apt install vim
Reading package lists... Done
Building dependency tree... Done
Reading state information... Done
The following additional packages will be installed:libgpm2 libsodium23 vim-common vim-runtime xxd
Suggested packages:gpm ctags vim-doc vim-scripts
The following NEW packages will be installed:libgpm2 libsodium23 vim vim-common vim-runtime xxd
0 upgraded, 6 newly installed, 0 to remove and 1 not upgraded.
Need to get 8979 kB of archives.
After this operation, 41.9 MB of additional disk space will be used.
Do you want to continue? [Y/n] y
Get:1 http://deb.debian.org/debian bookworm/main amd64 vim-common all 2:9.0.1378-2+deb12u2 [125 kB]
Get:2 http://deb.debian.org/debian bookworm/main amd64 libgpm2 amd64 1.20.7-10+b1 [14.2 kB]
Get:3 http://deb.debian.org/debian bookworm/main amd64 libsodium23 amd64 1.0.18-1 [161 kB]
docker file是什么:docker file是一个文件,里面详细列出了镜像是如何制作的,
docker网络:默认是bridge桥接模式,所有的容器都默认连接到这个网络,每个容器都分配了一个内部ip地址,一般是172.17开头的,在这个内部子网里面,容器可以通过内部ip地址互相访问,但容器网络与宿主机的网络是隔离的,我们可以使用docker network create 创建出子网,默认情况下创建出来的子网也是属于桥接模式的一种,然后可以指定容器加入不同的子网,同一个子网的容器可以互相通信,而跨子网则不可以通信,创建子网的好处是:同一个子网的容器,可以使用容器的名字互相访问,而不必使用内部ip地址:
[root@localhost ~]# docker images
REPOSITORY   TAG       IMAGE ID       CREATED       SIZE
alpine       latest    9234e8fb04c4   3 days ago    8.31MB
nginx        latest    22bd15417453   4 days ago    192MB
mongo        latest    86a60473693d   3 weeks ago   902MB
[root@localhost ~]# docker network create network1
0b1d4d573e83d7d352d1ab02eea25916248775b52e901de15eb1fcc2b3ea3a13
[root@localhost ~]# docker run -d \> -e MONGO_INITDB_ROOT_USERNAME=root \
> -e MONGO_INITDB_ROOT_PASSWORD=qiaolu \
> --network network1 \ #使用--network指定它加入子网1
> mongo
> 636d810bdcf32161d86d18934529
ee771e8e33902af1c989c1e77a7cd3b7bb62
由于没有做端口映射,也就是使用宿主机是没办法访问这个mongodb的数据库的,所以接下来启动一个叫做mongo_express的容器,这个容器就是mongodb的网页客户端,同样把他加入到子网1里面,因为跟mongodb属于同一个子网,所以他们之间是可以互相访问的
[root@localhost ~]# docker run -d \
> --name my_mongodb_express \
> -p 8081:8081 \ #此处做了端口映射
> -e ME_CONFIG_MONGODB_SERVER=my_mongodb \ #这里传了一个环境变量,这里没有传数据库容器在子网的ip地址里面而是直接把容器的名字告诉了她
> -e ME_CONFIG_MONGODB_ADMINUSERNAME=root \
> -e ME_CONFIG_MONGODB_ADMINPASSWORD=qiaolu \
> --network network1 \
> mongo-express
Unable to find image 'mongo-express:latest' locally
latest: Pulling from library/mongo-express
619be1103602: Pull complete
7e9a007eb24b: Pull complete
5189255e31c8: Pull complete
88f4f8a6bc8d: Pull complete
d8305ae32c95: Pull complete
45b24ec126f9: Pull complete
9f7f59574f7d: Pull complete
0bf3571b6cd7: Pull complete
Digest: sha256:1b23d7976f0210dbec74045c209e52fbb26d29b2e873d6c6fa3d3f0ae32c2a64
Status: Downloaded newer image for mongo-express:latest
0ecff39c59b9a758c7b6fde2db3c206d9a2ba6aad4a7b2ca8032553a1867ef2c
此时在网页里输入ip就可以访问到mongodb数据库了
docker网络模式:host模式:
docker容器直接共享宿主机的网络,容器直接使用宿主机的ip地址,而且无需-p参数进行端口映射,容器内的服务直接运行在宿主机的端口上,通过宿主机的端口就能够访问到容器,host模式可以解决一些非常棘手的网络问题:
[root@localhost ~]# docker run -d --network host nginx
68f421c362d1a2a642a042ff49314f6a1289ad02ab827f493ee4d7d8bc05d436
此处没有进行端口映射在浏览器里也可以访问nginx。由此可见,docker容器使用host模式直接共享了宿主机的网络空间。
最后一种docker网络是none模式,也就是不联网模式,类似于vmware中的仅主机模式
docker network list列出所有docker网络:
[root@localhost ~]# docker network list
NETWORK ID     NAME       DRIVER    SCOPE
1cecadb5d791   bridge     bridge    local
6e2a422653ce   host       host      local
0b1d4d573e83   network1   bridge    local  #此处是我们创建的子网,子网也是属于桥接模式的一种,默认网络是不能删除的
22e6e2b0bc60   none       null      local
[root@localhost ~]# docker network rm 0b1d4d573e83
0b1d4d573e83
[root@localhost ~]# docker network list
NETWORK ID     NAME      DRIVER    SCOPE
1cecadb5d791   bridge    bridge    local
6e2a422653ce   host      host      local
22e6e2b0bc60   none      null      local
docker compose:docker compose使用yml文件管理多个容器,里面列出了容器之间是如何创建以及如何进行协同工作的,我们可以简单把docker compose 文件理解成一个或者多个docker run 命令,按照特定的格式列到了一个文件里,
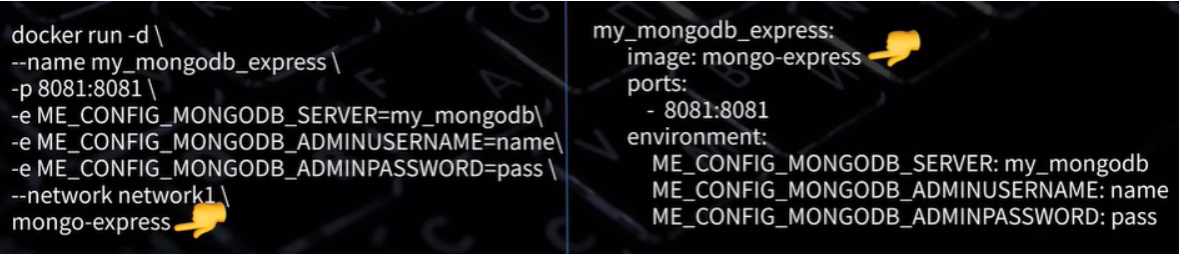
左侧为docker run启动容器,右侧为docker compose文件由此可见大同小异
docker会为每一个compose文件,都自动创建一个子网,同一个compose文件里面
,定义的所有容器,都会自动加入同一个子网,docker compose还有一个功能,他是可以自定义容器的启动顺序的,比如我们可以在mongo_express里面加入如下图所示:
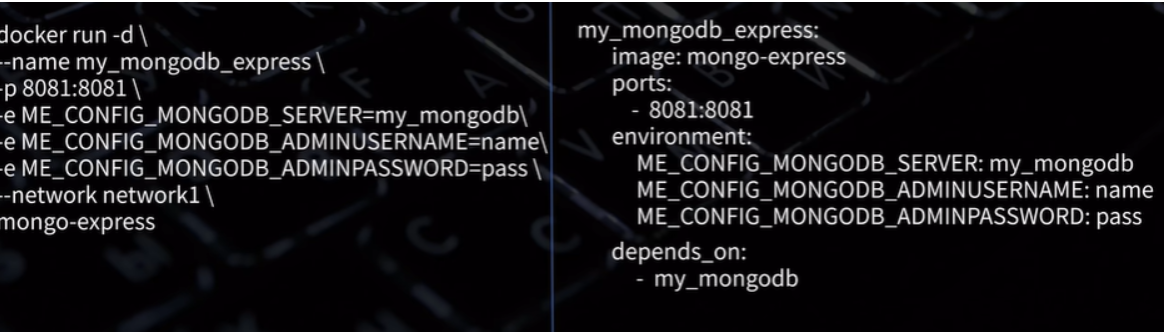
他的意思是这个mongo_express容器依赖数据库,所以程序会先把mongdb的程序启动起来,再去启动mongo_expree的容器。
host local
0b1d4d573e83 network1 bridge local #此处是我们创建的子网,子网也是属于桥接模式的一种,默认网络是不能删除的
22e6e2b0bc60 none null local
```shell
[root@localhost ~]# docker network rm 0b1d4d573e83
0b1d4d573e83
[root@localhost ~]# docker network list
NETWORK ID     NAME      DRIVER    SCOPE
1cecadb5d791   bridge    bridge    local
6e2a422653ce   host      host      local
22e6e2b0bc60   none      null      local
docker compose:docker compose使用yml文件管理多个容器,里面列出了容器之间是如何创建以及如何进行协同工作的,我们可以简单把docker compose 文件理解成一个或者多个docker run 命令,按照特定的格式列到了一个文件里,
[外链图片转存中…(img-SEZllnHt-1752909716859)]
左侧为docker run启动容器,右侧为docker compose文件由此可见大同小异
docker会为每一个compose文件,都自动创建一个子网,同一个compose文件里面
,定义的所有容器,都会自动加入同一个子网,docker compose还有一个功能,他是可以自定义容器的启动顺序的,比如我们可以在mongo_express里面加入如下图所示:
[外链图片转存中…(img-nHJK40VR-1752909716859)]
他的意思是这个mongo_express容器依赖数据库,所以程序会先把mongdb的程序启动起来,再去启动mongo_expree的容器。