用户中心——比如:腾讯的QQ账号可以登录到很多应用当中 01
用户中心——比如:腾讯的QQ账号可以登录到很多应用当中
文章目录
- 用户中心——比如:腾讯的QQ账号可以登录到很多应用当中
- 管理用户信息,用户管理——通用
- node.js 的安装 >= 14
- 启动项目的注意事项:
- Ant Design Pro
- 开启 Umi UI
- 瘦身
- 配置后端
- 数据库设计
- Mabiats-Plus 驼峰下划线原因报错
- 用户注册逻辑
- 用户登录逻辑
- 如何知道是哪个用户登录了
- 控制层 Controller 封装请求:
- 用户管理接口
- 最后:
管理用户信息,用户管理——通用
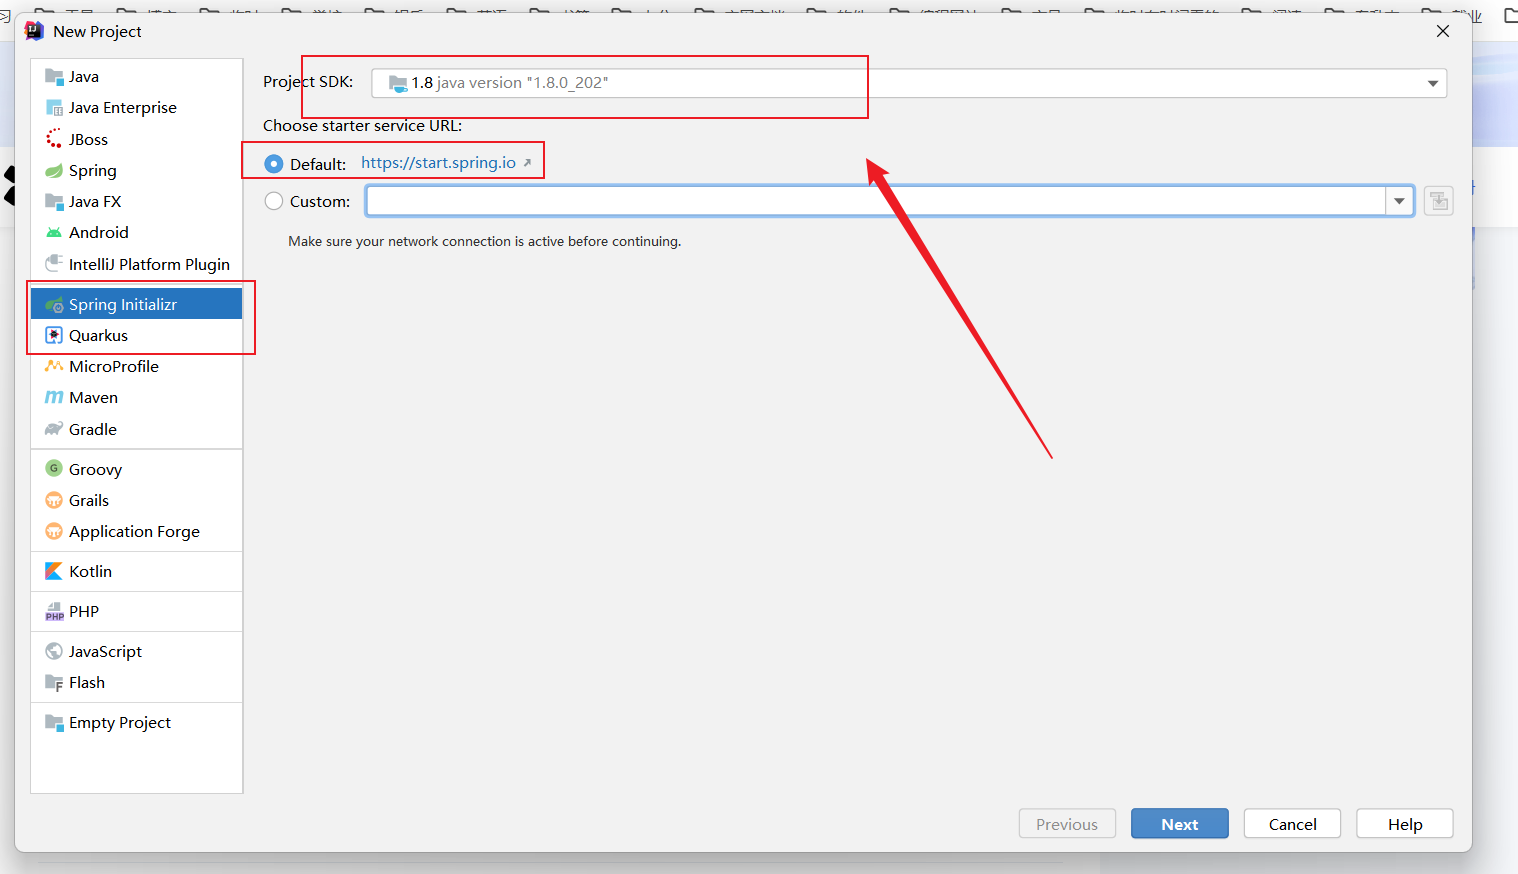
node.js 的安装 >= 14
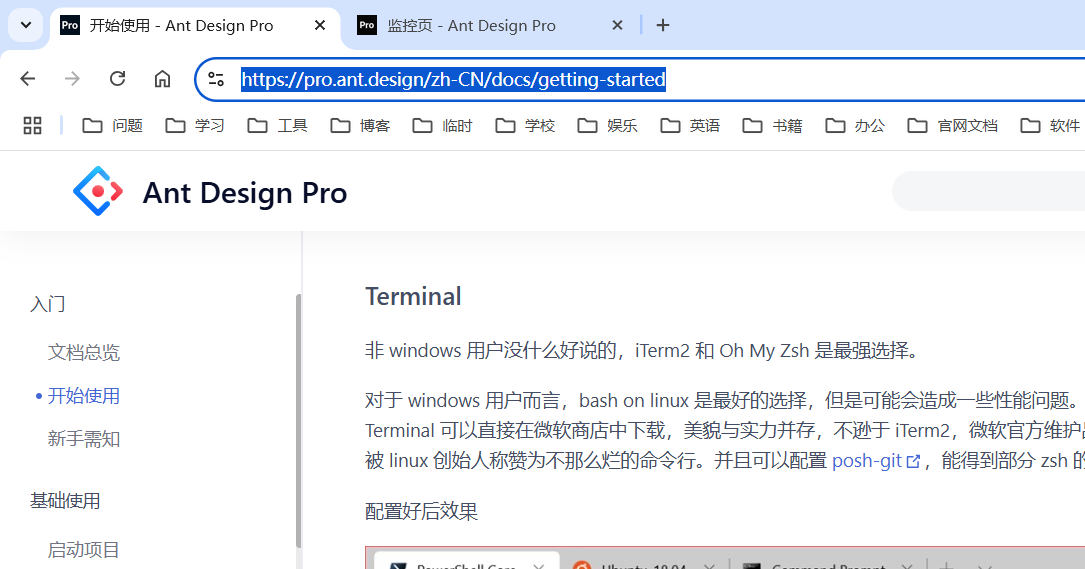
Ant Design Pro 的官方文档地址: https://pro.ant.design/zh-CN/docs/getting-started
# 使用 npm
npm i @ant-design/pro-cli -g
pro create myapp
这里我采用的是安装: Ant Design Pro v2
https://v2-pro.ant.design/docs/getting-started-cn
同时注意配置 Node 对应的环境变量信息。
本地开发:
安装依赖。
npm install # 安装相关的依赖
如果网络状况不佳,可以使用 cnpm 进行加速。
npm run start # 启动项目
启动项目的注意事项:
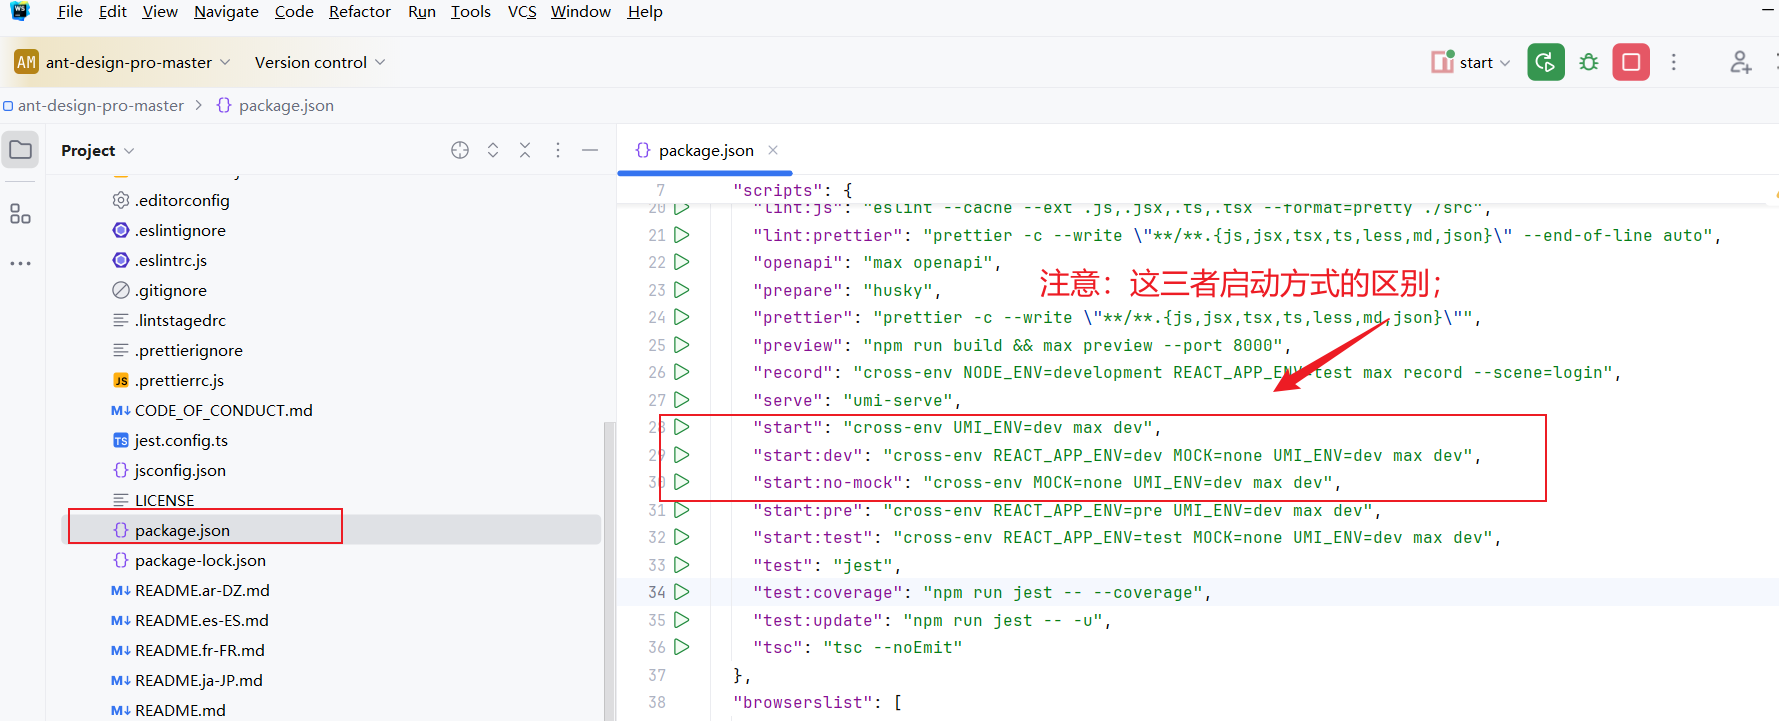
"start": "cross-env UMI_ENV=dev max dev",
"start:dev": "cross-env REACT_APP_ENV=dev MOCK=none UMI_ENV=dev max dev",
"start:no-mock": "cross-env MOCK=none UMI_ENV=dev max dev",
"start:pre": "cross-env REACT_APP_ENV=pre UMI_ENV=dev max dev",
"start:test": "cross-env REACT_APP_ENV=test MOCK=none UMI_ENV=dev max dev",
- start:dev 开发模式启动项目:是没有默认的用户和账号的,是无法登录成功的。
- start 启动项目:含有默认的用户和账号,就是账号: admin user ; 密码为:ant.design
由于 Ant Desgin Pro 版本的更新:这里我们使用的方式是:
通过先从 github,拷贝一份下来,然后再执行
npm install的方式:参考文档如下:Ant Design Pro 安装和配置指南-CSDN博客
GitHub 对应的地址:Forbidden · GitHub
Ant Design Pro
E:\Java\project\用户中心项目>yarn create umi myapp
yarn 包管理器 “样”和 npm 差不多,比 npm 更快一些
yarn -v
yarn 的安装;百度
或者是
npm i yarn -g
初始化项目
yarn create umi myapp
package.json 当中有一个 dependencies 当中记录了我们所需要的所有依赖内容。
所以直接用 yarn 就可以读取到这个内容上依赖内容了,就可以自动安装上相关的依赖了。
start:dev 无法登录 mock=none 就是没有数据了,没有后台,就无法登录了。
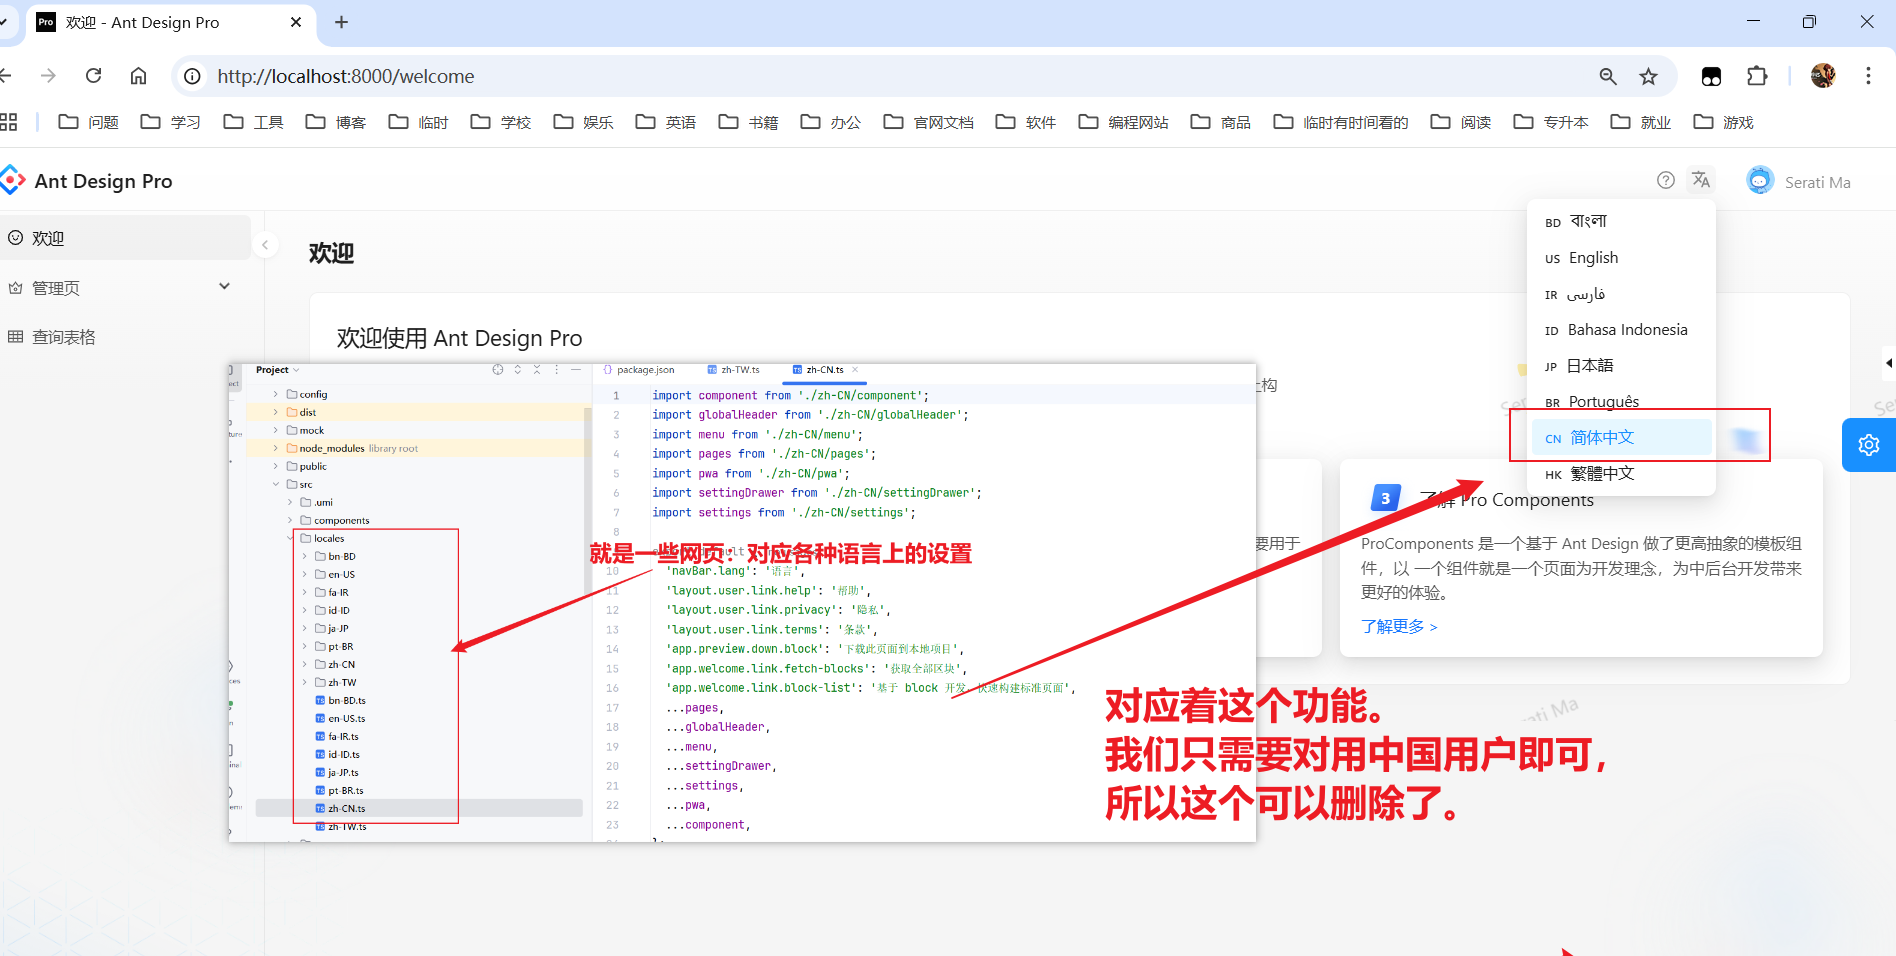
开启 Umi UI
安装 Umi UI
yarn add @umijs/preset-ui -D
就是一个 git pull 拉取
yarn 的安装教程
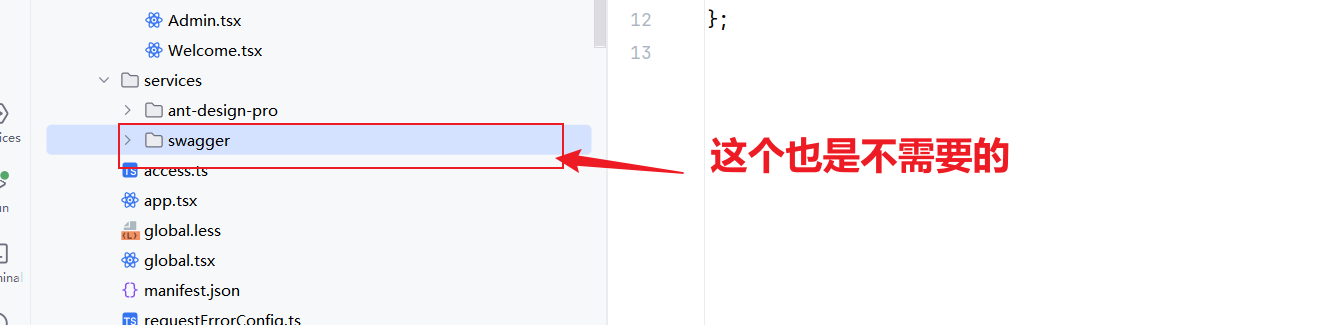
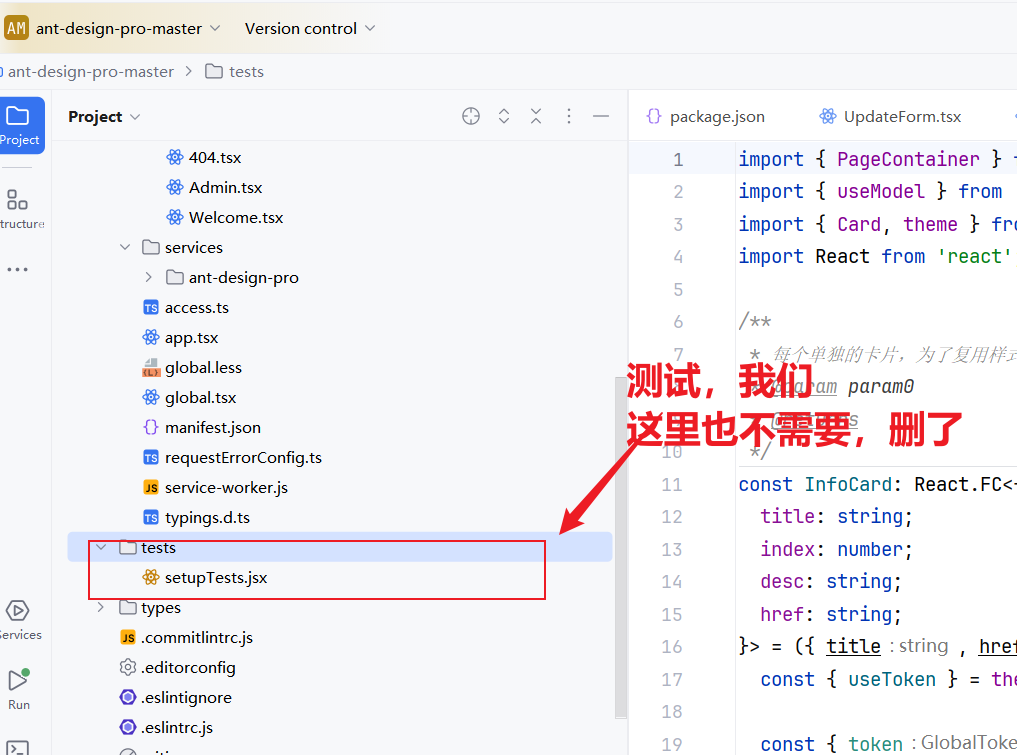
瘦身
- 移除国际化:i18n-remove 国际化 18 个单词 local 删除
- e2e 测试——删除
- DashboardAnalysis 数据——删除
补充:eslintrc.js 是一个代码格式,防止写烂代码
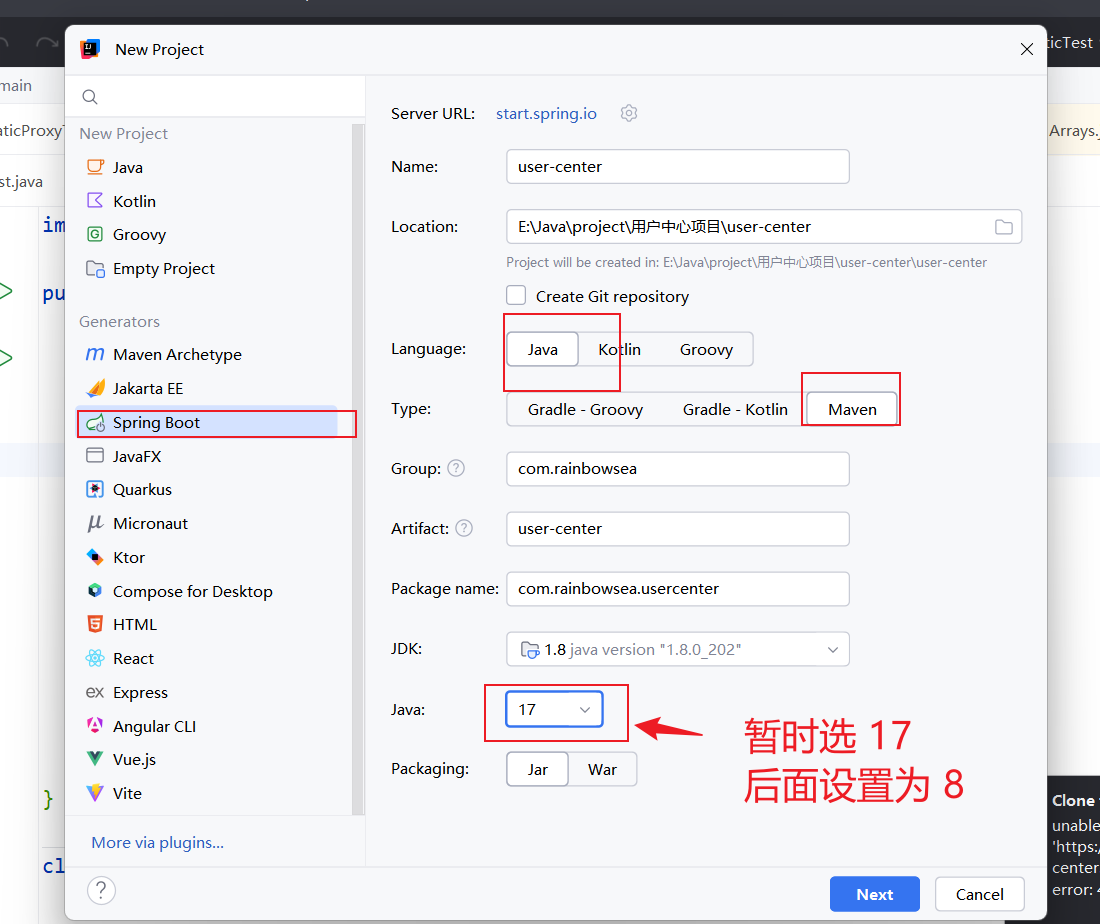
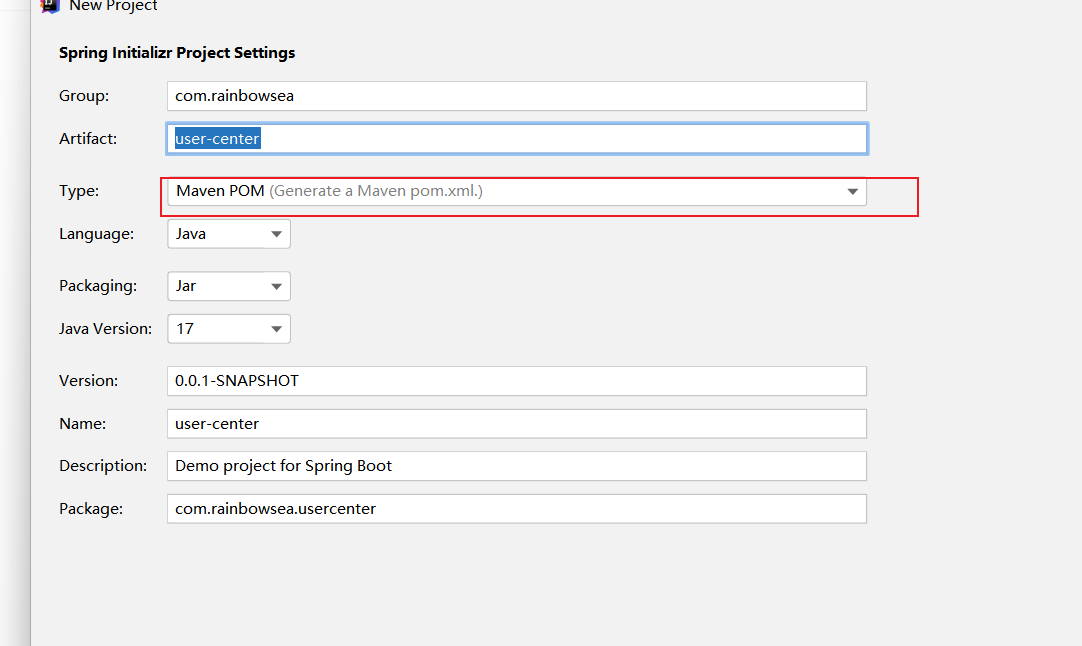
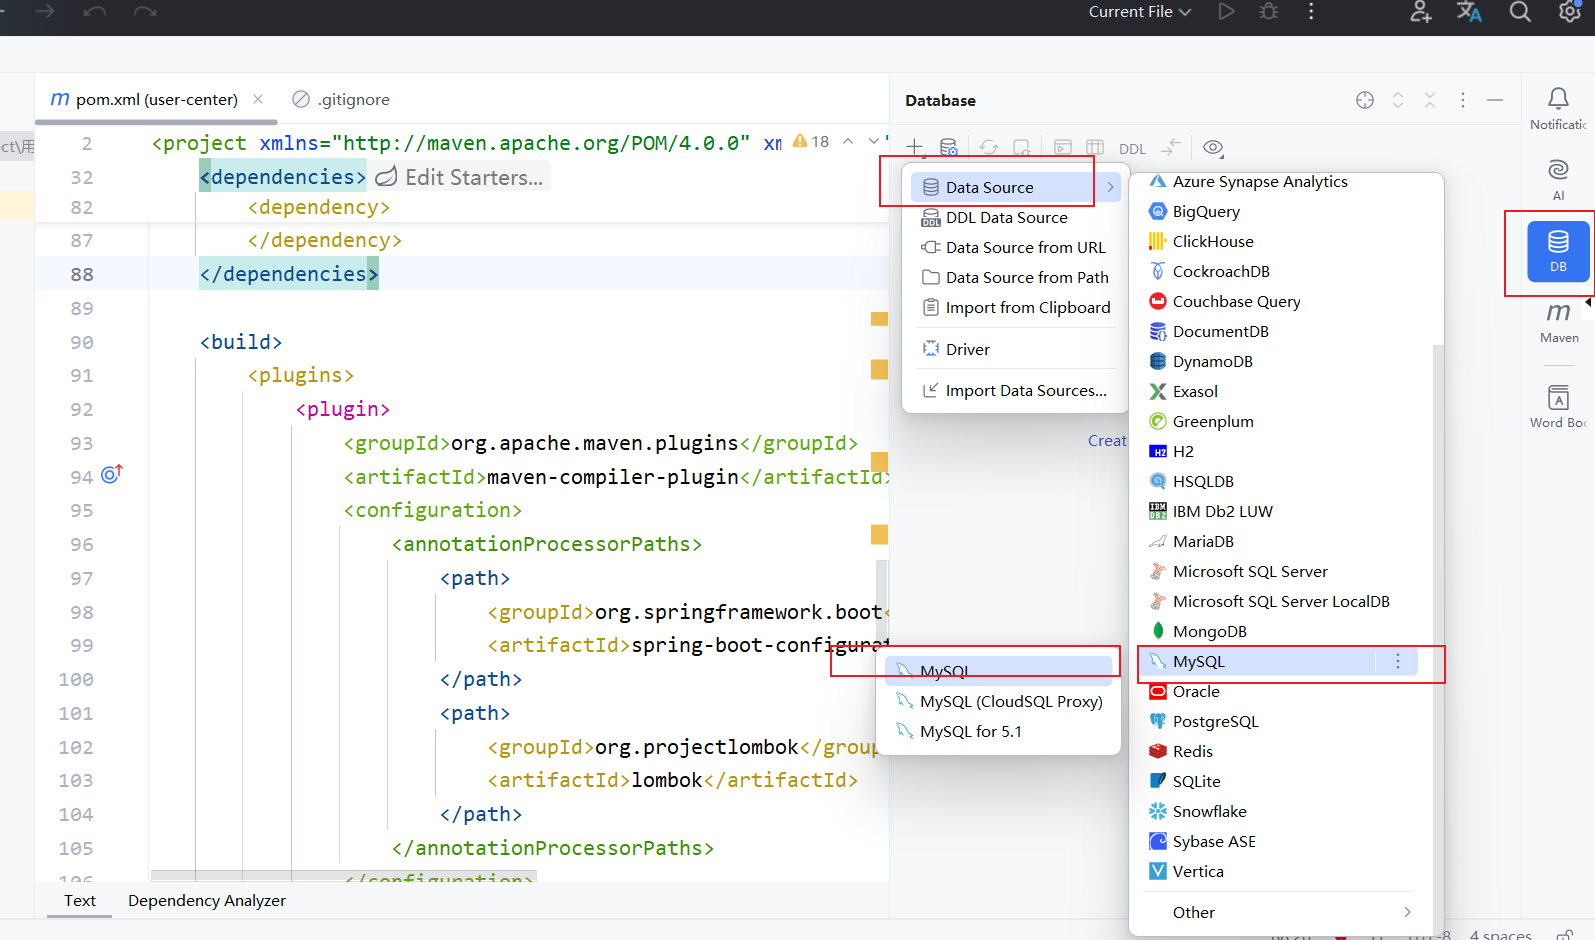
配置后端
MySQL5.7
快速初始化:SpringBoot 项目,三种方式
- gitHub : springboot-templates 模板 拉取(不建议,可能存在不好的代码),而且可能你是在后面才发现
- 使用 Spring Boot 官方模板生成器:https://start.spring.io/
- 直接在 IDEA 开发工具中生成
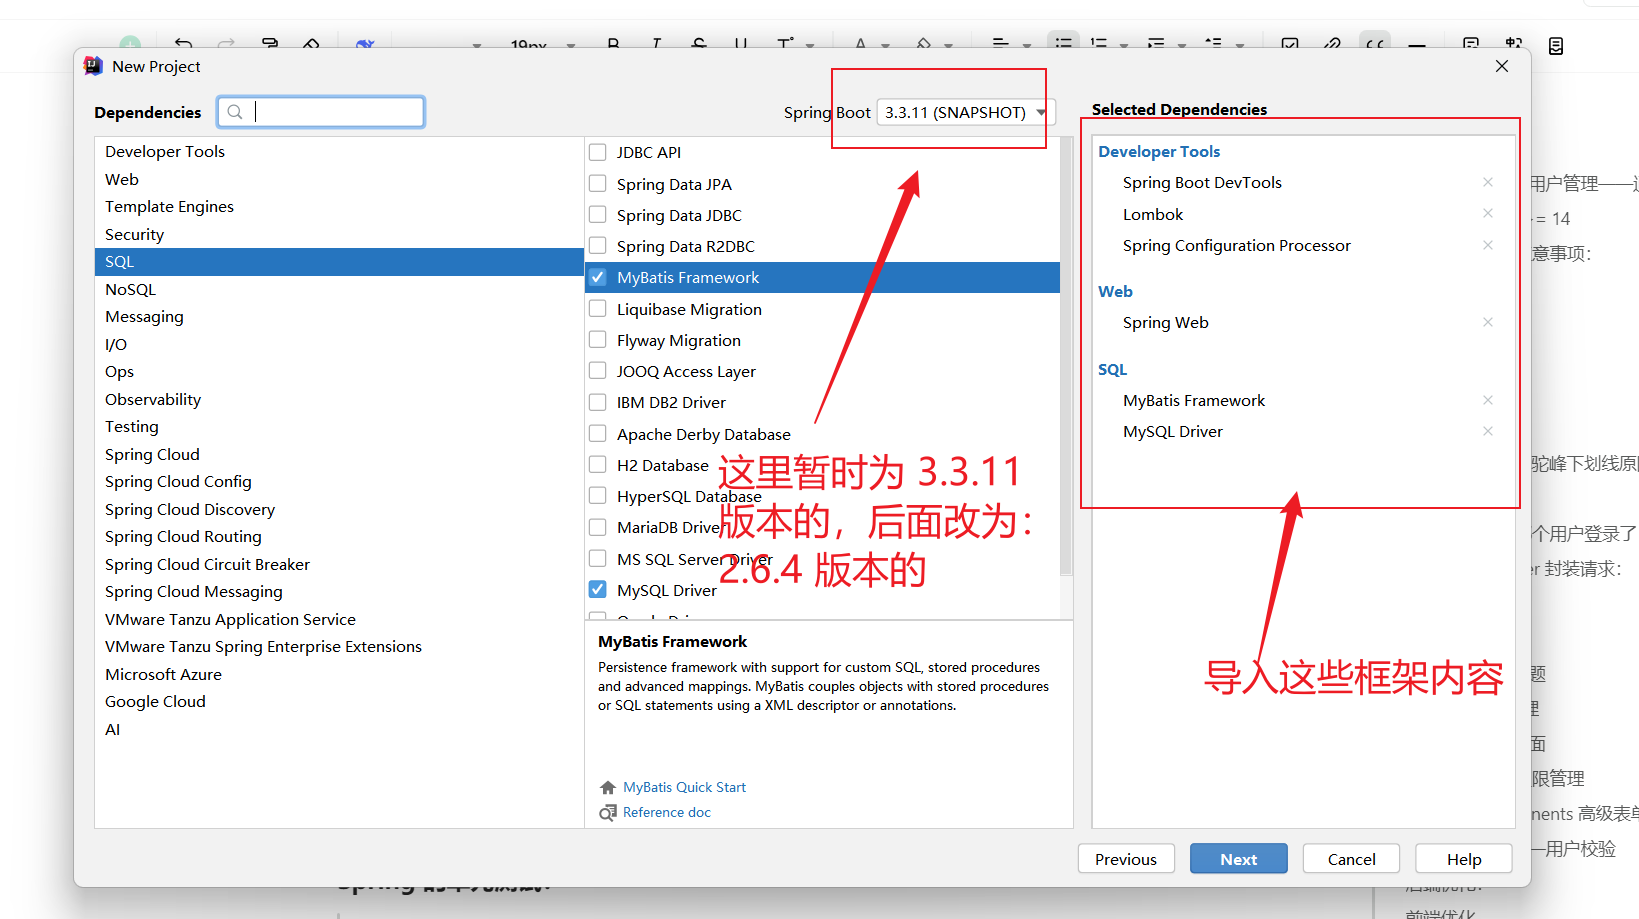
如果要引入java的包,可以去 maven 中心仓库寻找(http://mvnrepository.com/))
- Spring Boot DevTools 热更新,就是我们修改了代码,会自动更新重启项目
- Spring Configuration Processor 读取配置文件时有用的
- Spring 依赖注入框架,帮助你管理 Java 对象,集成一些其它的内容
- SpringMVC web 框架,提供接口访问,restful 接口等能力
- Mybaits Java 操作数据库的框架,持久层框架,对 jdbc 的封装
- mybatis-plus 对 mybaits 的增强,不用写 sql 也能实现增删改查
- SpringBoot(不用自己管理 Spring 配置,不用自己整合各种框架,快速启动/快速集成项目,不用自己整合各种框架)。比如:Spring,SpringMVC Mybaits 的工具,Spring Boot 就是对它们进行自动组装,集成一个开关(Spring Boot 就是一个开关 Logo),快速启动
Spring 的单元测试:
- 在测试类上添加:
@ RunWith(SpringRunner.class)注解- 在测试方法上使用
@ Test当中是org.junit.jupiter.api包下的 Test 就可以,自动帮我们启动 spring Boot 当中的项目类了。
在 pom.xml 文件当中导入相关的 xml文件信息
<?xml version="1.0" encoding="UTF-8"?>
<project xmlns="http://maven.apache.org/POM/4.0.0" xmlns:xsi="http://www.w3.org/2001/XMLSchema-instance"xsi:schemaLocation="http://maven.apache.org/POM/4.0.0 https://maven.apache.org/xsd/maven-4.0.0.xsd"><modelVersion>4.0.0</modelVersion><parent><groupId>org.springframework.boot</groupId><artifactId>spring-boot-starter-parent</artifactId><version>2.6.4</version><relativePath/> <!-- lookup parent from repository --></parent><groupId>com.rainbowsea</groupId><artifactId>user-center</artifactId><version>0.0.1-SNAPSHOT</version><name>user-center</name><description>Demo project for Spring Boot</description><url/><licenses><license/></licenses><developers><developer/></developers><scm><connection/><developerConnection/><tag/><url/></scm><properties><java.version>1.8</java.version></properties><dependencies><dependency><groupId>org.springframework.boot</groupId><artifactId>spring-boot-starter-web</artifactId></dependency><dependency><groupId>org.mybatis.spring.boot</groupId><artifactId>mybatis-spring-boot-starter</artifactId><version>2.2.2</version></dependency><dependency><groupId>com.baomidou</groupId><artifactId>mybatis-plus-boot-starter</artifactId><version>3.5.1</version></dependency><dependency><groupId>org.springframework.boot</groupId><artifactId>spring-boot-devtools</artifactId><scope>runtime</scope><optional>true</optional></dependency>
<!--        <dependency>-->
<!--            <groupId>com.mysql</groupId>-->
<!--            <artifactId>mysql-connector-j</artifactId>-->
<!--            <scope>runtime</scope>-->
<!--        </dependency>--><!-- https://mvnrepository.com/artifact/mysql/mysql-connector-java --><dependency><groupId>mysql</groupId><artifactId>mysql-connector-java</artifactId><version>8.0.28</version></dependency><dependency><groupId>org.springframework.boot</groupId><artifactId>spring-boot-configuration-processor</artifactId><optional>true</optional></dependency><dependency><groupId>org.projectlombok</groupId><artifactId>lombok</artifactId><optional>true</optional></dependency><dependency><groupId>org.springframework.boot</groupId><artifactId>spring-boot-starter-test</artifactId><scope>test</scope></dependency><dependency><groupId>org.mybatis.spring.boot</groupId><artifactId>mybatis-spring-boot-starter-test</artifactId><version>3.0.4</version><scope>test</scope></dependency></dependencies><build><plugins><plugin><groupId>org.apache.maven.plugins</groupId><artifactId>maven-compiler-plugin</artifactId><configuration><annotationProcessorPaths><path><groupId>org.springframework.boot</groupId><artifactId>spring-boot-configuration-processor</artifactId></path><path><groupId>org.projectlombok</groupId><artifactId>lombok</artifactId></path></annotationProcessorPaths></configuration></plugin><plugin><groupId>org.springframework.boot</groupId><artifactId>spring-boot-maven-plugin</artifactId><configuration><excludes><exclude><groupId>org.projectlombok</groupId><artifactId>lombok</artifactId></exclude></excludes></configuration></plugin></plugins></build><repositories><repository><id>spring-snapshots</id><name>Spring Snapshots</name><url>https://repo.spring.io/snapshot</url><releases><enabled>false</enabled></releases></repository></repositories><pluginRepositories><pluginRepository><id>spring-snapshots</id><name>Spring Snapshots</name><url>https://repo.spring.io/snapshot</url><releases><enabled>false</enabled></releases></pluginRepository></pluginRepositories></project>
补充上:Junit 用于测试使用
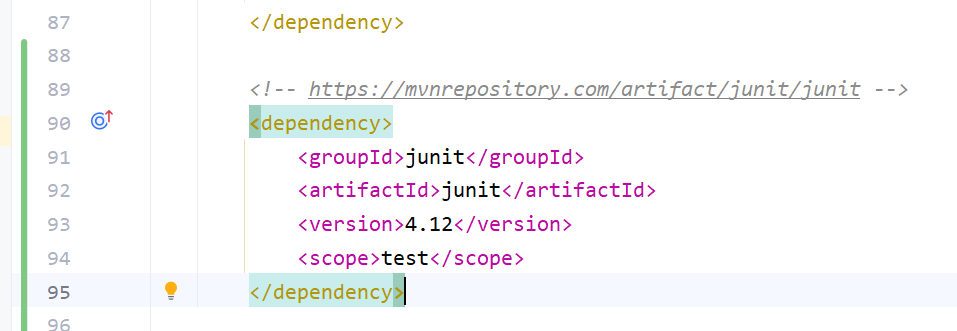
<!-- https://mvnrepository.com/artifact/junit/junit -->
<dependency><groupId>junit</groupId><artifactId>junit</artifactId><version>4.12</version><scope>test</scope>
</dependency>
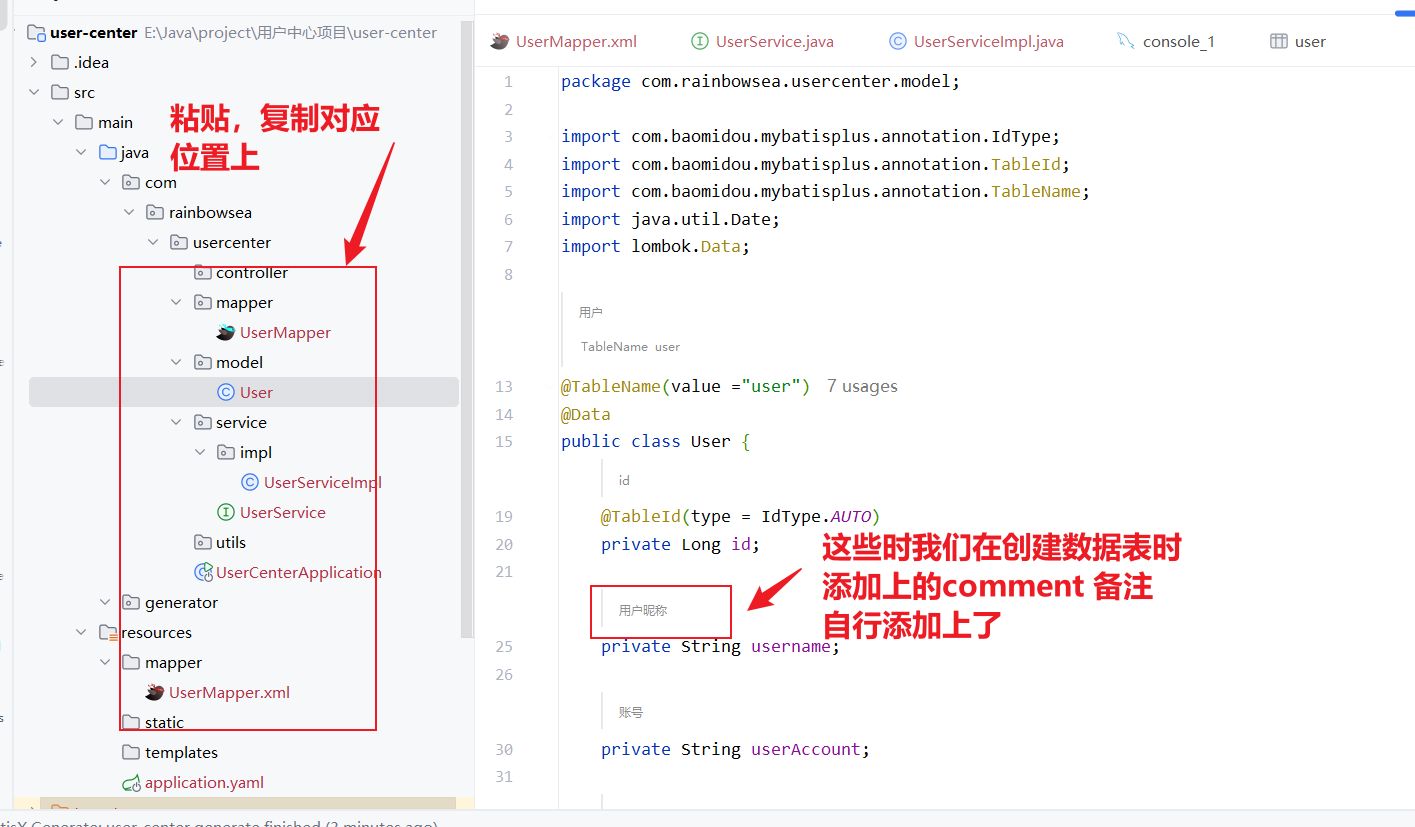
数据库设计
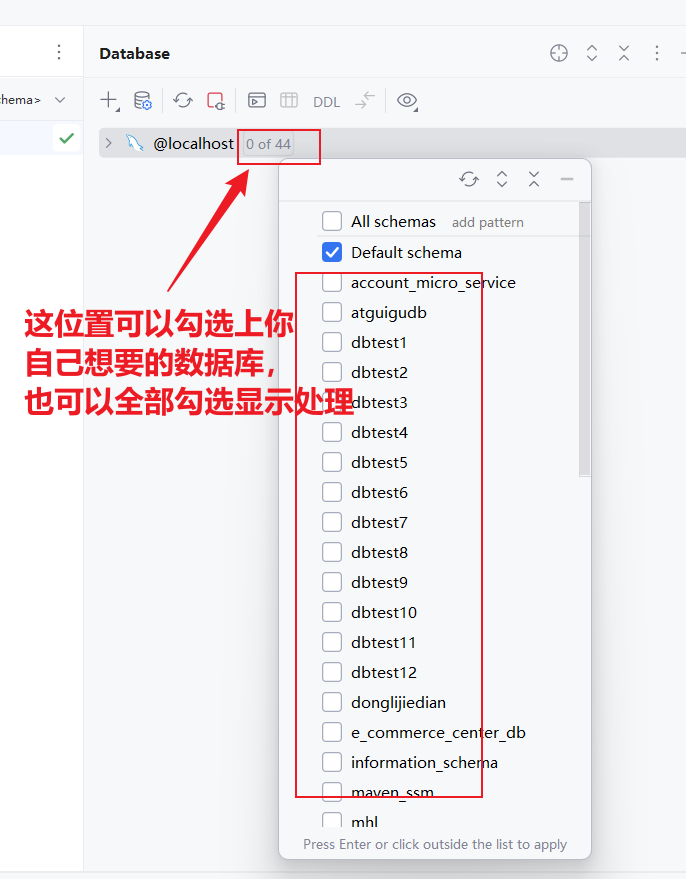
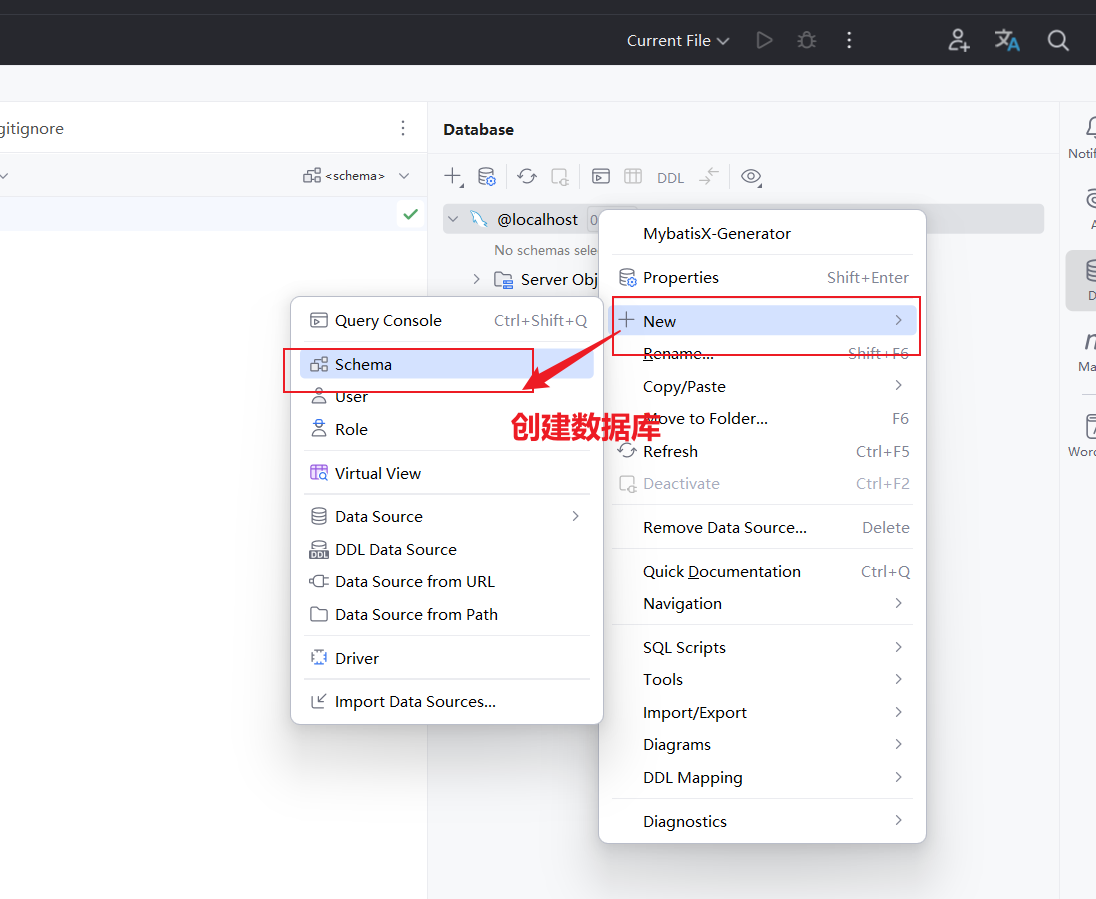
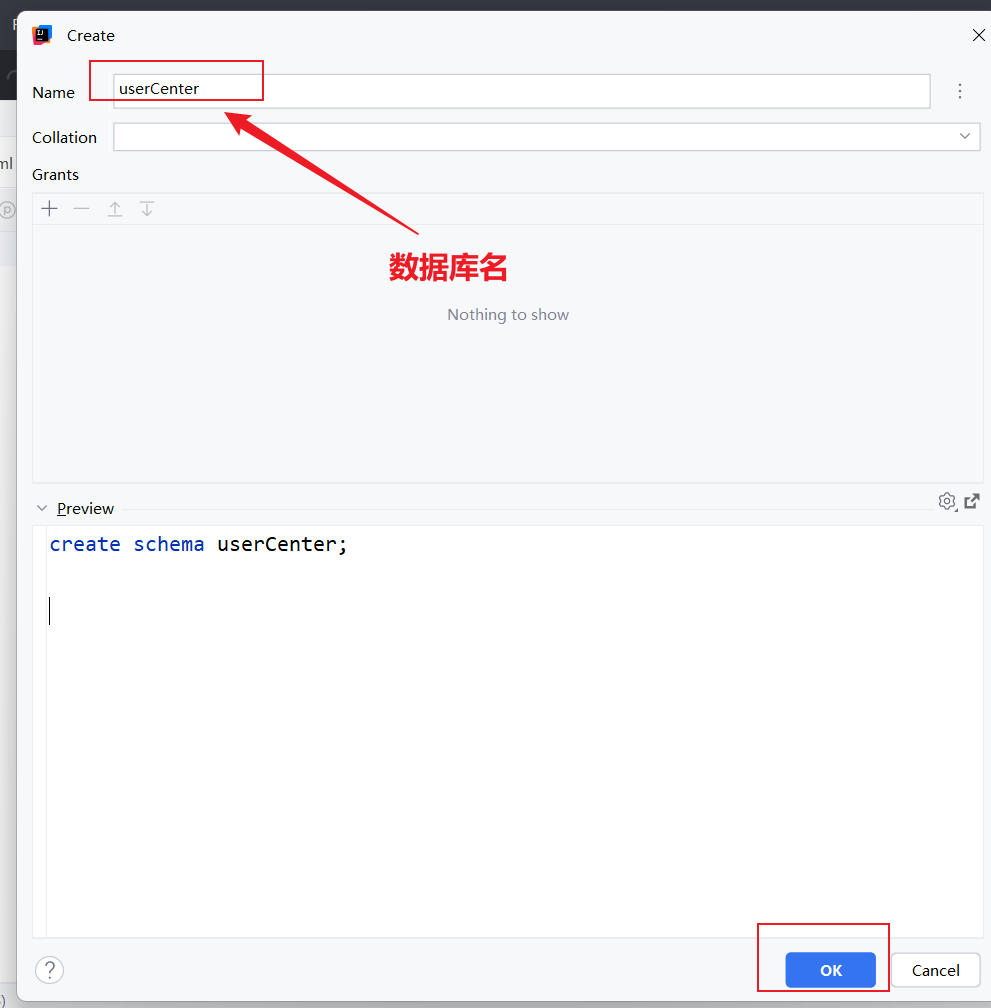
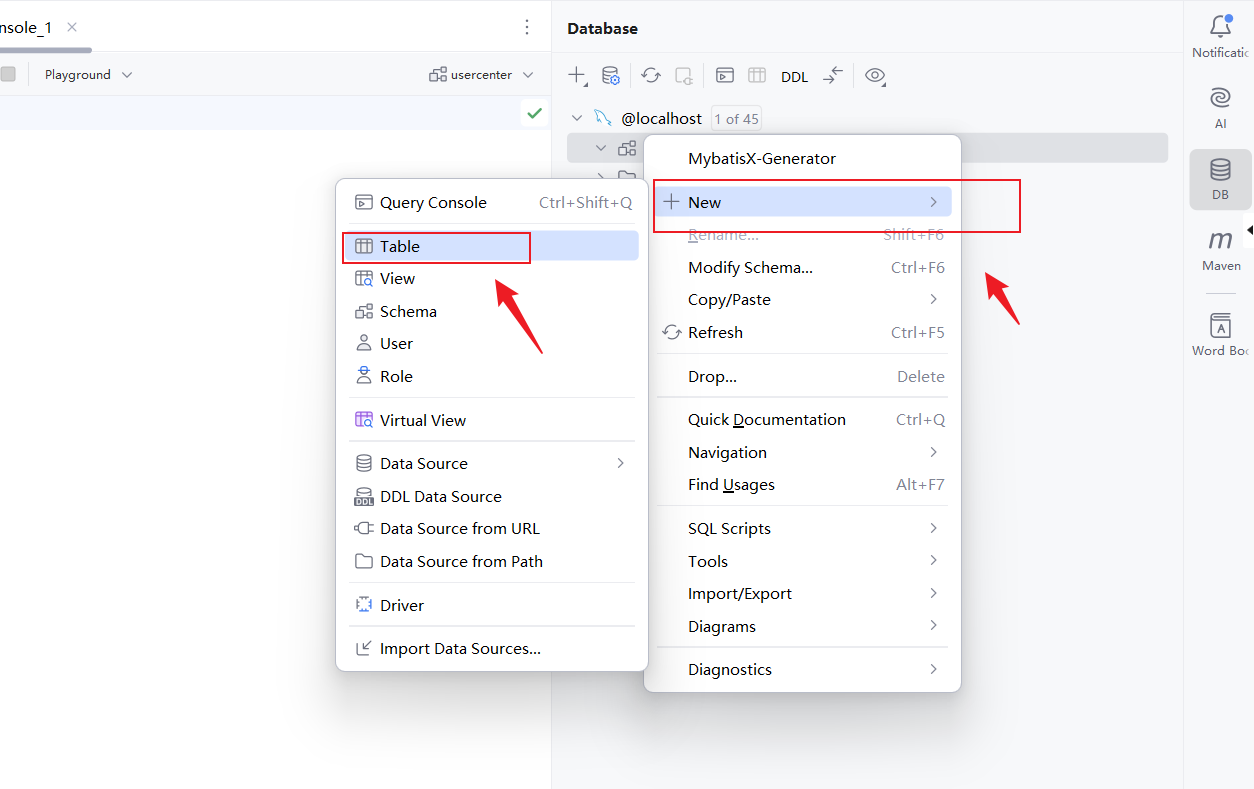
使用 IDEA 默认的工具,连接上本地数据库:
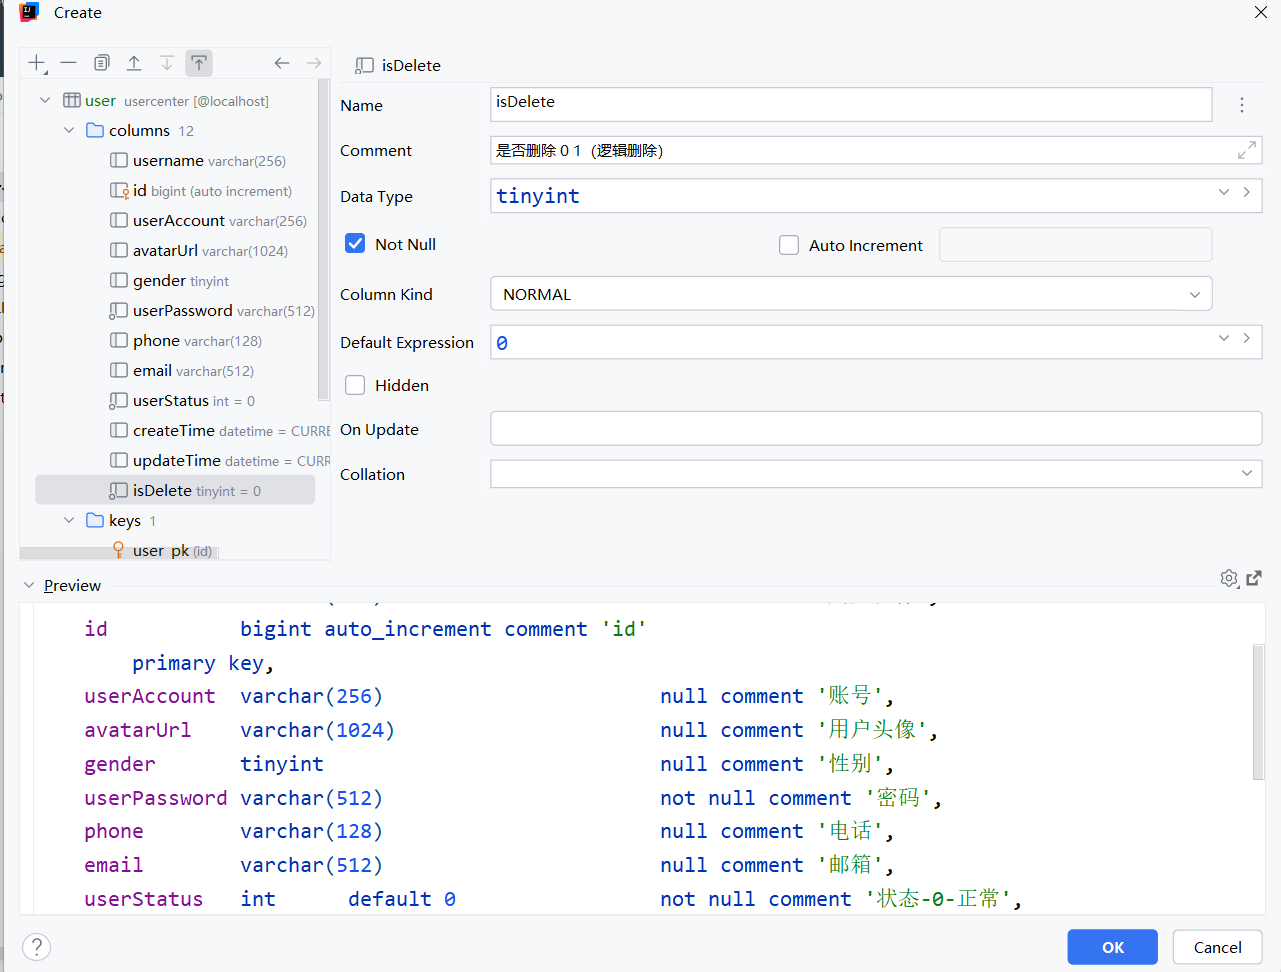
create table user
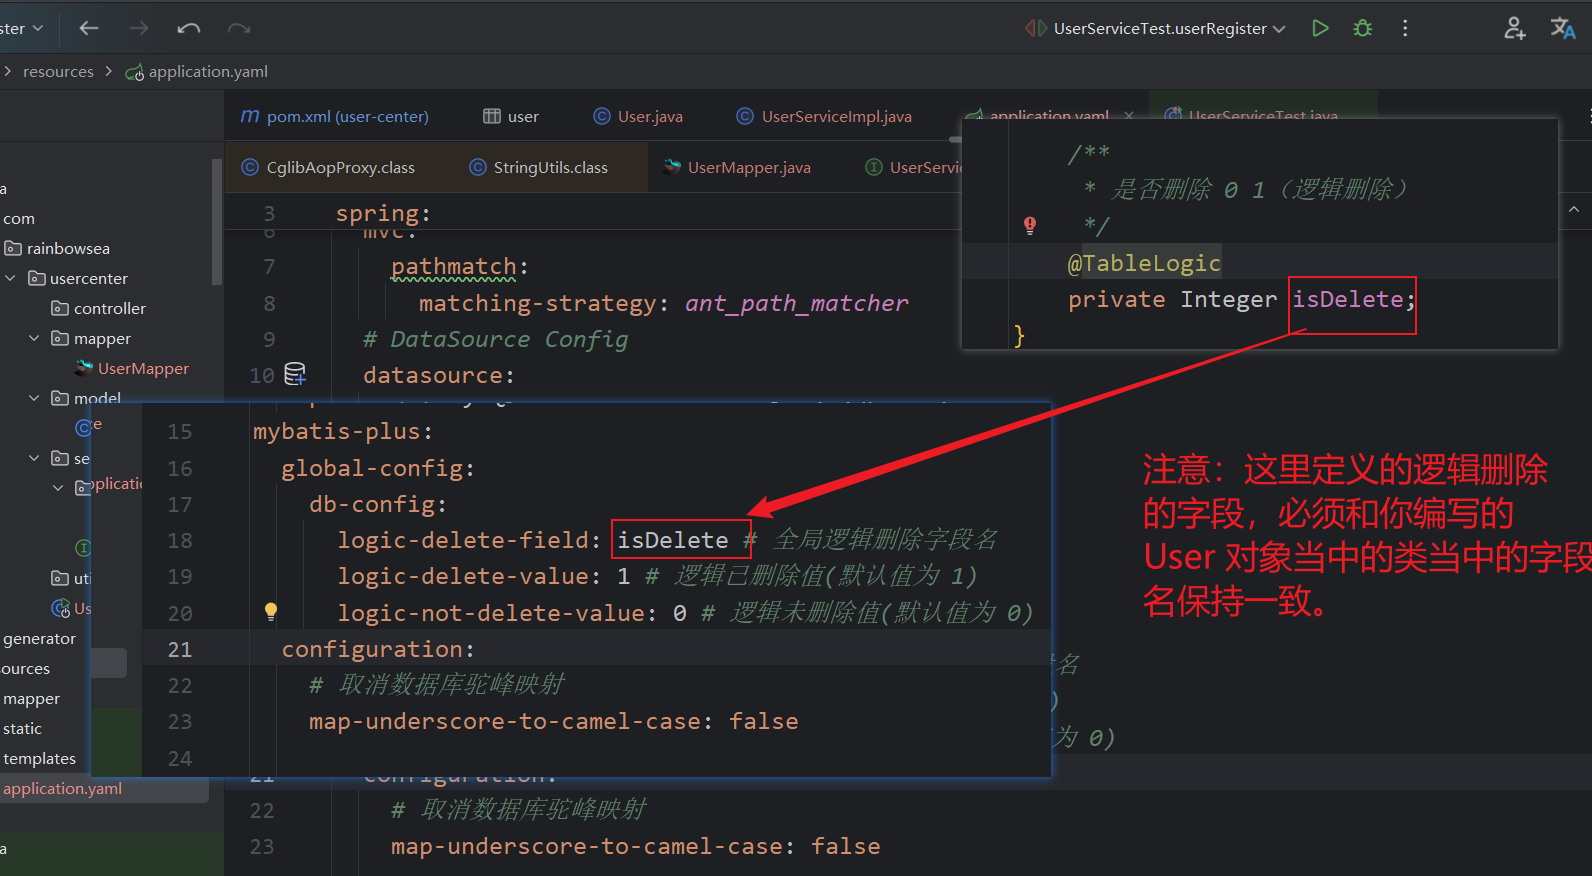
(username varchar(256) null comment '用户昵称',id bigint auto_increment comment 'id'primary key,userAccount varchar(256) null comment '账号',avatarUrl varchar(1024) null comment '用户头像',gender tinyint null comment '性别',userPassword varchar(512) not null comment '密码',phone varchar(128) null comment '电话',email varchar(512) null comment '邮箱',userStatus int default 0 not null comment '状态-0-正常',createTime datetime default CURRENT_TIMESTAMP null comment '创建时间',updateTime datetime default CURRENT_TIMESTAMP null comment '更新时间',isDelete tinyint default 0 not null comment '是否删除 0 1(逻辑删除)'
)comment '用户';id(主键)bigint
username 昵称 varchar
userAccount 登录账号
avatarUrl 头像 varchar
gender 性别 tinyint
userPassword 密码 varchar
phone 电话 varchar
email 邮箱 varchar
userStatus 用户状态 int 0 - 正常
createTime 创建时间(数据插入时间)datetime
updateTime 更新时间(数据更新时间)datetime
isDelete 是否删除 0 1(逻辑删除)tinyint
userRole 用户角色 0 - 普通用户 1 - 管理员- 业务上的删除,和与业务无关上的删除
MySQL 添加默认时间,两个默认时间
模型 user 对象-> 和数据库的字段关联上,使用自动生成,MyBatix(Enadled)
Actual Column 生成实体对象的属性是一致的勾选上的话
测试“包”尽量和开发的“包”保持一致,不然,有时路径包的不同,可能存在错误。
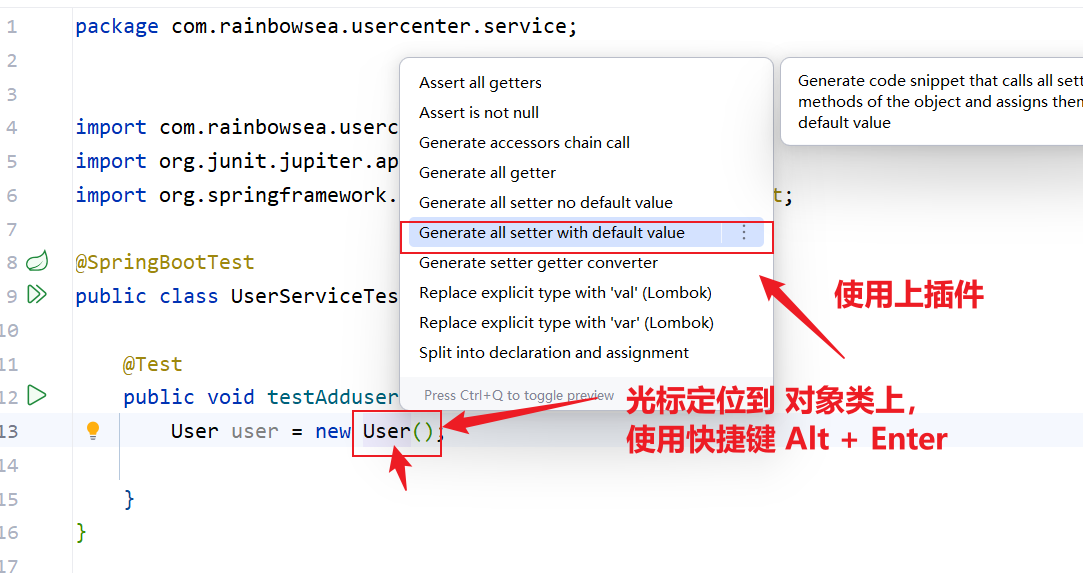
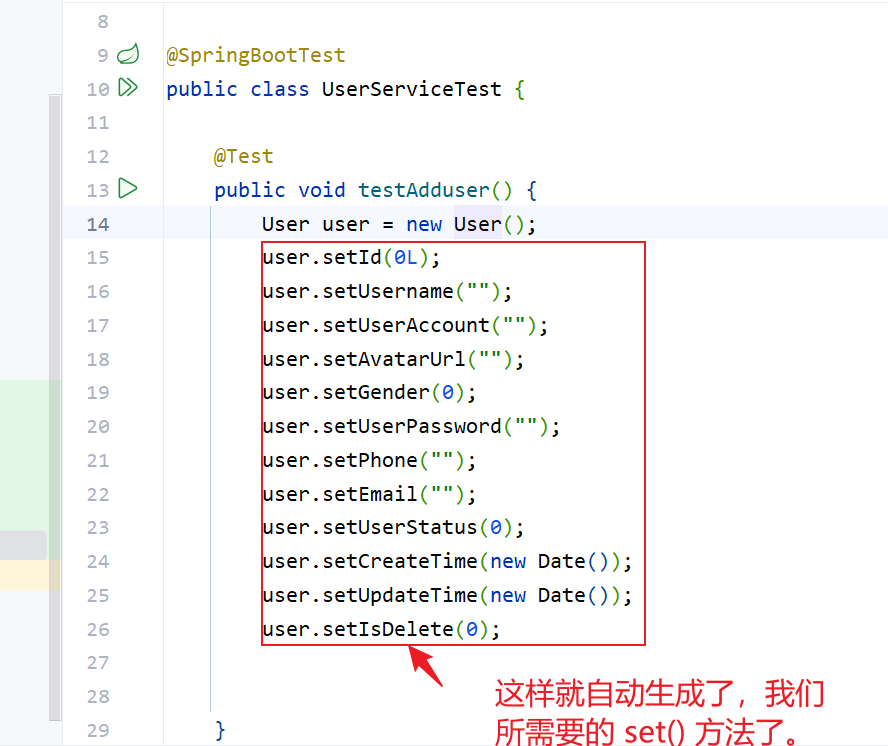
Springboot 测试类(@ Test org.junit.jupitor.api.Test)
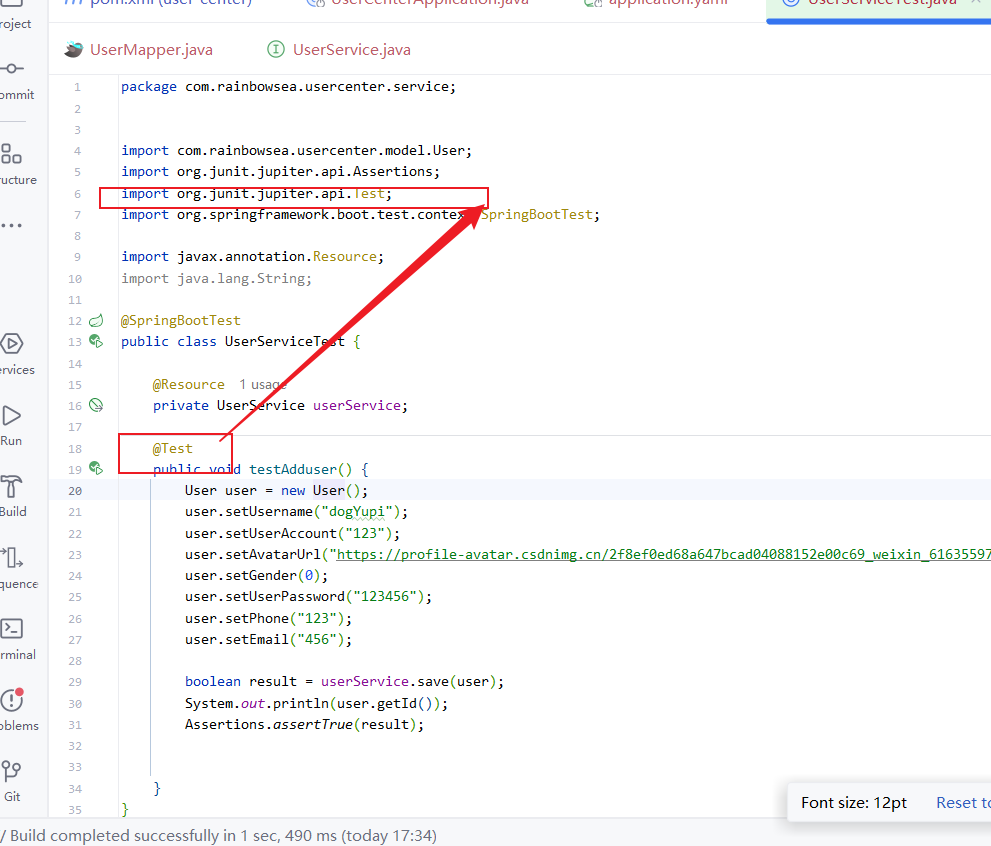
package com.rainbowsea.usercenter.service;import com.rainbowsea.usercenter.model.User;
import org.junit.jupiter.api.Assertions;
import org.junit.jupiter.api.Test;
import org.springframework.boot.test.context.SpringBootTest;import javax.annotation.Resource;
import java.lang.String;@SpringBootTest
public class UserServiceTest {@Resourceprivate UserService userService;@Testpublic void testAdduser() {User user = new User();user.setUsername("dogYupi");user.setUserAccount("123");user.setAvatarUrl("https://profile-avatar.csdnimg.cn/2f8ef0ed68a647bcad04088152e00c69_weixin_61635597.jpg!1");user.setGender(0);user.setUserPassword("123456");user.setPhone("123");user.setEmail("456");boolean result = userService.save(user);System.out.println(user.getId());Assertions.assertTrue(result);}
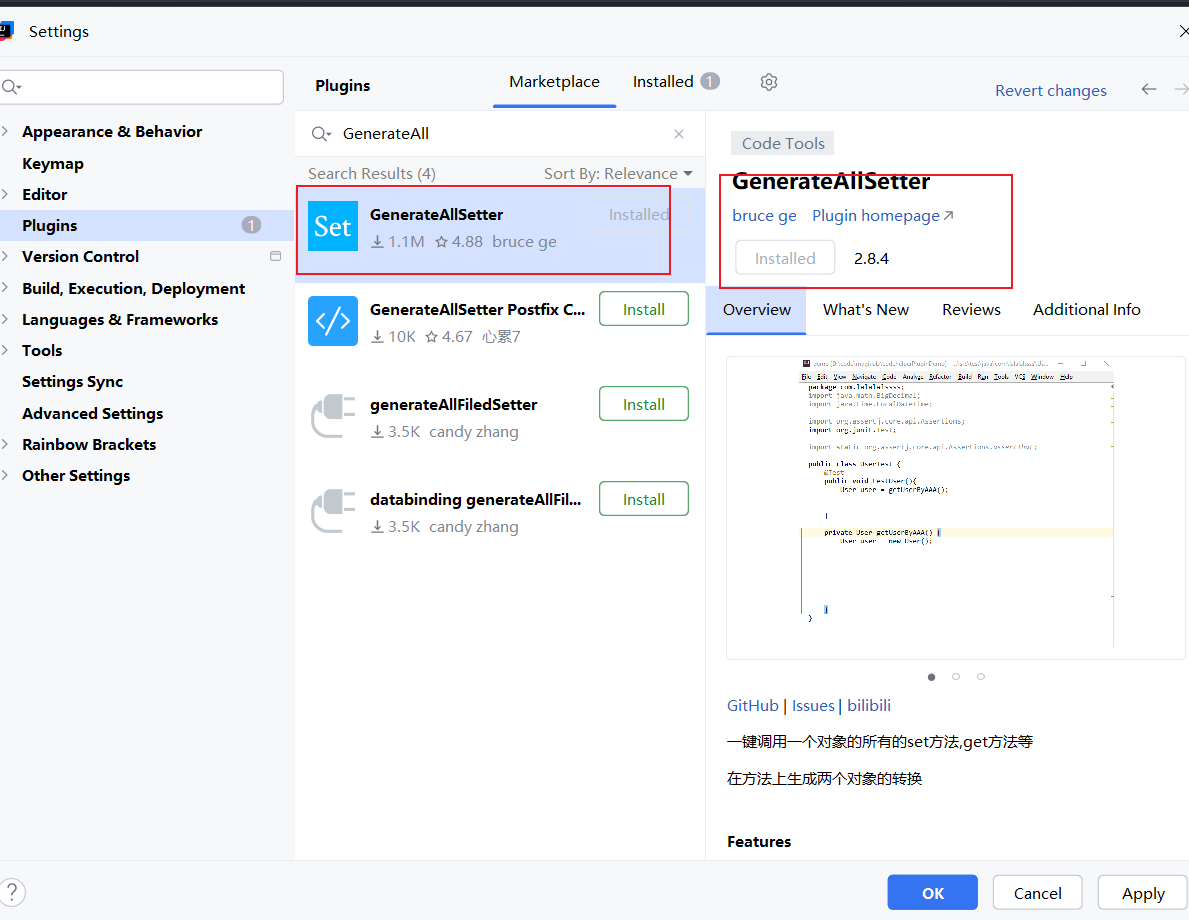
}插件 ( Generate All setter Enalbed 生成 set 方法,进行赋值)
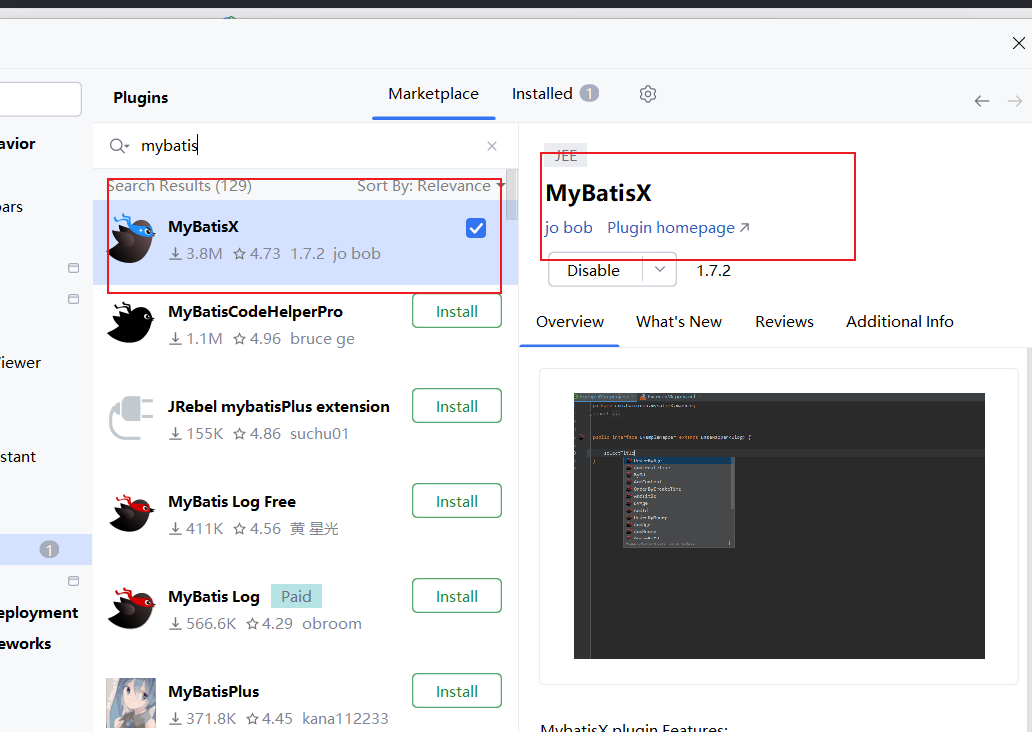
MyBatisX IDEA 插件的详细使用:

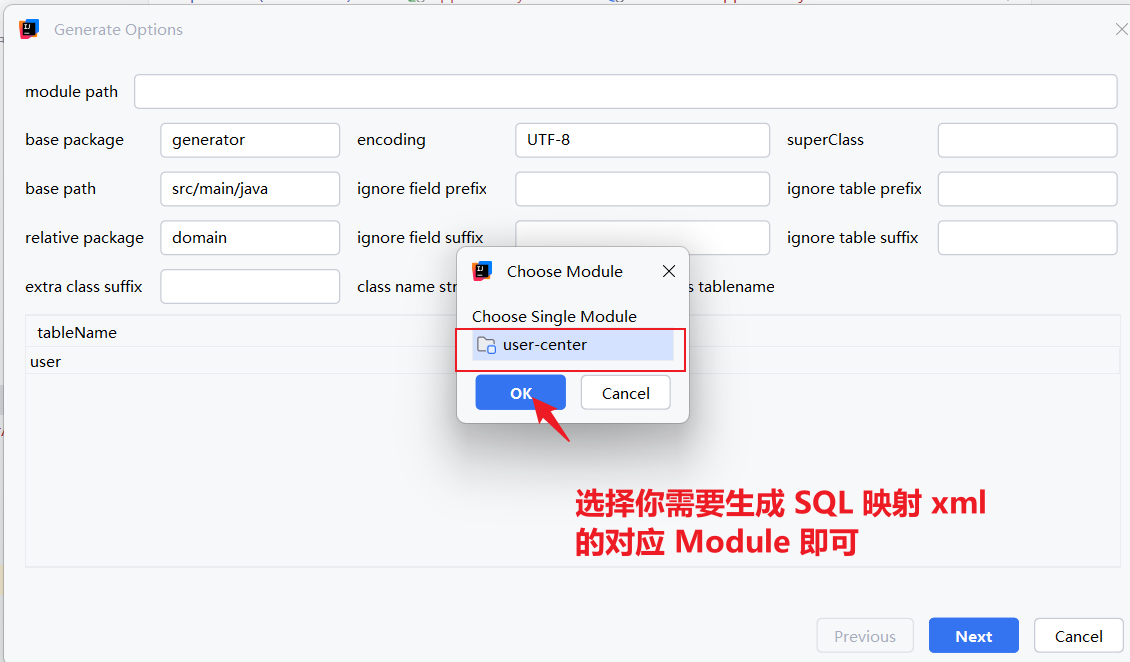
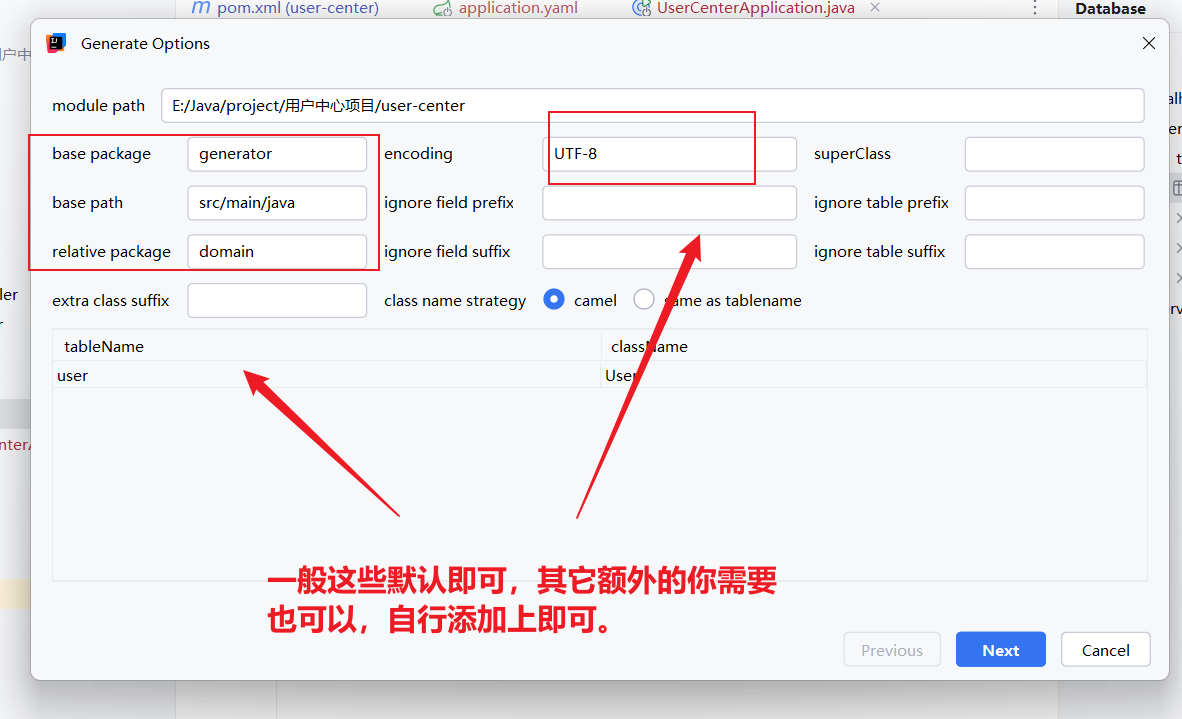
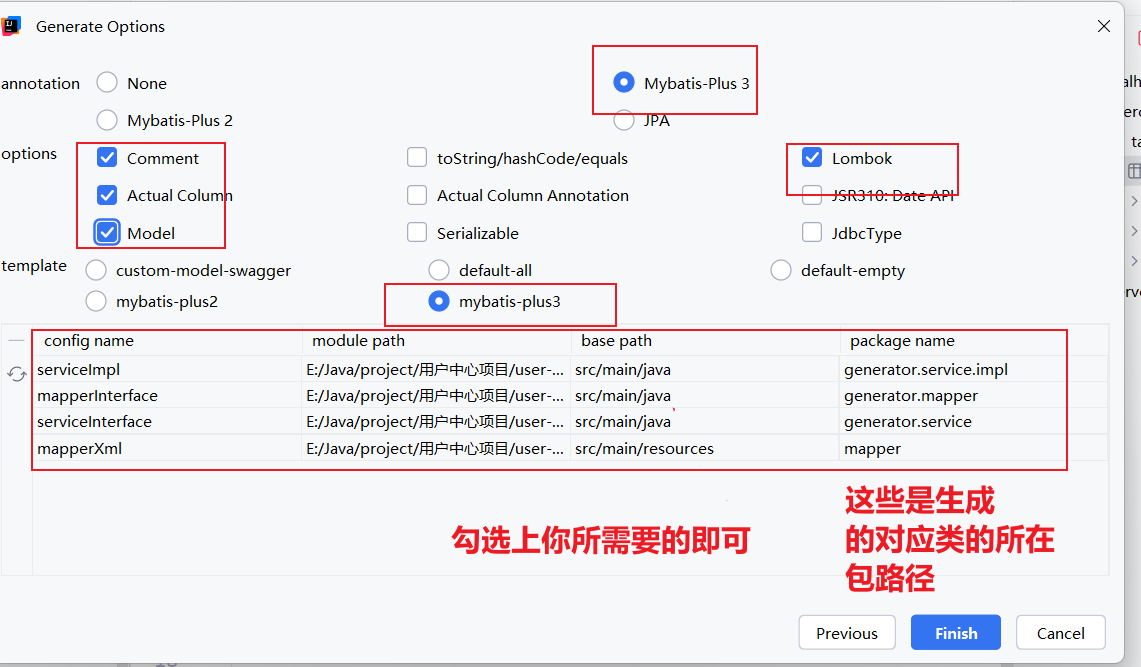
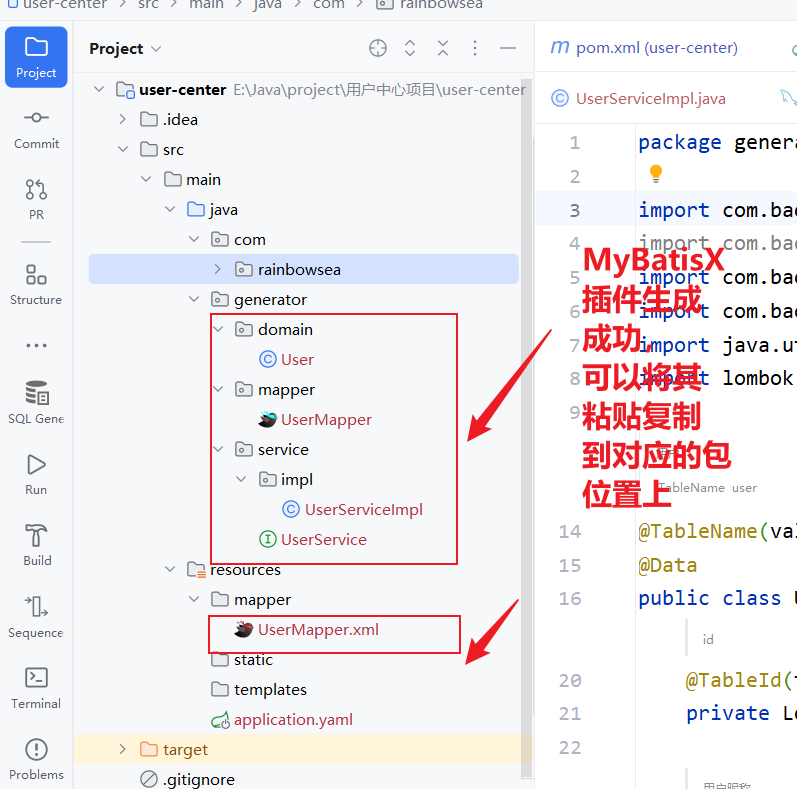
IDEA GenerateAllSetter
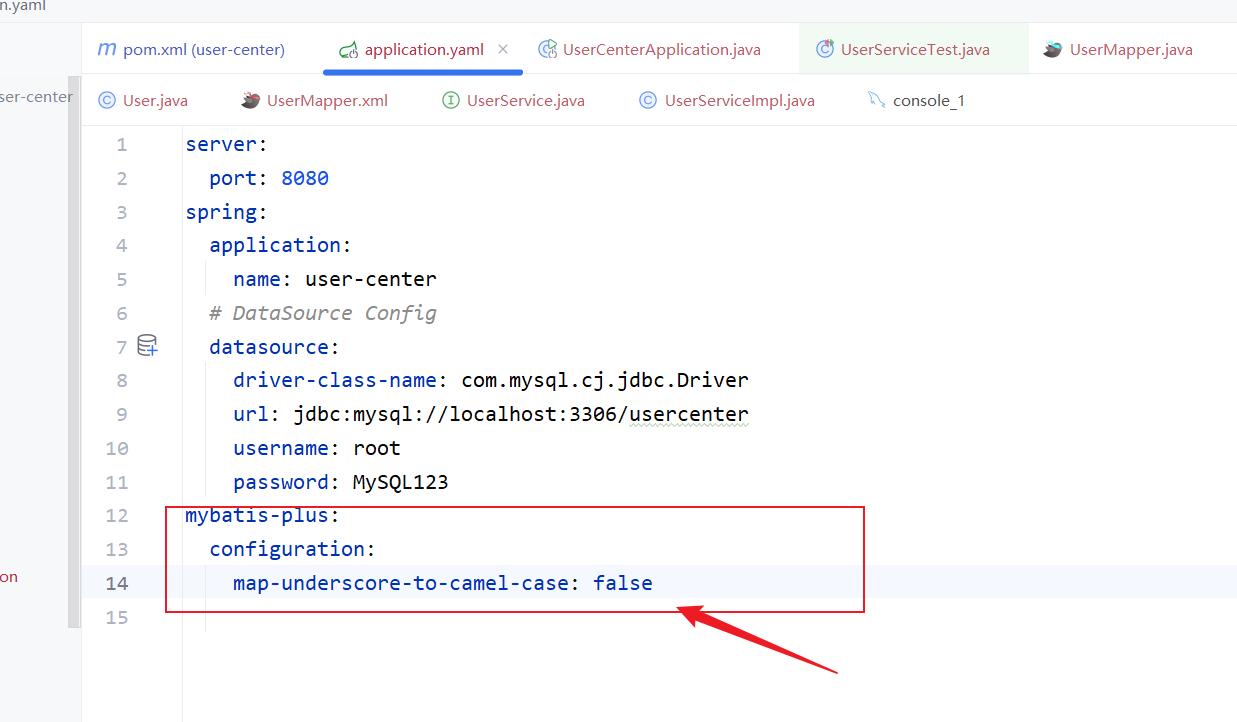
Mabiats-Plus 驼峰下划线原因报错
map-underscore-to-conmel-case : false
# 默认是 true 表示开启了 将数据表当中的下划线转换为了驼峰映射。
如果你的数据库已经是驼峰命名了字段,那么就需要设置为 false 不然,会报错找不到
prsf 可以快速打出常量;
限流,在某一台 IP,登录太多了,就限制一下。不过做过度设计。
Sl4fi 是 在 Lomack 当中的,log.inof(“建议用英文,这样可以使用任何接口读取 日志,不会有中文乱码”)
用户注册逻辑
注册逻辑:
- 校验用户账号和密码是否合法。
- 非空
- 账号长度不小于 4 位
- 密码就不小于 8 位
- 账号不包含特殊字符
- 校验密码是否输入正确,要和数据库中的密文密码去对比,密码就是需要加密,永远不需要对密码解密的操作。
- 用户脱敏,隐藏敏感信息,防止数据库中的字段泄露
- 我们要记录用户的登录态(session),将其存到服务器上(用后端 Spring Boot 框架封装的服务器 tomcat 去记录) cookie
- 返回脱敏后的用户信息。
- 特别的: 当校验的过程中存在查询数据库,连接数据库,将其验证放入到校验的最后面,因为连接数据库所消耗的资源,比较大,所以将其放后面。
用户 脱敏
不脱敏的话,你返回给前端的数据就是,实实在在从后端库当中拿取到的,一些敏感的数据了,脱敏这里:新 new 一个对象,重新 set 设置,你要返回给前端的信息即可,不想返回的,set 设置为 默认的即可。
补充:commons-lang3 工具类,用于对内容上的校验:
该类当中封装了,需要有用的工具类。比如:这里使用上的:
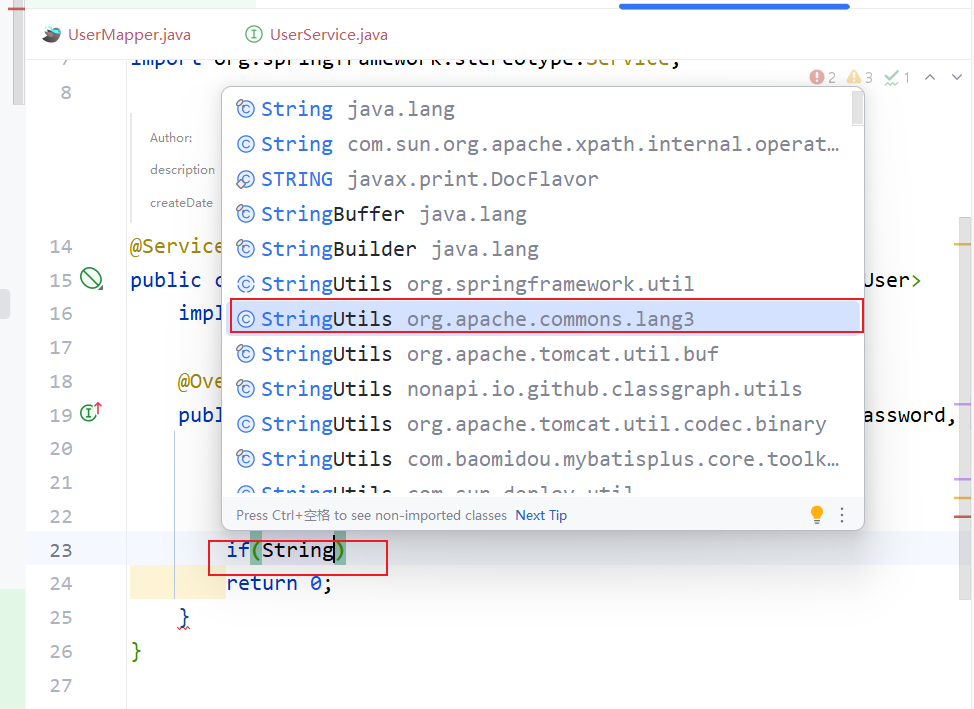
<!-- https://mvnrepository.com/artifact/org.apache.commons/commons-lang3 -->
<dependency><groupId>org.apache.commons</groupId><artifactId>commons-lang3</artifactId><version>3.12.0</version>
</dependency>
package com.rainbowsea.usercenter.service.impl;import com.baomidou.mybatisplus.extension.service.impl.ServiceImpl;
import com.rainbowsea.usercenter.model.User;
import com.rainbowsea.usercenter.service.UserService;
import com.rainbowsea.usercenter.mapper.UserMapper;
import org.apache.commons.lang3.StringUtils;
import org.springframework.stereotype.Service;/*** @author huo* @description 针对表【user(用户)】的数据库操作Service实现* @createDate 2025-04-14 16:03:21*/
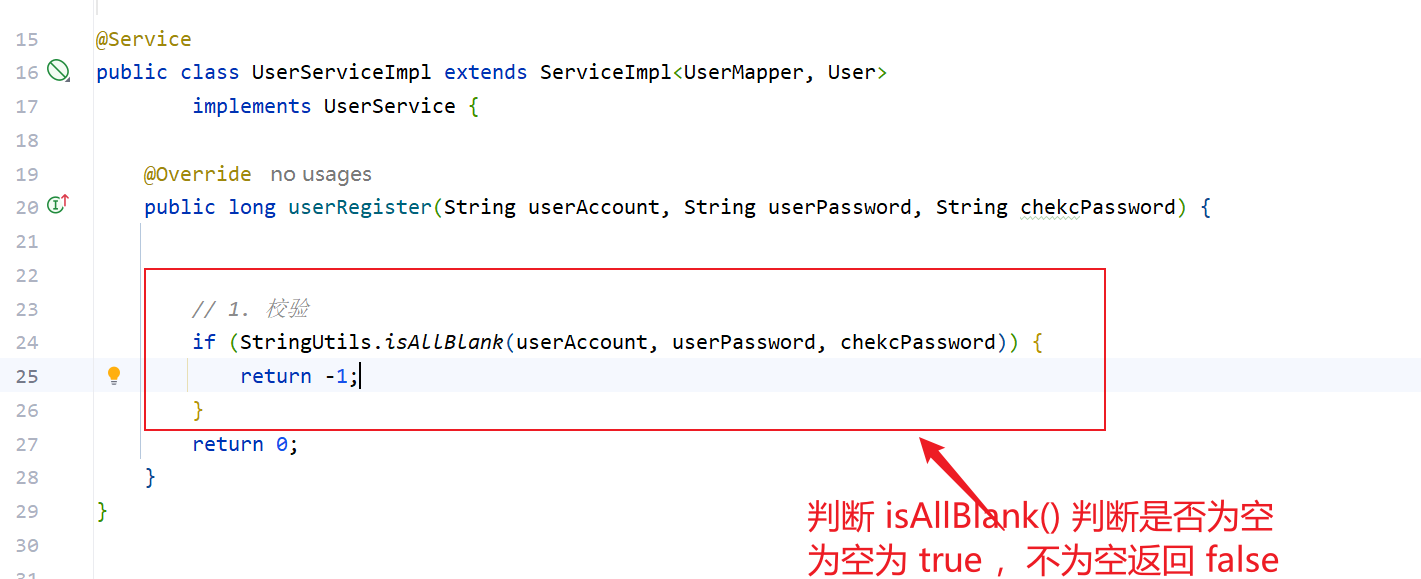
@Service
public class UserServiceImpl extends ServiceImpl<UserMapper, User>implements UserService {@Overridepublic long userRegister(String userAccount, String userPassword, String chekcPassword) {// 1. 校验if (StringUtils.isAllBlank(userAccount, userPassword, chekcPassword)) {return -1;}return 0;}
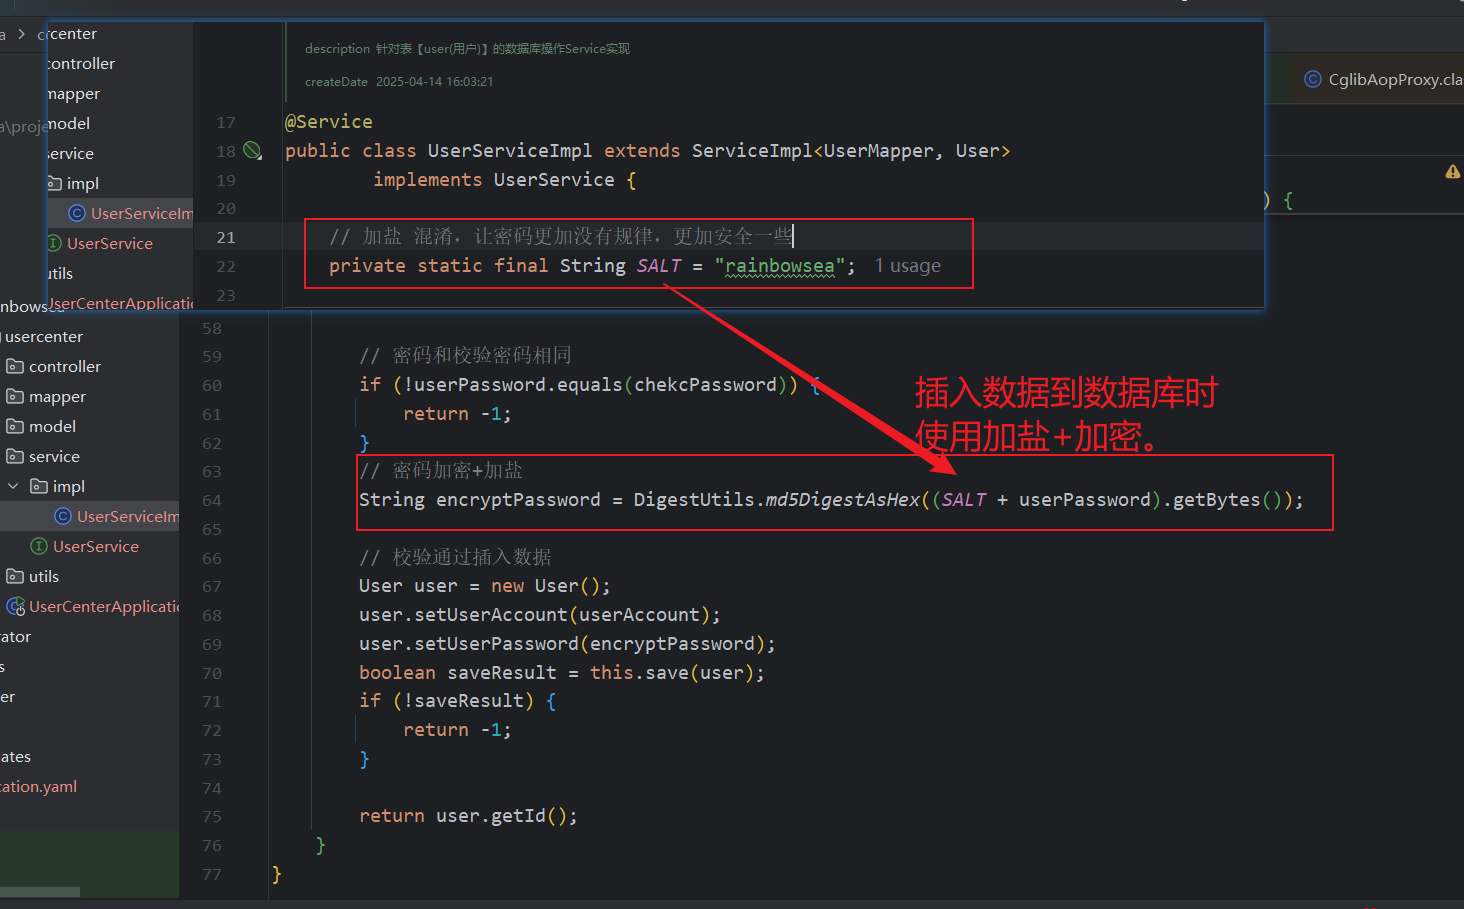
}密码必须加密,不可以明文存储,必须加密,并且永远不需要对密码解密。这里我们使用的加密工具是一个 **DigestUtils** 工具类。是在 org.springframework.util.DigestUtils。
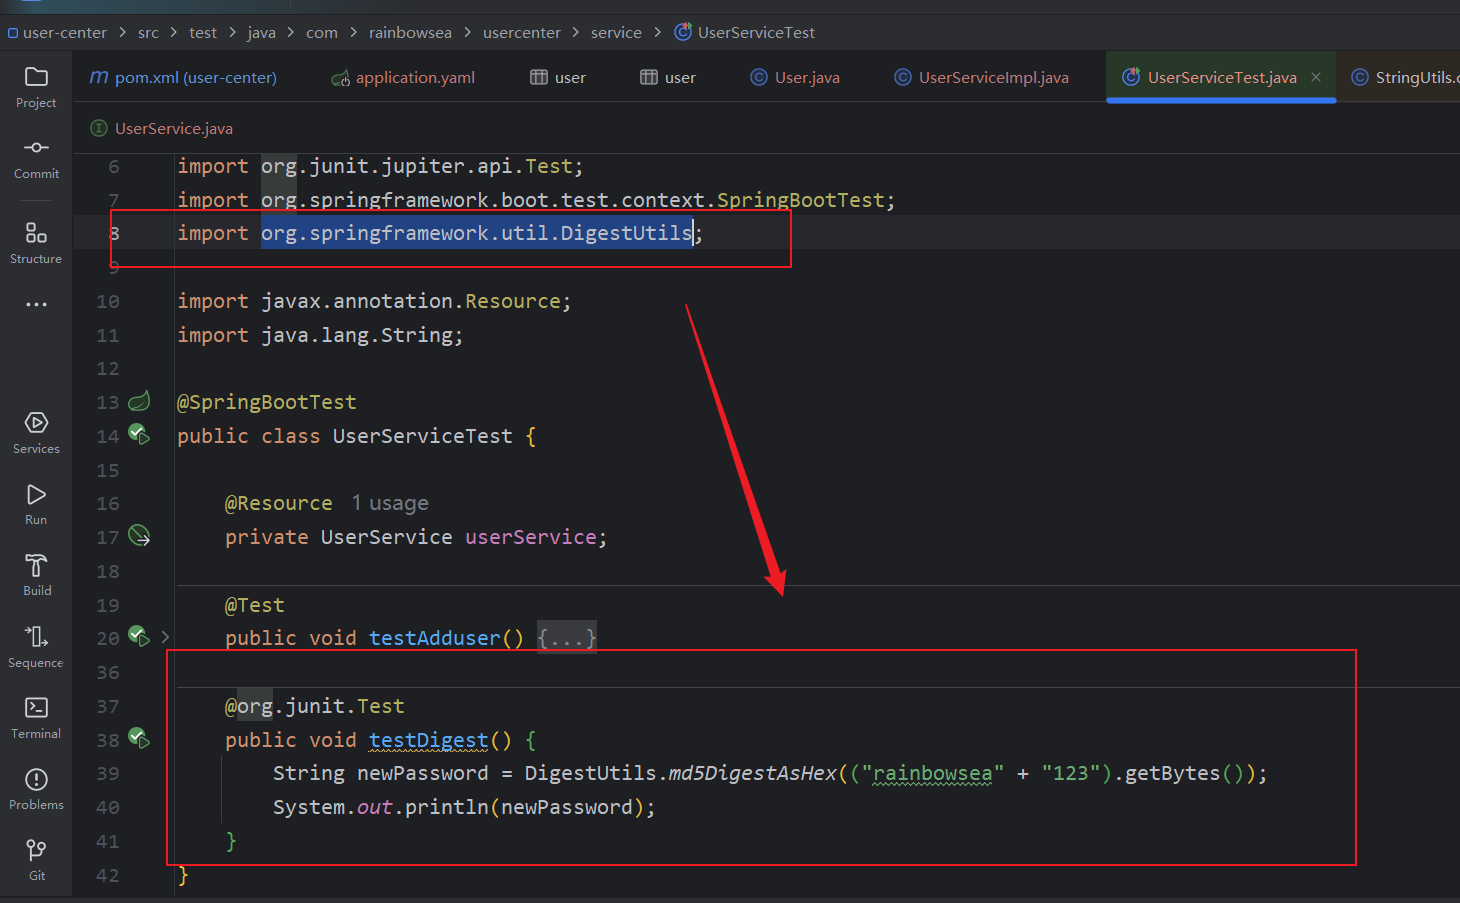
import org.springframework.util.DigestUtils;@org.junit.Testpublic void testDigest() {String newPassword = DigestUtils.md5DigestAsHex(("rainbowsea" + "123").getBytes());System.out.println(newPassword);}
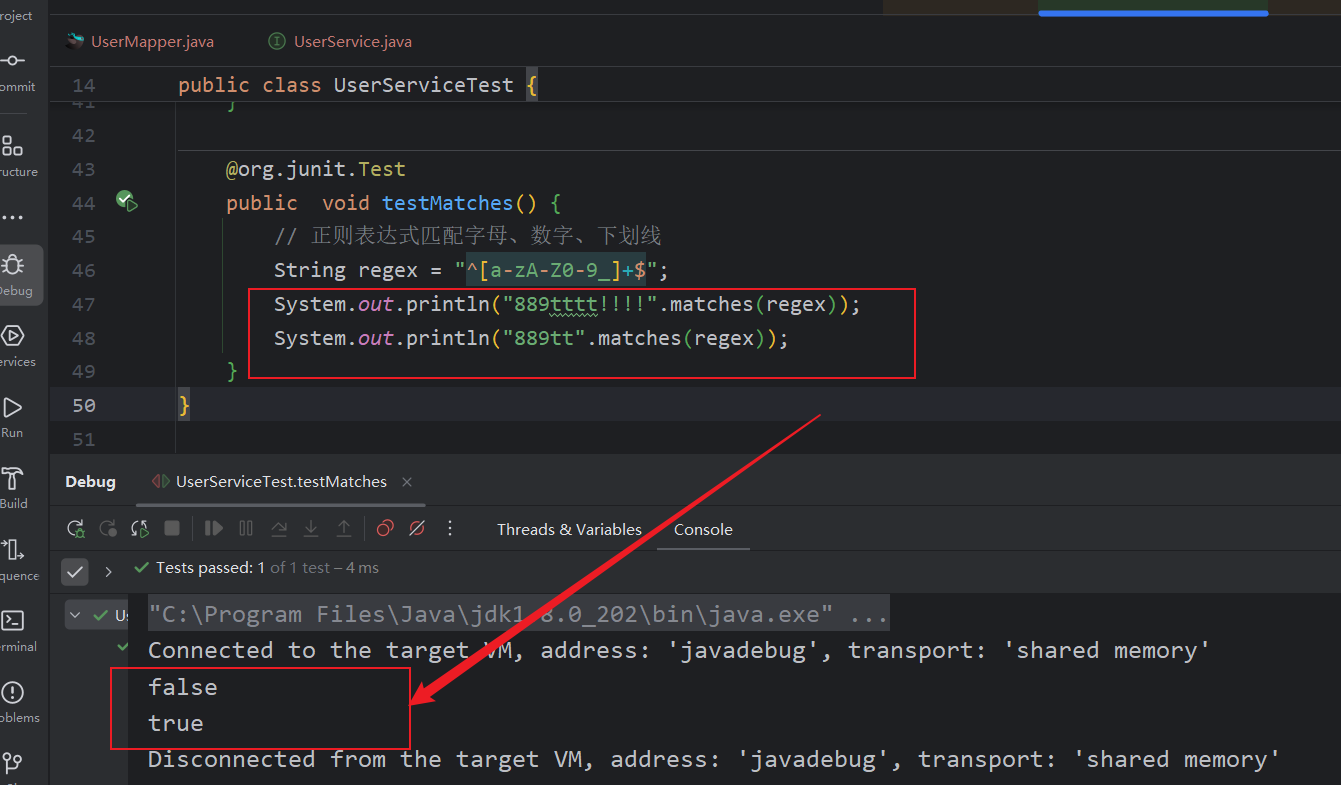
账户不能有特殊字符,这里我们使用的正则表达式,使用的是 **matches()** 它是 String 当中的方法。
    @org.junit.Testpublic  void testMatches() {// 正则表达式匹配字母、数字、下划线String regex = "^[a-zA-Z0-9_]+$";// matches() 满足正则表达式,则返回 true,否则返回 false System.out.println("889tttt!!!!".matches(regex));System.out.println("889tt".matches(regex));}
}
密码必须加密,不可以明文存储,加盐(让密码更混乱一些),永远不需要对密码进行解密
- 数据库的查询校验,可以放置到校验的最后面(或者比较后面),让前面的校验通过了,再走(数据库查询的校验),不然,前面不走数据的校验都没通过,而你数据库查询更耗费资源。
- 可以尽量减少使用 if-else ,而是使用 (!if) 进入 return -1 返回的形式。
初始验证用户注册的逻辑代码实现:
package com.rainbowsea.usercenter.service.impl;import com.baomidou.mybatisplus.core.conditions.query.QueryWrapper;
import com.baomidou.mybatisplus.extension.service.impl.ServiceImpl;
import com.rainbowsea.usercenter.model.User;
import com.rainbowsea.usercenter.service.UserService;
import com.rainbowsea.usercenter.mapper.UserMapper;
import org.apache.commons.lang3.StringUtils;
import org.springframework.stereotype.Service;
import org.springframework.util.DigestUtils;/*** @author huo* @description 针对表【user(用户)】的数据库操作Service实现* @createDate 2025-04-14 16:03:21*/
@Service
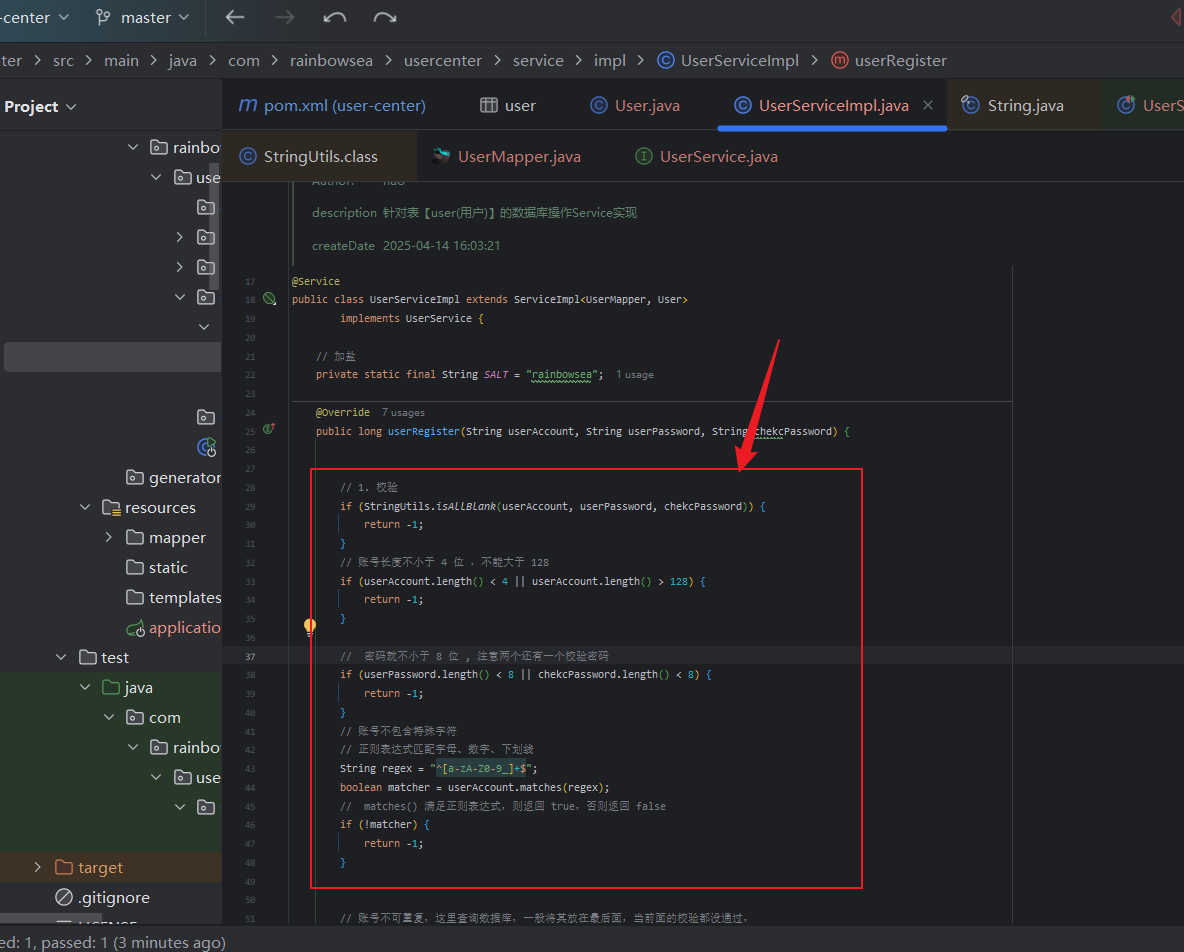
public class UserServiceImpl extends ServiceImpl<UserMapper, User>implements UserService {// 加盐private static final String SALT = "rainbowsea";@Overridepublic long userRegister(String userAccount, String userPassword, String chekcPassword) {// 1. 校验if (StringUtils.isAllBlank(userAccount, userPassword, chekcPassword)) {return -1;}// 账号长度不小于 4 位 ,不能大于 128if (userAccount.length() < 4 || userAccount.length() > 128) {return -1;}// 密码就不小于 8 位 , 注意两个还有一个校验密码if (userPassword.length() < 8 || chekcPassword.length() < 8) {return -1;}// 账号不包含特殊字符// 正则表达式匹配字母、数字、下划线String regex = "^[a-zA-Z0-9_]+$";boolean matcher = userAccount.matches(regex);// matches() 满足正则表达式,则返回 true,否则返回 falseif (!matcher) {return -1;}// 账号不可重复,这里查询数据库,一般将其放在最后面,当前面的校验都没通过,QueryWrapper<User> queryWrapper = new QueryWrapper<>();queryWrapper.eq("userAccount", userAccount);long count = this.count(queryWrapper); // 查询到就大于 0if (count > 0) {return -1;}// 密码和校验密码相同if (!userPassword.equals(chekcPassword)) {return -1;}// 密码加密+加盐String encryptPassword = DigestUtils.md5DigestAsHex((SALT + userPassword).getBytes());// 校验通过插入数据User user = new User();user.setUserAccount(userAccount);user.setUserPassword(encryptPassword);boolean saveResult = this.save(user);if (!saveResult) {return -1;}return user.getId();}
}
对应的测试验证测试:
import org.junit.jupiter.api.Test;@Testpublic void userRegister() {User user = new User();// 验证密码不为空String userAccount = "dogYupi";String userPassword = "";String checkPassword = "12345678";long result = userService.userRegister(userAccount, userPassword, checkPassword);Assertions.assertEquals(-1, result);// 测试账户长度不能小于 4userAccount = "yu";userPassword = "12345678";result = userService.userRegister(userAccount, userPassword, checkPassword);Assertions.assertEquals(-1, result);// 验证账户不可以重复userAccount = "dogYupi";userPassword = "12345678";result = userService.userRegister(userAccount, userPassword, checkPassword);Assertions.assertEquals(-1, result);// 验证账户不包含特殊字符userAccount = "yu pi";result = userService.userRegister(userAccount, userPassword, checkPassword);Assertions.assertEquals(-1, result);// 验证密码和校验密码不一致checkPassword = "123456789";result = userService.userRegister(userAccount, userPassword, checkPassword);Assertions.assertEquals(-1, result);// 验证密码不小于 8 位userPassword = "123";result = userService.userRegister(userAccount, userPassword, checkPassword);Assertions.assertEquals(-1, result);// 验证密码不为空userAccount = "rainbowsea";userPassword = "12345678";checkPassword = "12345678";result = userService.userRegister(userAccount, userPassword, checkPassword);Assertions.assertTrue(result > 0);//Assertions.assertTrue( result > 0);}
用户登录逻辑
- 校验用户账户和密码是否合法
- 非空判断
- 账户长度 不小于 4 位数,不可以大于 128 位数
- 密码 不小于 8 位数
- 账户不包含特殊字符
- 校验密码是否输入正确,要和数据库中的密文密码去对比。
- 我们需要记录用户的登录态(session),将其存储到服务器上(用后端 Spring Boot 框架封装的服务器 tomcat 去记录 cookile)
- 返回用户的信息给前端,需要注意的是,这里我们需要将返回的数据进行一个脱敏操作,返回给我们想要给前端用户的信息,其它的信息,不需要返回给前端,也不可以让前端拿到。
用户脱敏
不脱敏的话,你返回给前端的数据就是,实实在在从后端库当中拿取到的,一些敏感的数据了,脱敏这里:新 new 一个对象,重新 set 设置,你要返回给前端的信息即可,不想返回的,set 设置为 默认的即可。
密码加密+加盐,注意:你查询密码的时候,因为你的当时插入数据是怎么加密的,你查询对面的时候也是怎么加密的, 因为你在数据库当中存储的是你加密的密码,用的是对称加密。
如何知道是哪个用户登录了
Java Web 这一块的知识内容
- 连接服务器端后,可以得到一个 session 状态(这里可以使用 匿名会话),返回给前端。
- 登录成功后,得到了登录成功的 session 状态,并且给该 session 设置一些值(比如用户信息),session 相当类比于一个 Map 集合(对应着 key-value 键值对),返回给前端一个设置 cookie 的”命令/信息“
sessioin => cookie
- 前端接收到后端等的命令后,设置 cookie ,保存到浏览器内
- 前端再次请求后端的时候(相同的域名,这里存在一个跨域问题),在请求头中带上对应的 cookie 去请求。
- 后端拿到前端传来的 cookie ,找到对应的 session
- 后端从 session 中可以取出基于该 session 存储的变量(用户的登录信息,登录名一些你想给前端的信息内容)
@Service
@Slf4j
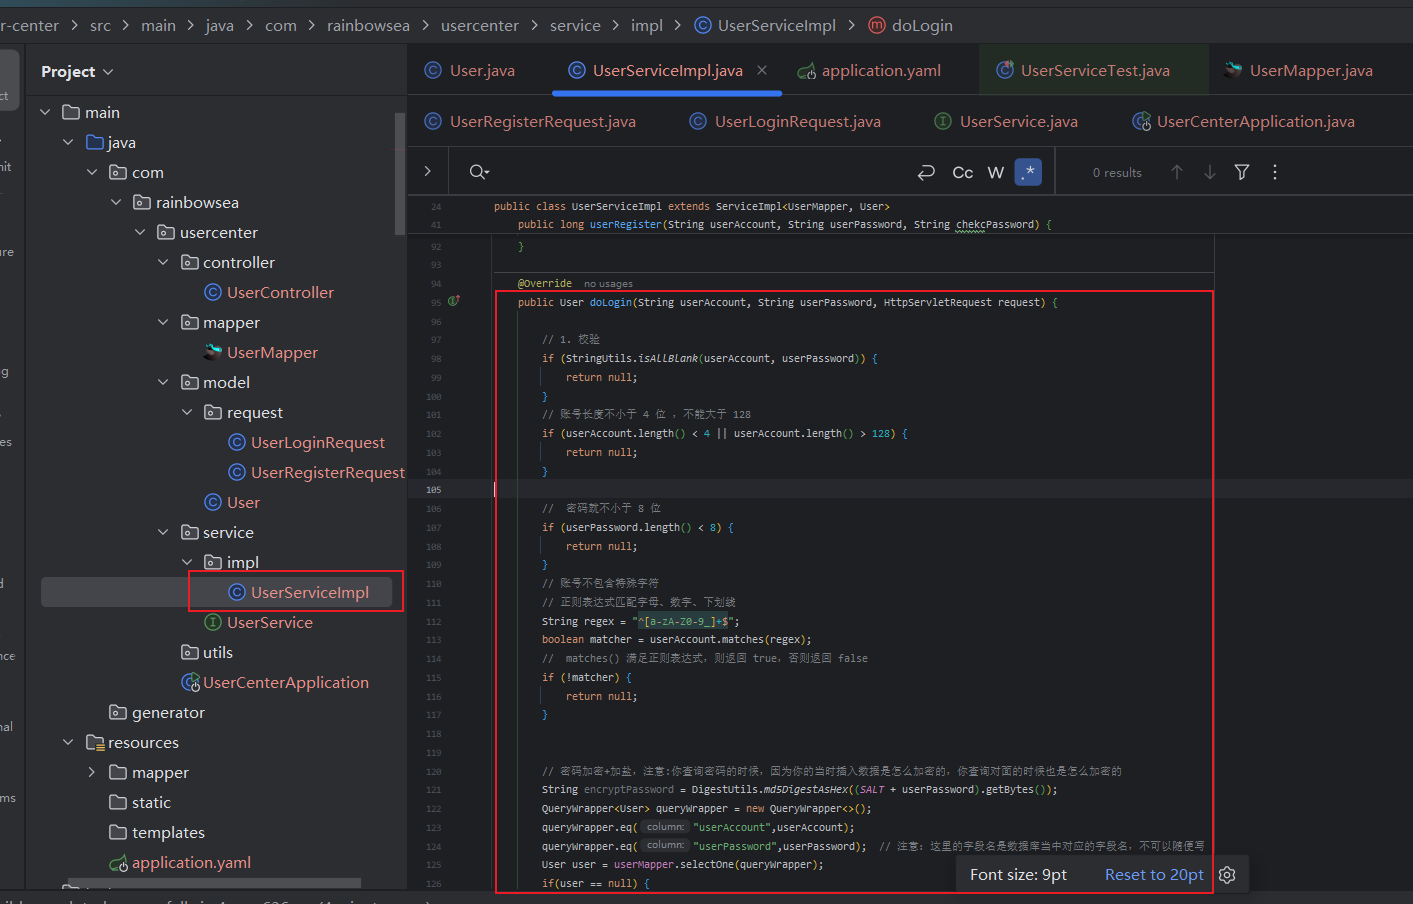
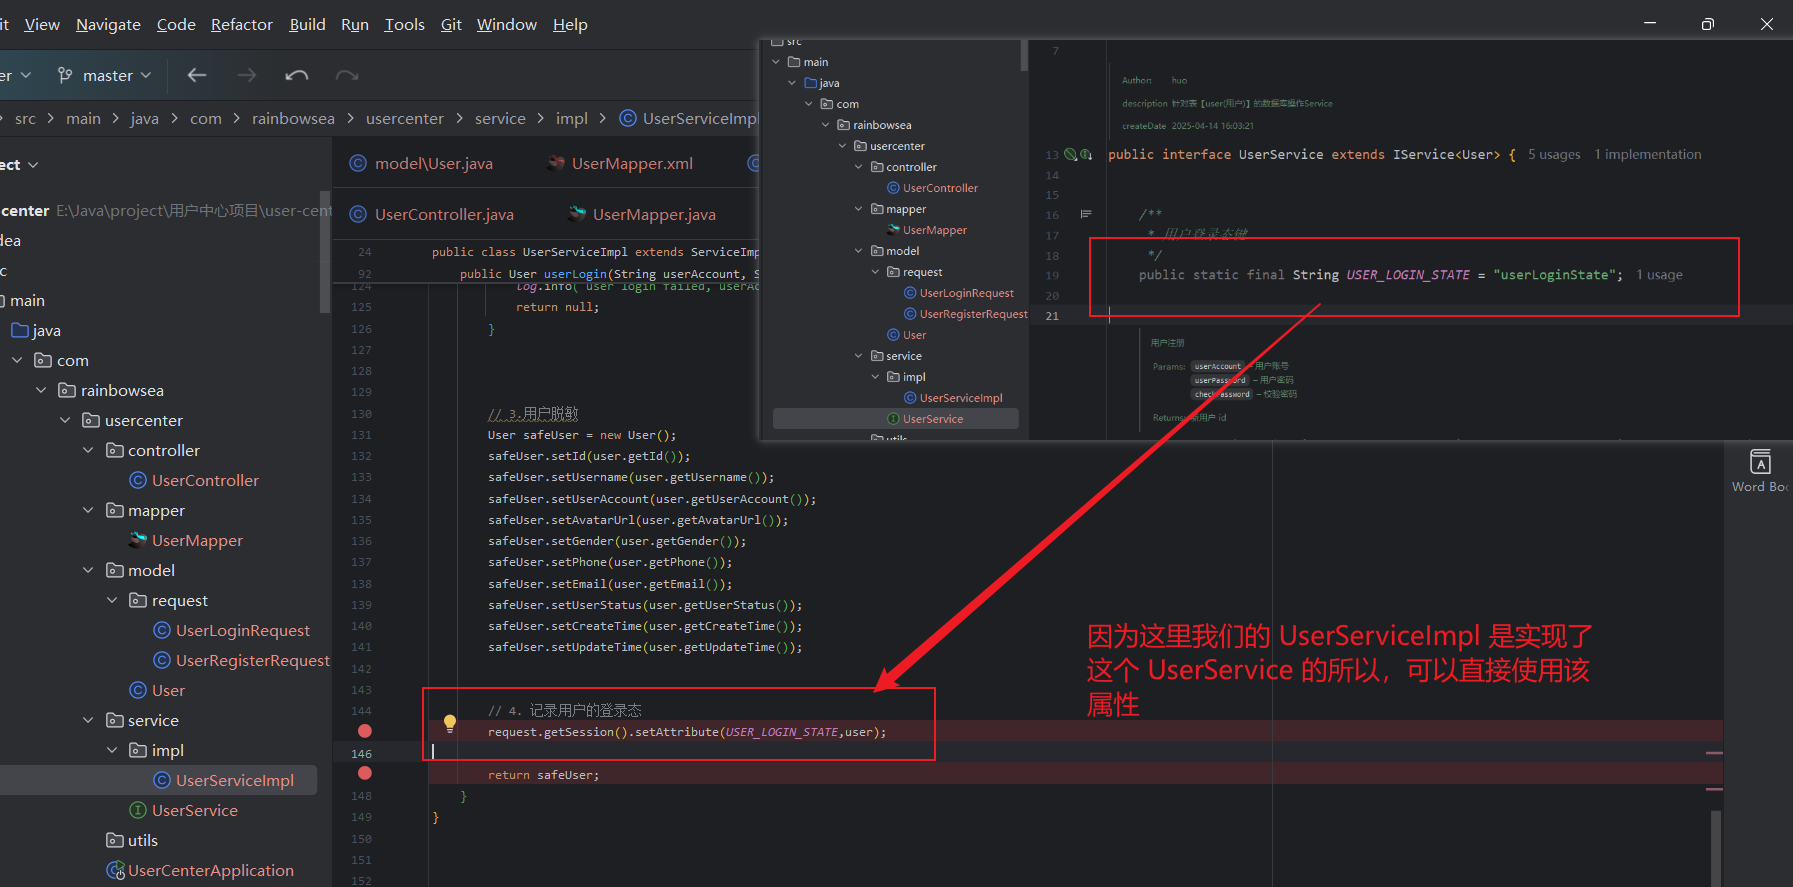
public class UserServiceImpl extends ServiceImpl<UserMapper, User>implements UserService {/*** 加盐 混淆,让密码更加没有规律,更加安全一些*/private static final String SALT = "rainbowsea";/*** 用户登录态*/private static final String USER_LOGIN_STATE = "userloginstate";@Resourceprivate UserMapper userMapper;@Overridepublic User doLogin(String userAccount, String userPassword, HttpServletRequest request) {// 1. 校验if (StringUtils.isAllBlank(userAccount, userPassword)) {return null;}// 账号长度不小于 4 位 ,不能大于 128if (userAccount.length() < 4 || userAccount.length() > 128) {return null;}// 密码就不小于 8 位if (userPassword.length() < 8) {return null;}// 账号不包含特殊字符// 正则表达式匹配字母、数字、下划线String regex = "^[a-zA-Z0-9_]+$";boolean matcher = userAccount.matches(regex);// matches() 满足正则表达式,则返回 true,否则返回 falseif (!matcher) {return null;}// 密码加密+加盐,注意:你查询密码的时候,因为你的当时插入数据是怎么加密的,你查询对面的时候也是怎么加密的String encryptPassword = DigestUtils.md5DigestAsHex((SALT + userPassword).getBytes());QueryWrapper<User> queryWrapper = new QueryWrapper<>();queryWrapper.eq("userAccount",userAccount);queryWrapper.eq("userPassword",userPassword); // 注意:这里的字段名是数据库当中对应的字段名,不可以随便写User user = userMapper.selectOne(queryWrapper);if(user == null) {log.info("user login failed, userAccount cannot userPassword");return null;}// 3.用户脱敏User safeUser = new User();safeUser.setId(user.getId());safeUser.setUsername(user.getUsername());safeUser.setUserAccount(user.getUserAccount());safeUser.setAvatarUrl(user.getAvatarUrl());safeUser.setGender(user.getGender());safeUser.setPhone(user.getPhone());safeUser.setEmail(user.getEmail());safeUser.setUserStatus(user.getUserStatus());safeUser.setCreateTime(user.getCreateTime());safeUser.setUpdateTime(user.getUpdateTime());// 4. 记录用户的登录态request.getSession().setAttribute(USER_LOGIN_STATE,user);return safeUser;}}
// todo 修改为自定义异常。
MyBatis-plus 的逻辑删除设置:
逻辑删除支持
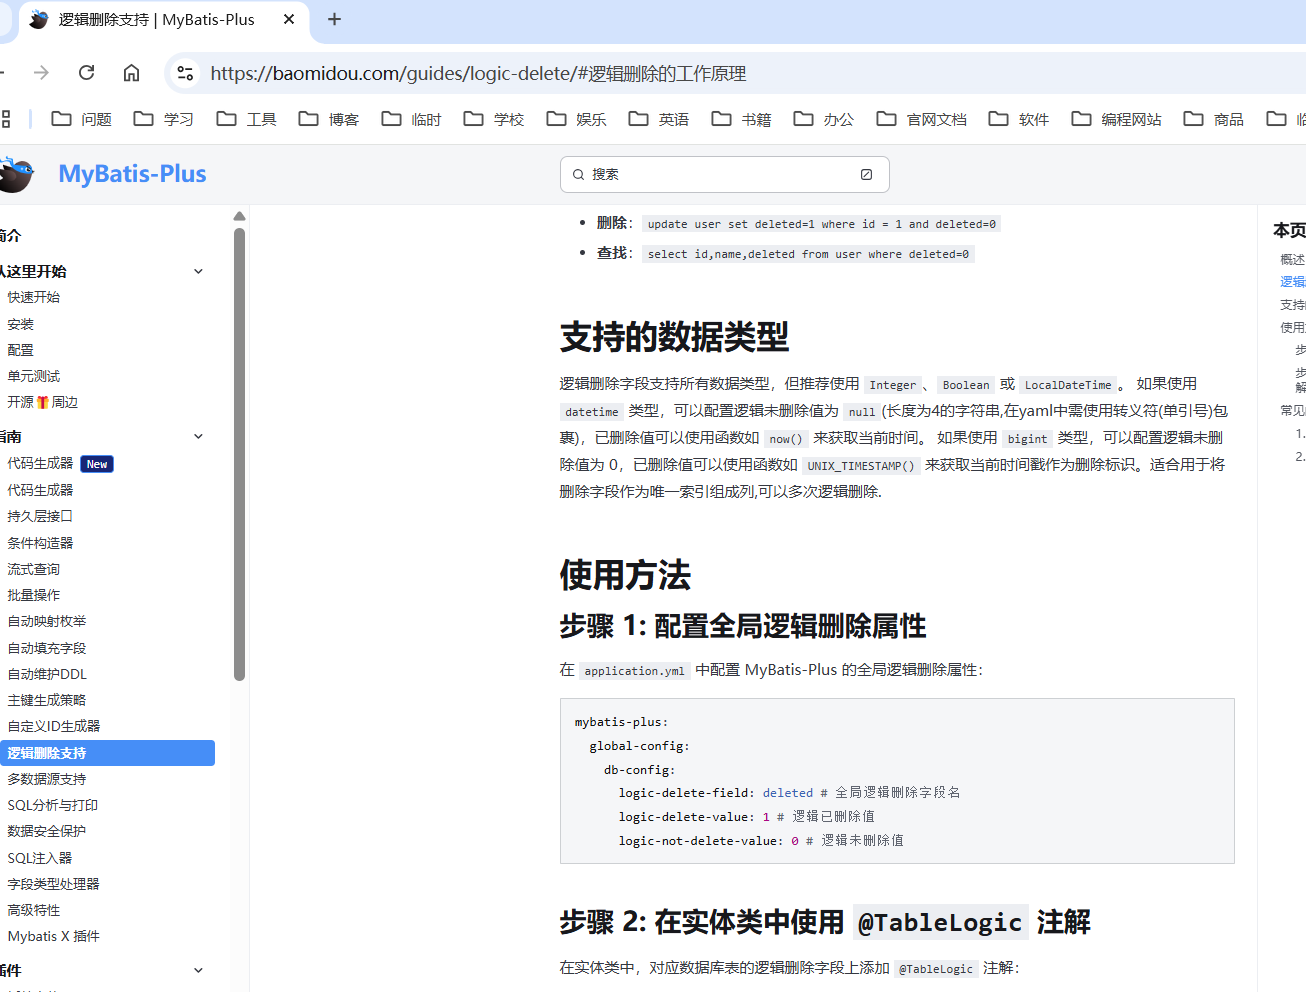
mybatis-plus:global-config:db-config:logic-delete-field: deleted # 全局逻辑删除字段名logic-delete-value: 1 # 逻辑已删除值logic-not-delete-value: 0 # 逻辑未删除值
import com.baomidou.mybatisplus.annotation.TableLogic;public class User {// 其他字段...@TableLogicprivate Integer deleted;
}
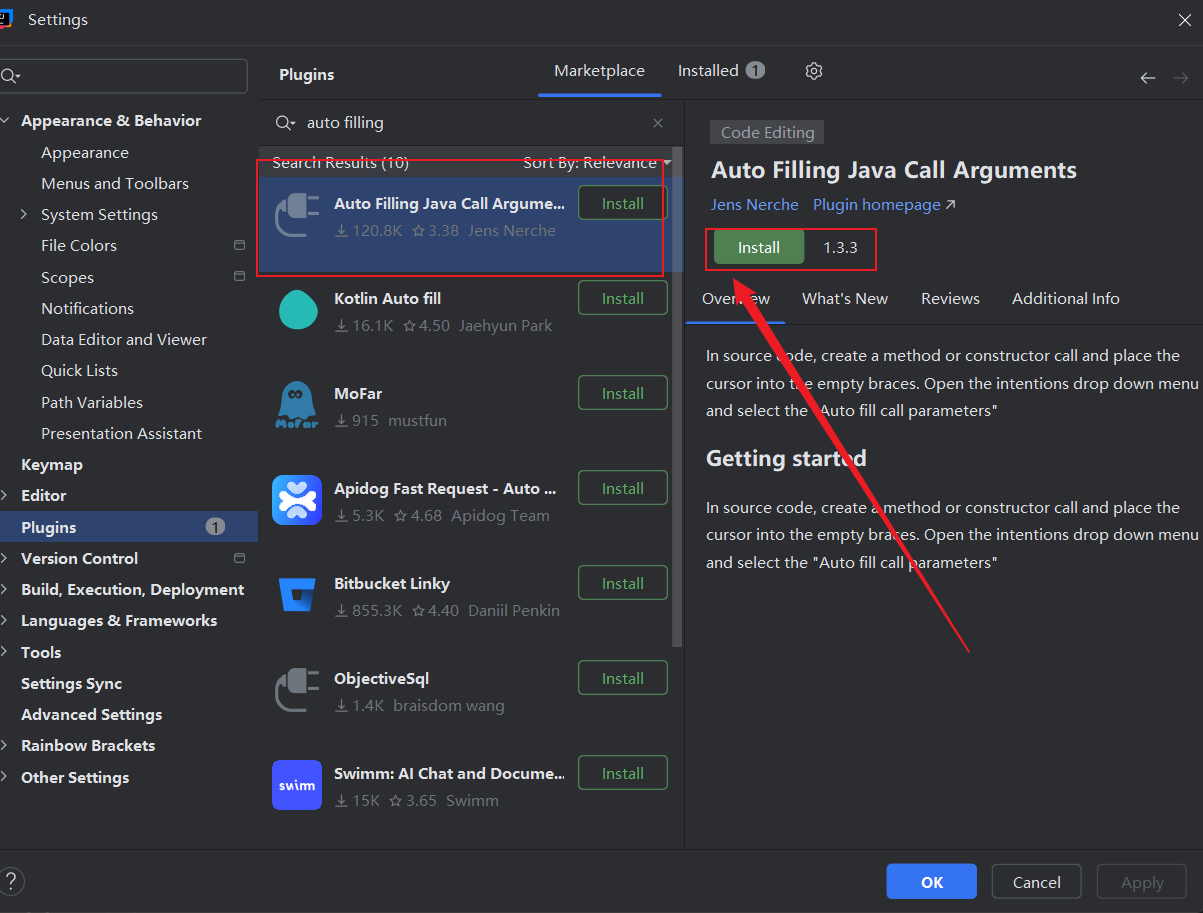
auto filling java call 自动添加 Java 方法参数;
用户注册接口
- 接收参数:用户账户,密码
- 请求类型:POST
- 请求体:JSON 格式的数据
请求参数很长时,不建议使用 GET 请求
- 返回值:用户信息(脱敏)
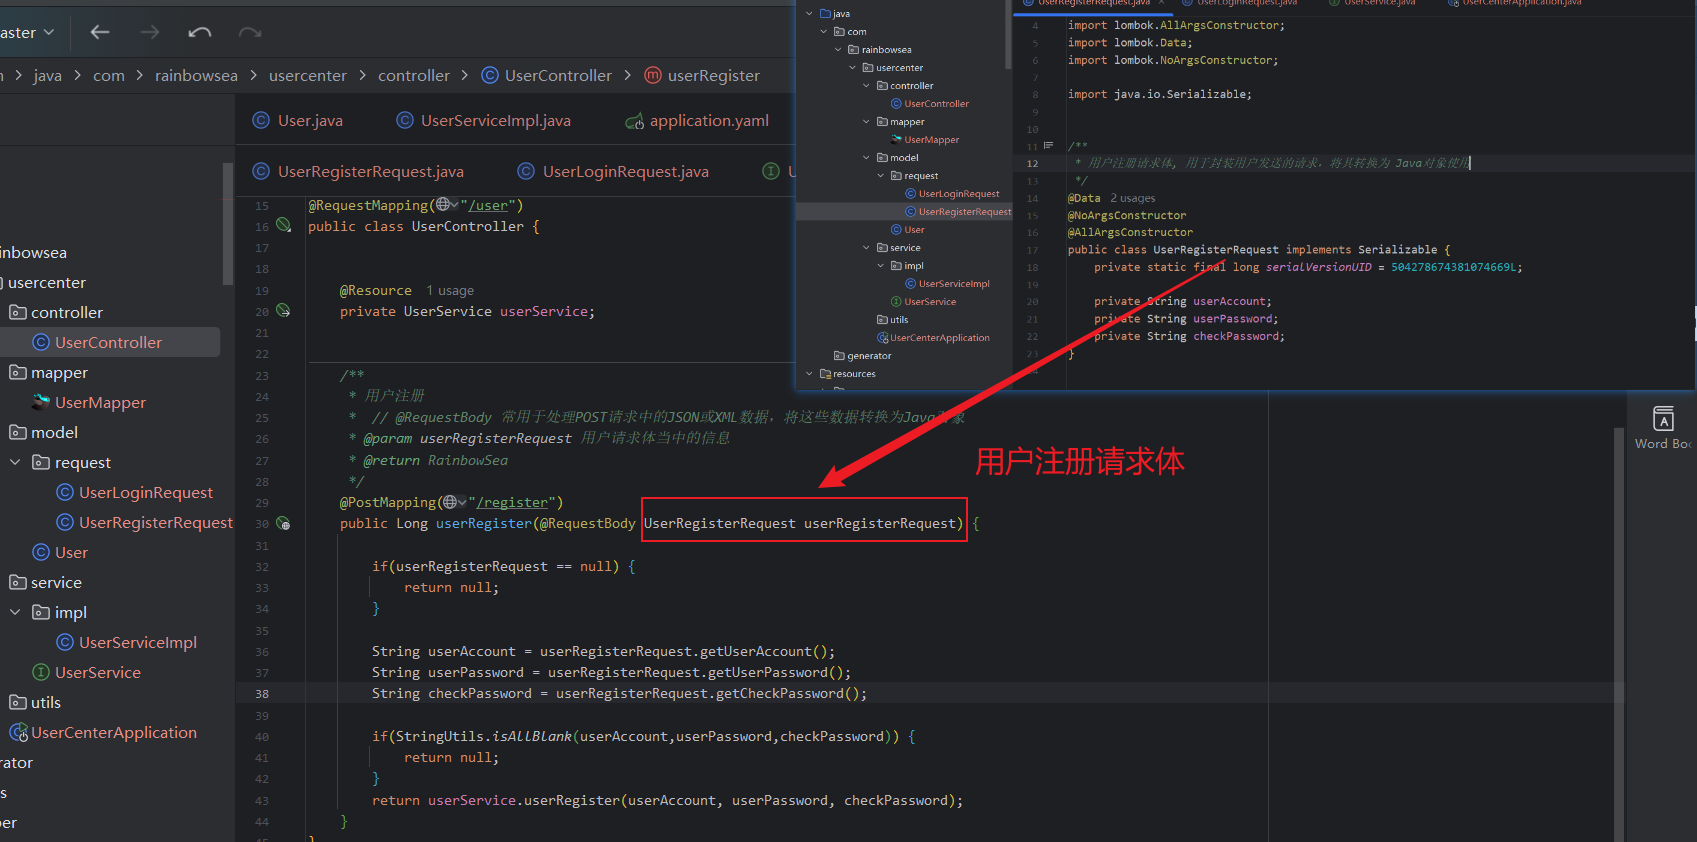
这里我们定义一个,用户注册的一个请求体。
作用:就是当用户发送请求过来,可以将用户在前端发送的信息,转换为我们设置配置设置的一个 用户注册请求体。
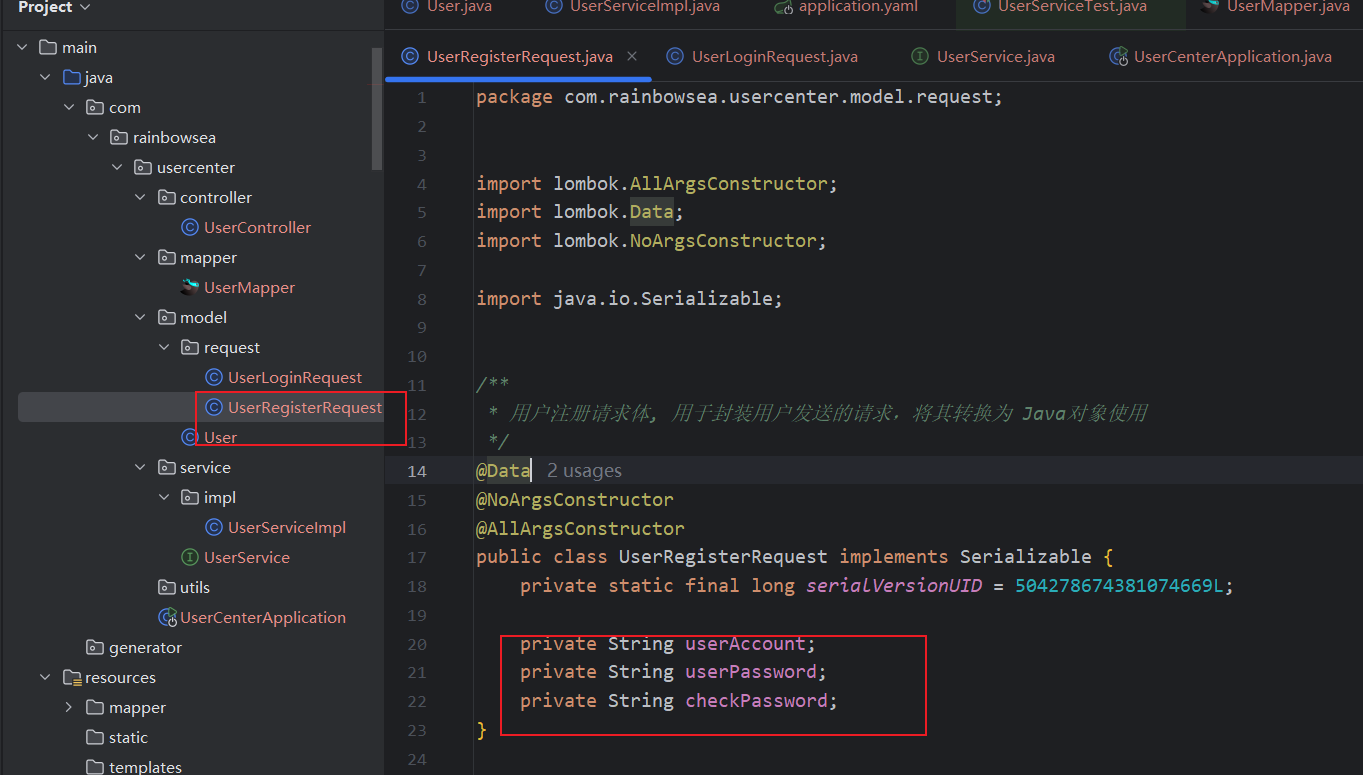
package com.rainbowsea.usercenter.model.request;import lombok.AllArgsConstructor;
import lombok.Data;
import lombok.NoArgsConstructor;import java.io.Serializable;/*** 用户注册请求体, 用于封装用户发送的请求,将其转换为 Java对象使用*/
@Data
@NoArgsConstructor
@AllArgsConstructor
public class UserRegisterRequest implements Serializable {private static final long serialVersionUID = 504278674381074669L;private String userAccount;private String userPassword;private String checkPassword;
}
用户注册和登录校验逻辑完整代码:
package com.rainbowsea.usercenter.service.impl;
import java.util.Date;import com.baomidou.mybatisplus.core.conditions.query.QueryWrapper;
import com.baomidou.mybatisplus.extension.service.impl.ServiceImpl;
import com.rainbowsea.usercenter.model.User;
import com.rainbowsea.usercenter.service.UserService;
import com.rainbowsea.usercenter.mapper.UserMapper;
import lombok.extern.slf4j.Slf4j;
import org.apache.commons.lang3.StringUtils;
import org.springframework.stereotype.Service;
import org.springframework.util.DigestUtils;import javax.annotation.Resource;
import javax.servlet.http.HttpServletRequest;/*** @author huo* @description 针对表【user(用户)】的数据库操作Service实现* @createDate 2025-04-14 16:03:21*/
@Service
@Slf4j
public class UserServiceImpl extends ServiceImpl<UserMapper, User>implements UserService {/*** 加盐 混淆,让密码更加没有规律,更加安全一些*/private static final String SALT = "rainbowsea";/*** 用户登录态*/private static final String USER_LOGIN_STATE = "userloginstate";@Resourceprivate UserMapper userMapper;@Overridepublic long userRegister(String userAccount, String userPassword, String chekcPassword) {// 1. 校验if (StringUtils.isAllBlank(userAccount, userPassword, chekcPassword)) {return -1;}// 账号长度不小于 4 位 ,不能大于 128if (userAccount.length() < 4 || userAccount.length() > 128) {return -1;}//  密码就不小于 8 位 , 注意两个还有一个校验密码if (userPassword.length() < 8 || chekcPassword.length() < 8) {return -1;}// 账号不包含特殊字符// 正则表达式匹配字母、数字、下划线String regex = "^[a-zA-Z0-9_]+$";boolean matcher = userAccount.matches(regex);//  matches() 满足正则表达式,则返回 true,否则返回 falseif (!matcher) {return -1;}// 账号不可重复,这里查询数据库,一般将其放在最后面,当前面的校验都没通过,QueryWrapper<User> queryWrapper = new QueryWrapper<>();queryWrapper.eq("userAccount", userAccount);long count = this.count(queryWrapper);  // 查询到就大于 0if (count > 0) {return -1;}// 密码和校验密码相同if (!userPassword.equals(chekcPassword)) {return -1;}// 密码加密+加盐String encryptPassword = DigestUtils.md5DigestAsHex((SALT + userPassword).getBytes());// 校验通过插入数据User user = new User();user.setUserAccount(userAccount);user.setUserPassword(encryptPassword);boolean saveResult = this.save(user);if (!saveResult) {return -1;}return user.getId();}@Overridepublic User userLogin(String userAccount, String userPassword, HttpServletRequest request) {// 1. 校验if (StringUtils.isAllBlank(userAccount, userPassword)) {return null;}// 账号长度不小于 4 位 ,不能大于 128if (userAccount.length() < 4 || userAccount.length() > 128) {return null;}//  密码就不小于 8 位if (userPassword.length() < 8) {return null;}// 账号不包含特殊字符// 正则表达式匹配字母、数字、下划线String regex = "^[a-zA-Z0-9_]+$";boolean matcher = userAccount.matches(regex);//  matches() 满足正则表达式,则返回 true,否则返回 falseif (!matcher) {return null;}// 密码加密+加盐,注意:你查询密码的时候,因为你的当时插入数据是怎么加密的,你查询对面的时候也是怎么加密的String encryptPassword = DigestUtils.md5DigestAsHex((SALT + userPassword).getBytes());QueryWrapper<User> queryWrapper = new QueryWrapper<>();queryWrapper.eq("userAccount",userAccount);queryWrapper.eq("userPassword",userPassword);  // 注意:这里的字段名是数据库当中对应的字段名,不可以随便写User user = userMapper.selectOne(queryWrapper);if(user == null) {log.info("user login failed, userAccount cannot userPassword");return null;}// 3.用户脱敏User safeUser = new User();safeUser.setId(user.getId());safeUser.setUsername(user.getUsername());safeUser.setUserAccount(user.getUserAccount());safeUser.setAvatarUrl(user.getAvatarUrl());safeUser.setGender(user.getGender());safeUser.setPhone(user.getPhone());safeUser.setEmail(user.getEmail());safeUser.setUserStatus(user.getUserStatus());safeUser.setCreateTime(user.getCreateTime());safeUser.setUpdateTime(user.getUpdateTime());// 4. 记录用户的登录态request.getSession().setAttribute(USER_LOGIN_STATE,user);return safeUser;}
}
用户注册控制层 Controller 封装请求:
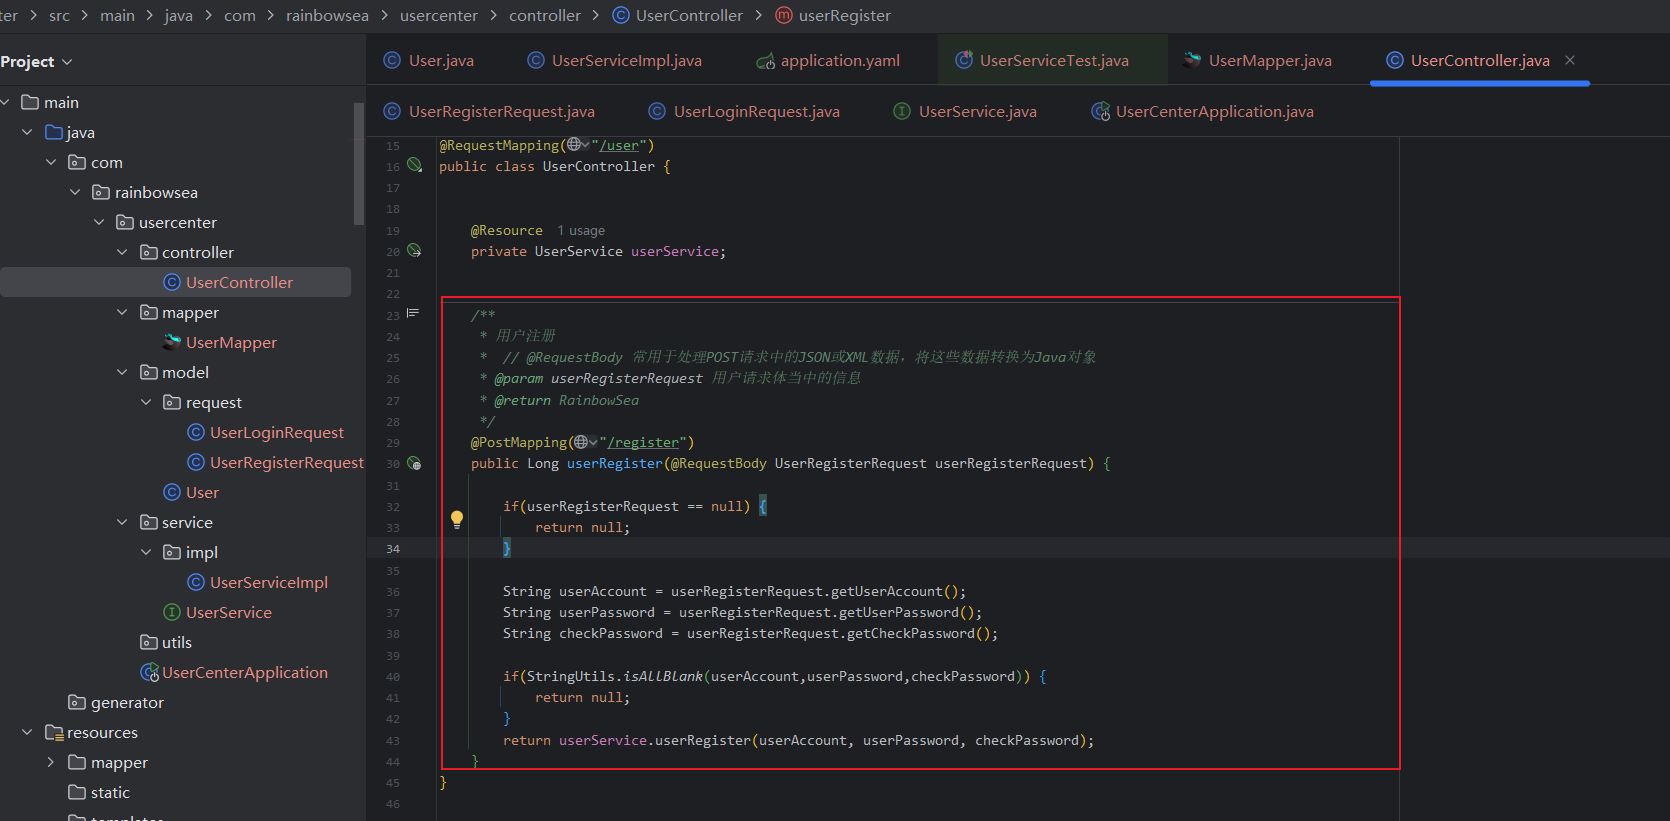
package com.rainbowsea.usercenter.controller;import com.rainbowsea.usercenter.model.request.UserRegisterRequest;
import com.rainbowsea.usercenter.service.UserService;
import org.apache.commons.lang3.StringUtils;
import org.springframework.web.bind.annotation.PostMapping;
import org.springframework.web.bind.annotation.RequestBody;
import org.springframework.web.bind.annotation.RequestMapping;
import org.springframework.web.bind.annotation.RestController;import javax.annotation.Resource;@RestController
@RequestMapping("/user")
public class UserController {@Resourceprivate UserService userService;/*** 用户注册*  // @RequestBody 常用于处理POST请求中的JSON或XML数据,将这些数据转换为Java对象* @param userRegisterRequest 用户请求体当中的信息* @return RainbowSea*/@PostMapping("/register")public Long userRegister(@RequestBody UserRegisterRequest userRegisterRequest) {if(userRegisterRequest == null) {return null;}String userAccount = userRegisterRequest.getUserAccount();String userPassword = userRegisterRequest.getUserPassword();String checkPassword = userRegisterRequest.getCheckPassword();if(StringUtils.isAllBlank(userAccount,userPassword,checkPassword)) {return null;}return userService.userRegister(userAccount, userPassword, checkPassword);}
}
用户登录控制层 Controller 封装请求:
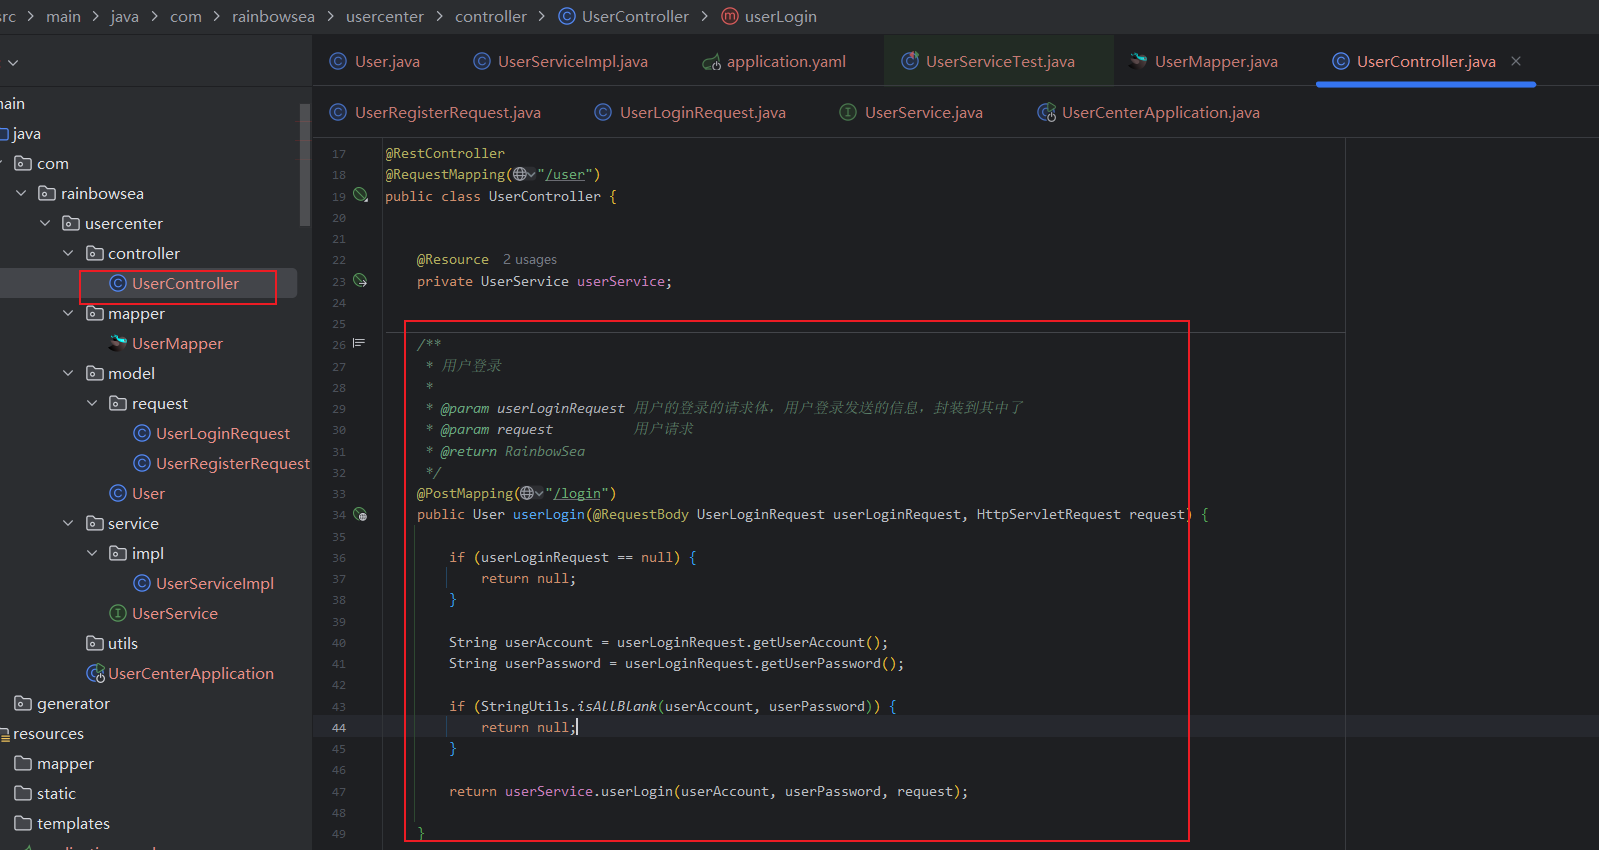
package com.rainbowsea.usercenter.controller;import com.rainbowsea.usercenter.model.User;
import com.rainbowsea.usercenter.model.request.UserLoginRequest;
import com.rainbowsea.usercenter.model.request.UserRegisterRequest;
import com.rainbowsea.usercenter.service.UserService;
import org.apache.commons.lang3.StringUtils;
import org.springframework.web.bind.annotation.PostMapping;
import org.springframework.web.bind.annotation.RequestBody;
import org.springframework.web.bind.annotation.RequestMapping;
import org.springframework.web.bind.annotation.RestController;import javax.annotation.Resource;
import javax.servlet.http.HttpServletRequest;@RestController
@RequestMapping("/user")
public class UserController {@Resourceprivate UserService userService;/*** 用户登录** @param userLoginRequest 用户的登录的请求体,用户登录发送的信息,封装到其中了* @param request          用户请求* @return RainbowSea*/@PostMapping("/login")public User userLogin(@RequestBody UserLoginRequest userLoginRequest, HttpServletRequest request) {if (userLoginRequest == null) {return null;}String userAccount = userLoginRequest.getUserAccount();String userPassword = userLoginRequest.getUserPassword();if (StringUtils.isAllBlank(userAccount, userPassword)) {return null;}return userService.userLogin(userAccount, userPassword, request);}}
用户注册和登录-控制层 Controller 封装请求完整:
package com.rainbowsea.usercenter.controller;import com.rainbowsea.usercenter.model.User;
import com.rainbowsea.usercenter.model.request.UserLoginRequest;
import com.rainbowsea.usercenter.model.request.UserRegisterRequest;
import com.rainbowsea.usercenter.service.UserService;
import org.apache.commons.lang3.StringUtils;
import org.springframework.web.bind.annotation.PostMapping;
import org.springframework.web.bind.annotation.RequestBody;
import org.springframework.web.bind.annotation.RequestMapping;
import org.springframework.web.bind.annotation.RestController;import javax.annotation.Resource;
import javax.servlet.http.HttpServletRequest;@RestController
@RequestMapping("/user")
public class UserController {@Resourceprivate UserService userService;/*** 用户登录** @param userLoginRequest 用户的登录的请求体,用户登录发送的信息,封装到其中了* @param request          用户请求* @return RainbowSea*/@PostMapping("/login")public User userLogin(@RequestBody UserLoginRequest userLoginRequest, HttpServletRequest request) {if (userLoginRequest == null) {return null;}String userAccount = userLoginRequest.getUserAccount();String userPassword = userLoginRequest.getUserPassword();if (StringUtils.isAllBlank(userAccount, userPassword)) {return null;}return userService.userLogin(userAccount, userPassword, request);}/*** 用户注册* // @RequestBody 常用于处理POST请求中的JSON或XML数据,将这些数据转换为Java对象** @param userRegisterRequest 用户请求体当中的信息,用户注册时发送的信息,封装到其中了* @return RainbowSea*/@PostMapping("/register")public Long userRegister(@RequestBody UserRegisterRequest userRegisterRequest) {if (userRegisterRequest == null) {return null;}String userAccount = userRegisterRequest.getUserAccount();String userPassword = userRegisterRequest.getUserPassword();String checkPassword = userRegisterRequest.getCheckPassword();if (StringUtils.isAllBlank(userAccount, userPassword, checkPassword)) {return null;}return userService.userRegister(userAccount, userPassword, checkPassword);}
}
控制层 Controller 封装请求:
@RestController 适用于编写 restful 风格的 api,返回值默认为 json 类型
controller 层倾向于对请求参数本身的校验,不涉及业务逻辑本身(越少越好)
service 层是对业务逻辑的校验(有可能被 controller 之外的类调用)
校验,测试,Controller 控制层的逻辑测试
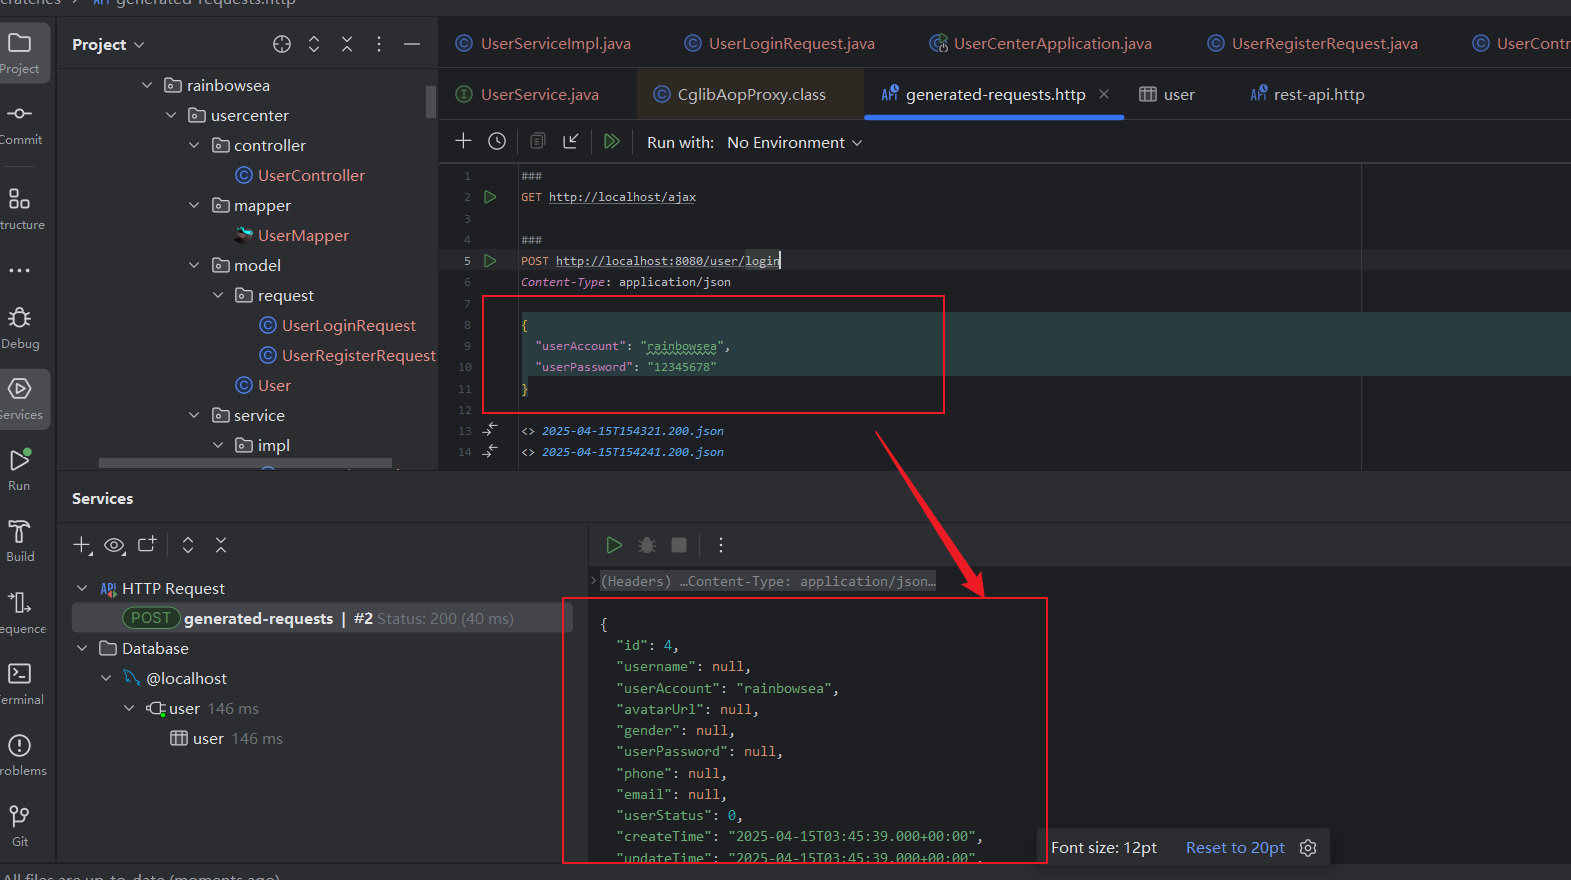
这里我们不使用 postMan ,而是使用 IDEA 自带的一个 HTTP Client工具:
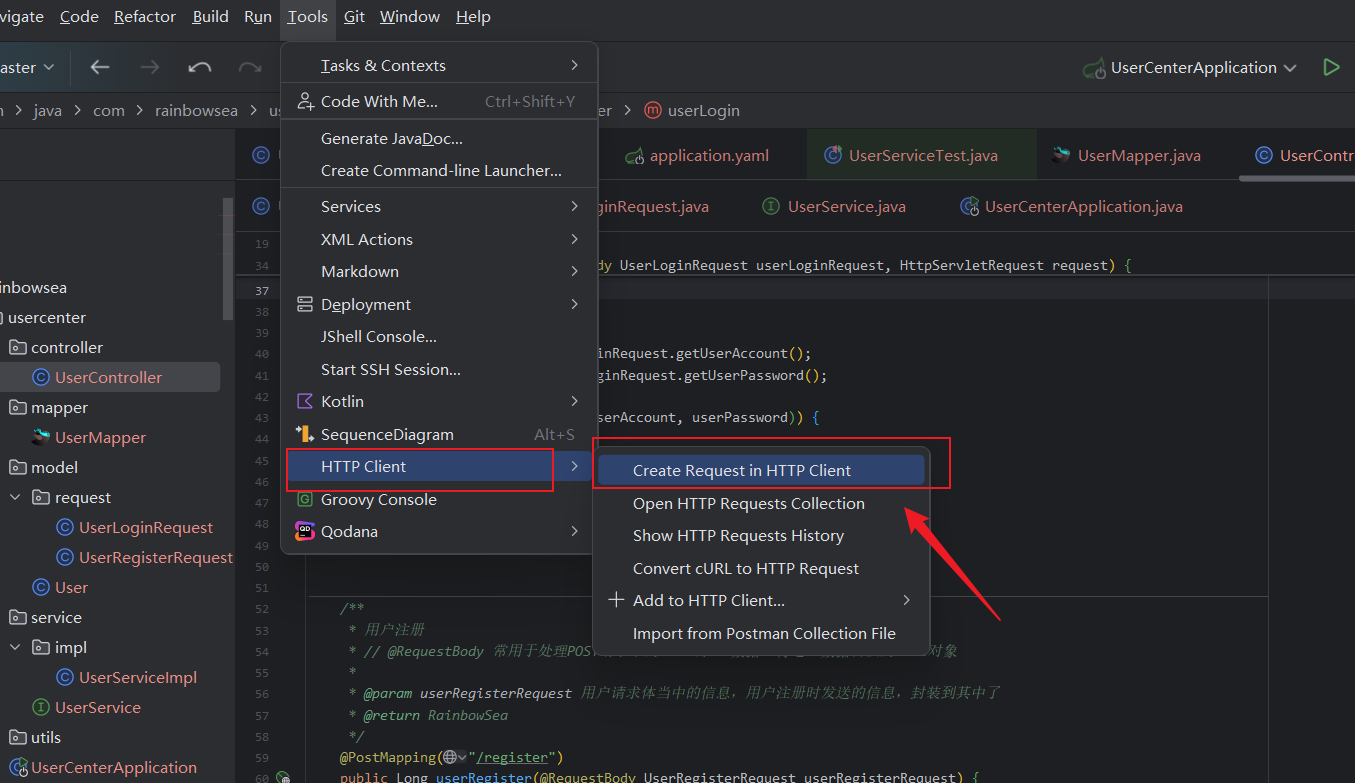
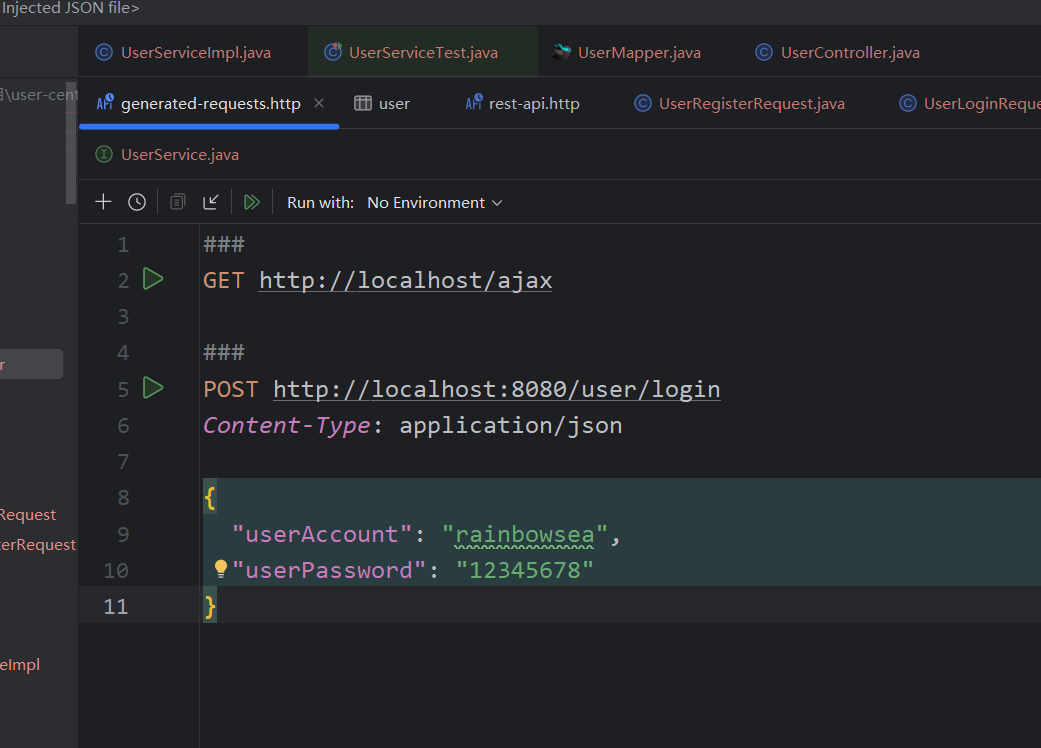
###
GET http://localhost/ajax###
POST http://localhost:8080/user/login
Content-Type: application/json{"userAccount": "rainbowsea","userPassword": "12345678"
}
注意:需要先将你的微服务,对应微服务启动起来,才可以被使用访问上。
**补充:**添加上了;查询用户信息,删除用户的接口。
同时这里我们对数据库重新更新了一下,添加了一个 userRole 角色字段,userRole int default 0 not null comment '用户角色 0- 普通用户 1 - 管理员 2 - vip'
注意:用户角色权限上的管理,这里我们只有 管理员用户才可以执行查询操作,其它用户是不可以执行查询操作的,这里我们在 controller 进行一个代码的编写。
这里我们优化将我们的一个 用户登录态键配置在,这里的 UserService的接口当中,这样我们就可以在多个位置上进行引用该用户登录态键,作为,一个判断用户是否登录的一个操作。
用户管理接口
!!!必须鉴权
- 查询用户
- 删除用户()
写代码流程:
- 先做设计
- 代码实现
- 持续优化!!!(复用代码,提取公共逻辑/常量)
最后:
“在这个最后的篇章中,我要表达我对每一位读者的感激之情。你们的关注和回复是我创作的动力源泉,我从你们身上吸取了无尽的灵感与勇气。我会将你们的鼓励留在心底,继续在其他的领域奋斗。感谢你们,我们总会在某个时刻再次相遇。”
