Linux部署私有文件管理系统MinIO
最近需要用到一个文件管理服务,但是又不想花钱,所以就想着自己搭建一个,刚好我们用的一个开源框架已经集成了MinIO,所以就选了这个
我这边对文件服务性能要求不是太高,单机版就可以
安装非常简单,几个命令就可以
# 下载服务文件
wget https://dl.min.io/server/minio/release/linux-amd64/minio
# 设置权限
chmod +x minio
# 移动目录方便执行
sudo mv minio /usr/local/bin/
# 创建数据目录
mkdir -p /data/minio
# 添加用户
export MINIO_ROOT_USER=minioadmin
# 添加密码
export MINIO_ROOT_PASSWORD=minio123
上面配置完后我们再来配置开机自启服务,直接执行下面命令即可
cat <<EOF > /etc/systemd/system/minio.service
[Unit]
Description=MinIO Object Storage
After=network.target[Service]
User=root
ExecStart=/usr/local/bin/minio server /data/minio --console-address ":9001"
Environment=MINIO_ROOT_USER=minioadmin
Environment=MINIO_ROOT_PASSWORD=minio123
Restart=always
LimitNOFILE=65536[Install]
WantedBy=multi-user.target
EOF
然后依次执行下面的命令
# 加载配置
systemctl daemon-reexec
# 加入开机项
systemctl enable minio
# 启动服务
systemctl start minio
# 查看服务
systemctl status minio
如果 systemctl status minio 返回下面内容就说明启动成功了
[root@ecm-74de bin]# systemctl status minio
● minio.service - MinIO ServerLoaded: loaded (/etc/systemd/system/minio.service; enabled; vendor preset: disabled)Active: active (running) since Mon 2025-06-09 16:09:49 CST; 2h 51min agoMain PID: 25443 (minio)Tasks: 14Memory: 235.5MCGroup: /system.slice/minio.service└─25443 /usr/local/bin/minio server /data/minio --console-address :9001Jun 09 16:09:49 ecm-74de systemd[1]: Started MinIO Server.
Jun 09 16:09:49 ecm-74de minio[25443]: MinIO Object Storage Server
Jun 09 16:09:49 ecm-74de minio[25443]: Copyright: 2015-2025 MinIO, Inc.
Jun 09 16:09:49 ecm-74de minio[25443]: License: GNU AGPLv3 - https://www.gnu.org/licenses/agpl-3.0.html
Jun 09 16:09:49 ecm-74de minio[25443]: Version: RELEASE.2025-05-24T17-08-30Z (go1.24.3 linux/amd64)
Jun 09 16:09:49 ecm-74de minio[25443]: API: http://10.0.0.5:9000  http://127.0.0.1:9000
Jun 09 16:09:49 ecm-74de minio[25443]: WebUI: http://10.0.0.5:9001 http://127.0.0.1:9001
Jun 09 16:09:49 ecm-74de minio[25443]: Docs: https://docs.min.io
Jun 09 16:09:49 ecm-74de minio[25443]: WARN: Detected Linux kernel version older than 4.0 release, there are some known potential performance problems with this kernel version. MinIO recommends a minimum of 4.x linux... best performance
Hint: Some lines were ellipsized, use -l to show in full.
这里我给服务配置了两个域名,一个是控制台的,一个是给 api 调用的,分别对应两个端口 9000 和 9001
控制台 nginx 配置
这里主要注意里面有个 websocket 配置,一开始没有配置这个发现文件列表刷新不出来
server {listen 80;server_name oss-console.sakura.com;return 301 https://$host$request_uri;
}server {listen 443 ssl;server_name oss-console.sakura.com;ssl_certificate /etc/nginx/ssl/sakura.com.pem;ssl_certificate_key /etc/nginx/ssl/sakura.com.key;client_max_body_size 512m;# WebSocket 支持location /ws/ {proxy_pass http://127.0.0.1:9001;proxy_http_version 1.1;proxy_set_header Upgrade $http_upgrade;proxy_set_header Connection "upgrade";proxy_set_header Host $host;proxy_set_header X-Real-IP $remote_addr;proxy_set_header X-Forwarded-For $proxy_add_x_forwarded_for;proxy_set_header X-Forwarded-Proto https;proxy_buffering off;}# 控制台页面(9001)location / {proxy_pass http://127.0.0.1:9001;proxy_set_header Host $host;proxy_set_header X-Real-IP $remote_addr;proxy_set_header X-Forwarded-For $proxy_add_x_forwarded_for;proxy_set_header X-Forwarded-Proto https;proxy_http_version 1.1;proxy_set_header Connection "";proxy_buffering off;}access_log /etc/nginx/logs/oss-console.access.log;error_log  /etc/nginx/logs/oss-console.error.log;
}
api nginx 配置
server {listen 80;server_name oss.sakura.com;return 301 https://$host$request_uri;
}server {listen 443 ssl;server_name oss.sakura.com;ssl_certificate /etc/nginx/ssl/sakura.com.pem;ssl_certificate_key /etc/nginx/ssl/sakura.com.key;client_max_body_size 512m;# S3 API 接口(9000)location / {proxy_pass http://127.0.0.1:9000/;proxy_set_header Host $host;proxy_set_header X-Real-IP $remote_addr;proxy_set_header X-Forwarded-For $proxy_add_x_forwarded_for;proxy_set_header X-Forwarded-Proto https;proxy_http_version 1.1;proxy_set_header Connection "";proxy_buffering off;}access_log /etc/nginx/logs/oss.access.log;error_log  /etc/nginx/logs/oss.error.log;
}
重启 nginx 配置
# 校验配置文件语法
nginx -t
# 重新加载配置
nginx -s reload
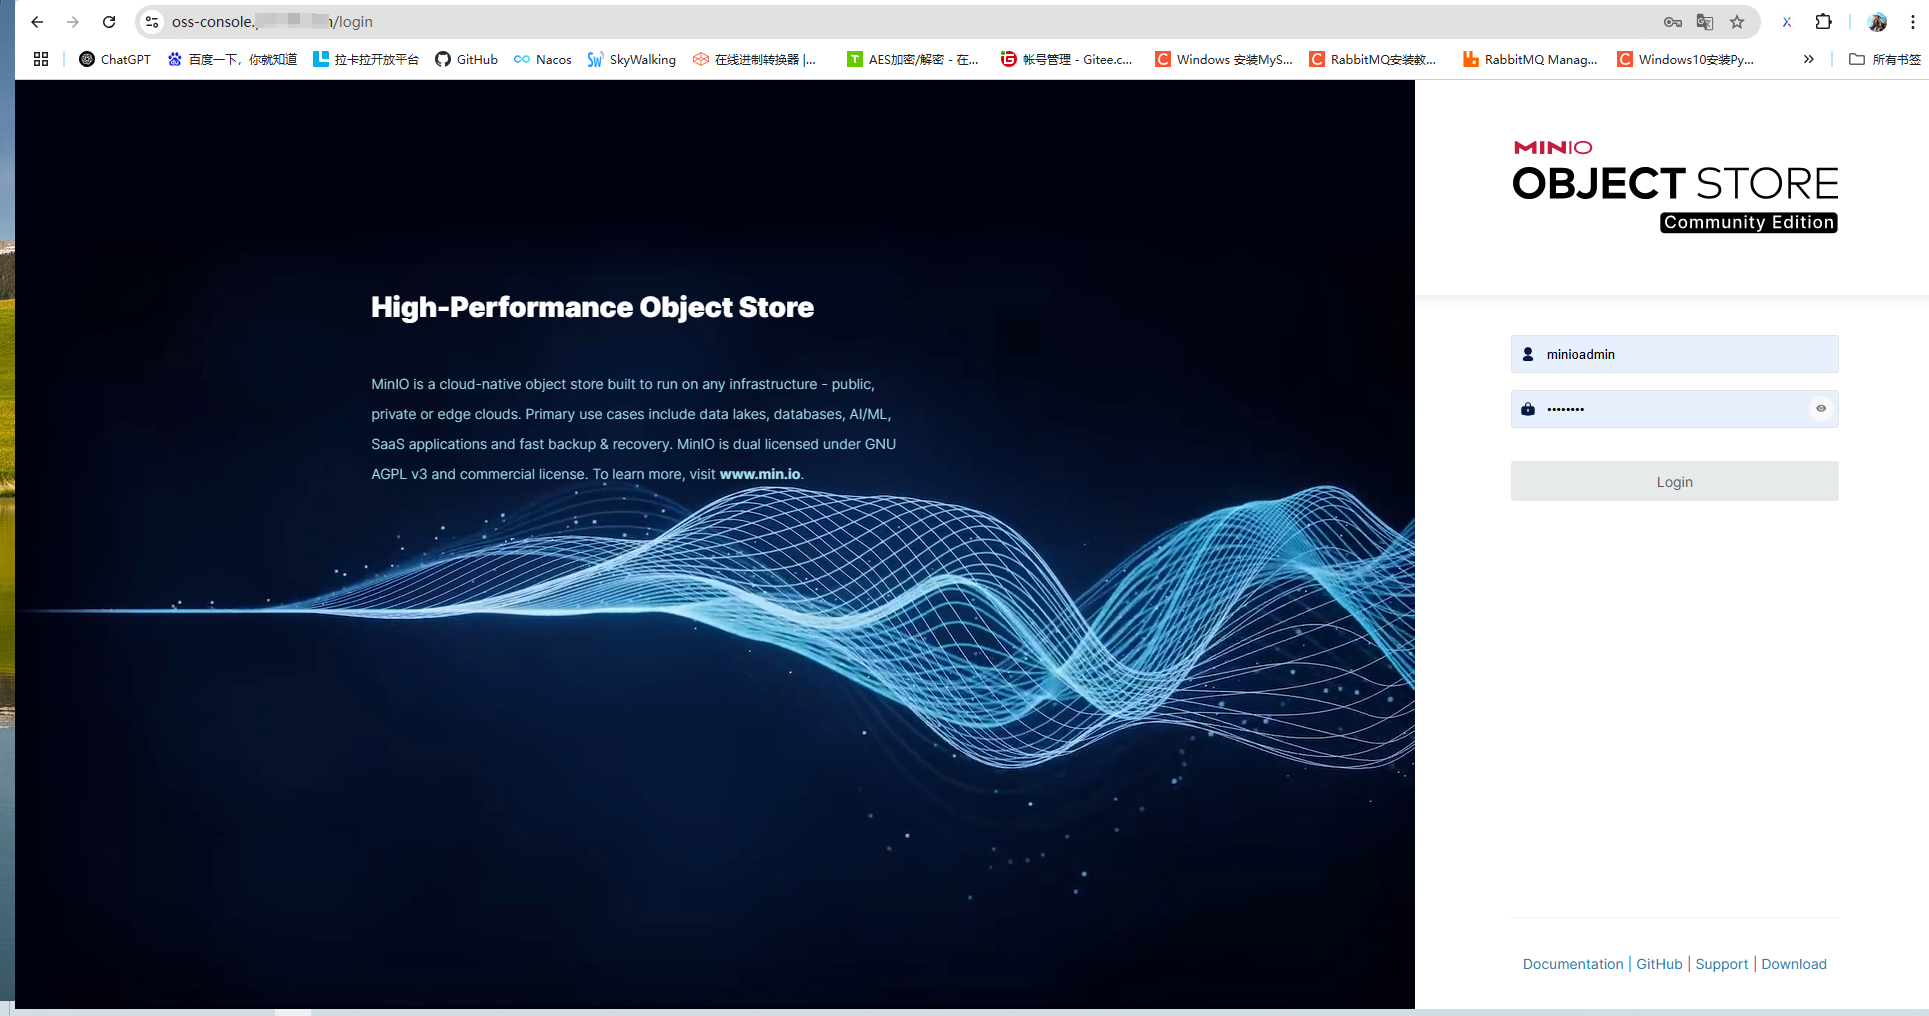
正常情况下访问 https://oss-console.sakura.com 就可以看到下面页面了
然后就是项目集成
首先是 pom
我这里多了个 okhttp 是因为启动的时候提示 minio 里面自带的 okhttp 和我之前的冲突了
<dependency><groupId>io.minio</groupId><artifactId>minio</artifactId><version>8.5.3</version></dependency><dependency><groupId>com.squareup.okhttp3</groupId><artifactId>okhttp</artifactId><version>4.12.0</version></dependency>
然后 yml 配置文件
minio:endpoint: https://oss.sakura.comaccess-key: minioadminsecret-key: sakura123bucket: doyike-bucket
配置文件
import io.minio.MinioClient;
import lombok.Data;
import org.springframework.boot.context.properties.ConfigurationProperties;
import org.springframework.context.annotation.Bean;
import org.springframework.context.annotation.Configuration;/*** @author Sakura* @date 2025/6/9 16:37*/
@Configuration
@ConfigurationProperties(prefix = "minio")
@Data
public class MinioConfig {private String endpoint;private String accessKey;private String secretKey;private String bucket;@Beanpublic MinioClient minioClient() {return MinioClient.builder().endpoint(endpoint).credentials(accessKey, secretKey).build();}
}
测试方法
import lombok.RequiredArgsConstructor;
import org.springframework.http.HttpStatus;
import org.springframework.http.ResponseEntity;
import org.springframework.web.bind.annotation.PostMapping;
import org.springframework.web.bind.annotation.RequestMapping;
import org.springframework.web.bind.annotation.RequestParam;
import org.springframework.web.bind.annotation.RestController;
import org.springframework.web.multipart.MultipartFile;/*** @author Sakura* @date 2025/6/9 16:38*/
@RestController
@RequestMapping("/minio")
@RequiredArgsConstructor
public class MinioController {private final MinioService minioService;@PostMapping("/upload")public ResponseEntity<String> upload(@RequestParam("file") MultipartFile file) {try {String url = minioService.uploadFile(file);return ResponseEntity.ok(url);} catch (Exception e) {return ResponseEntity.status(HttpStatus.INTERNAL_SERVER_ERROR).body("上传失败:" + e.getMessage());}}
}
这里特别要注意,MinIO 默认所有的桶都是私有的,上传的文件访问会有很多限制,然后访问连接特别的长,然后我在控制台又没有找到可以设置权限的地方(不知道是不是安装有问题),接着我又安装 mc 发现还是设置不了,没办法我就自己写了一个修改桶权限的 main 方法,这样上传的文件就能直接域名加桶加文件名访问了
import io.minio.*;
import io.minio.errors.MinioException;
import io.minio.http.Method;
import lombok.RequiredArgsConstructor;
import org.springframework.stereotype.Service;
import org.springframework.web.multipart.MultipartFile;import java.util.UUID;/*** @author Sakura* @date 2025/6/9 16:40*/
@Service
@RequiredArgsConstructor
public class MinioService {private final MinioClient minioClient;private final MinioConfig minioConfig;public String uploadFile(MultipartFile file) throws Exception {String bucket = minioConfig.getBucket();String filename = UUID.randomUUID() + "_" + file.getOriginalFilename();// 自动创建 bucket(可选)boolean found = minioClient.bucketExists(BucketExistsArgs.builder().bucket(bucket).build());if (!found) {minioClient.makeBucket(MakeBucketArgs.builder().bucket(bucket).build());}// 上传文件minioClient.putObject(PutObjectArgs.builder().bucket(bucket).object(filename).stream(file.getInputStream(), file.getSize(), -1).contentType(file.getContentType()).build());// 返回可访问链接(可选)return minioClient.getPresignedObjectUrl(GetPresignedObjectUrlArgs.builder().bucket(bucket).object(filename).method(Method.GET).build());}public static void main(String[] args) {try {// 连接 MinIO 服务端,替换为你的配置MinioClient minioClient = MinioClient.builder().endpoint("https://oss.sakura.com").credentials("minioadmin", "sakura123").build();String bucketName = "doyike-bucket";// 桶公开读权限策略,JSON格式(允许匿名读取所有对象)String policyJson = "{\n" +"  \"Version\":\"2012-10-17\",\n" +"  \"Statement\":[\n" +"    {\n" +"      \"Effect\":\"Allow\",\n" +"      \"Principal\":{\"AWS\":[\"*\"]},\n" +"      \"Action\":[\"s3:GetObject\"],\n" +"      \"Resource\":[\"arn:aws:s3:::" + bucketName + "/*\"]\n" +"    }\n" +"  ]\n" +"}";// 设置桶策略minioClient.setBucketPolicy(SetBucketPolicyArgs.builder().bucket(bucketName).config(policyJson).build());System.out.println("桶权限设置成功,桶 " + bucketName + " 现在公开可读");} catch (MinioException e) {System.err.println("Error occurred: " + e);} catch (Exception e) {e.printStackTrace();}}
}
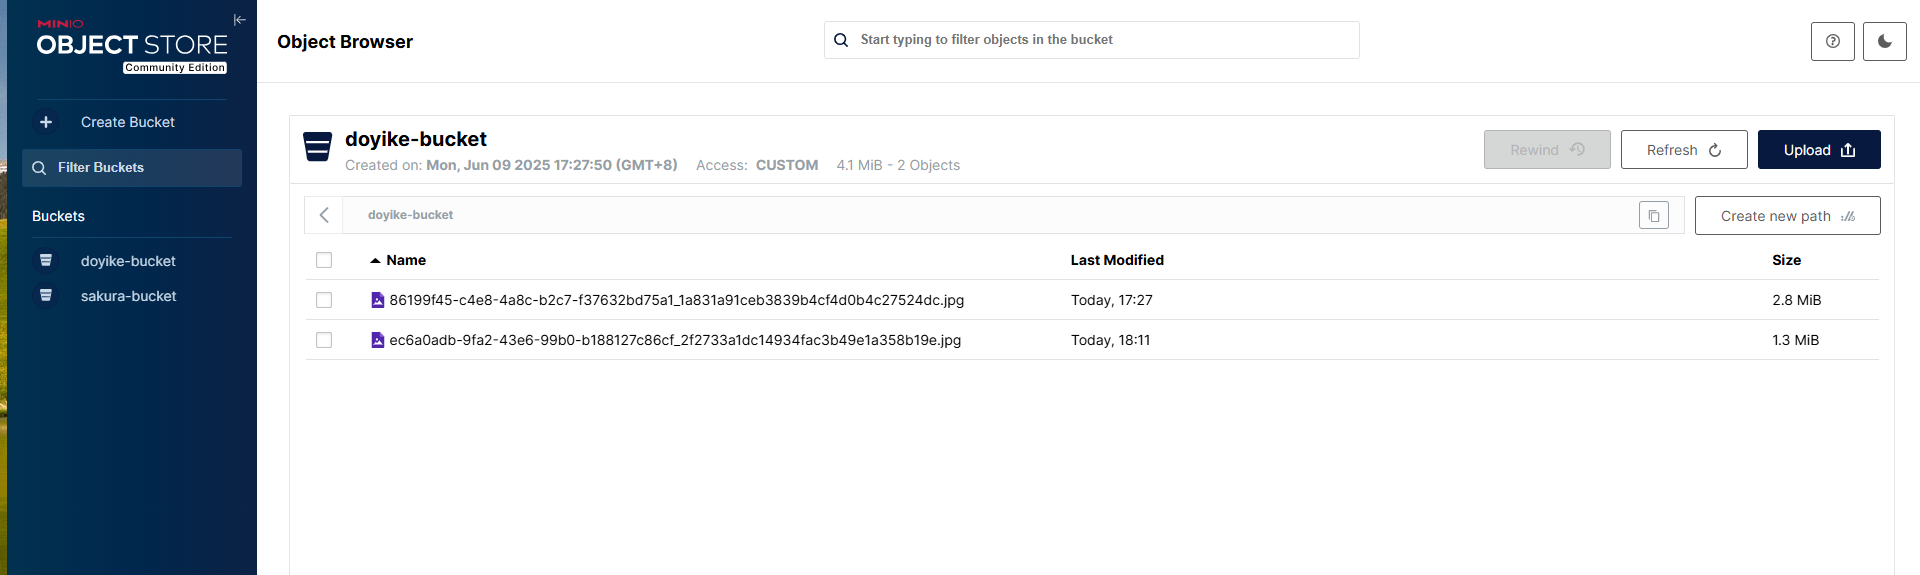
最后上传的文件可以登录控制台查看的